Lab 4: Perform Disk Encryption
Lab 4: Perform Disk Encryption
Module 20: Cryptography
Lab 4: Perform Disk Encryption
Task 1: Perform Disk Encryption using VeraCrypt
VeraCrypt is a software used for establishing and maintaining an on-the-fly-encrypted volume (data storage device). On-the-fly encryption
means that data is automatically encrypted just before it is saved, and decrypted just after it is loaded, without any user intervention
. No data stored on an encrypted volume can be read (decrypted) without using the correct password/keyfile(s) or correct encryption keys.
The entire file system is encrypted (e.g., file names, folder names, free space, metadata, etc.).
Here, we will use the VeraCrypt tool to perform disk encryption.
refer to blog
---------------------------------------------------------------------------------------------------------------------------------------
Module 20: Cryptography
Lab 4: Perform Disk Encryption
Task 2: Perform Disk Encryption using BitLocker Drive Encryption
BitLocker provides offline-data and OS protection for your computer, and helps to ensure that data stored on a computer that is running
Windows® is not revealed if the computer is tampered with when the installed OS is offline. BitLocker uses a microchip that is called a
Trusted Platform Module (TPM) to provide enhanced protection for your data and to preserve early boot-component integrity. The TPM can
help protect your data from theft or unauthorized viewing by encrypting the entire Windows volumes.
Here, we will perform disk encryption using BitLocker Drive Encryption.
refer to blog
---------------------------------------------------------------------------------------------------------------------------------------
Module 20: Cryptography
Lab 4: Perform Disk Encryption
Task 3: Perform Disk Encryption using Rohos Disk Encryption
Rohos Disk Encryption creates hidden and password-protected partitions on a computer or USB flash drive, and password protects/locks
access to your Internet applications. It uses a NIST-approved AES encryption algorithm with a 256-bit encryption key length. Encryption
is automatic and on-the-fly.
Here, we will use the Rohos Disk Encryption tool to perform disk encryption.
refer to blog
---------------------------------------------------------------------------------------------------------------------------------------
Lab Scenario
Disk encryption is a technology that sprotects the confidentiality of the data stored on a disk by converting it into an unreadable code using disk encryption software or hardware, thus preventing unauthorized users from accessing it. Disk encryption provides confidentiality and privacy using passphrases and hidden volumes. As a professional ethical hacker or pen tester, you should perform disk encryption in order to prevent sensitive information from unauthorized access.
Disk encryption works in a manner similar to text-message encryption and protects data even when the OS is not active. By using an encryption program for the user’s disk (Blue Ray, DVD, USB flash drive, External HDD, and Backup), the user can safeguard any or all information burned onto the disk and thus prevent it from falling into the wrong hands. Disk-encryption software scrambles the information burned on the disk into an illegible code. It is only after decryption of the disk information that one can read and use it.
This lab will demonstrate the use of various disk encryption tools to perform this technique.
Lab Objectives
- Perform disk encryption using VeraCrypt
- Perform disk encryption using BitLocker Drive Encryption
- Perform disk encryption using Rohos Disk Encryption
Overview of Disk Encryption
Disk encryption is useful when the user needs to send sensitive information through email. In addition, disk encryption can prevent the real-time exchange of information from threats. When users exchange encrypted information, it minimizes the chances of compromising the data; the only way an attacker could access the information is by decrypting the message. Furthermore, encryption software installed on a user’s system ensures the security of the system. Install encryption software on any systems that hold valuable information or on those exposed to unlimited data transfer.
Task 1: Perform Disk Encryption using VeraCrypt
VeraCrypt is a software used for establishing and maintaining an on-the-fly-encrypted volume (data storage device). On-the-fly encryption means that data is automatically encrypted just before it is saved, and decrypted just after it is loaded, without any user intervention. No data stored on an encrypted volume can be read (decrypted) without using the correct password/keyfile(s) or correct encryption keys. The entire file system is encrypted (e.g., file names, folder names, free space, metadata, etc.).
Here, we will use the VeraCrypt tool to perform disk encryption.
Click Windows 10 to switch to the Windows 10 machine.
Navigate to the Desktop, double-click VeraCrypt shortcut.
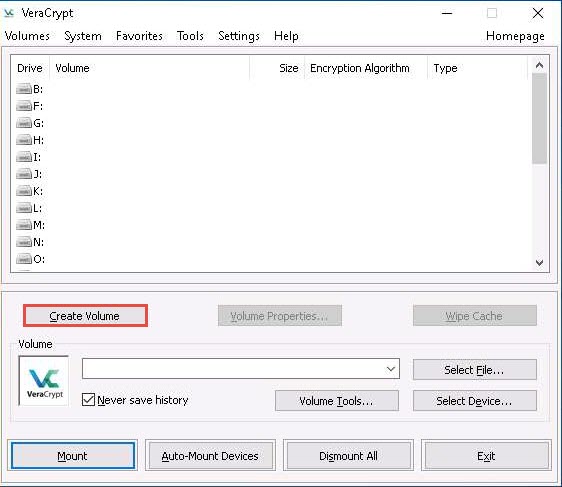
The VeraCrypt main window appears; click the Create Volume button.
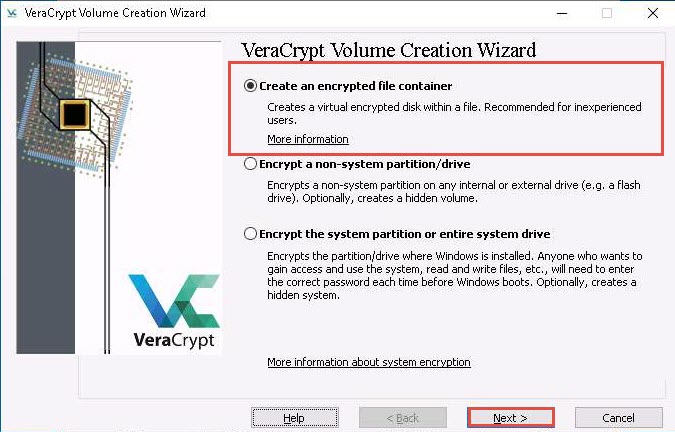
The VeraCrypt Volume Creation Wizard window appears. Ensure that the Create an encrypted file container radio-button is selected and click Next to proceed.
In the Volume Type wizard, keep the default settings and click Next.
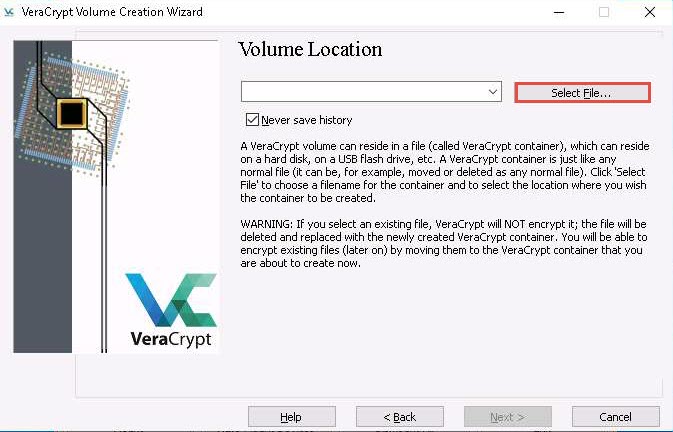
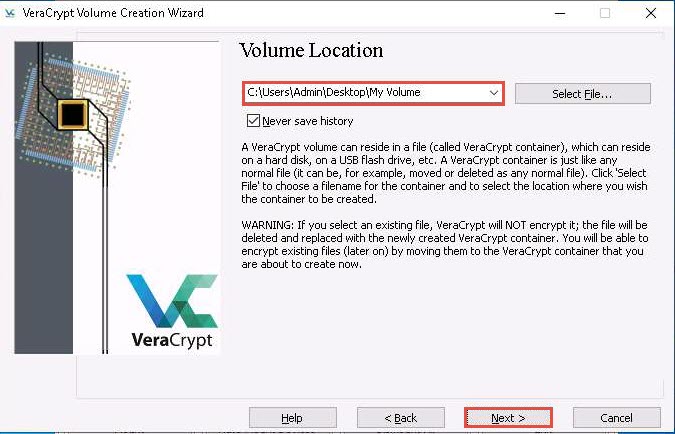
In the Volume Location wizard, click Select File….
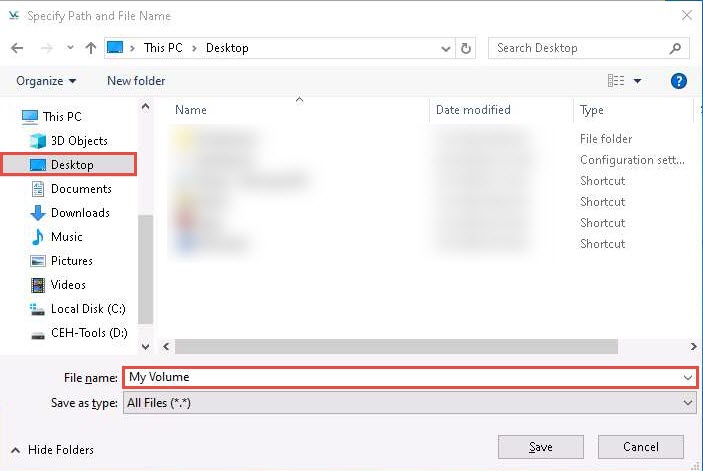
The Specify Path and File Name window appears; navigate to the desired location (here, Desktop), provide the File name as My Volume, and click Save.
After saving the file, the location of a file containing the VeraCrypt volume appears under the Volume Location field; then, click Next.
In the Encryption Options wizard, keep the default settings and click Next.
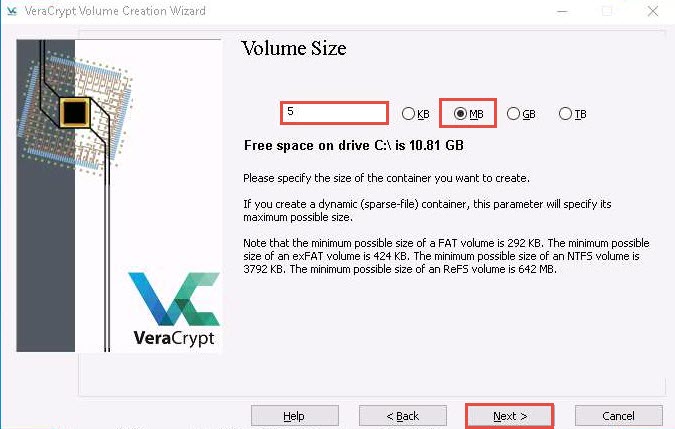
In the Volume Size wizard, ensure that the MB radio-button is selected and specify the size of the VeraCrypt container as 5; then, click Next.
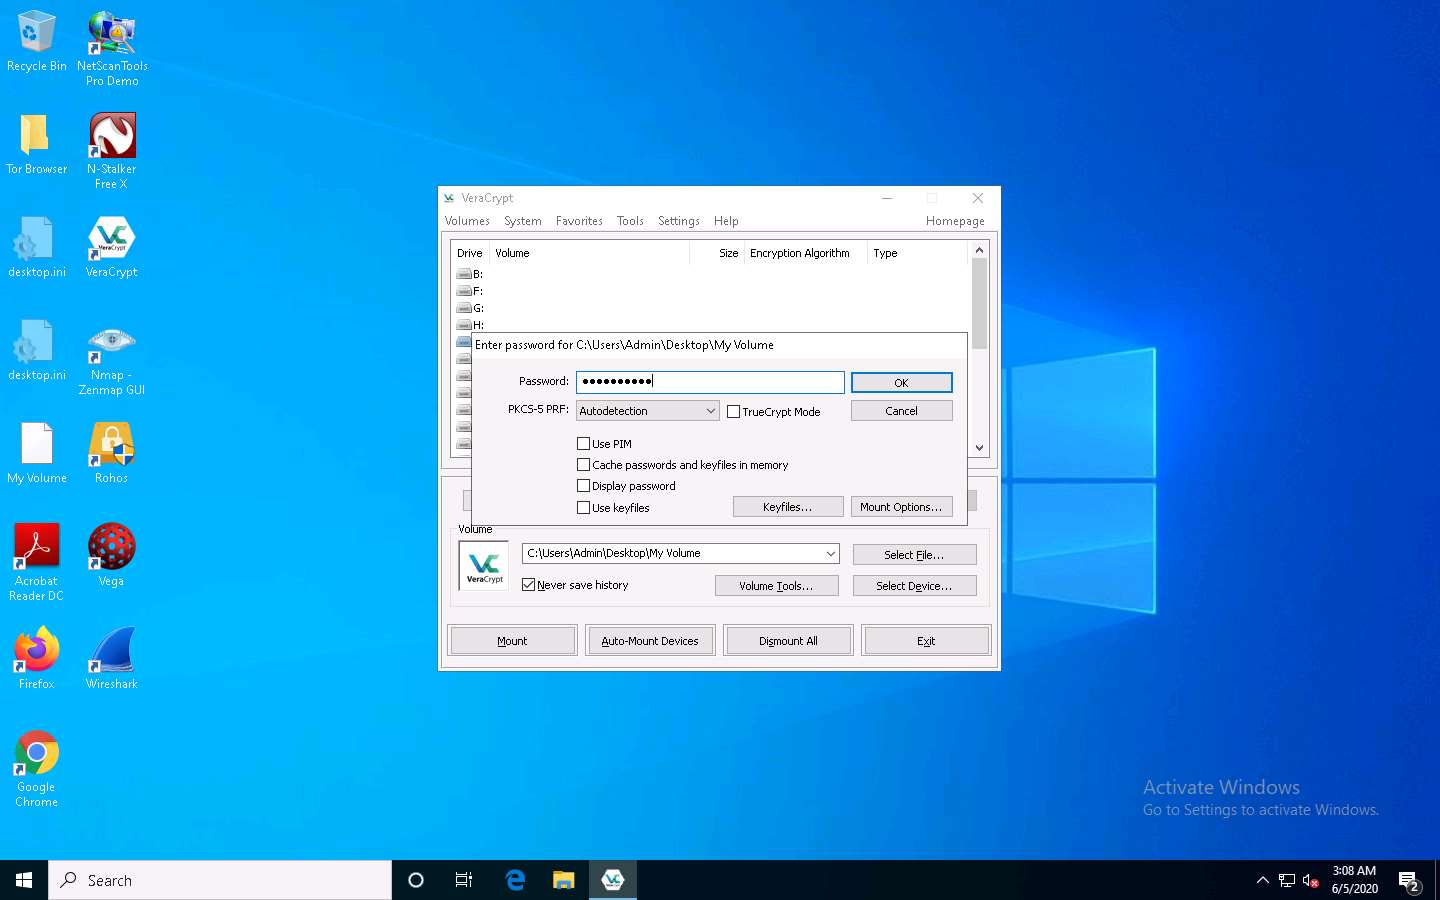
The Volume Password wizard appears; provide a strong password in the Password field, retype in the Confirm field, and click Next. The password provided in this lab is qwerty@123.

A VeraCrypt Volume Creation Wizard warning pop-up appears; then, click Yes.
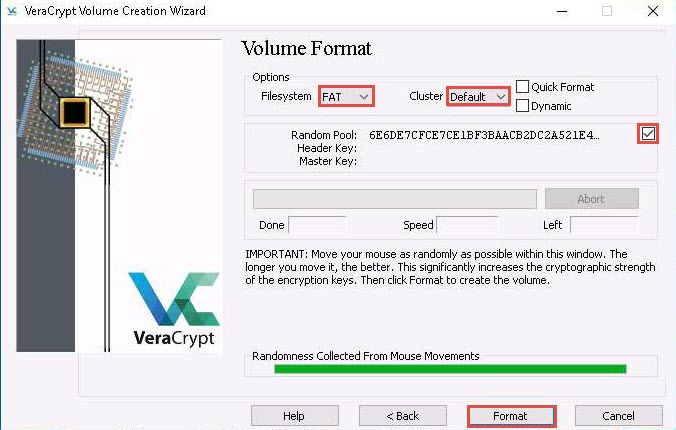
The Volume Format wizard appears; ensure that FAT is selected in the Filesystem option and Default is selected in Cluster option.
Check the checkbox under the Random Pool, Header Key, and Master Key section.
Move your mouse as randomly as possible within the Volume Creation Wizard window for at least 30 seconds and click the Format button.
After clicking Format, VeraCrypt will create a file called My Volume in the provided folder. This file depends on the VeraCrypt container (it will contain the encrypted VeraCrypt volume).
Depending on the size of the volume, volume creation may take some time.
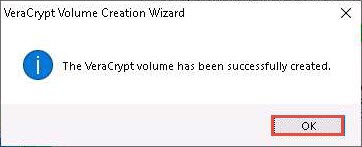
Once the volume is created, a VeraCrypt Volume Creation Wizard dialog-box appears; click OK.
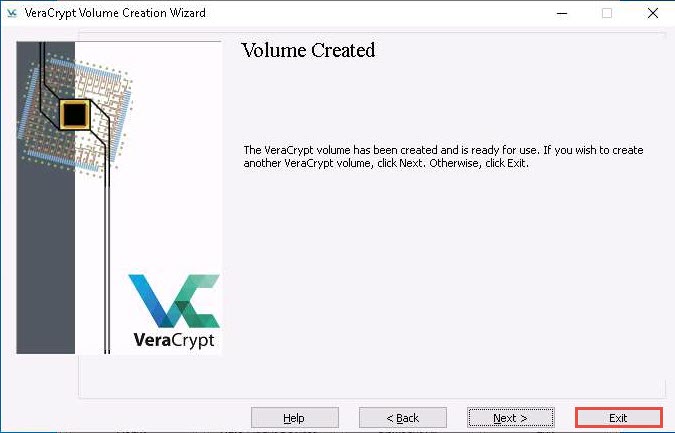
In the VeraCrypt Volume Creation Wizard window, a Volume Created message appears; then, click Exit.
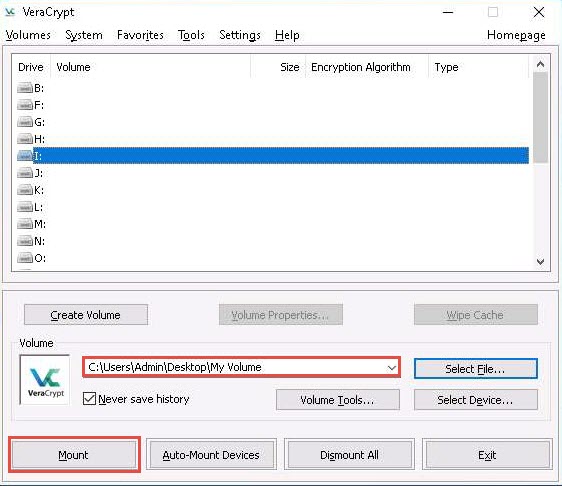
The VeraCrypt main window appears; select a drive (here, I:) and click Select File….

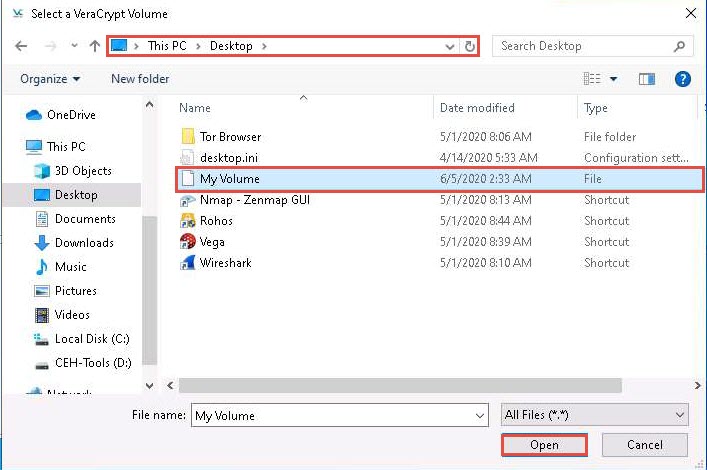
The Select a VeraCrypt Volume window appears; navigate to Desktop, click My Volume, and click Open.
The window closes, and the VeraCrypt window appears displaying the location of selected volume under the Volume field; then, click Mount.
The Enter password dialog-box appears; type the password you specified in Step#11 into the Password field and click OK.
The password specified in this task is qwerty@123.
After the password is verified, VeraCrypt will mount the volume in I: drive, as shown in the screenshot:
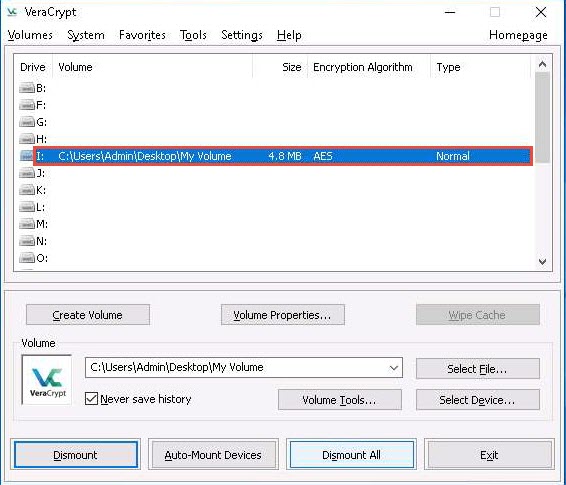
My Volume has successfully mounted the container as a virtual disk (I:). The virtual disk is entirely encrypted (including file names, allocation tables, free space, etc.) and behaves similarly to a real disk. You can copy or move files to this virtual disk to encrypt them.
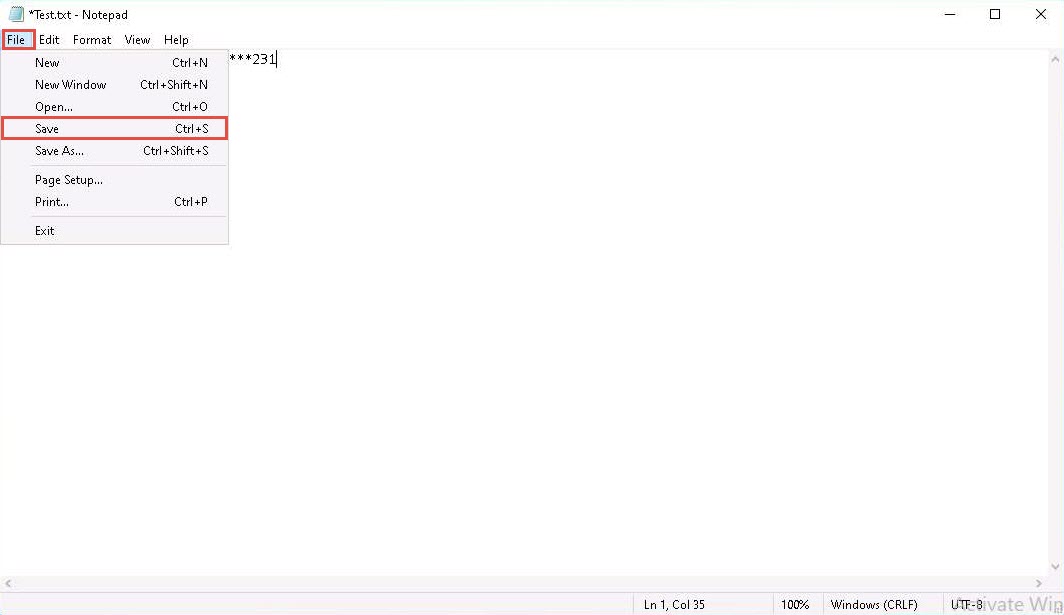
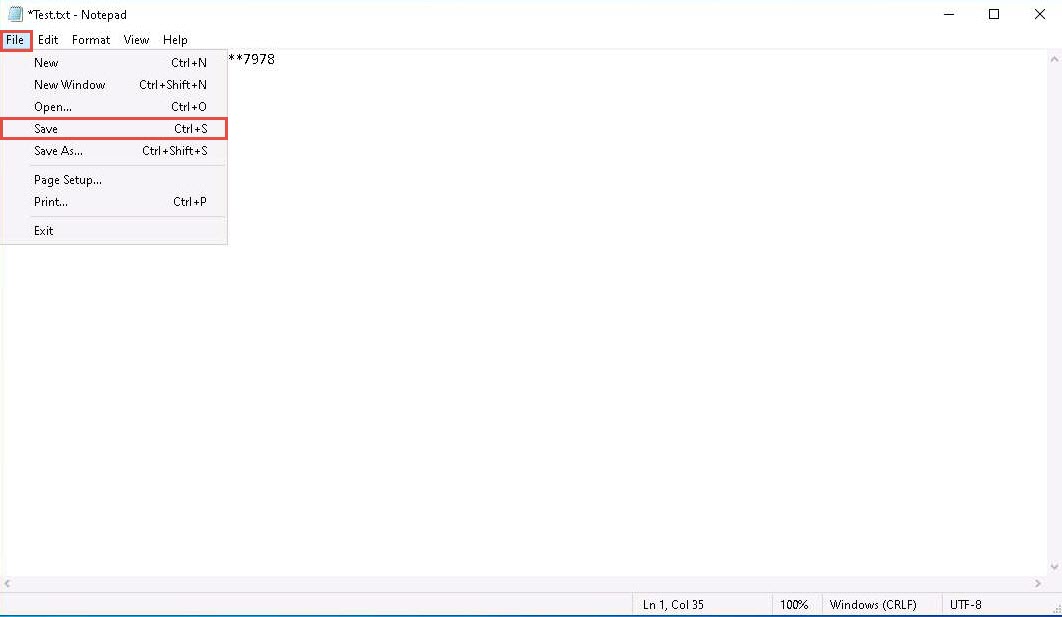
Create a text file on Desktop and name it Test. Open the text file and insert text.
Click File in the menu bar and click Save.
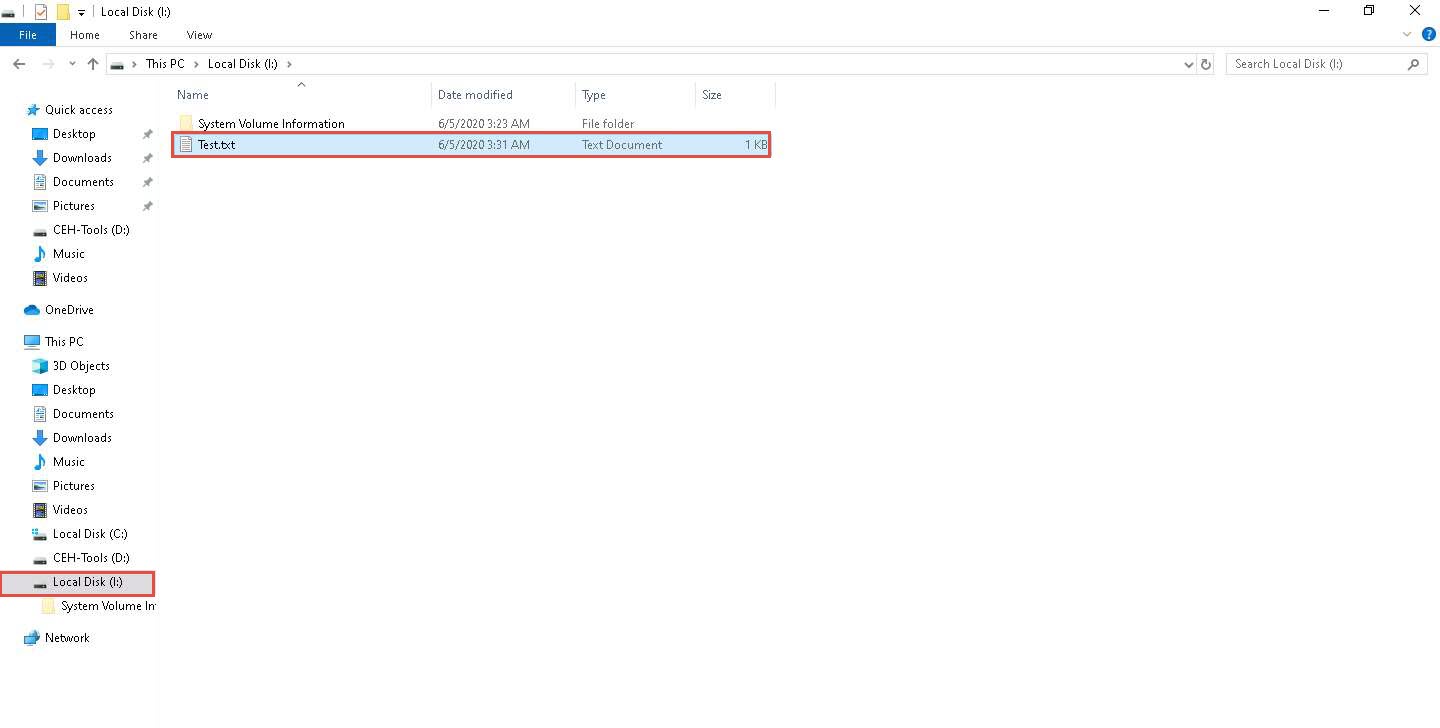
Copy the file from Desktop and paste it into Local Disk (I:). Close the window.
Switch to the VeraCrypt window, click Dismount, and then click Exit.
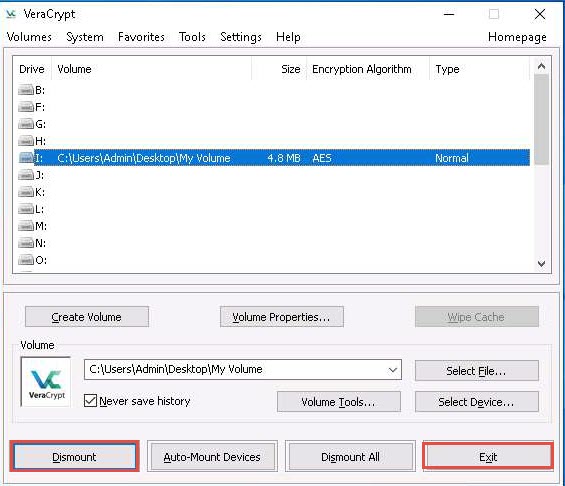
The I: drive located in This PC disappears.
This lab is used to demonstrate that, in cases of system hacks, if an attacker manages to gain remote access or complete access to the machine, he/she will not be able to find the encrypted volume—including its files—unless he/she is able to obtain the password. Thus, all sensitive information located on the encrypted volume is safeguarded.
This concludes the demonstration of performing disk encryption using VeraCrypt.
Close all open windows and document all the acquired information.
Task 2: Perform Disk Encryption using BitLocker Drive Encryption
BitLocker provides offline-data and OS protection for your computer, and helps to ensure that data stored on a computer that is running Windows® is not revealed if the computer is tampered with when the installed OS is offline. BitLocker uses a microchip that is called a Trusted Platform Module (TPM) to provide enhanced protection for your data and to preserve early boot-component integrity. The TPM can help protect your data from theft or unauthorized viewing by encrypting the entire Windows volumes.
Here, we will perform disk encryption using BitLocker Drive Encryption.
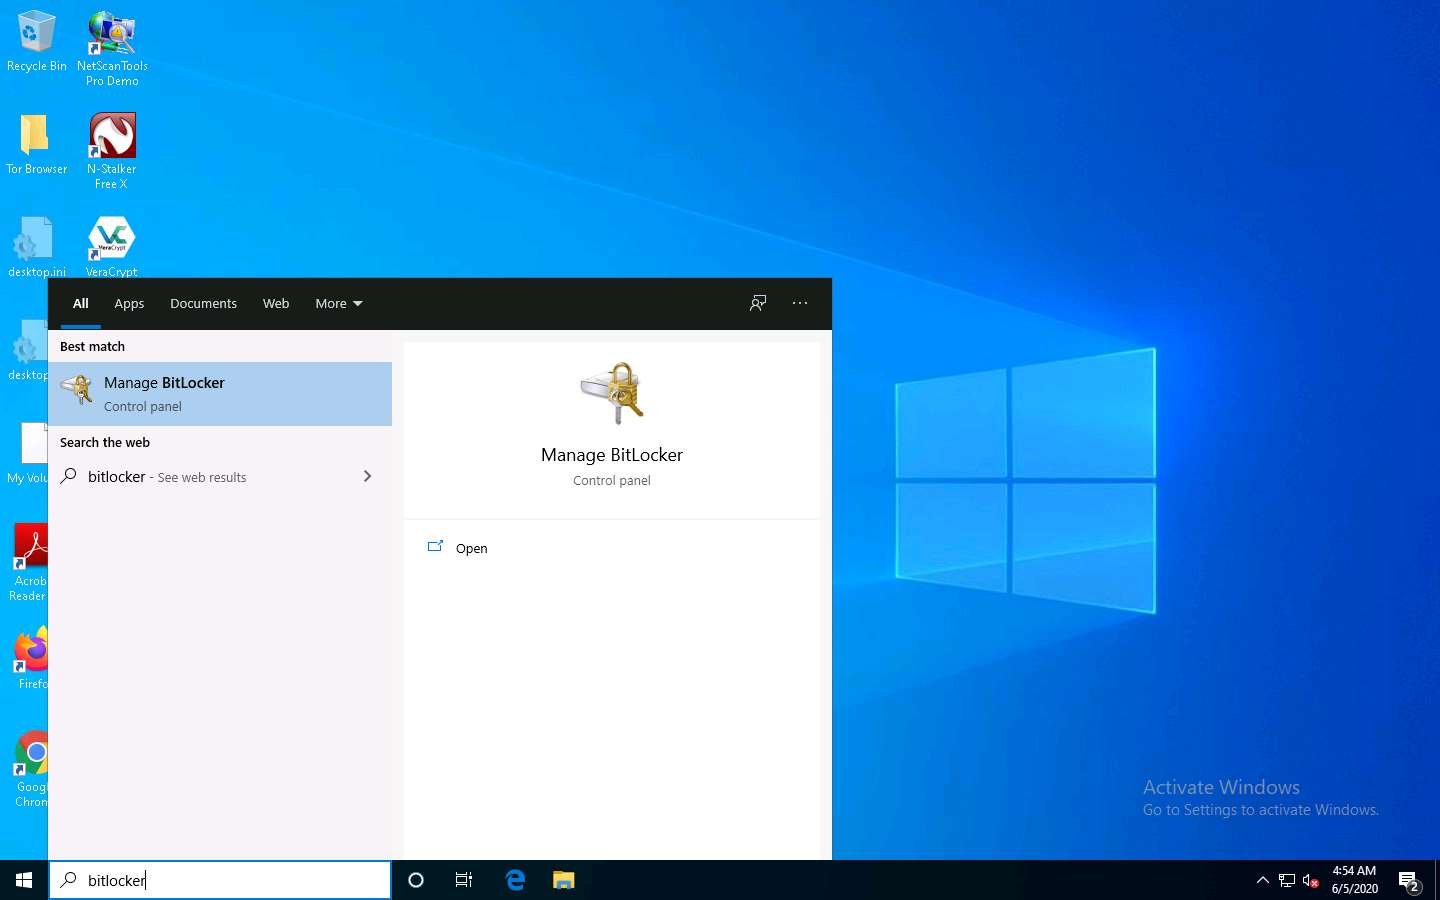
In the Windows 10 machine, click the Type here to search field present at the bottom-left corner of Desktop and type bitlocker. Select Manage BitLocker from the search results.
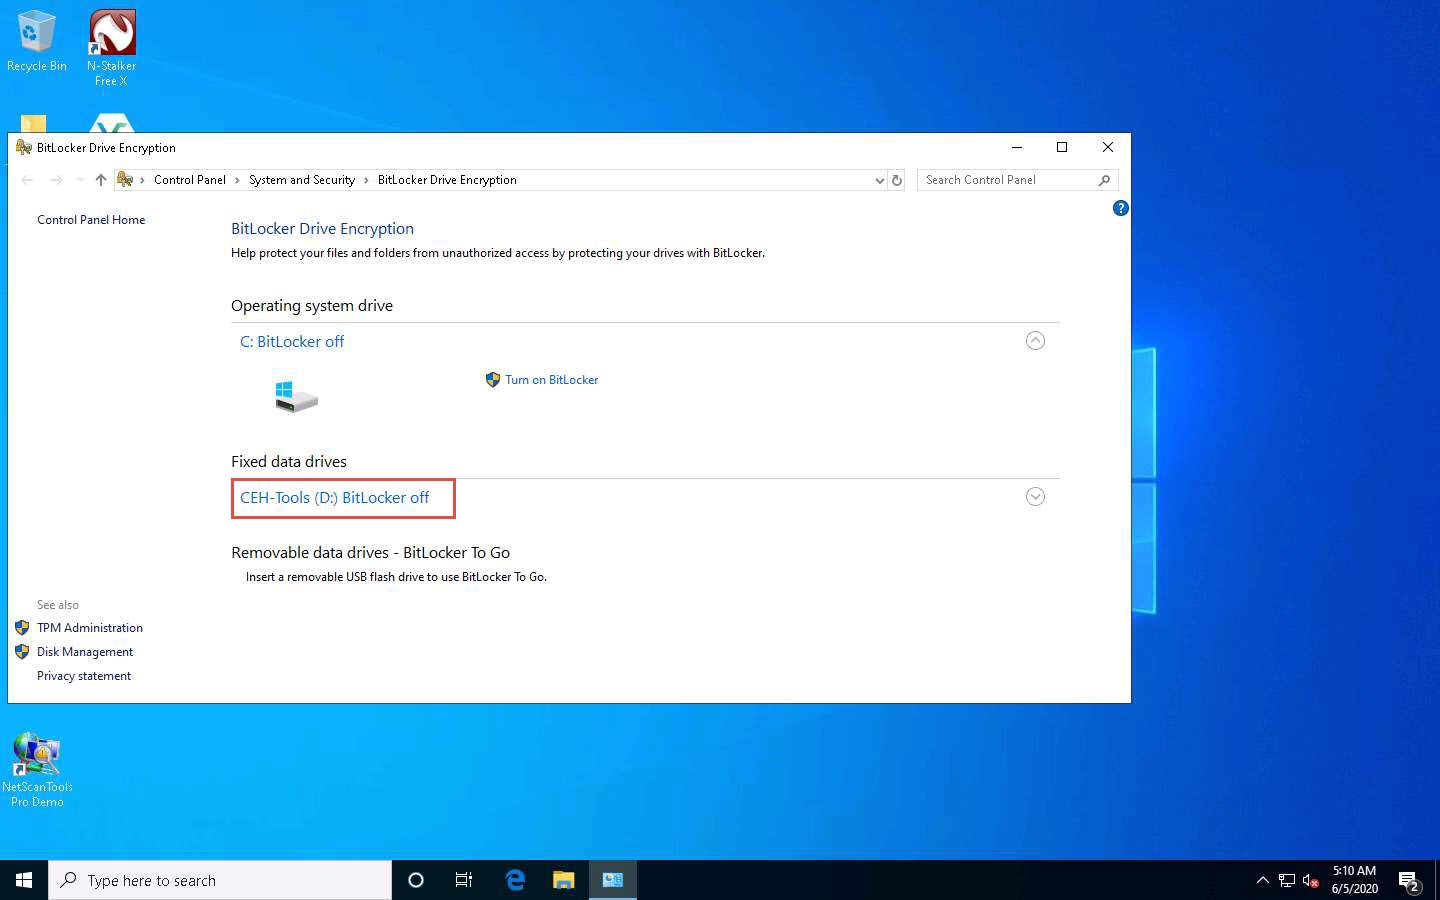
The BitLocker Drive Encryption window appears; click the CEH-Tools (D:) BitLocker off option under the Fixed data drives section.
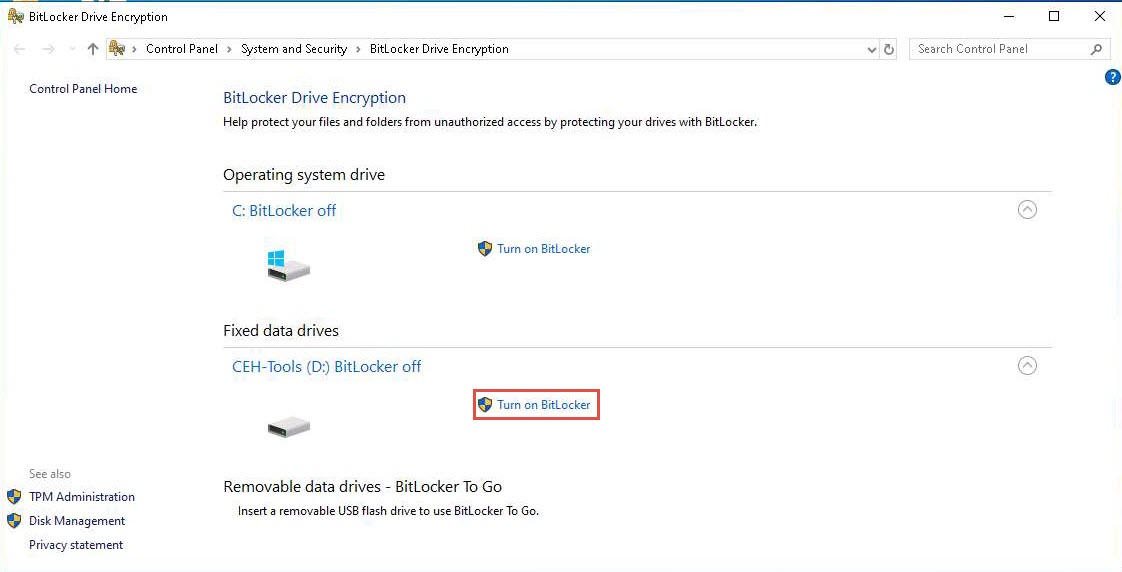
Click the Turn on BitLocker option under CEH-Tools (D:) BitLocker off.
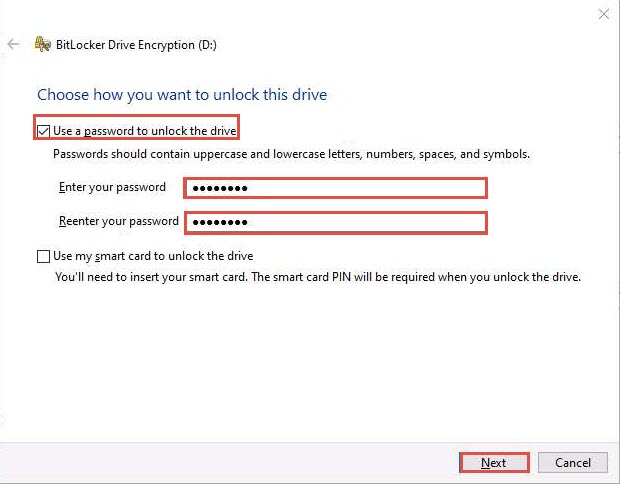
The BitLocker Drive Encryption (D:) wizard appears; check the Use a password to unlock the drive checkbox.
Type the password in the Enter your password field and re-type the password in the Reenter your password field; then, click Next (Here, the password entered is test@123).
The How do you want to back up your recovery key? step appears; click Save to a file from the available options.
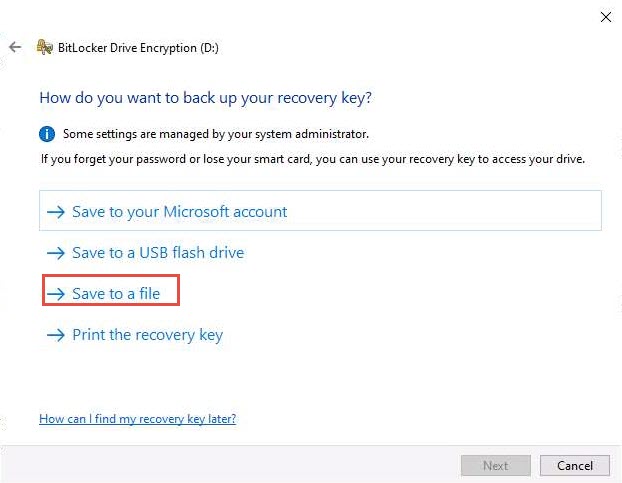
The Save BitLocker recovery key as window appears; keep the save location set to This PC --> Documents and click Save.
Click Next in the How do you want to back up your recovery key? step.
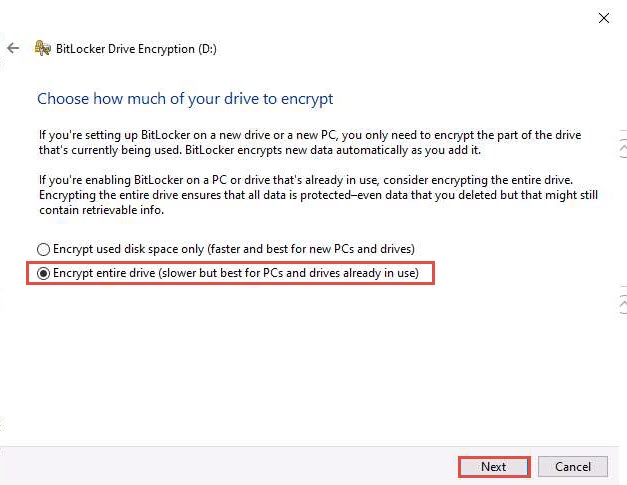
In the Choose how much of your drive to encrypt step, select the Encrypt entire drive (slower but best for PCs and drives already in use) button, and click Next.
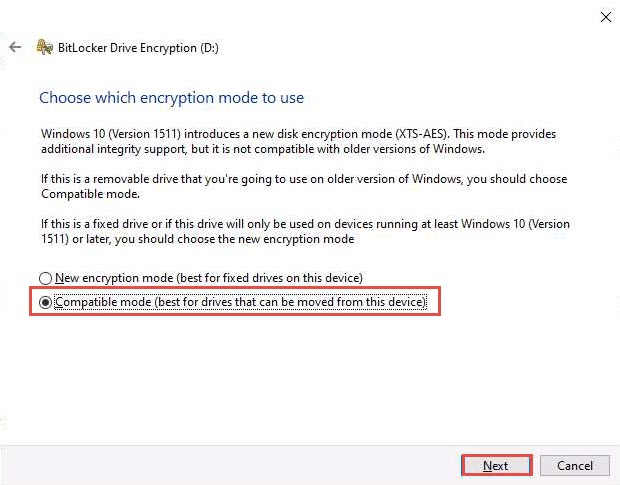
In the Choose which encryption mode to use step, ensure that the Compatible mode (best for drives that can be moved from this device) option is selected, and click Next.
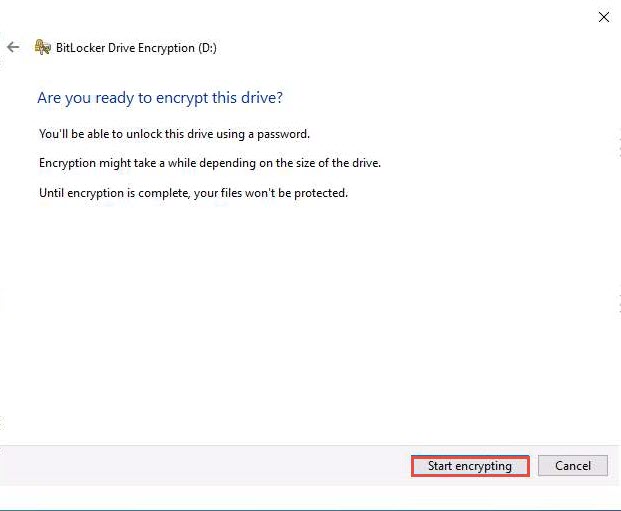
In the Are you ready to encrypt this drive? step, click Start encrypting to encrypt the selected drive.
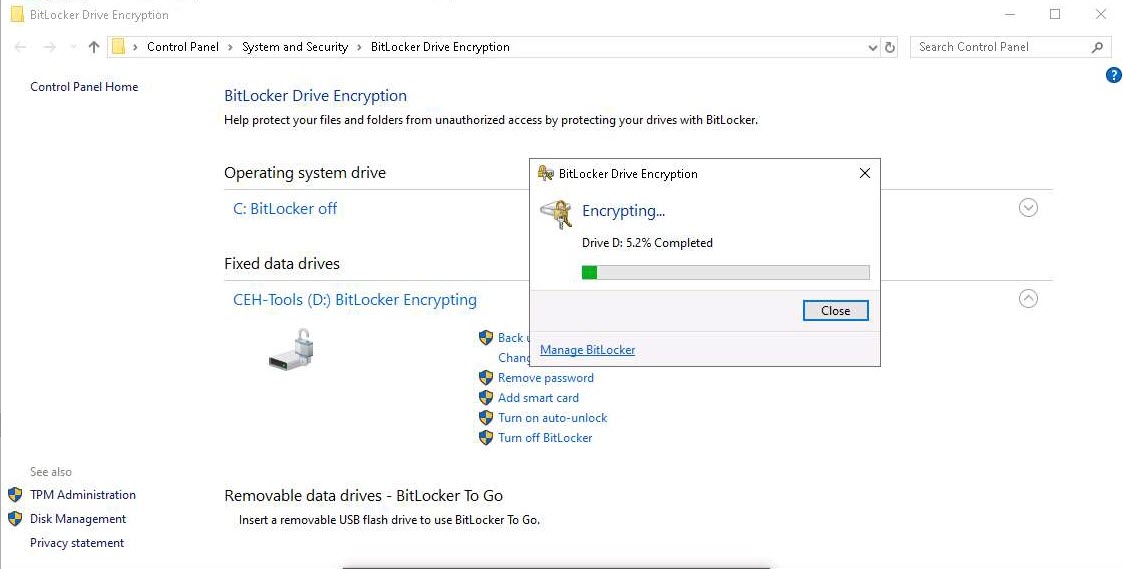
The BitLocker Drive Encryption pop-up appears, showing the Encrypting… status.
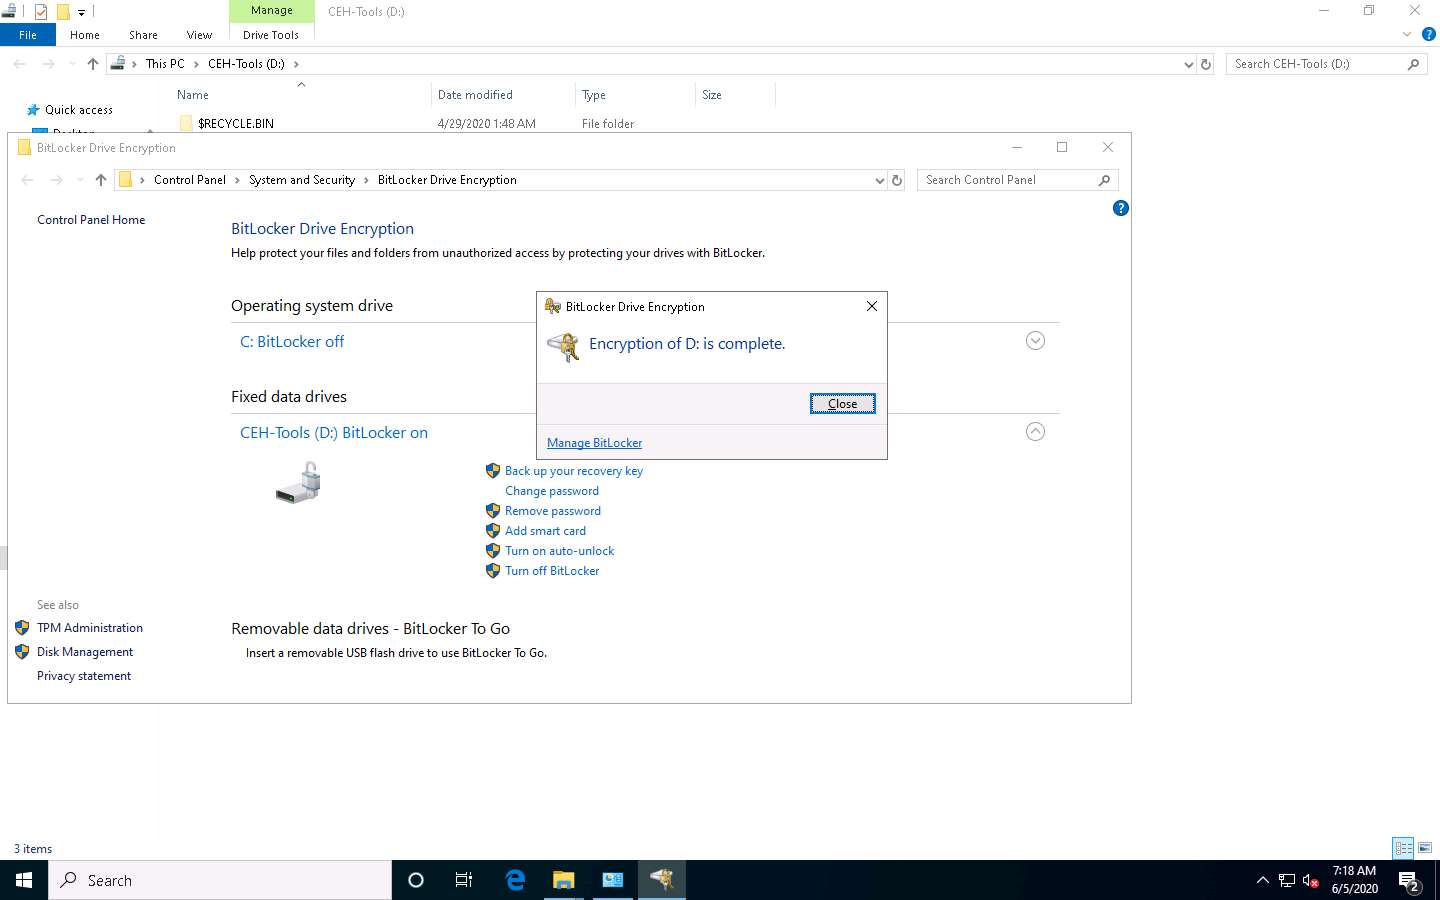
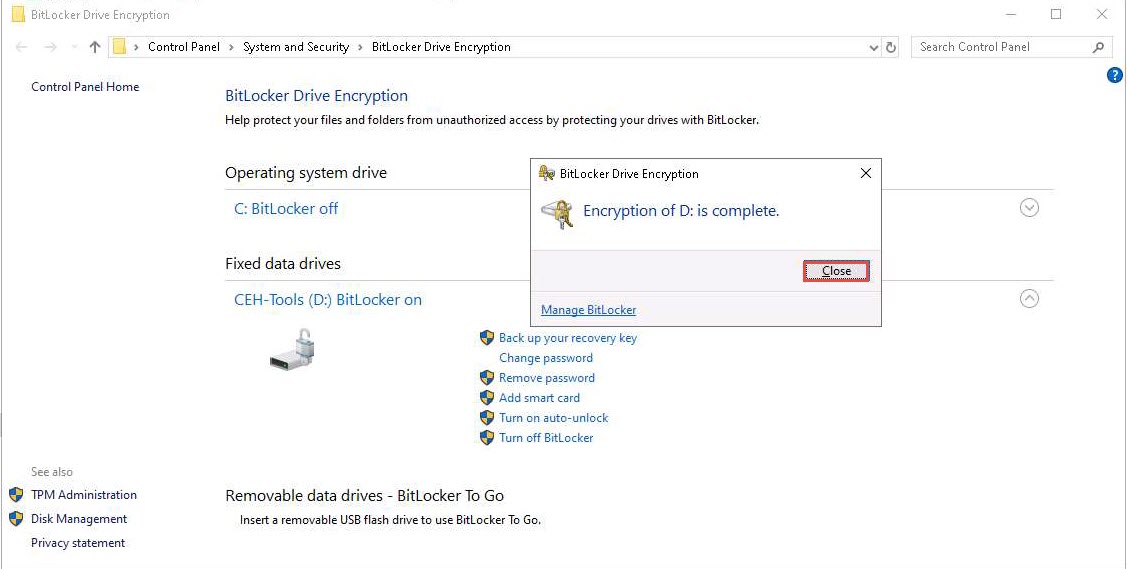
After the completion of the encryption process, the Encryption of D: is complete notification appears; click Close and Restart the machine.
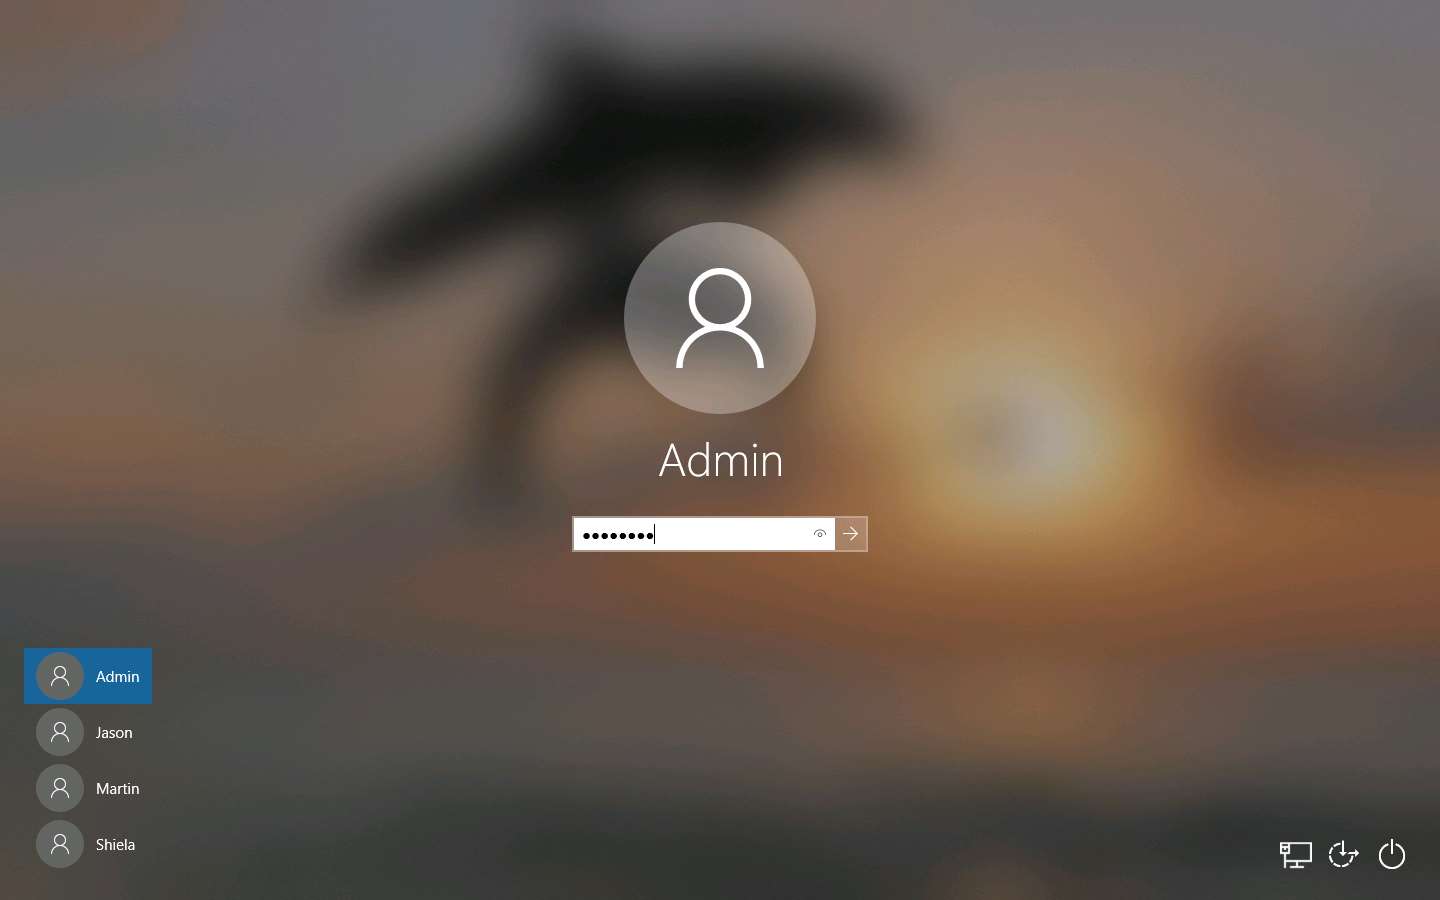
After the system reboots, click Ctrl+Alt+Delete to activate it. By default, Admin user profile is selected, click Pa$$w0rd to paste the password in the Password field and press Enter to login
Open File Explorer and click This PC from the left pane.
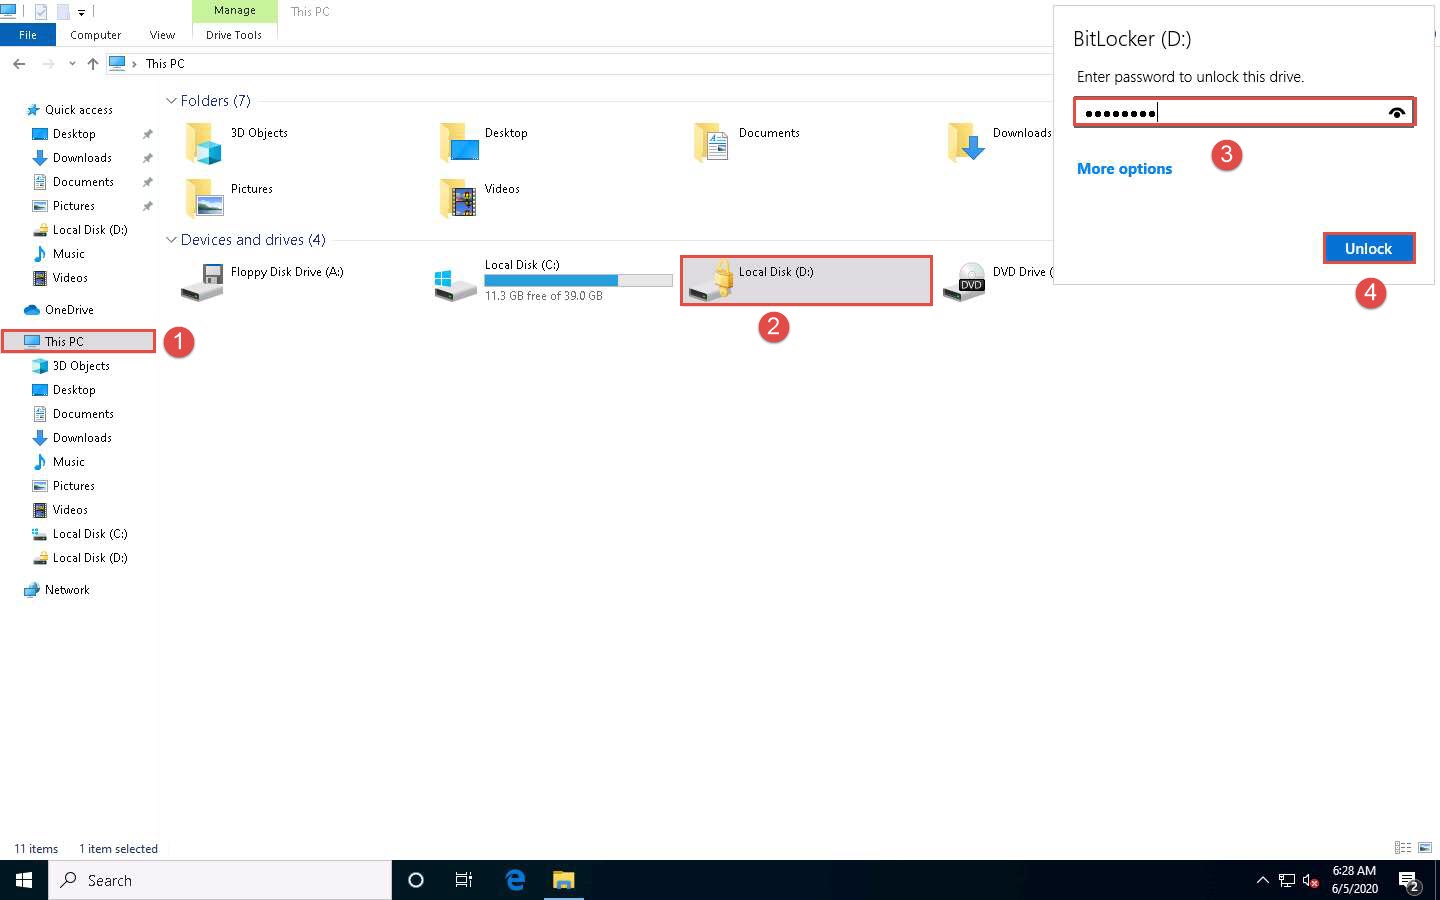
You can observe that CEH-Tools (D:) is now encrypted; double-click and the BitLocker (D:) security pop-up appears at the top-right corner of Desktop
Type the password you provided in Step#5 and click Unlock.
Here, the password is test@123.
If the CEH-Tools (D:) pop-up appears at the top-right corner of the window. Click the Open folder to view files option to view the disk content.
The CEH-Tools (D:) window appears displaying the disk content, as shown in the screenshot.
The disk will remain unlocked until the next time you restart the system.
This concludes the demonstration of performing disk encryption using BitLocker Drive Encryption.
Once, you are done with this task; you must turn off BitLocker to decrypt the CEH-Tools (D:) disk.
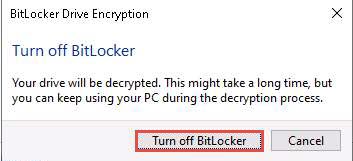
To do so, open the BitLocker Drive Encryption window, click CEH-Tools (D:) BitLocker on and from the options click Turn off BitLocker.

The BitLocker Drive Encryption pop-up appears; click Turn off BitLocker.
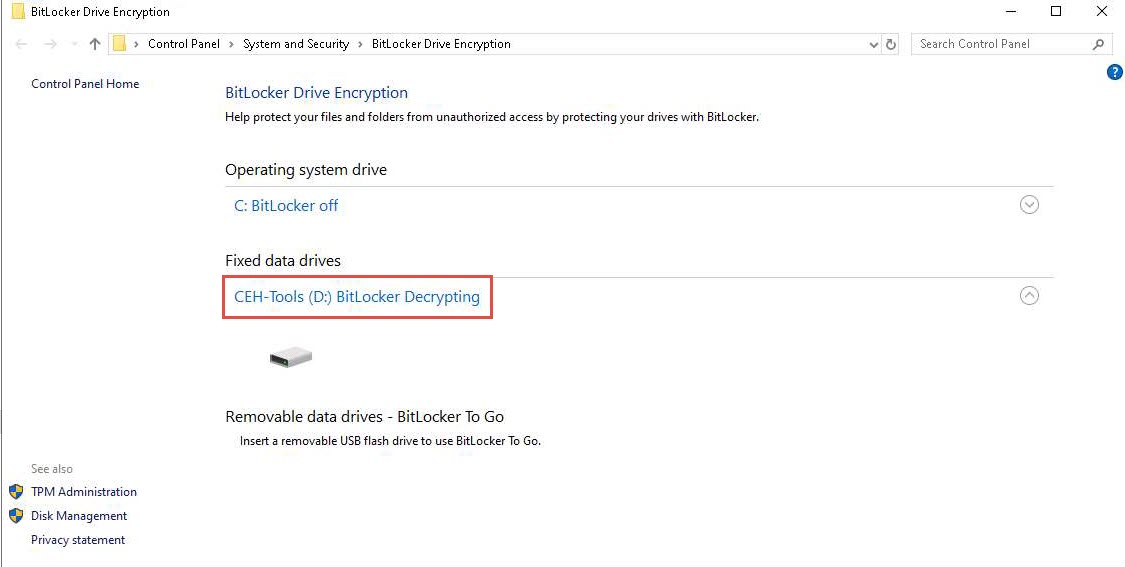
BitLocker initiates the decryption process. Wait for it to complete.
If after the completion of decryption process, the Decryption of D: is complete pop-up appears; click Close.
The CEH-Tools (D:) decrypts successfully.
Close all open windows and document all the acquired information.
Task 3: Perform Disk Encryption using Rohos Disk Encryption
Rohos Disk Encryption creates hidden and password-protected partitions on a computer or USB flash drive, and password protects/locks access to your Internet applications. It uses a NIST-approved AES encryption algorithm with a 256-bit encryption key length. Encryption is automatic and on-the-fly.
Here, we will use the Rohos Disk Encryption tool to perform disk encryption.
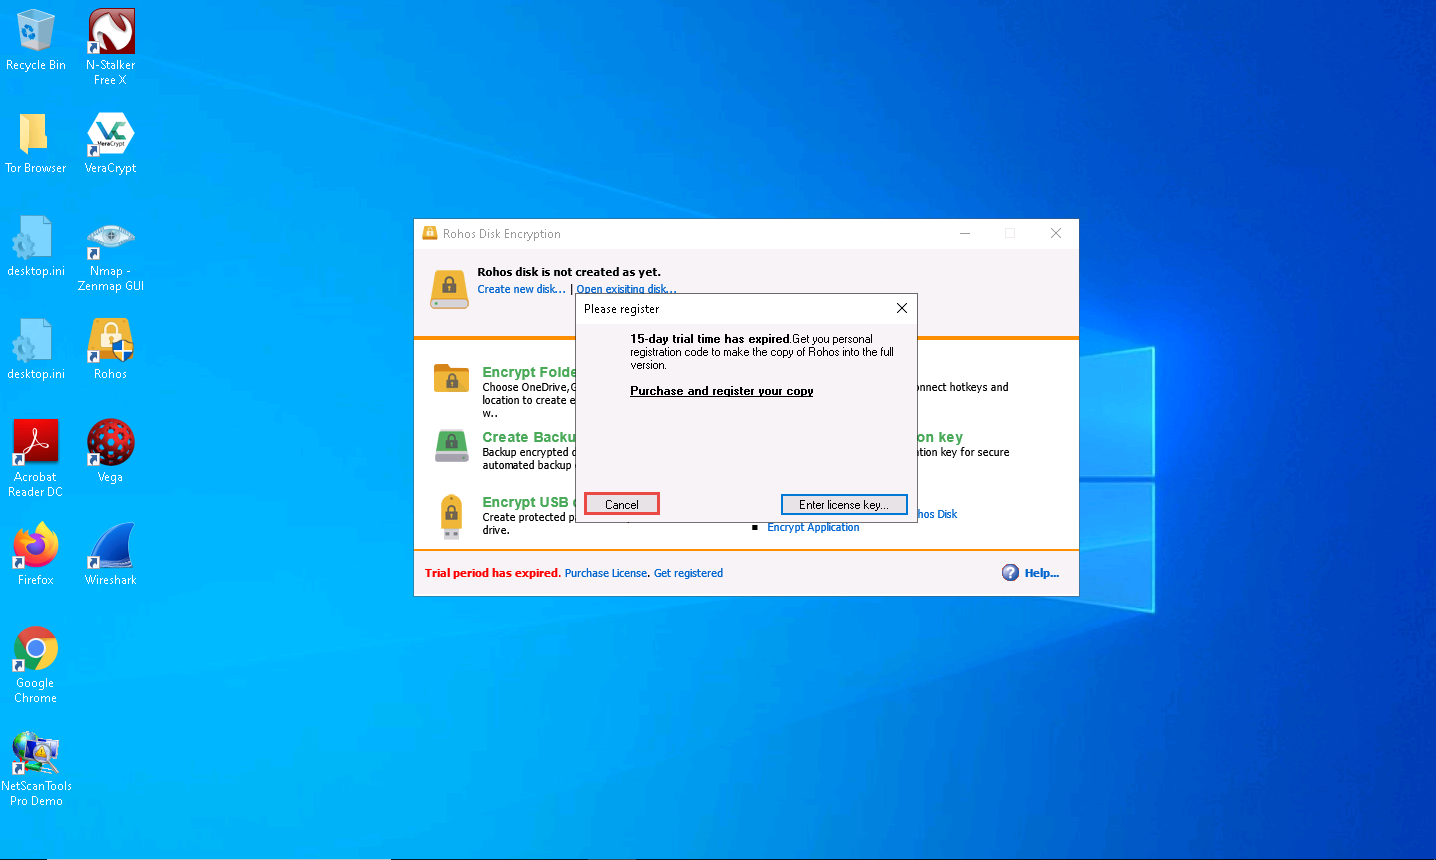
In the Windows 10 machine, double-click Rohos shortcut on the Desktop.
If User Account Control pop-up appears, click Yes.

Please register pop-up appears, click Cancel.
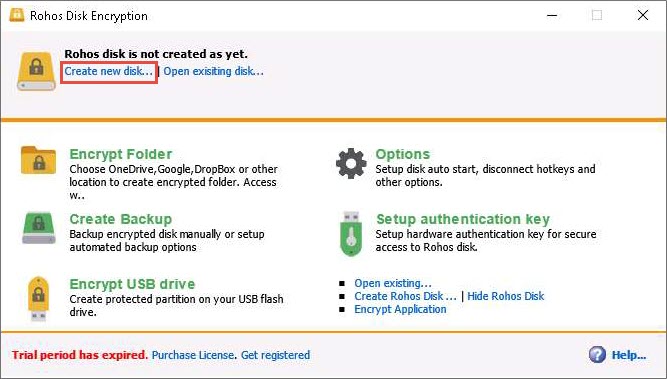
The Rohos Disk Encryption main window appears; click Create new disk…
The Create new Rohos disk window appears; click Change… to modify the size of the encrypted disk.
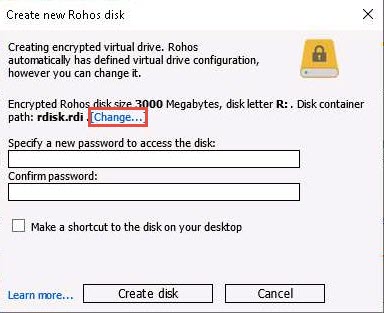
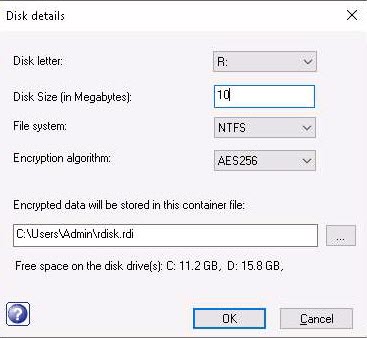
The Disk details wizard appears; modify the disk size to 10 in the Disk Size (in Megabytes) field and leave all other settings to default; then, click OK.
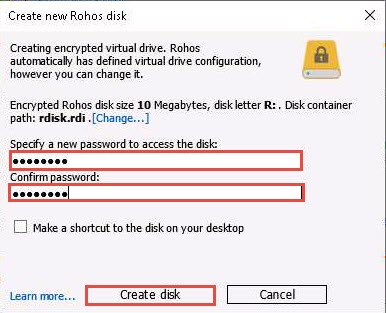
Provide a password in the Specify a new password to access the disk field and retype it into the Confirm password field; then, click Create disk button (Here, the password provided is test@123).
Wait until the encrypted volume is created. The time to create the encrypted volume depends upon the size you specified under the Disk Size option: if large, it will take a long time to create the volume.
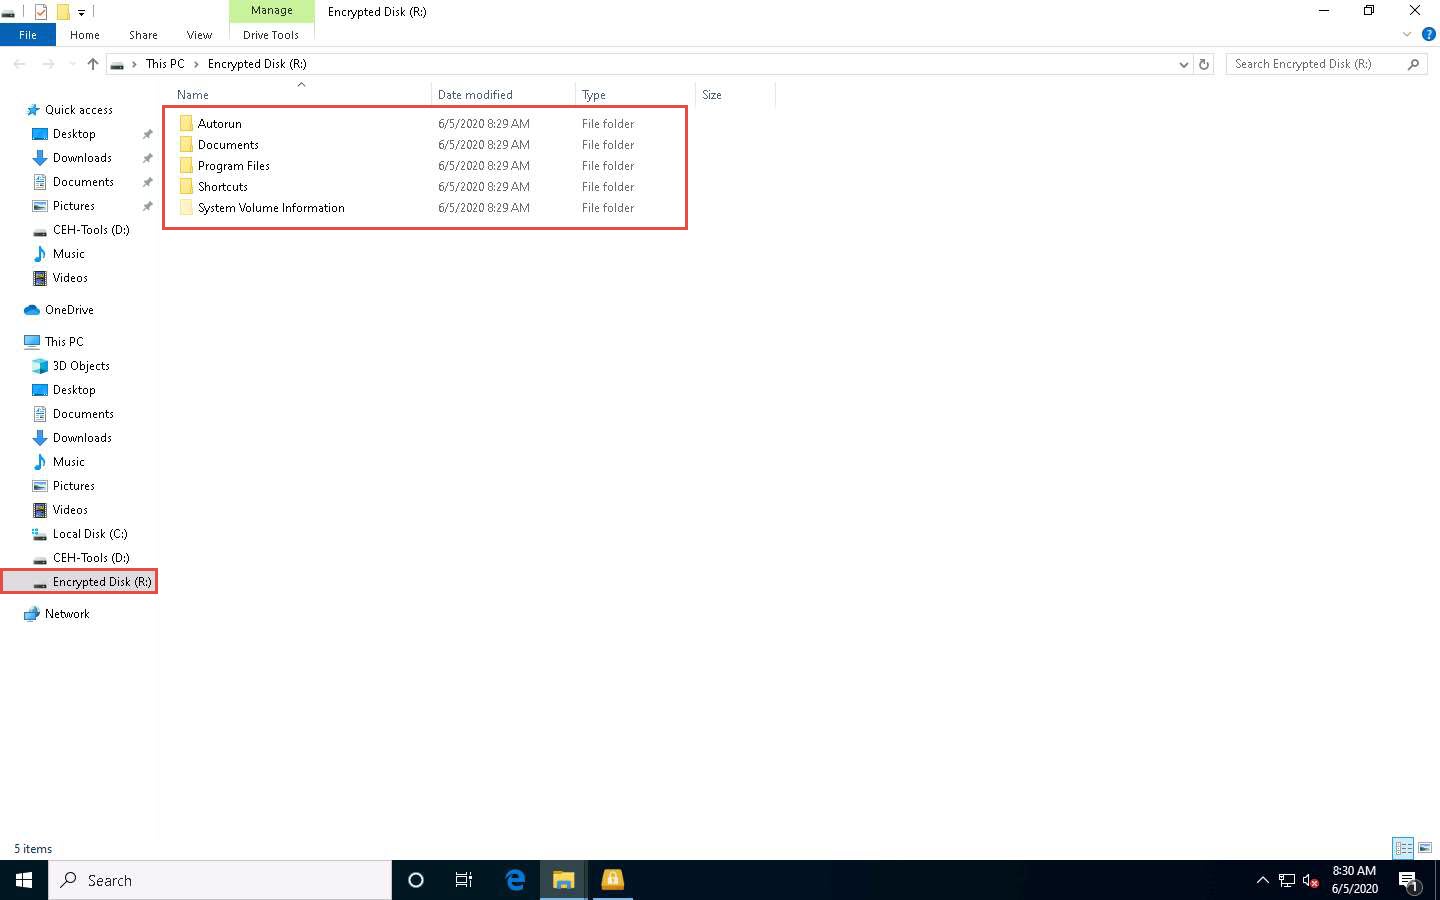
On creating the encrypted volume, the Encrypted Disk (R:) window appears, displaying the default disk content, as shown in the screenshot.
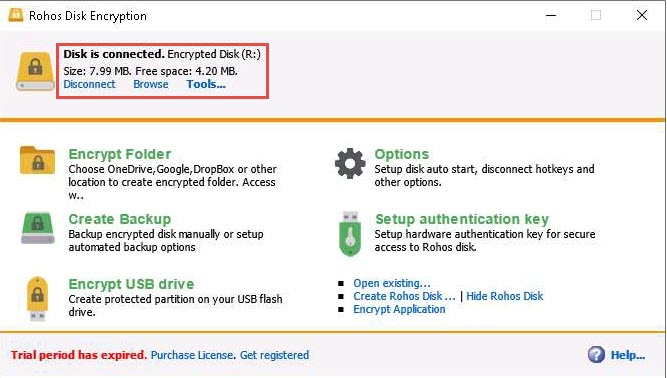
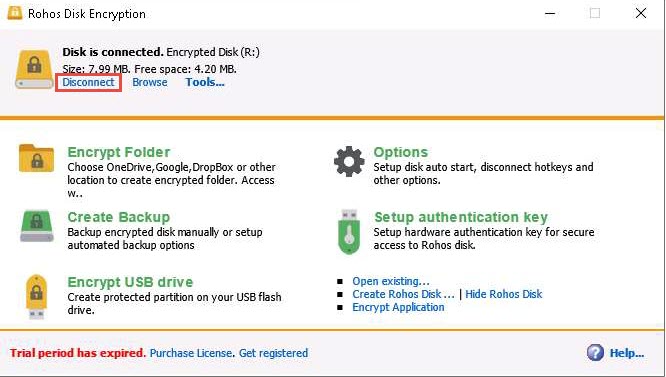
The Disk is connected notification appears at the top section of the Rohos Disk Encryption window.
This drive appears only when you are connected to Rohos Disk Encryption, and disappears when you exit.
If you wish to conceal any important files/directories from anyone accessing your system, you can place them in this drive and access them whenever required (by launching Rohos and entering the password).
Now, we shall place a text file in Encrypted disk (R:). To do so, create a text file on Desktop and name it Test. Open the file and insert text.
Click File in the menu bar and click Save.
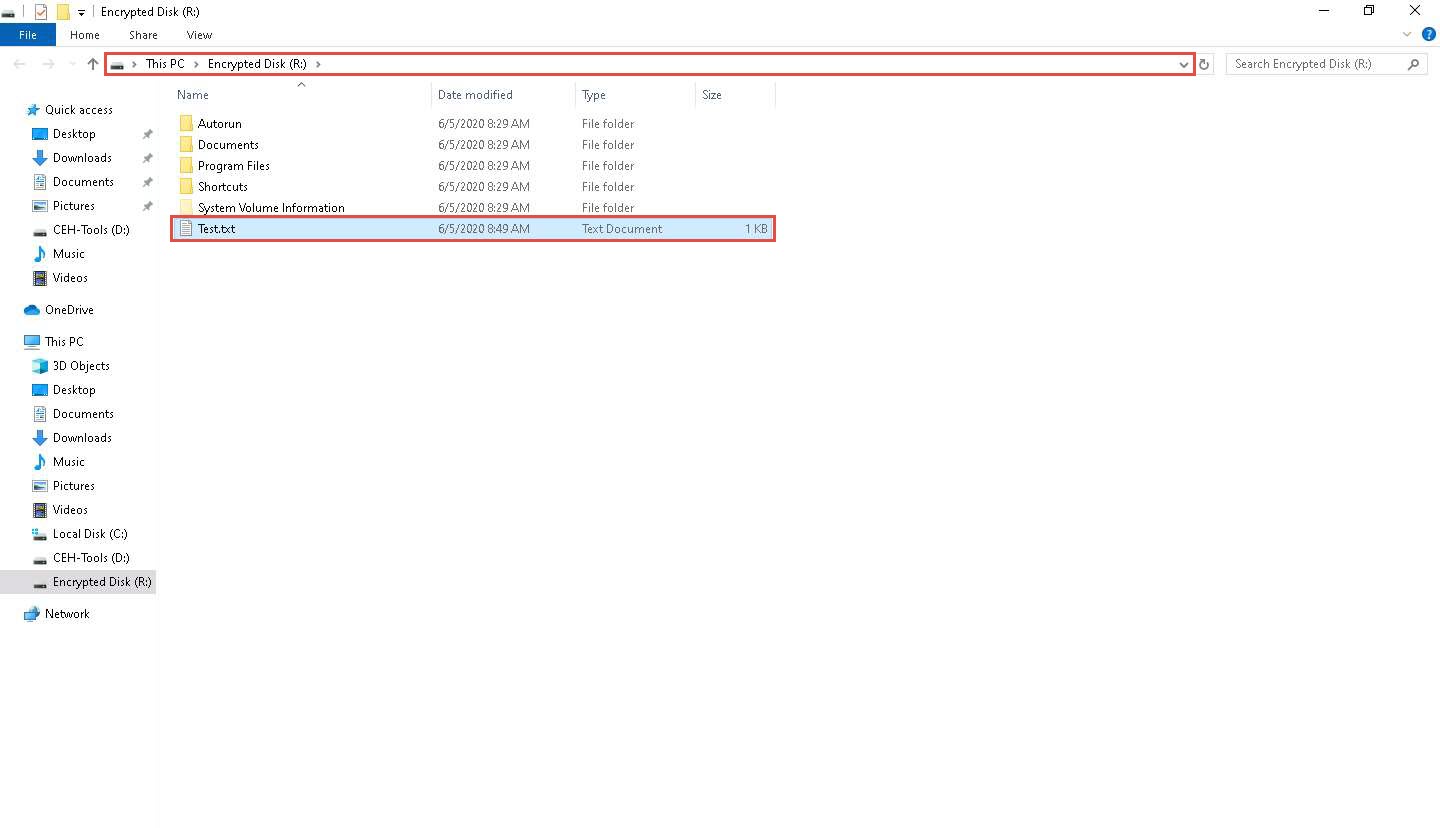
Copy the file from Desktop and paste into Encrypted Disk (R:). Close the window.
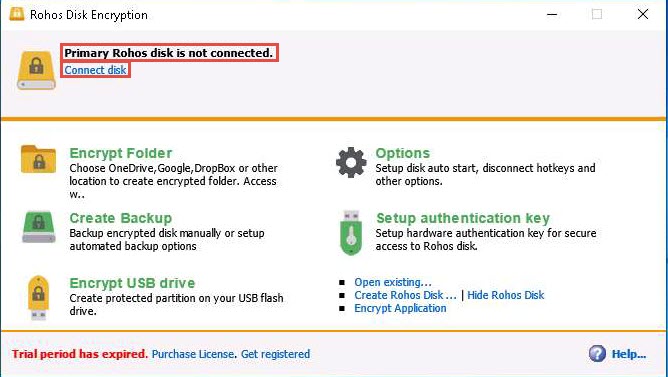
Switch to the Rohos Disk Encryption window and click Disconnect to dismount Encrypted disk (R:).

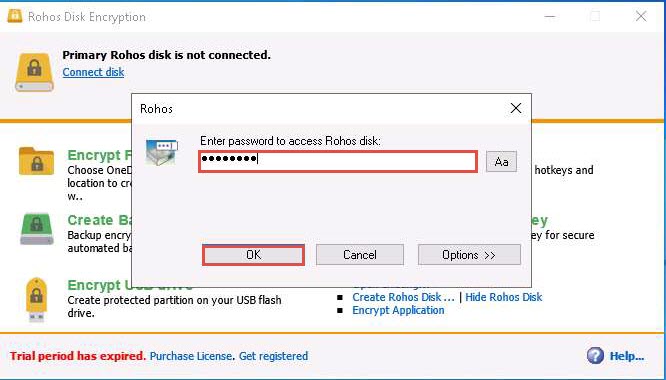
A notification appears stating Primary Rohos disk is not connected at the top of the Rohos Disk Encryption window. To mount the disk again, click the Connect disk option.
The Rohos pop-up appears; type the password you provided in Step#9 into the Enter password to access Rohos disk field and click OK.
Here, the password is test@123.
The Disk is connected notification appears in the Rohos Disk Encryption window. Click Browse to explore the disk content.

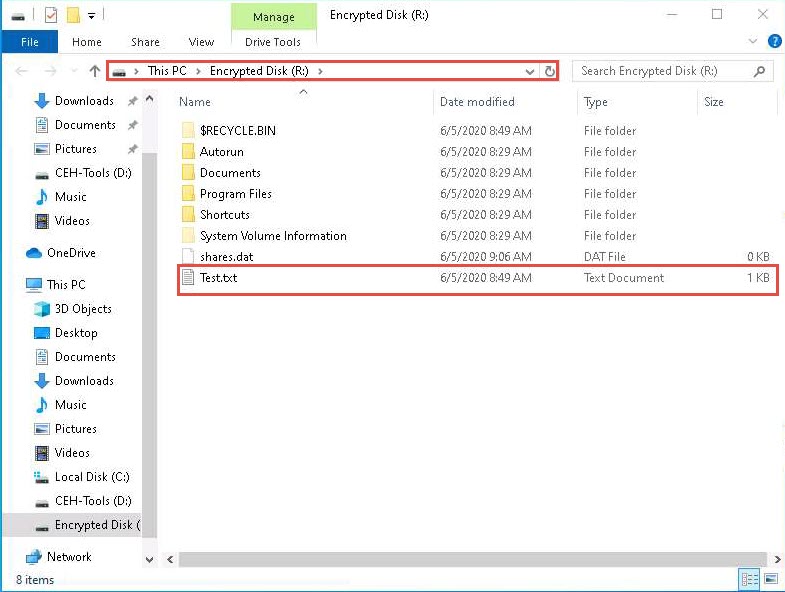
The Encrypted Disk (R:) window appears; you can see the Test.txt file that was pasted onto the disk earlier, as shown in the screenshot.
You can access the disk content and further add, delete, and modify the files. After making the intended changes, click Disconnect again in the Rohos Disk Encryption window to dismount the disk.
You can also use the Encrypt USB drive option to share sensible information with someone via USB. You can use this application to store the files in an encrypted disk and share the password with that person. The person with whom you want to share the files can access them only after entering the correct password. This way, you can protect the files from being viewed by a third person and thereby safeguard them.
This concludes the demonstration of performing disk encryption using Rohos Disk Encryption.
You can also use other disk encryption tools such as FinalCrypt (http://www.finalcrypt.org), Seqrite Encryption Manager (https://www.seqrite.com), FileVault (https://support.apple.com), and Gillsoft Full Disk Encryption (http://www.gilisoft.com) to perform disk encryption.
Close all open windows and document all the acquired information


Comments
Post a Comment