Lab 1: Perform Intrusion Detection using Various Tools
Lab 1: Perform Intrusion Detection using Various Tools
Module 12: Evading IDS, Firewalls, and Honeypots
Lab 1: Perform Intrusion Detection using Various Tools
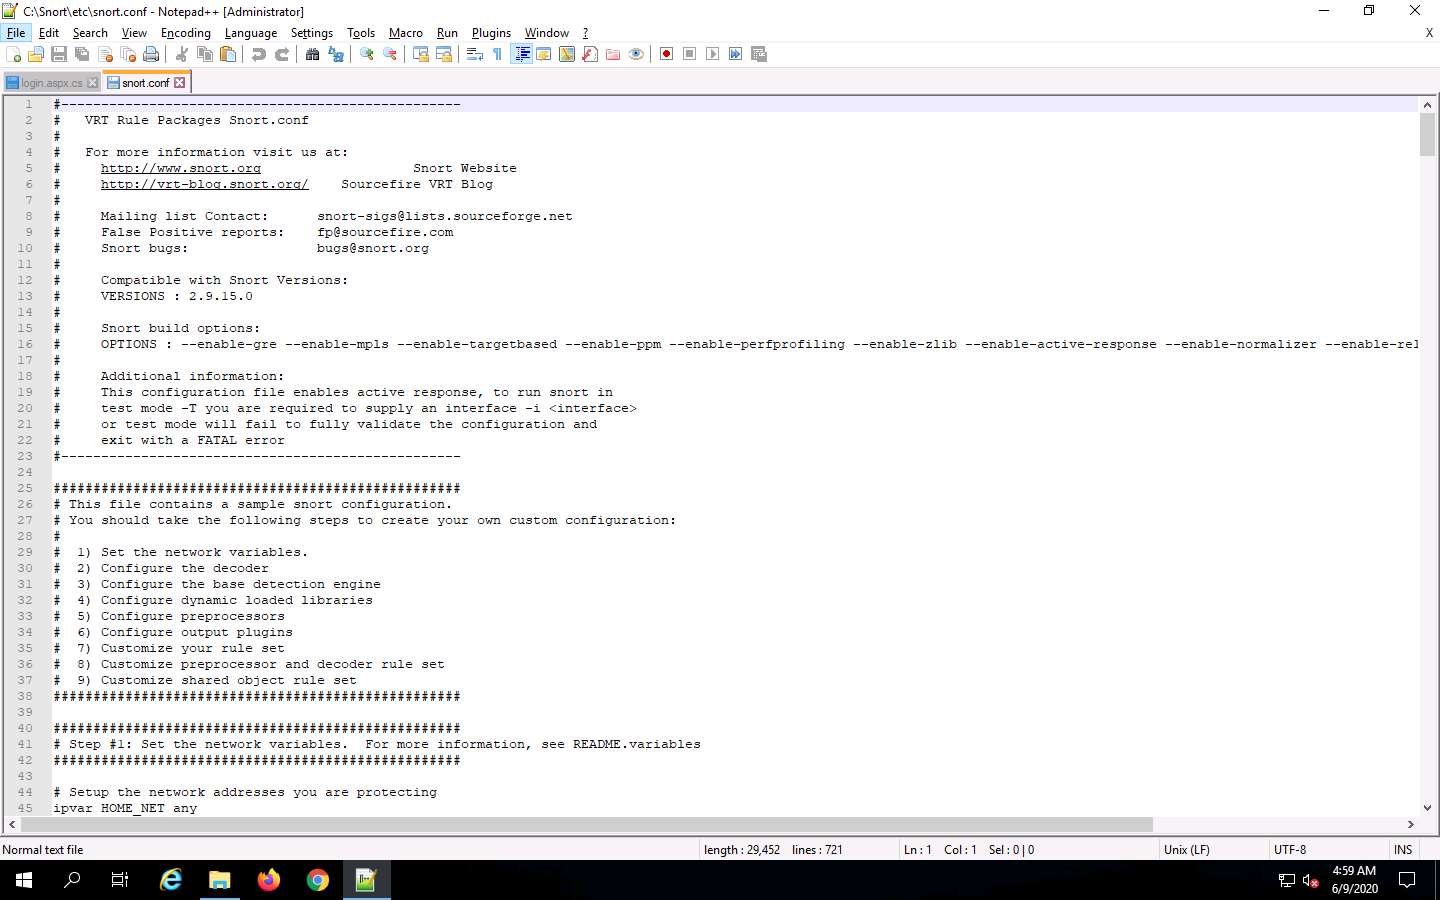
Task 1: Detect Intrusions using Snort
if your here during test im sorry good luck follow lab instructions
get a real IDS and have their engineers set it up RIP
Z:\CEHv11 Module 12 Evading IDS, Firewalls, and Honeypots\Intrusion Detection Tools\Snort
click the Snort_2_9_15_Installer.exe
installer will go away after you click ok
go to:
Z:\CEHv11 Module 12 Evading IDS, Firewalls, and Honeypots\Intrusion Detection Tools\Snort\snortrules-snapshot-29150\etc
right click copy snort.conf
paste it in C:\Snort\etc
replace file with the one ur pasting in
go to:
Z:\CEHv11 Module 12 Evading IDS, Firewalls, and Honeypots\Intrusion Detection Tools\Snort\snortrules-snapshot-29150
copy snortrules-snapshot-29150
paste into C:\Snort.
from that file you now pasted in go into it and copy preproc_rules
paste it into C:\Snort;
click replace
doping same thing copy rules folder
paste it into c:\snort
windows key
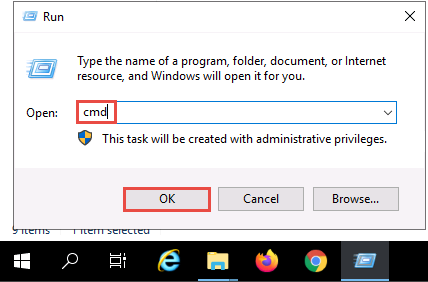
run
cmd
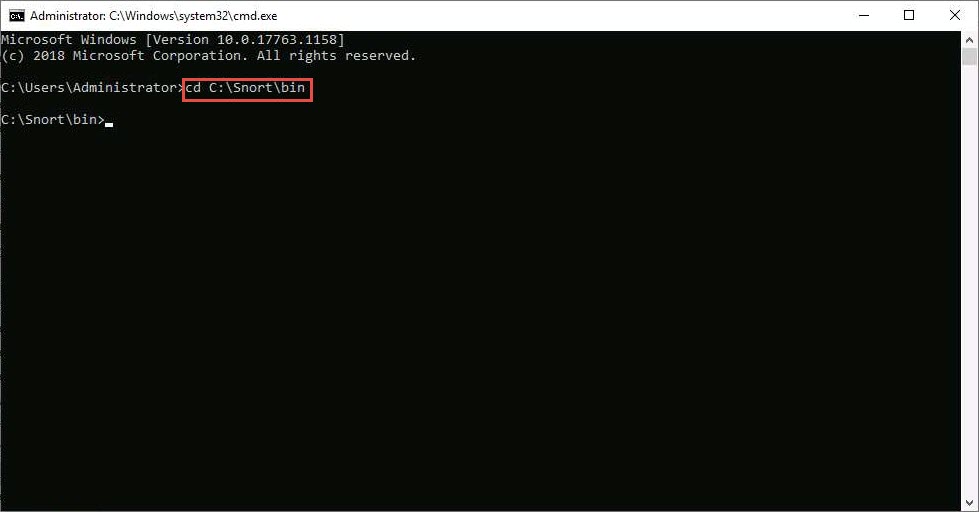
cd C:\Snort\bin
type snort
After completion press Ctrl+C
snort -W
this command lists your machine’s physical address, IP address, and Ethernet Drivers, but all are disabled by default
Observe your Ethernet Driver index number and write it down (in this lab, it is 1).
enable the Ethernet Driver, in the command prompt, type:
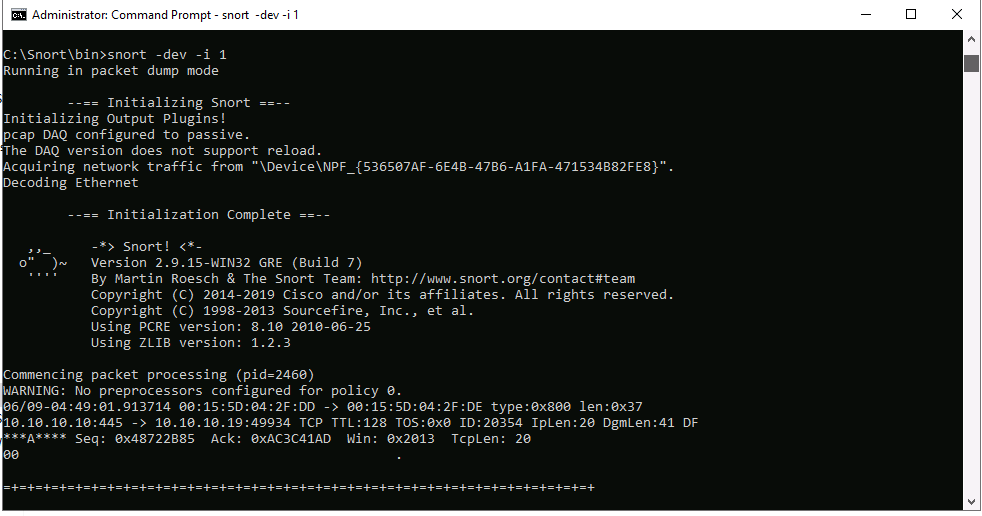
snort -dev -i 1 and press Enter
You see a rapid scroll text in the command prompt, which means that the Ethernet Driver is enabled and working properly.
launch another command prompt
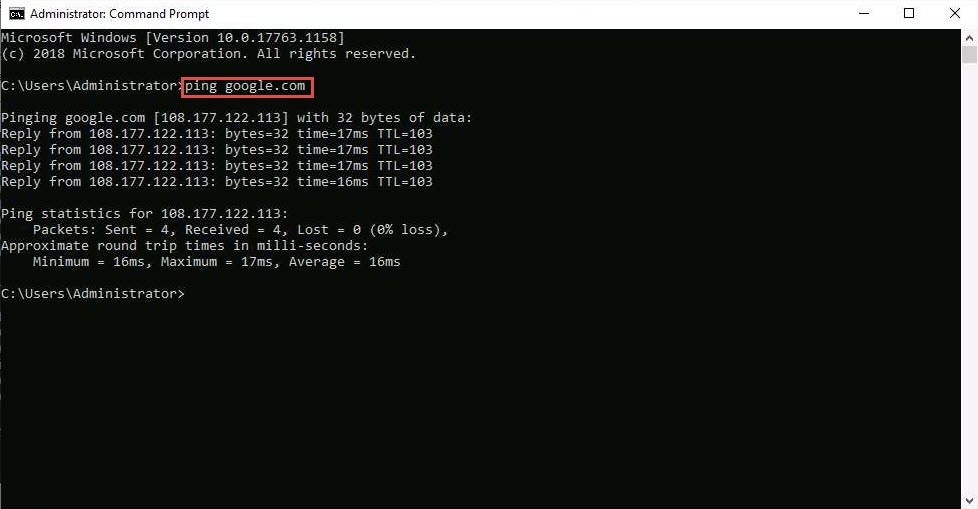
ping google.com
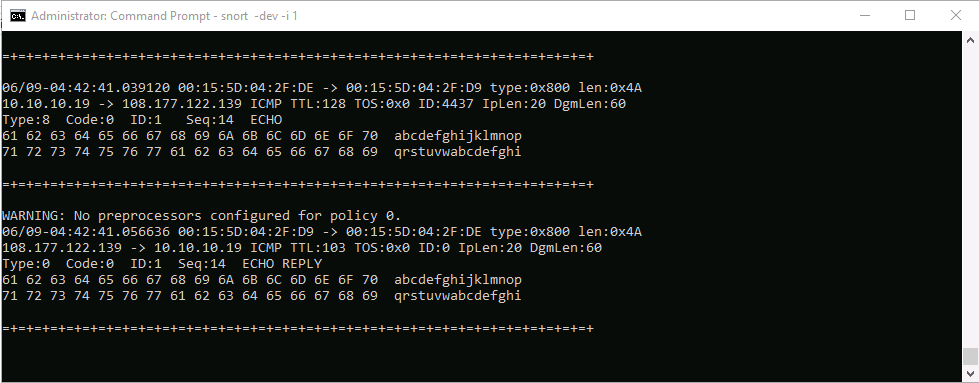
This ping command triggers a Snort alert in the Snort command prompt with rapid scrolling text.
Close both command prompt windows. The verification of Snort installation and the triggering
alert is complete, and Snort is working correctly in verbose mode.
go to
C:\Snort\etc.
open snort.conf with notepad ++
go to line 45
replace any with the IP of the targt machine snort is running
If you have a DNS Server, then make changes in the DNS_SERVERS line by replacing $HOME_NET with your DNS Server IP address;
its the part that says list of dns servers on your network right below that line 51
in this lab its 8.8.8.8
The same applies to SMTP_SERVERS, HTTP_SERVERS, SQL_SERVERS, TELNET_SERVERS, and SSH_SERVERS.
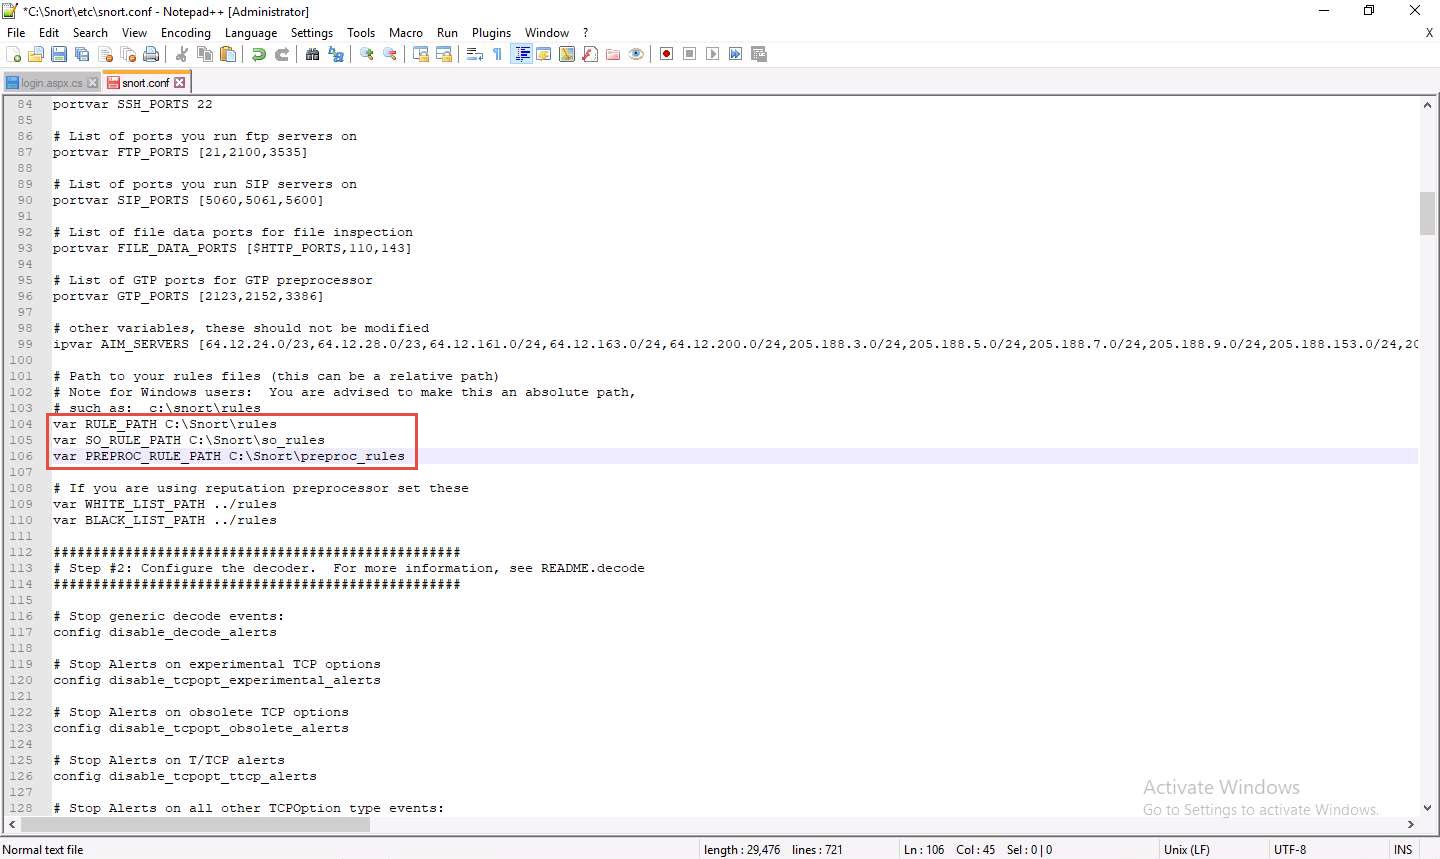
scroll to line Line 104
replace ../rules with C:\Snort\rules
Line 105,
replace ../so_rules with C:\Snort\so_rules
Line 106,
replace ../preproc_rules with C:\Snort\preproc_rules
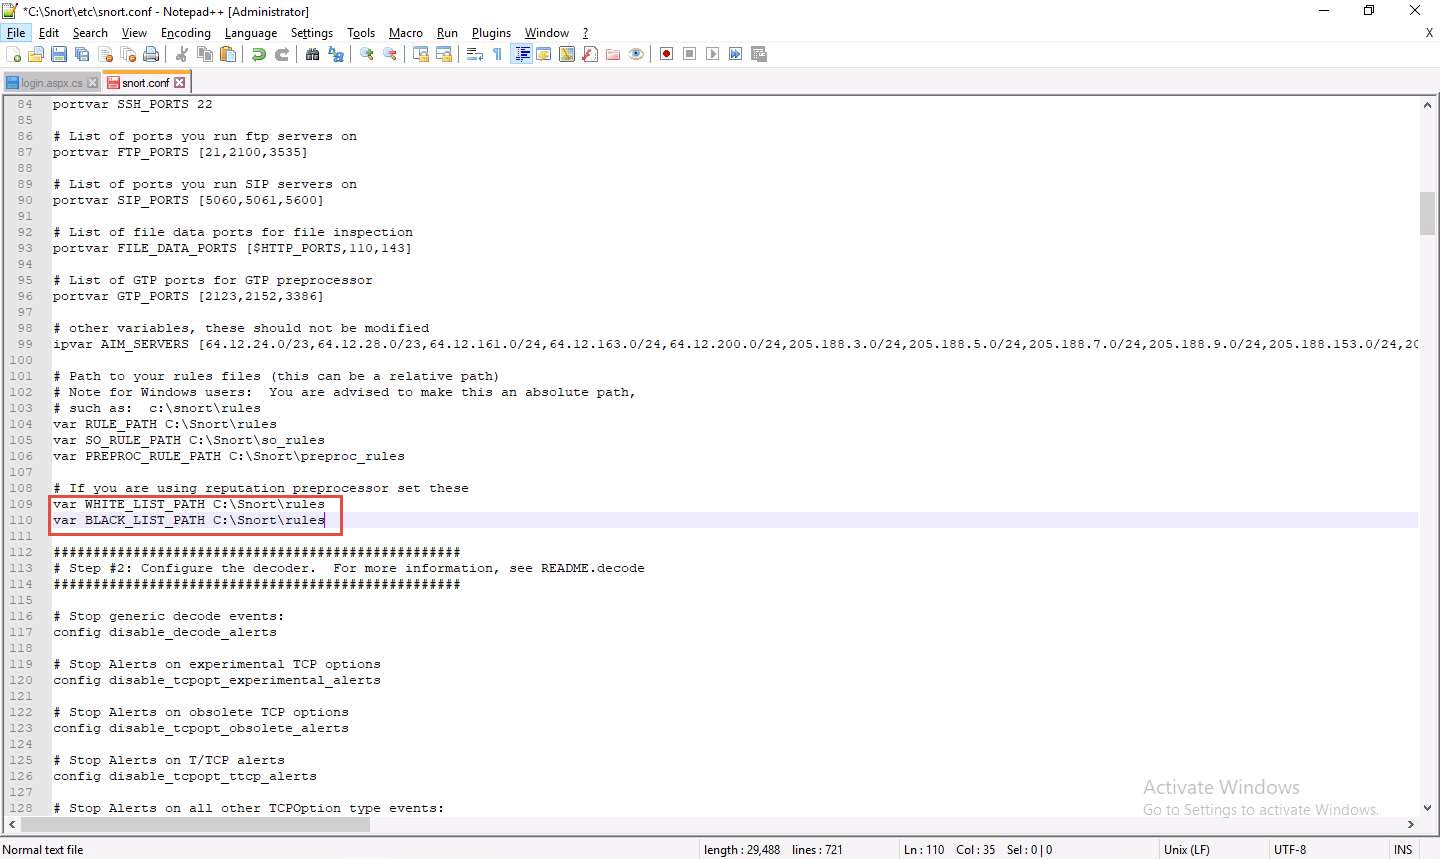
109 and 110, replace
../rules with C:\Snort\rules.
minimise notepad
go to C:\Snort\rules,
create two text files; name them white_list and black_list and change their file extensions from .txt to .rules.
back in notepad
line 243
replace /usr/local/lib/snort_dynamicpreprocessor/ with C:\Snort\lib\snort_dynamicpreprocessor.
Line 246)
replace /usr/local/lib/snort_dynamicengine/libsf_engine.so with C:\Snort\lib\snort_dynamicengine\sf_engine.dll.
Add (space) in between # and dynamicdetection (Line 250).
add #‘#’ and (space) before each preprocessor rule (262-266).
line 326
delete lzma keyword and a (space).
you are now on step 45 and want to throw your computer
refer to blog for rest of lab.
lets say all this is already done by the nice lab people
go into cmd
cd C:\Snort\bin
snort -iX -A console -c C:\Snort\etc\snort.conf -l C:\Snort\log -K ascii
If you receive a fatal error, you should first verify that you have typed all modifications correctly and consider quitting your job
If you receive an error stating “Could not create the registry key,” then run the command prompt as Administrator.
if all done good it will show
Commencing packet processing (pid=xxxx) (the value of xxxx may be any number; in this lab, it is 5384)
After initializing interface and logged signatures, Snort starts and waits for an attack and triggers alerts when attacks occur on the machine.
Leave the Snort command prompt running.
Attack your own machine, and check whether Snort detects it or not.
waste of time
---------------------------------------------------------------------------------------------------------------------------------------
Module 12: Evading IDS, Firewalls, and Honeypots
Lab 1: Perform Intrusion Detection using Various Tools
Task 2: Detect Malicious Network Traffic using ZoneAlarm FREE FIREWALL 2019
ZoneAlarm FREE Firewall 2019 blocks attackers and intruders from accessing your system.
It manages and monitors all incoming and outgoing traffic and shields the network from hackers, malware,
and other online threats that put network privacy at risk, and monitors programs for suspicious behavior spotting
and stopping new attacks that bypass traditional anti-virus protection. This Firewall prevents identity theft by guarding
your data, and erases your tracks allowing you to surf the web in complete privacy. Furthermore, it locks out attackers,
blocks intrusions, and makes your PC invisible online. Additionally, it filters out annoying, as well as potentially
dangerous, email.
refer to blog
---------------------------------------------------------------------------------------------------------------------------------------
Module 12: Evading IDS, Firewalls, and Honeypots
Lab 1: Perform Intrusion Detection using Various Tools
Task 3: Detect Malicious Network Traffic using HoneyBOT
HoneyBOT is a medium interaction honeypot for windows. A honeypot creates a safe environment to capture and interact
with unsolicited traffic on a network. HoneyBOT is an easy-to-use solution that is ideal for network security research
or as part of an early-warning IDS.
refer to blog
-------------------------------------------------------------------------------------------------------------------------------------
Lab Scenario
The goal of the Intrusion Detection Analyst is to find possible attacks against a network. Recent years have witnessed a significant increase in Distributed Denial-of-Service (DDoS) attacks on the Internet, making network security a great concern. Analysts search for possible attacks by examining IDS logs and packet captures and corroborating them with firewall logs, known vulnerabilities, and general trending data from the Internet. IDS attacks are becoming more sophisticated; automatically reasoning the attack scenarios in real-time, and categorizing them has become a critical challenge. These processes result in huge amounts of data, which analysts must examine to detect a pattern. However, the overwhelming flow of events generated by IDS sensors make it difficult for security administrators to uncover hidden attack plans.
To become an expert penetration tester and security administrator, you must possess sound knowledge of network IPSs, IDSs, malicious network activity, and log information.
Lab Objectives
- Detect intrusions using Snort
- Detect malicious network traffic using ZoneAlarm FREE FIREWALL 2019
- Detect malicious network traffic using HoneyBOT
Overview of Intrusion Detection Systems
Intrusion detection systems are highly useful as they monitor both the inbound and outbound traffic of the network and continuously inspects the data for suspicious activities that may indicate a network or system security breach. The IDS checks traffic for signatures that match known intrusion patterns and signals an alarm when a match is detected. It can be categorized into active and passive, depending on its functionality: an IDS is generally passive and is used to detect intrusions, while an intrusion prevention system (IPS) is considered as an active IDS, as it is not only used to detect the intrusion on the network, but also prevent them.
Main Functions of IDS:
- Gathers and analyzes information from within a computer or a network, to identify the possible violations of security policy
- Also referred to as a “packet-sniffer,” which intercepts packets traveling along various communication mediums and protocols
- Evaluates traffic for suspected intrusions and signals an alarm after detection
Task 1: Detect Intrusions using Snort
Snort is an open-source network intrusion detection system, capable of performing real-time traffic analysis and packet logging on IP networks. It can perform protocol analysis and content searching/matching and is used to detect a variety of attacks and probes such as buffer overflows, stealth port scans, CGI attacks, SMB probes, and OS fingerprinting attempts. It uses a flexible rules language to describe traffic to collect or pass, as well as a detection engine that utilizes a modular plug-in architecture.
Uses of Snort:
- Straight packet sniffer such as tcpdump
- Packet logger (useful for network traffic debugging, etc.)
- Network intrusion prevention system
Here, we will use Snort to detect network intrusions.
Click on Windows Server 2019 to switch to Windows Server 2019 machine. Click Ctrl+Alt+Delete to activate the machine. By default, Administration user profile is selected, click Pa$$w0rd to paste the password in the Password field and press Enter to login.
Alternatively, you can also click Pa$$w0rd under Windows Server 2019 machine thumbnail in the Resources pane or Click Type Text | Type Password button under Commands (thunder icon) menu.
Networks screen appears, click Yes to allow your PC to be discoverable by other PCs and devices on the network.
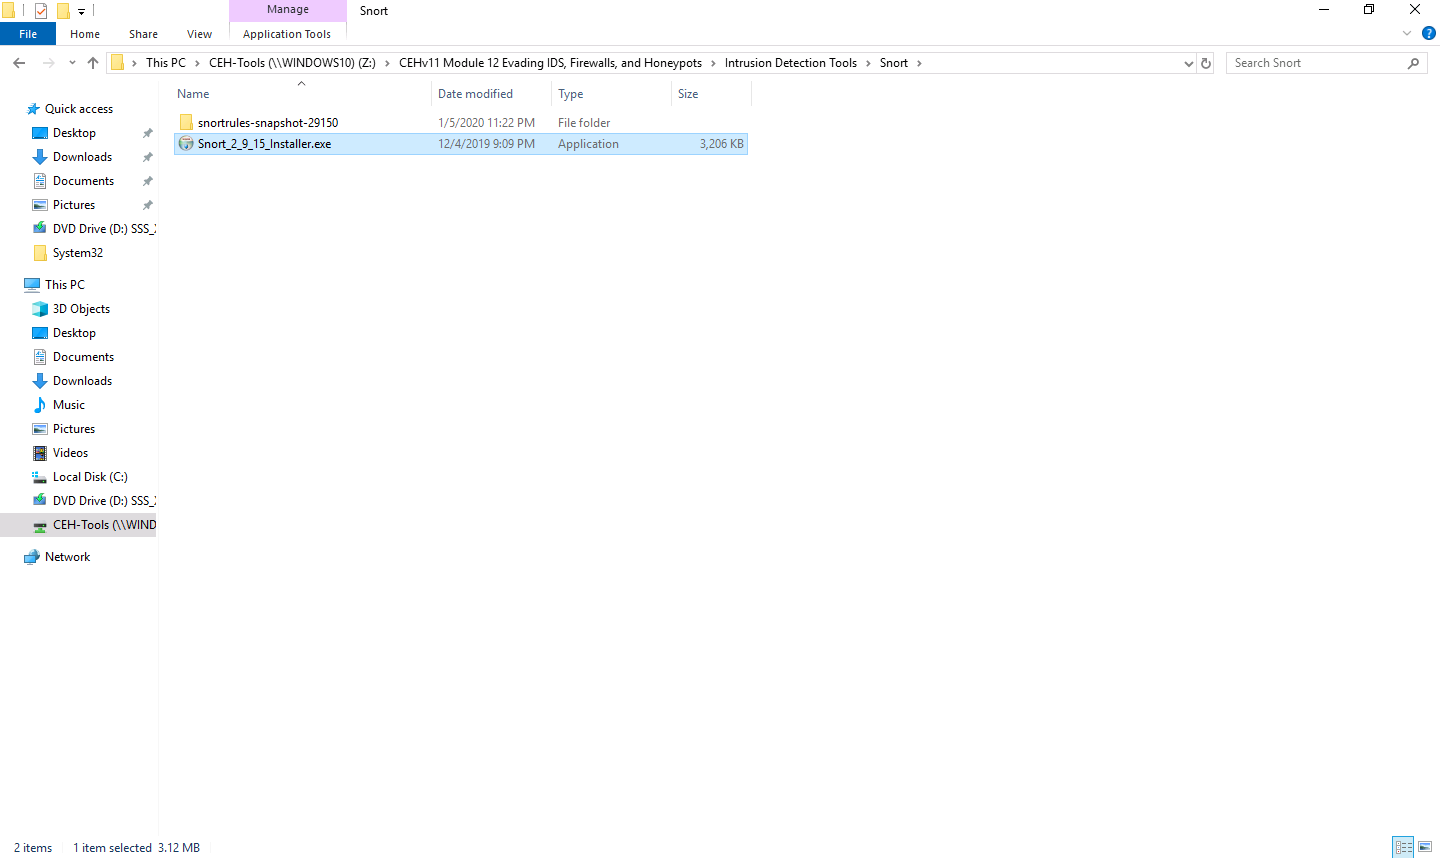
Navigate to Z:\CEHv11 Module 12 Evading IDS, Firewalls, and Honeypots\Intrusion Detection Tools\Snort and double-click the Snort_2_9_15_Installer.exe file to start the Snort installation.
If an Open File - Security warning pop-up window appears, click Run.
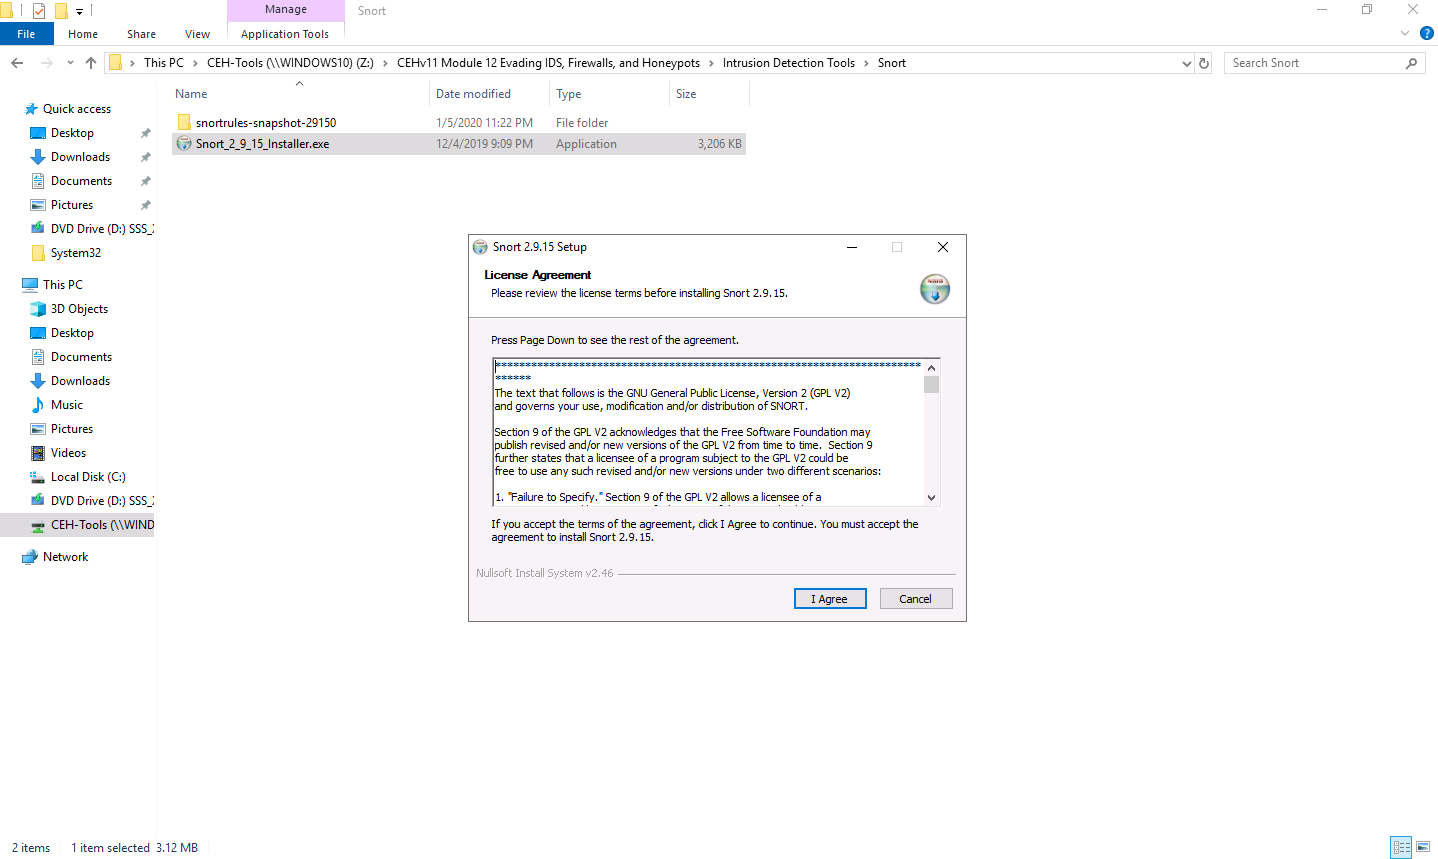
Accept the License Agreement and install Snort by selecting the default options that appear step by step in the wizard.
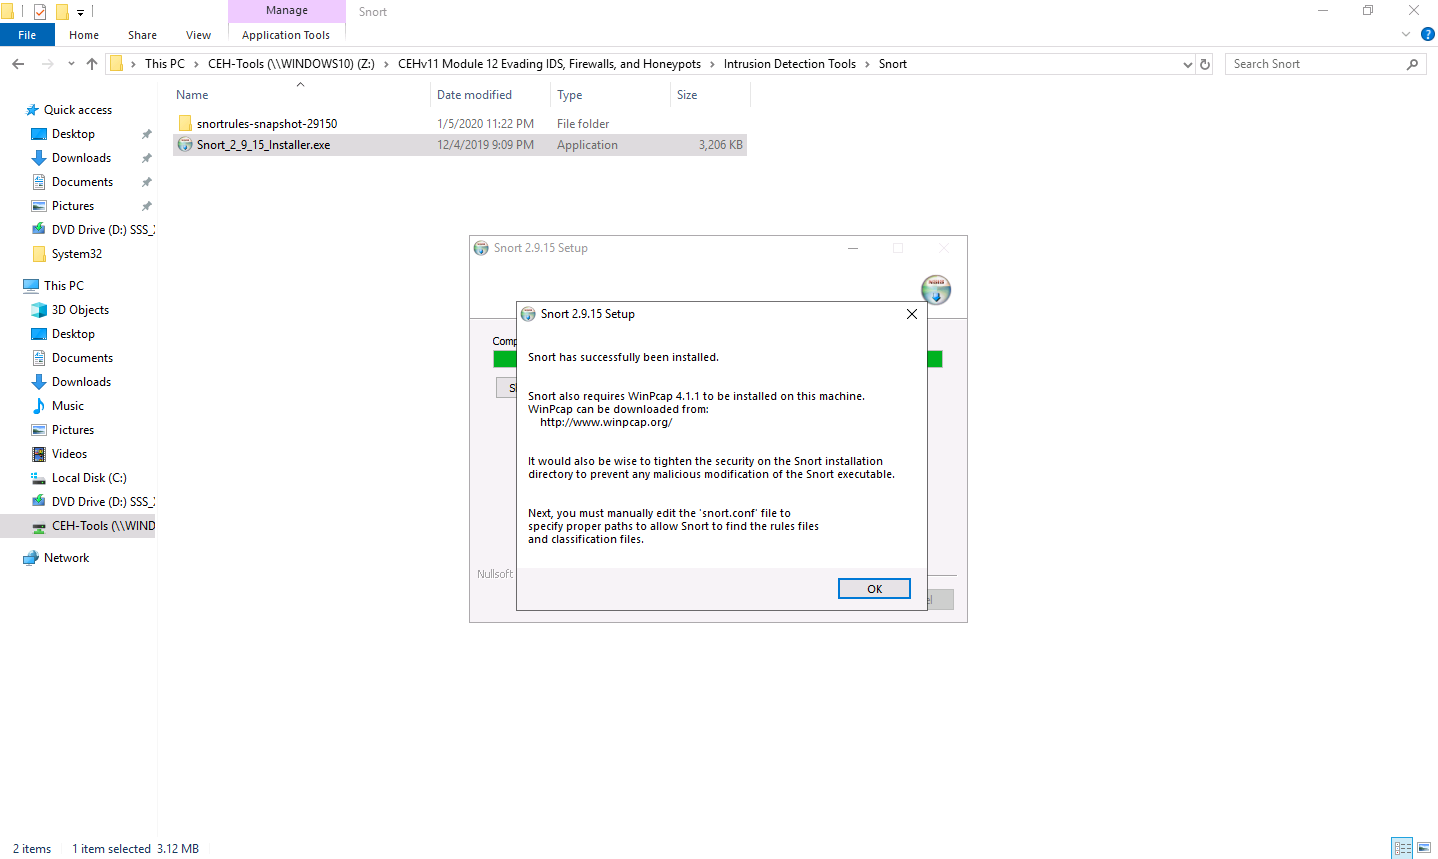
A window appears after the successful installation of Snort; click Close.
Click OK to exit the Snort Installation window.
Snort requires WinPcap to be installed on your machine. In this lab environment, we have already installed WinPcap drivers for packet capturing.
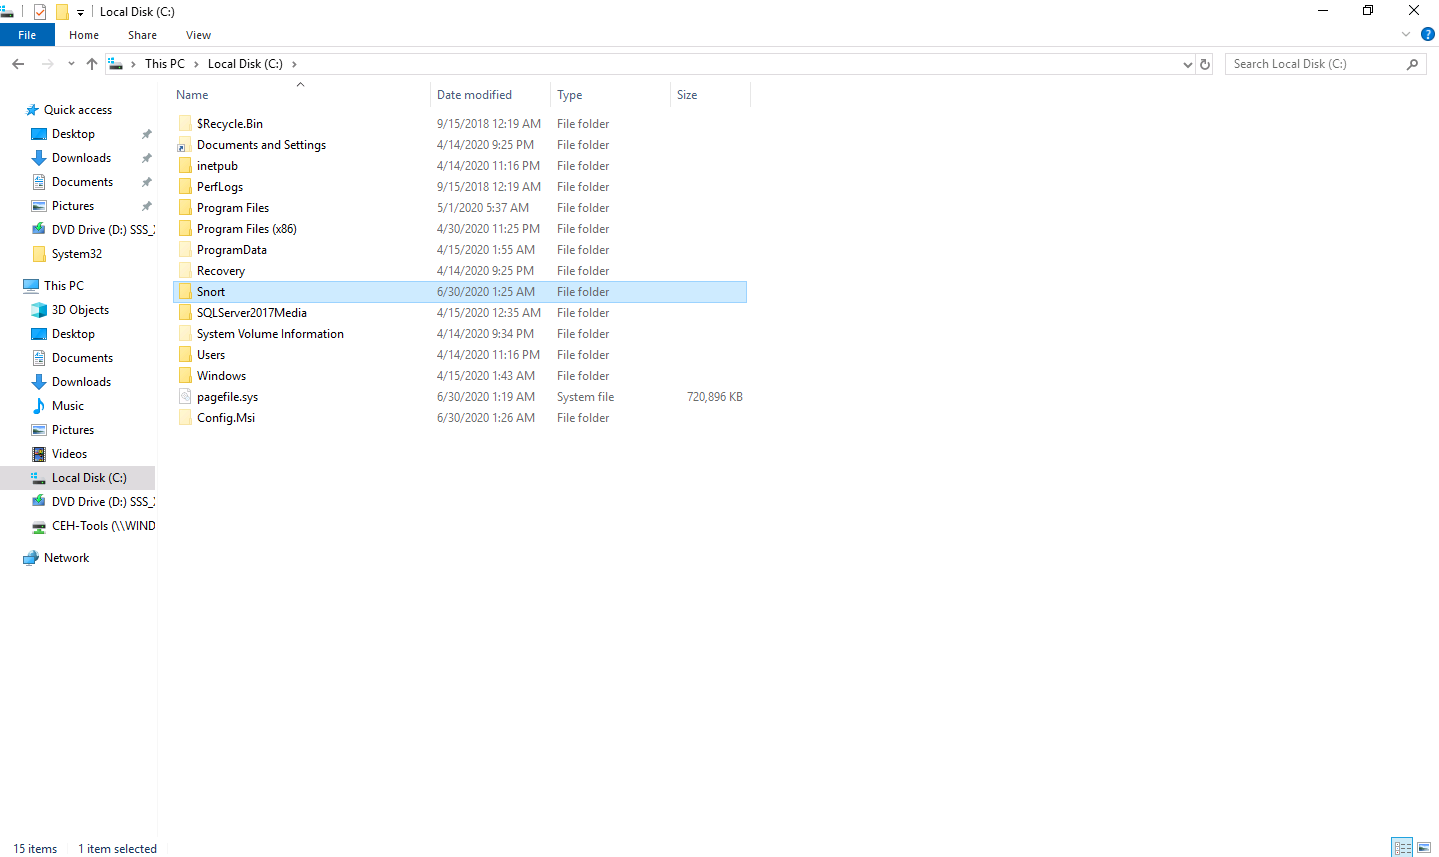
By default, Snort installs itself in C:\Snort (C:\ or D:\, depending on the disk drive in which the OS is installed).
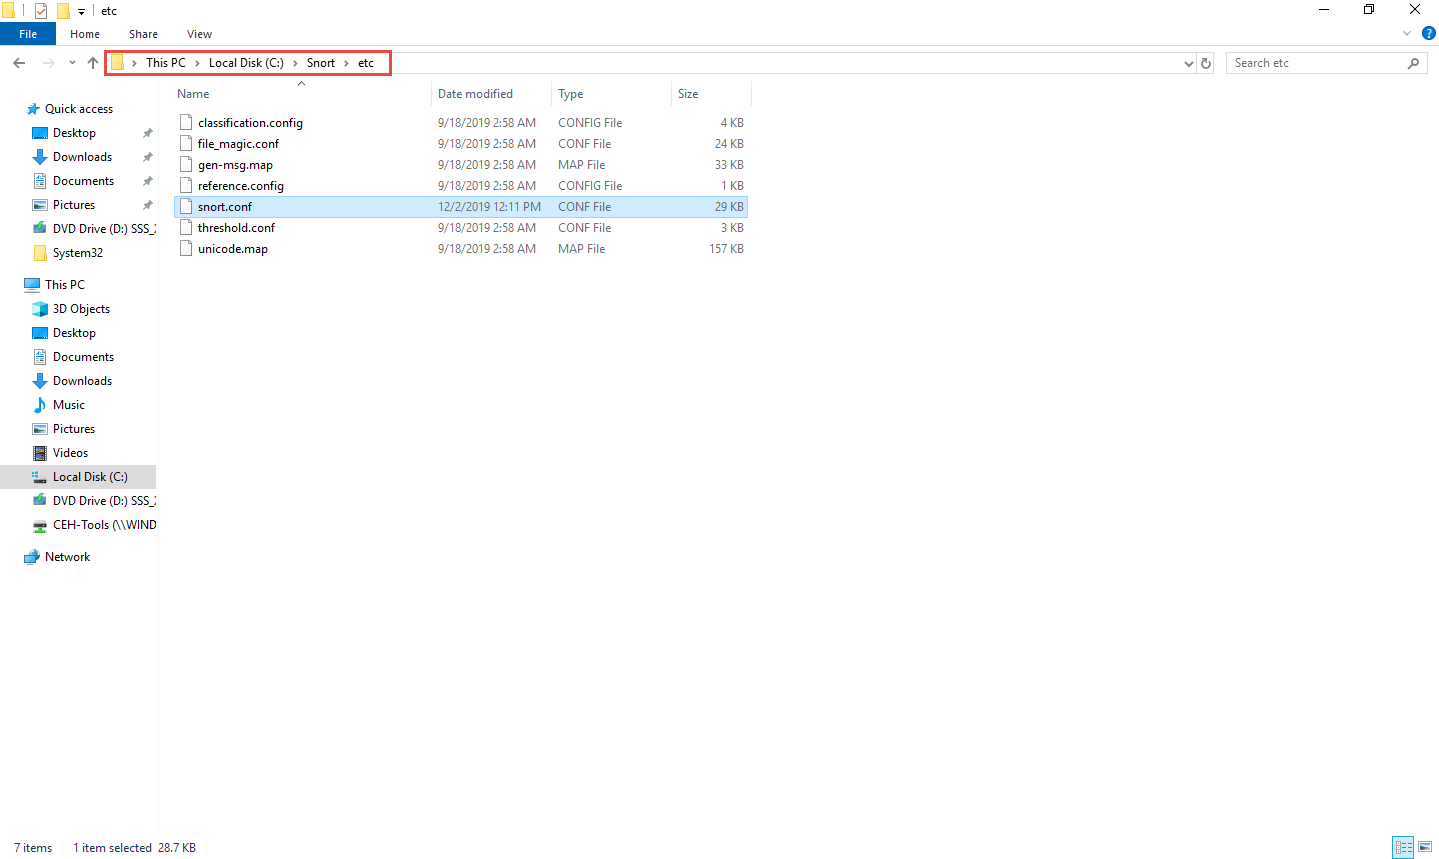
Navigate to the etc folder in the specified location, Z:\CEHv11 Module 12 Evading IDS, Firewalls, and Honeypots\Intrusion Detection Tools\Snort\snortrules-snapshot-29150\etc of the Snort rules; copy snort.conf and paste it in C:\Snort\etc.
snort.conf is already present in C:\Snort\etc; replace the file with the newly copied file.
Copy the so_rules folder from Z:\CEHv11 Module 12 Evading IDS, Firewalls, and Honeypots\Intrusion Detection Tools\Snort\snortrules-snapshot-29150 and paste into C:\Snort.
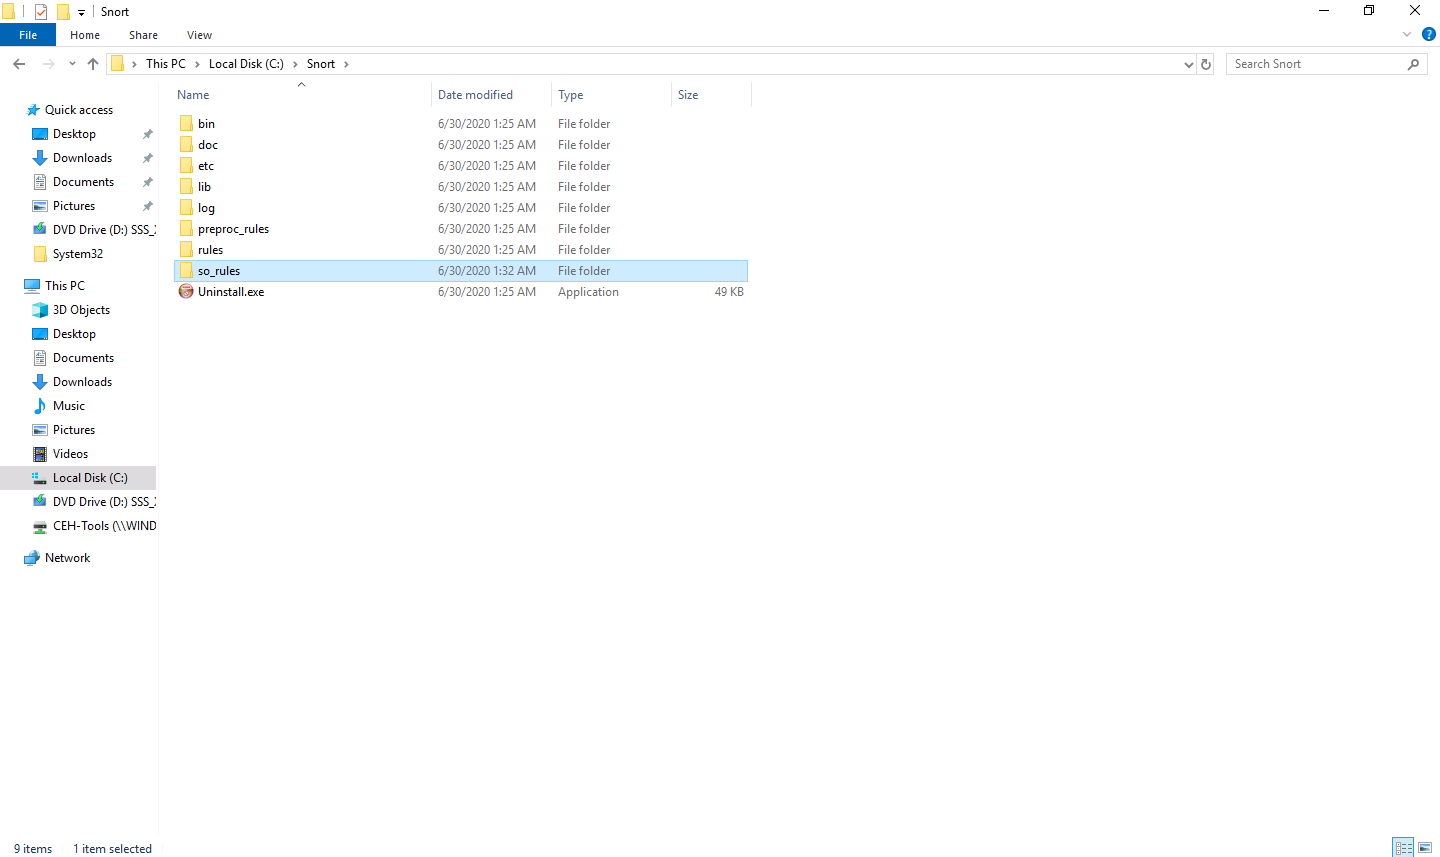
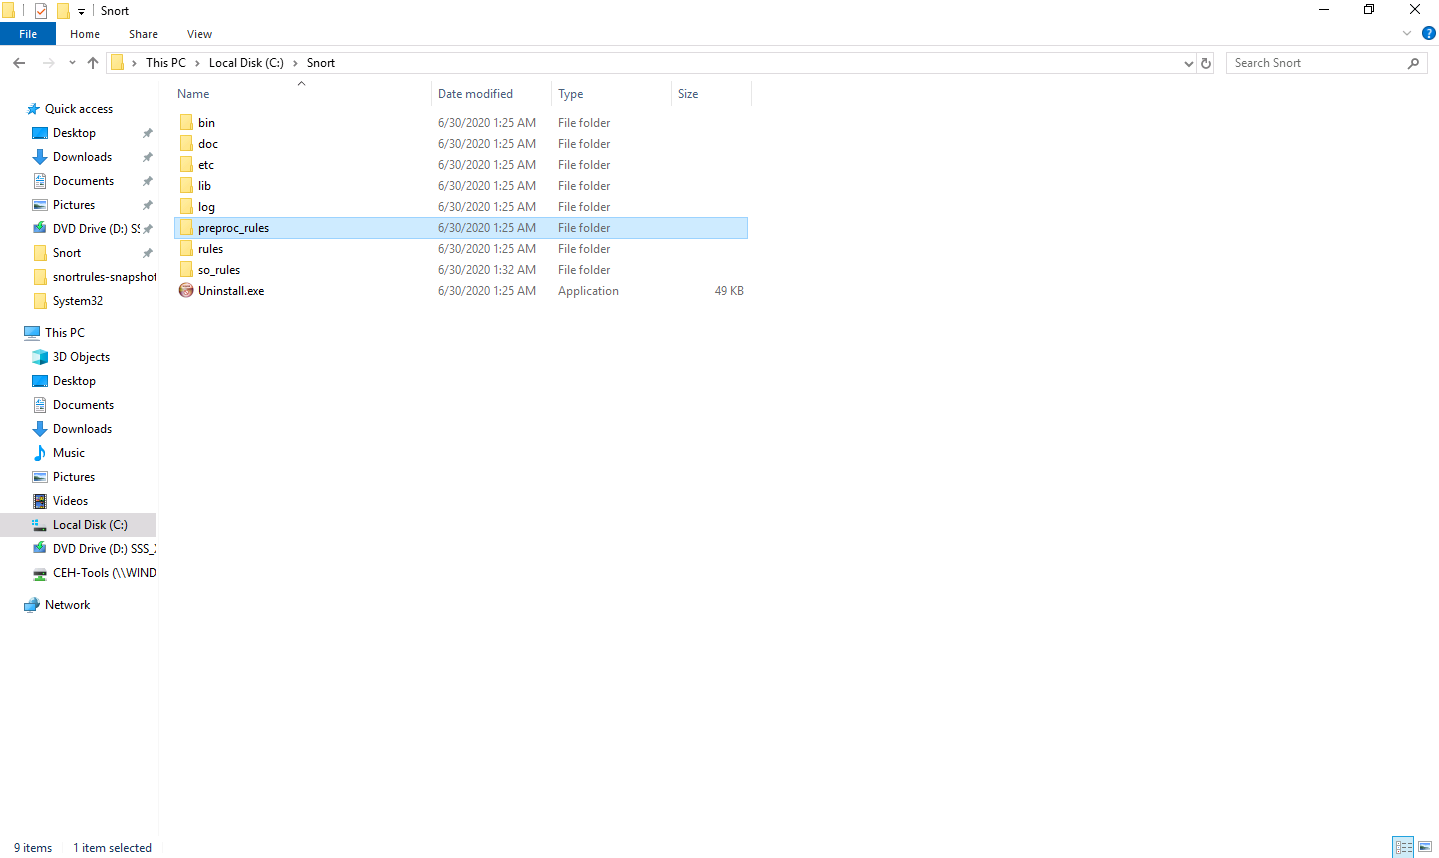
Copy the preproc_rules folder from Z:\CEHv11 Module 12 Evading IDS, Firewalls, and Honeypots\Intrusion Detection Tools\Snort\snortrules-snapshot-29150, and paste it into C:\Snort. The preproc_rules folder is already present in C:\Snort; replace this folder with the preproc_rules folder taken from the specified location.
Using the same method, copy the rules folder from Z:\CEHv11 Module 12 Evading IDS, Firewalls, and Honeypots\Intrusion Detection Tools\Snort\snortrules-snapshot-29150 and paste into C:\Snort.

Now right-click on the Windows Start icon and click Run from the menu.
The Run window appears; type cmd in the Open field and click OK to launch command prompt window.
The Command Prompt window appears; type cd C:\Snort\bin and press Enter to access the bin folder in the command prompt.
Type snort and press Enter.
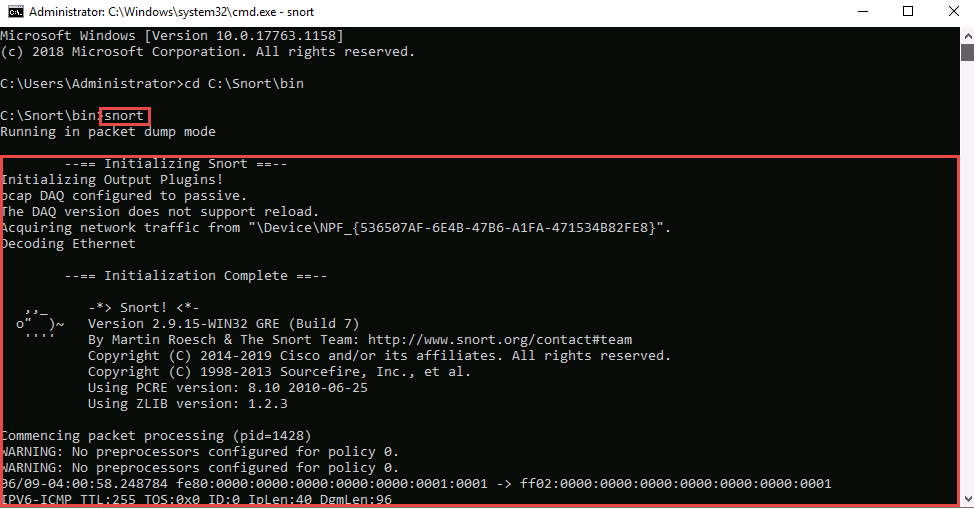
Snort initializes; wait for it to complete. After completion press Ctrl+C, Snort exits and comes back to C:\Snort\bin.
Now type snort -W. This command lists your machine’s physical address, IP address, and Ethernet Drivers, but all are disabled by default.
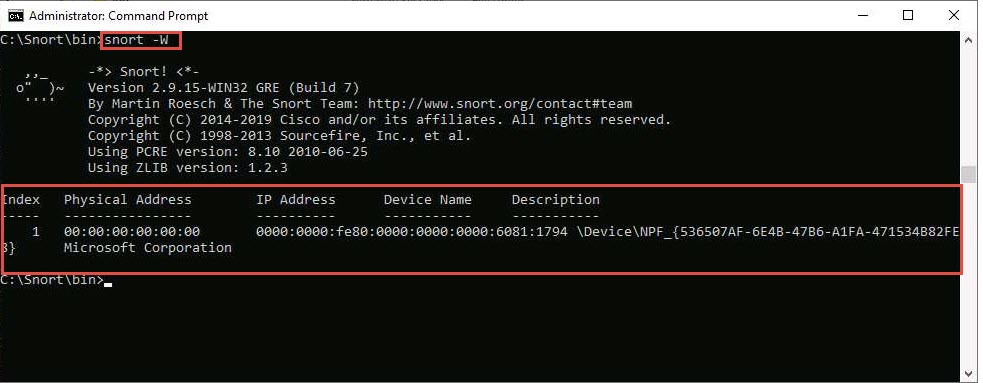
Observe your Ethernet Driver index number and write it down (in this lab, it is 1).
To enable the Ethernet Driver, in the command prompt, type snort -dev -i 1 and press Enter.
You see a rapid scroll text in the command prompt, which means that the Ethernet Driver is enabled and working properly.
Leave the Snort command prompt window open, and launch another command prompt window.
In a new command prompt, type ping google.com and press Enter.
This ping command triggers a Snort alert in the Snort command prompt with rapid scrolling text.
The Google IP address will differ in your lab environment.
Close both command prompt windows. The verification of Snort installation and the triggering alert is complete, and Snort is working correctly in verbose mode.
Configure the snort.conf file, located at C:\Snort\etc.
Open the snort.conf file with Notepad++.
Scroll down to the Step #1: Set the network variables section (Line 41) of the snort.conf file. In the HOME_NET line (Line 45), replace any with the IP addresses of the machine (target machine) on which Snort is running. Here, the target machine is Windows Server 2019 and the IP address is 10.10.10.19.
This IP address may vary in your lab environment.
Leave the EXTERNAL_NET any line as it is.
If you have a DNS Server, then make changes in the DNS_SERVERS line by replacing $HOME_NET with your DNS Server IP address; otherwise, leave this line as it is.
Here, the DNS server is 8.8.8.8.
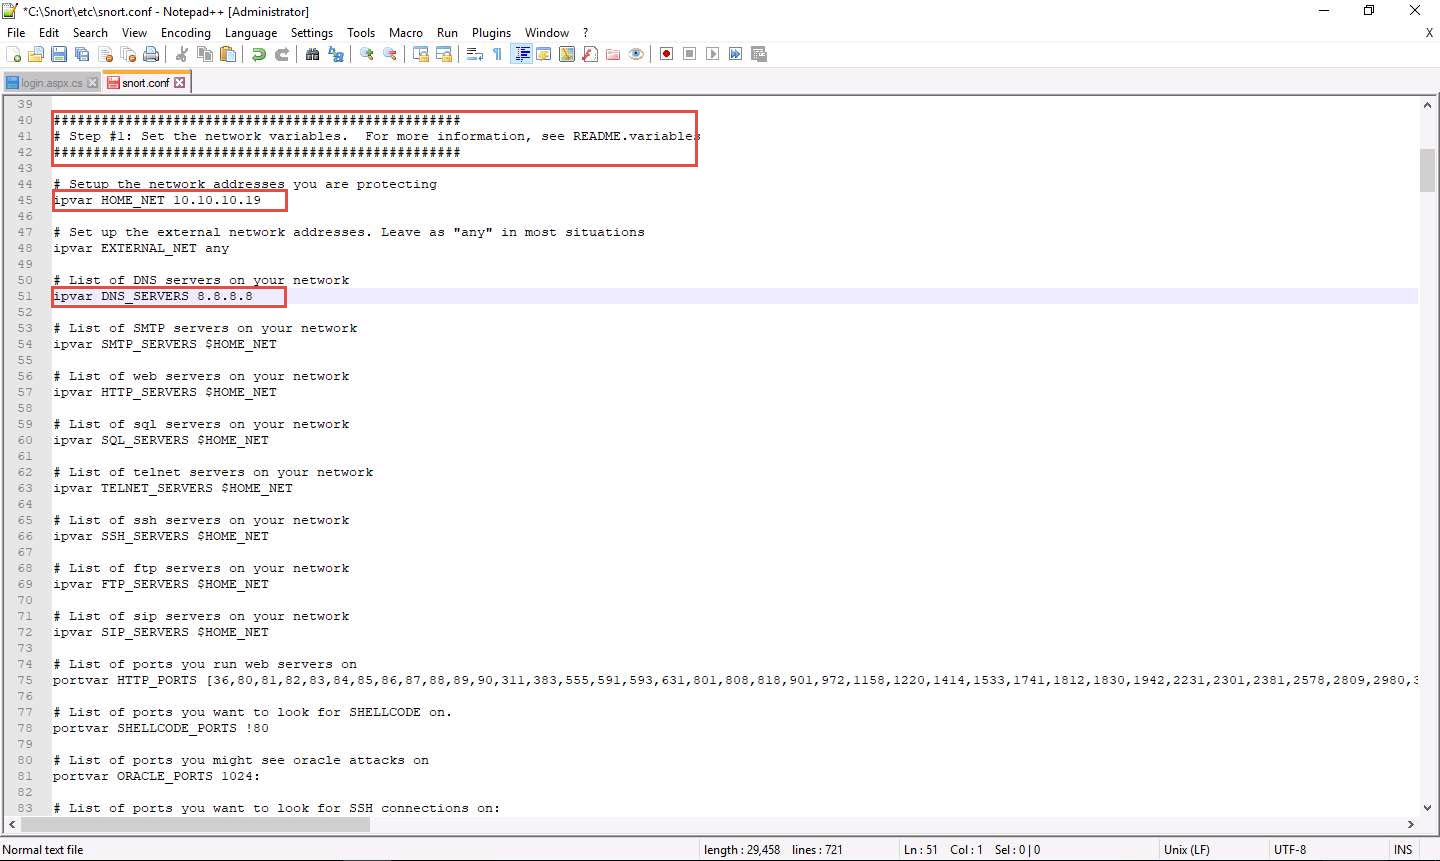
The same applies to SMTP_SERVERS, HTTP_SERVERS, SQL_SERVERS, TELNET_SERVERS, and SSH_SERVERS.
Remember that if you do not have any servers running on your machine, leave the line as it is. DO NOT make any changes in that line.
Scroll down to RULE_PATH (Line 104). In Line 104, replace ../rules with C:\Snort\rules in Line 105, replace ../so_rules with C:\Snort\so_rules and in Line 106, replace ../preproc_rules with C:\Snort\preproc_rules.
In Lines 109 and 110, replace ../rules with C:\Snort\rules. Minimize the Notepad++ window.
Navigate to C:\Snort\rules, and create two text files; name them white_list and black_list and change their file extensions from .txt to .rules.
To create a text file, right-click anywhere inside the rules window and navigate to New --> Text Document.
While changing the extension, if any pop-up appears, click Yes.
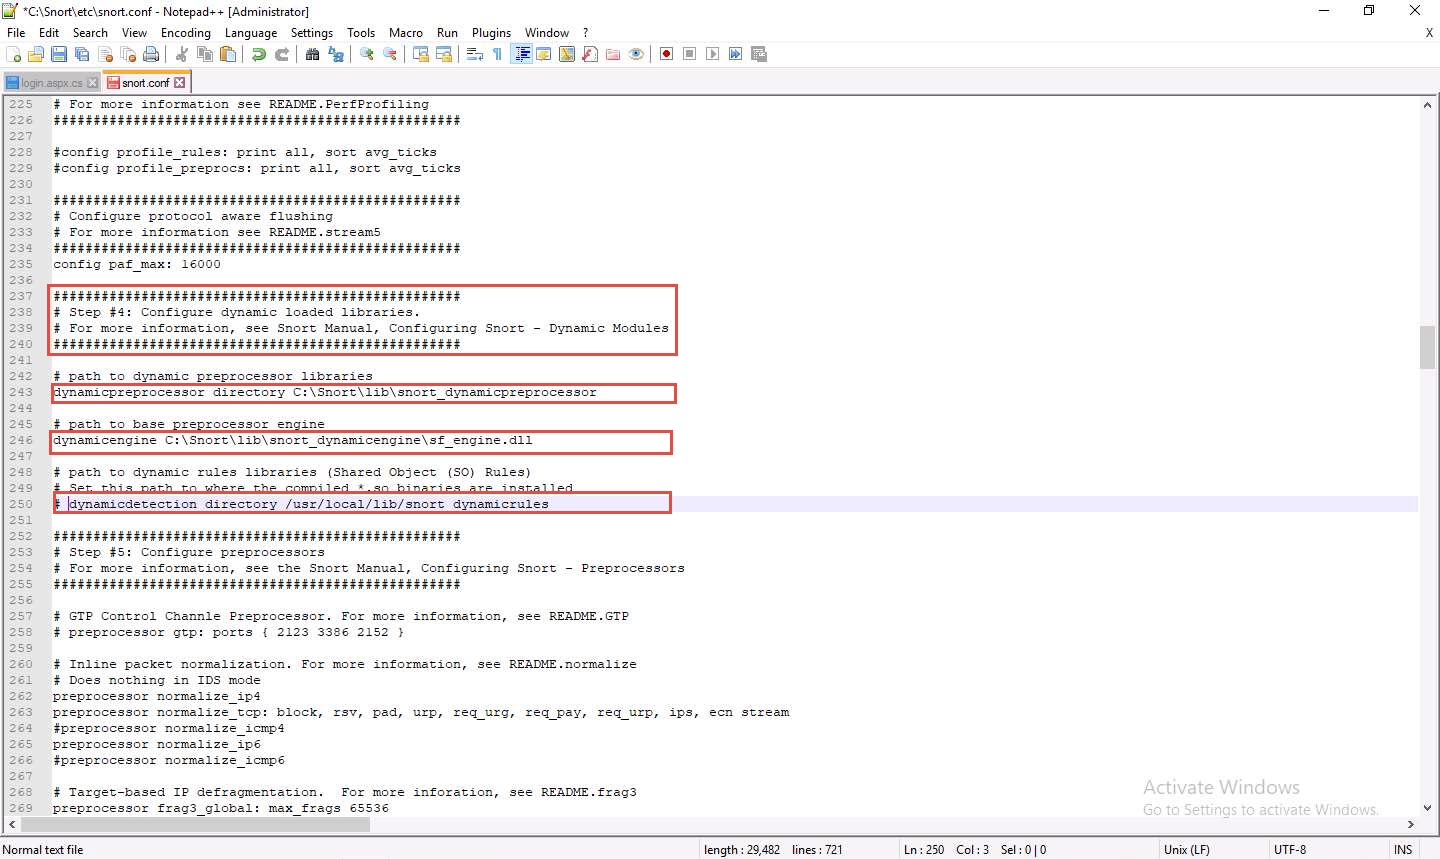
Switch back to Notepad++, scroll down to the Step #4: Configure dynamic loaded libraries section (Line 238). Configure dynamic loaded libraries in this section.
Add the path to dynamic preprocessor libraries (Line 243); replace /usr/local/lib/snort_dynamicpreprocessor/ with your dynamic preprocessor libraries folder location.
In this lab, the dynamic preprocessor libraries are located at C:\Snort\lib\snort_dynamicpreprocessor.
At the path to base preprocessor (or dynamic) engine (Line 246), replace /usr/local/lib/snort_dynamicengine/libsf_engine.so with your base preprocessor engine C:\Snort\lib\snort_dynamicengine\sf_engine.dll.
Ensure that the dynamic rules libraries (Line 250) is commented out, as you have already configured the libraries in dynamic preprocessor libraries.
Add (space) in between # and dynamicdetection (Line 250).
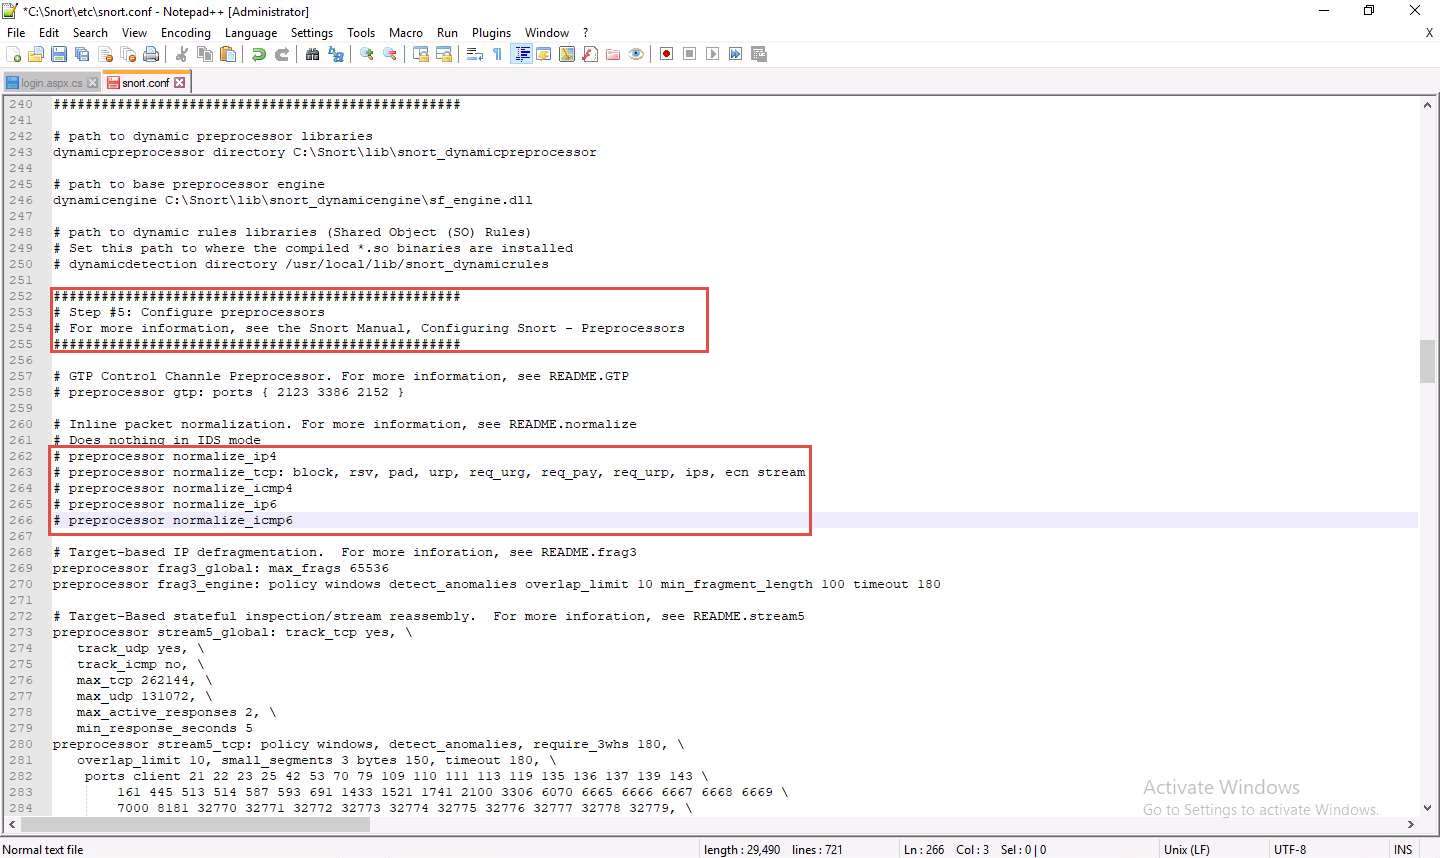
Scroll down to the Step #5: Configure preprocessors section (Line 253), the listed preprocessor. This does nothing in IDS mode, however, it generates errors at runtime.
Comment out all the preprocessors listed in this section by adding ‘#’ and (space) before each preprocessor rule (262-266).
To ‘comment out’ is to render a block of code inert by turning it into a comment.
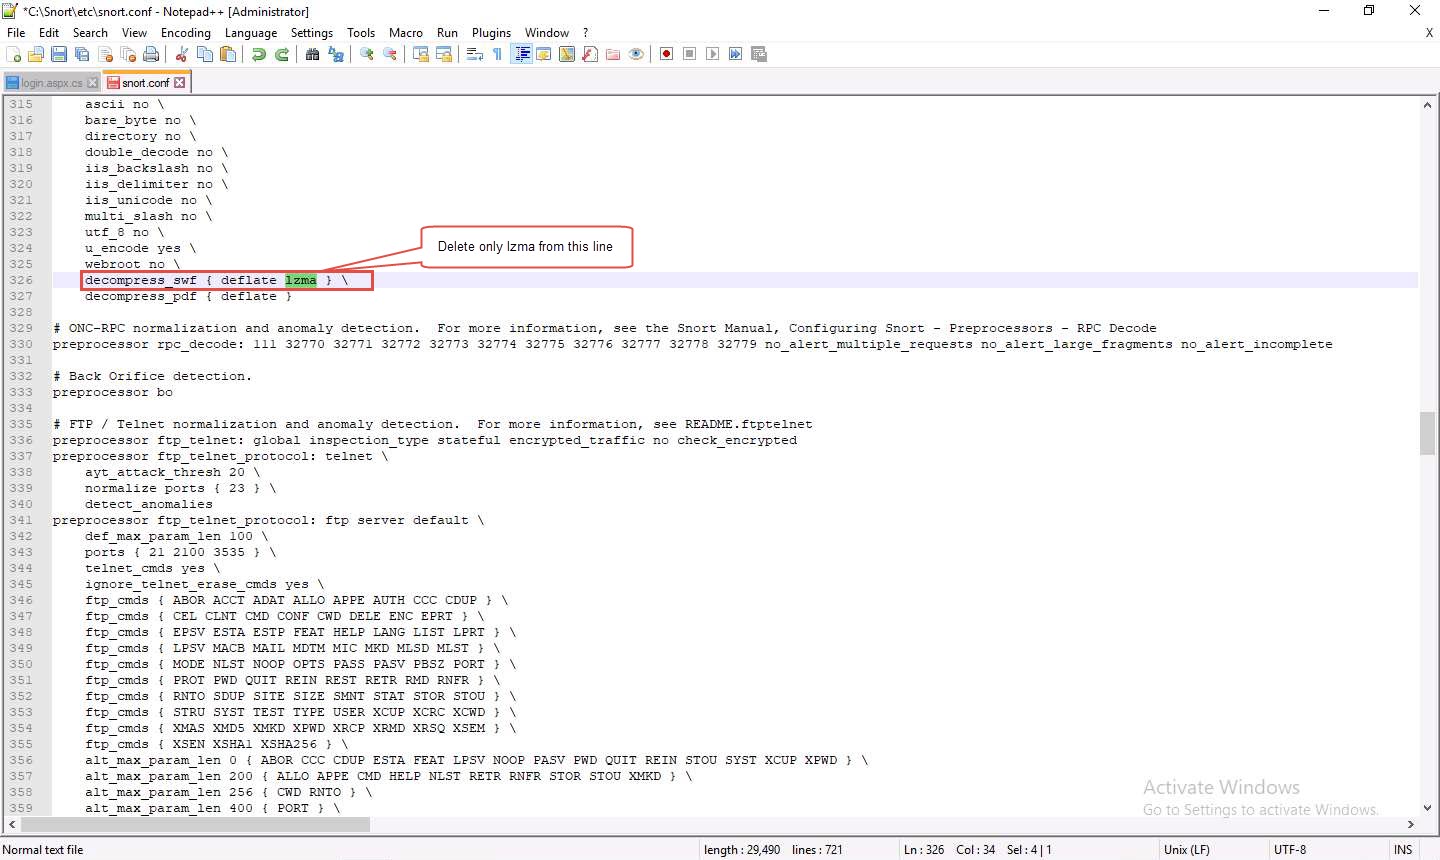
Scroll down to line 326 and delete lzma keyword and a (space).
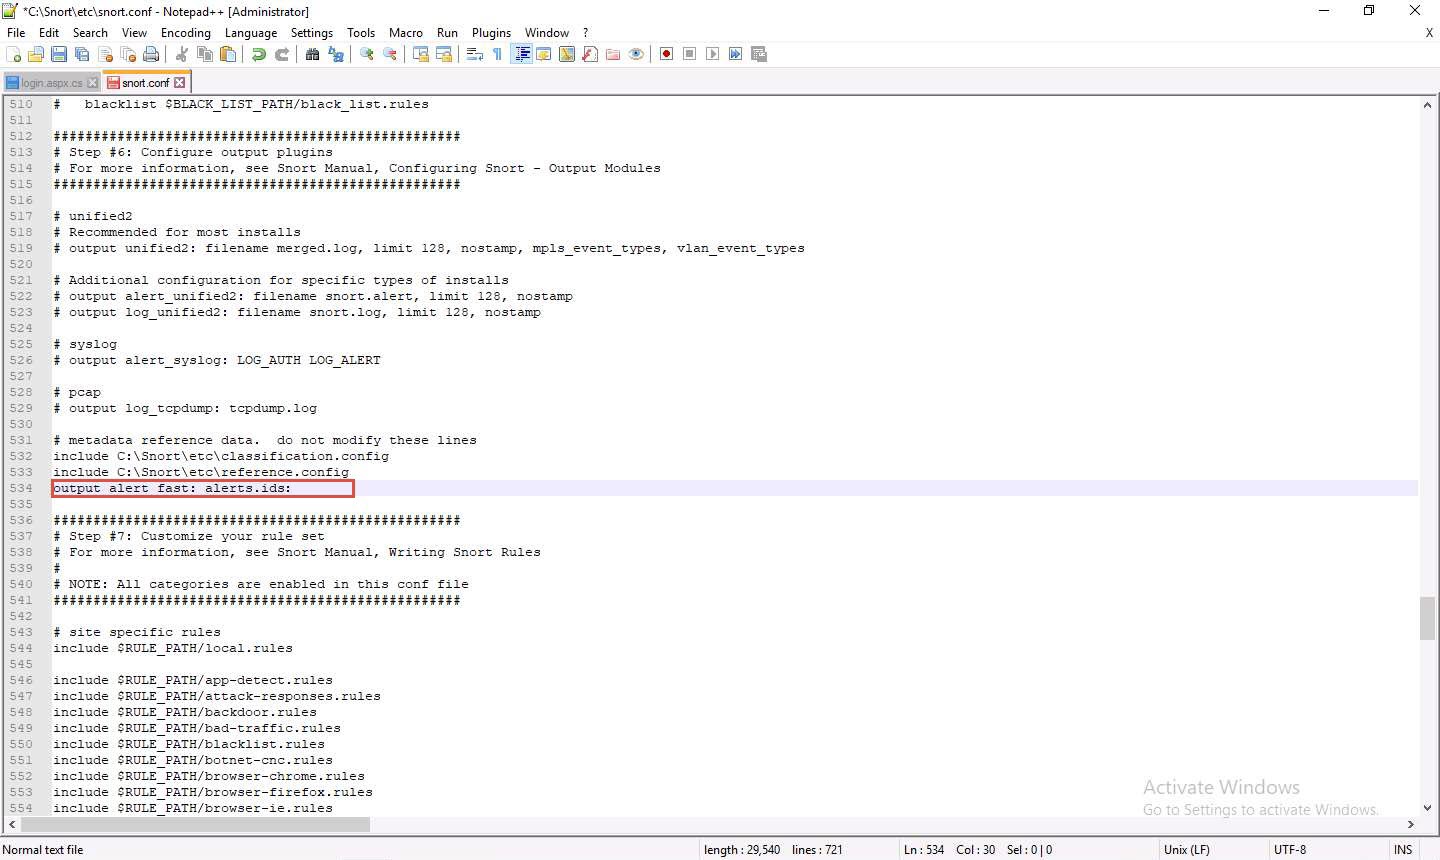
Scroll down to Step #6: Configure output plugins (Line 513). In this step, provide the location of the classification.config and reference.config files.
These two files are in C:\Snort\etc. Provide this location of files in the configure output plugins (in Lines 532 and 533) (i.e., C:\Snort\etc\classification.config and C:\Snort\etc\reference.config).
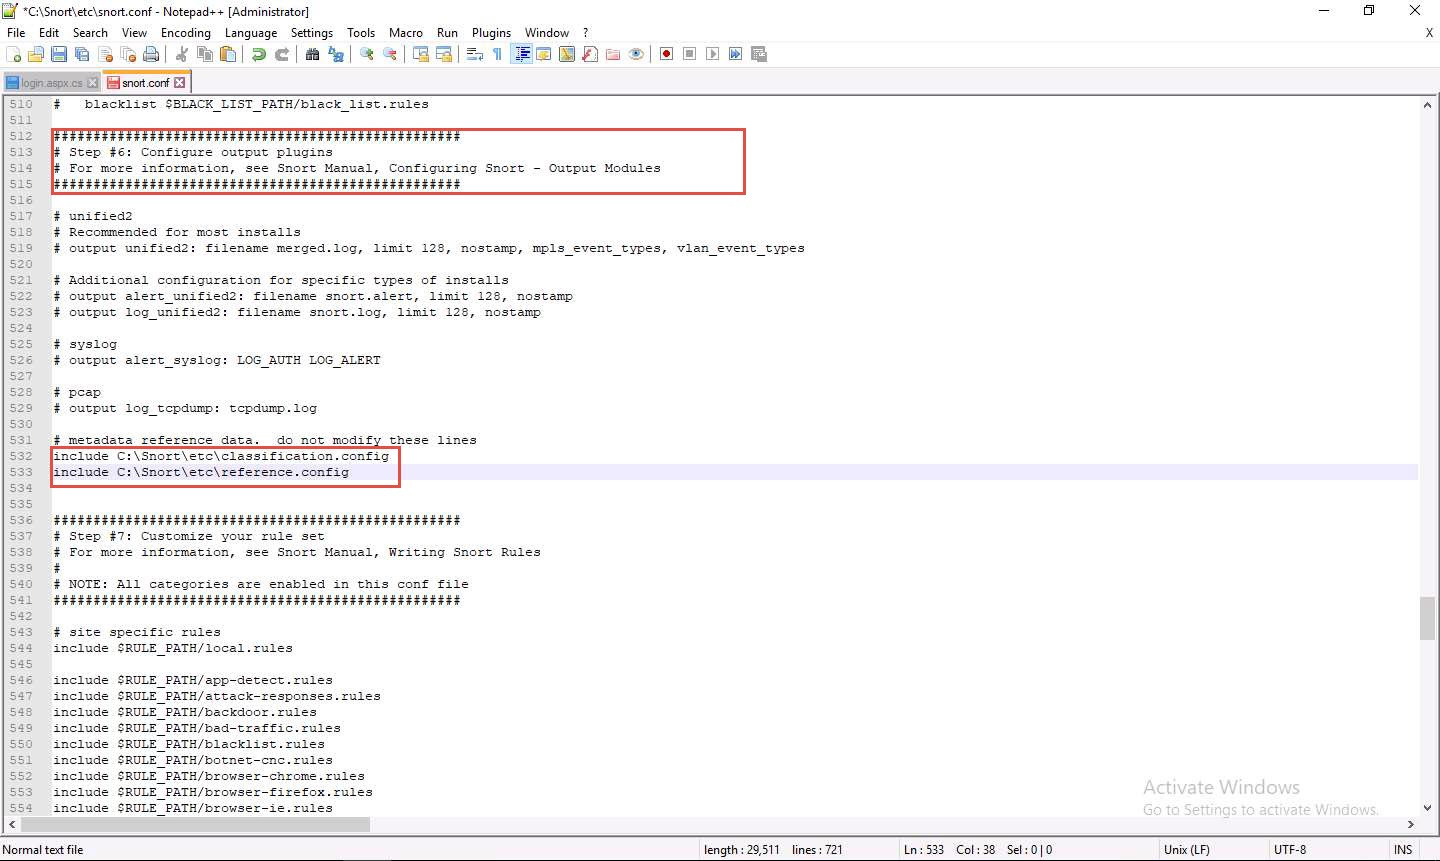
In Step #6, add to line (534) output alert_fast: alerts.ids: this command orders Snort to dump all logs into the alerts.ids file.
In the snort.conf file, find and replace the ipvar string with var. To do this, press Ctrl+H on the keyboard. The Replace window appears; enter ipvar in the Find what : text field, enter var in the Replace with : text field, and click Replace All.
You will get a notification saying 11 occurrences were replaced.
By default, the string is ipvar, which is not recognized by Snort: replace with the var string, and then close the window.
Snort now supports multiple configurations based on VLAN Id or IP subnet within a single instance of Snort. This allows administrators to specify multiple snort configuration files and bind each configuration to one or more VLANs or subnets rather than running one Snort for each configuration required.
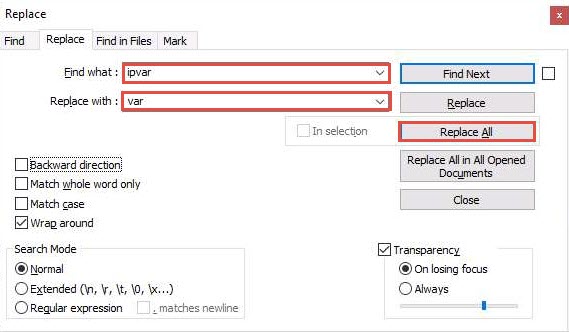
Click Close to close the Replace window.
Save the snort.conf file by pressing Ctrl+S and close Notepad++ window.
Before running Snort, you need to enable detection rules in the Snort rules file. For this task, we have enabled the ICMP rule so that Snort can detect any host discovery ping probes directed at the system running Snort.
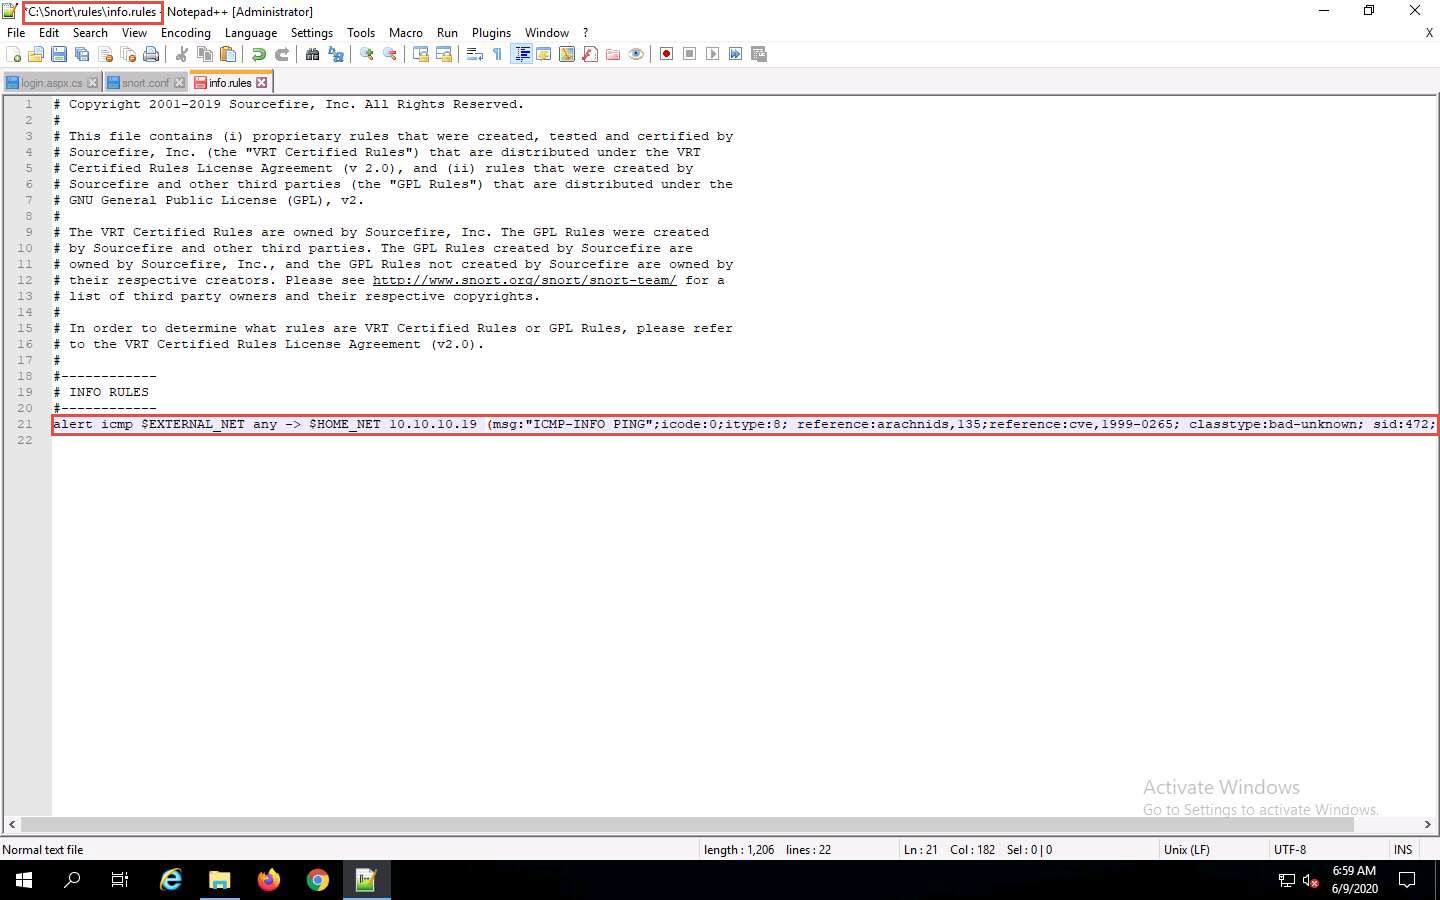
Navigate to C:\Snort\rules and open the icmp-info.rules file with Notepad++.
In line 21, type alert icmp $EXTERNAL_NET any -> $HOME_NET 10.10.10.19 (msg:"ICMP-INFO PING"; icode:0; itype:8; reference:arachnids,135; reference:cve,1999-0265; classtype:bad-unknown; sid:472; rev:7;) and save. Close the Notepad++ window.
The IP address (10.10.10.19) mentioned in $HOME_NET may vary in your lab environment.
Now right-click on the Windows Start icon and click Run from the menu.
In the Run window, type cmd in the Open field and press Enter: This will launch a command prompt window.
In the command prompt window, type cd C:\Snort\bin and press Enter.
Type snort -iX -A console -c C:\Snort\etc\snort.conf -l C:\Snort\log -K ascii and press Enter to start Snort (replace X with your device index number; in this lab: X is 1).
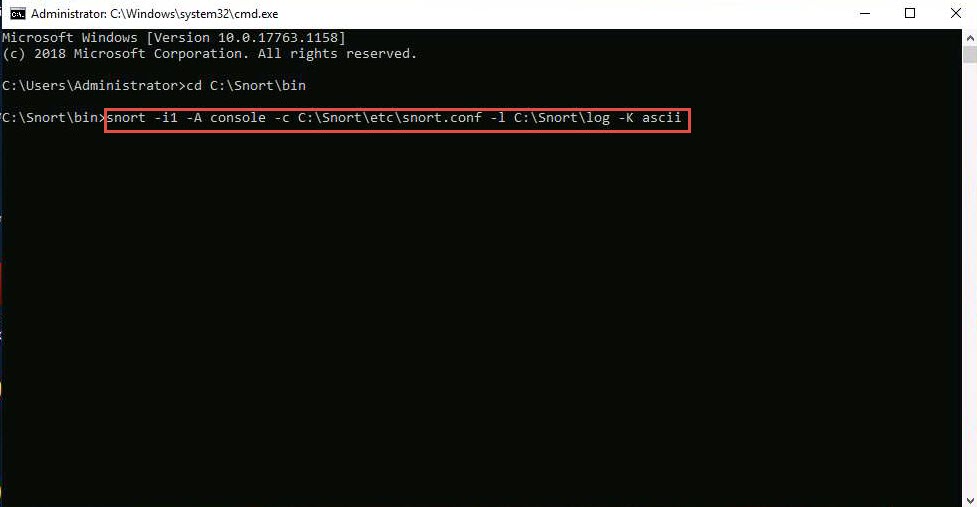
If you receive a fatal error, you should first verify that you have typed all modifications correctly into the snort.conf file, and then search through the file for entries matching your fatal error message.
If you receive an error stating “Could not create the registry key,” then run the command prompt as Administrator.
Snort starts running in IDS mode. It first initializes output plug-ins, preprocessors, plug-ins, loads dynamic preprocessors libraries, rule chains of Snort, and then logs all signatures.
If you have entered all command information correctly, you receive a comment stating Commencing packet processing (pid=xxxx) (the value of xxxx may be any number; in this lab, it is 5384), as shown in the screenshot.
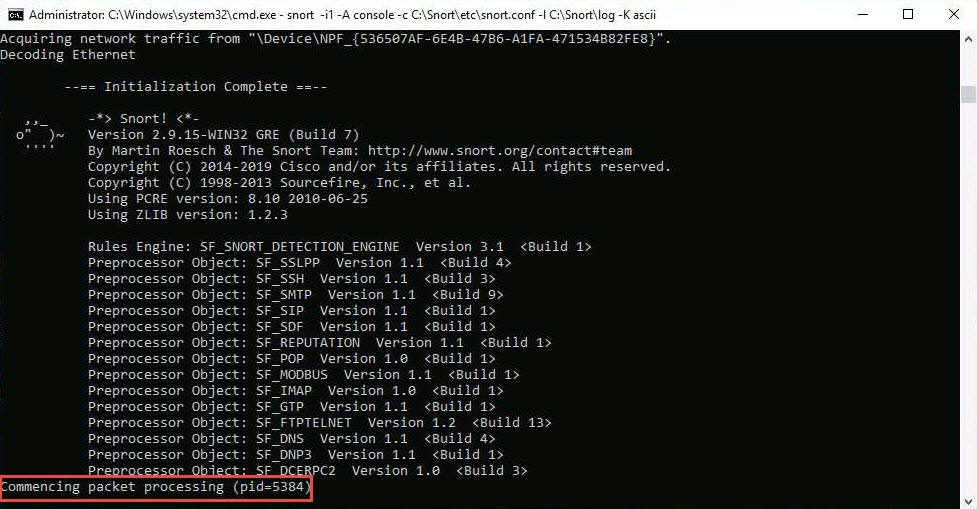
After initializing interface and logged signatures, Snort starts and waits for an attack and triggers alerts when attacks occur on the machine.
Leave the Snort command prompt running.
Attack your own machine, and check whether Snort detects it or not.
Now, click on Windows 10 to switch to the Windows 10 machine (Attacker Machine). Click Ctrl+Alt+Delete to activate the machine.
Alternatively, you can also click Ctrl+Alt+Delete button under Windows 10 machine thumbnail in the Resources pane or Click Ctrl+Alt+Delete button under Commands (thunder icon) menu.
By default, Admin user profile is selected, click Pa$$w0rd to paste the password in the Password field and press Enter to login.
Alternatively, you can also click Pa$$w0rd under Windows 10 machine thumbnail in the Resources pane or Click Type Text | Type Password button under Commands (thunder icon) menu.
Networks screen appears, click Yes to allow your PC to be discoverable by other PCs and devices on the network.
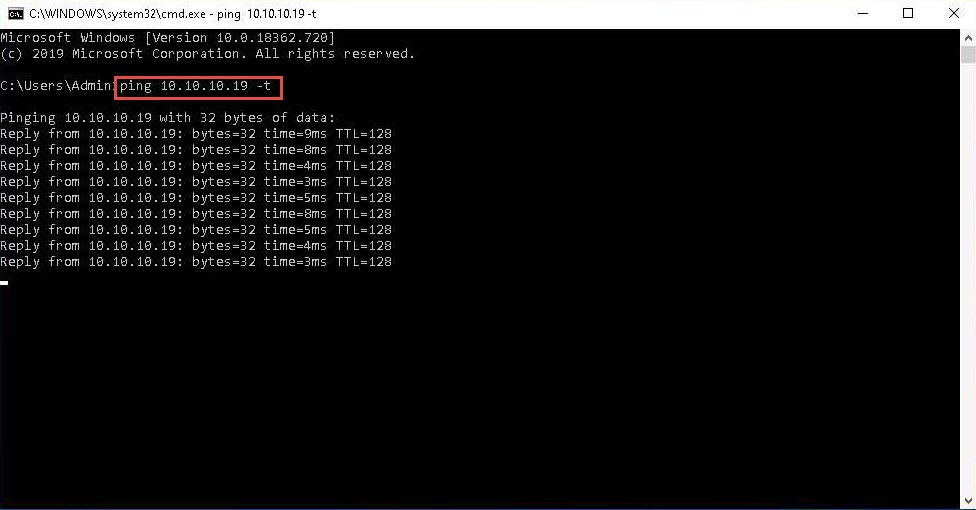
Open the command prompt and issue the command ping 10.10.10.19 -t from the Attacker Machine
10.10.10.19 is the IP address of the Windows Server 2019. This IP address may differ in your lab environment.
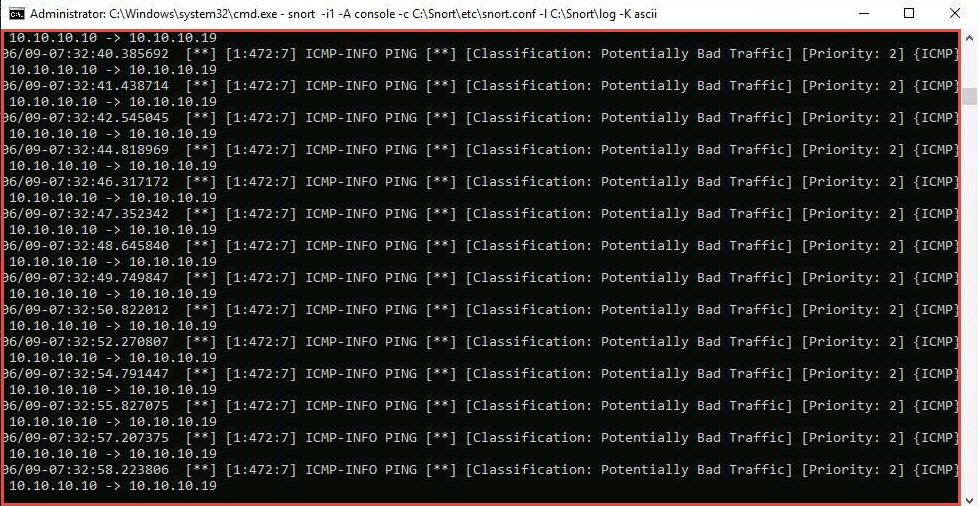
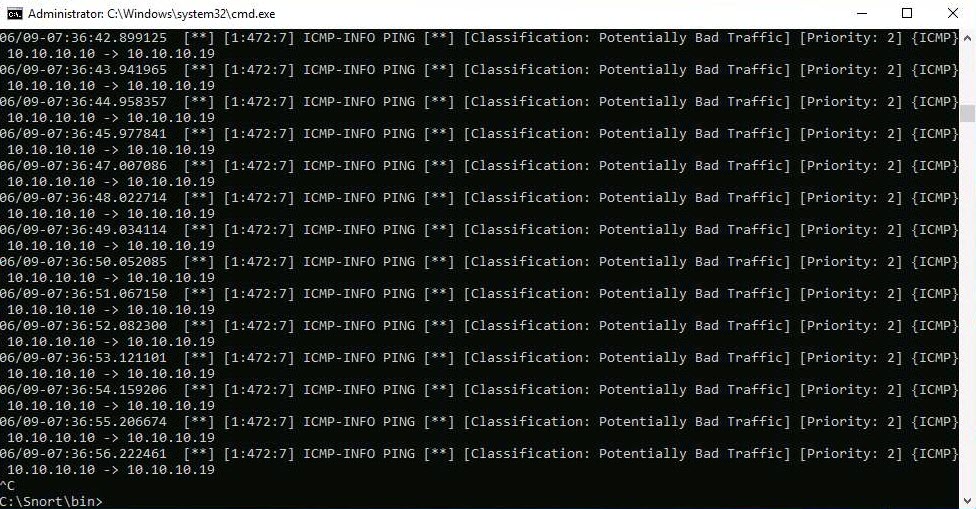
Click Windows Server 2019 to return to the Windows Server 2019 machine. Observe that Snort triggers an alarm, as shown in the screenshot:
Press Ctrl+C to stop Snort; snort exits.
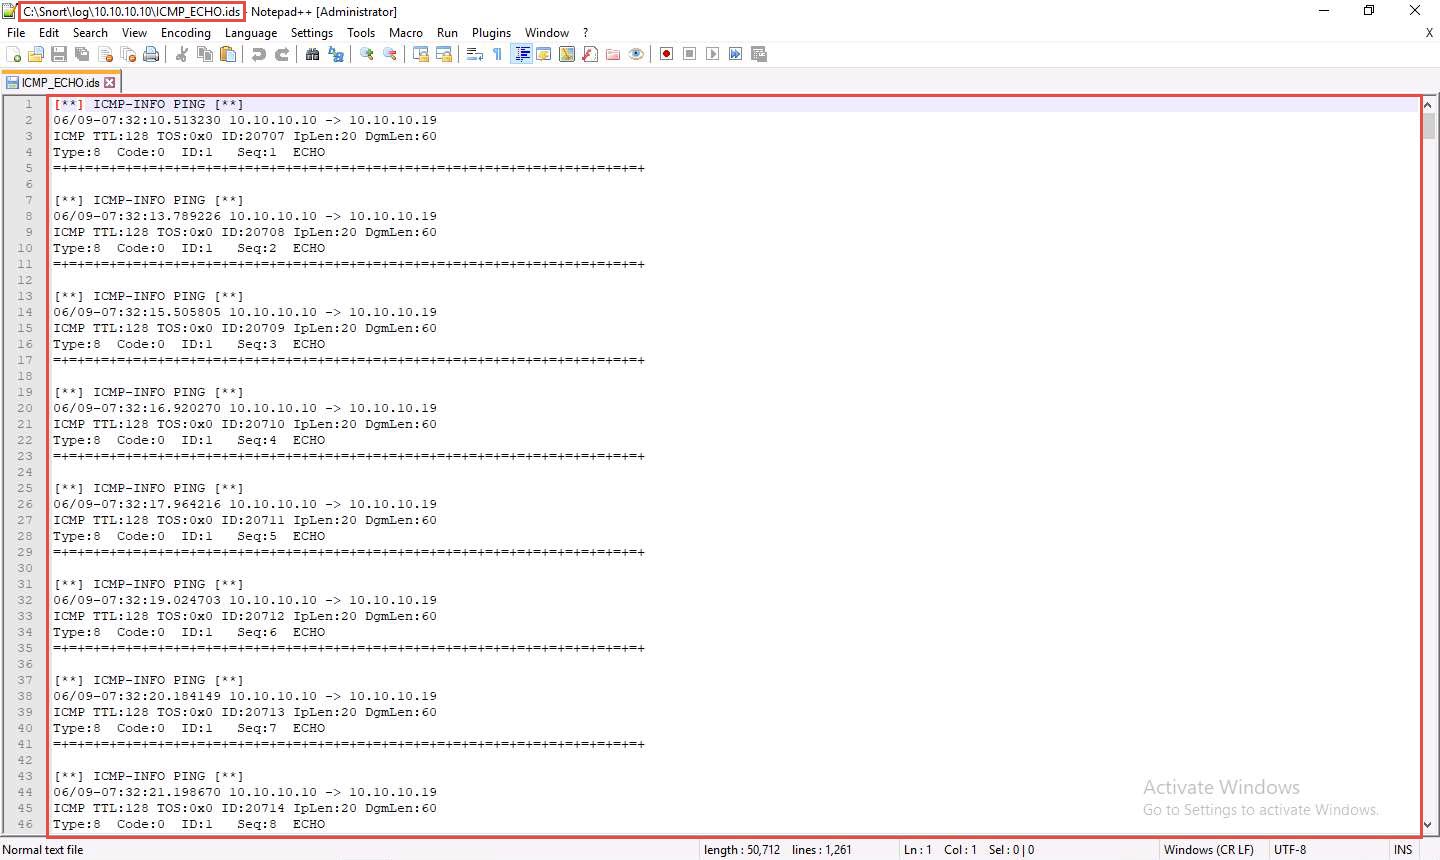
Go to the C:\Snort\log\10.10.10.10 folder and open the ICMP_ECHO.ids file with Notepad++. You see that all the log entries are saved in the ICMP_ECHO.ids file.
The folder name 10.10.10.10 might vary in your lab environment, depending on the IP address of the Windows 10 machine.
This means that whenever an attacker attempts to connect or communicate with the machine, Snort immediately triggers an alarm
This will make you aware of the intrusion and can thus take certain security measures to disconnect the lines of communication with the attacker’s machine.
Close all open windows in the Windows 10 and Windows Server 2019 machines.
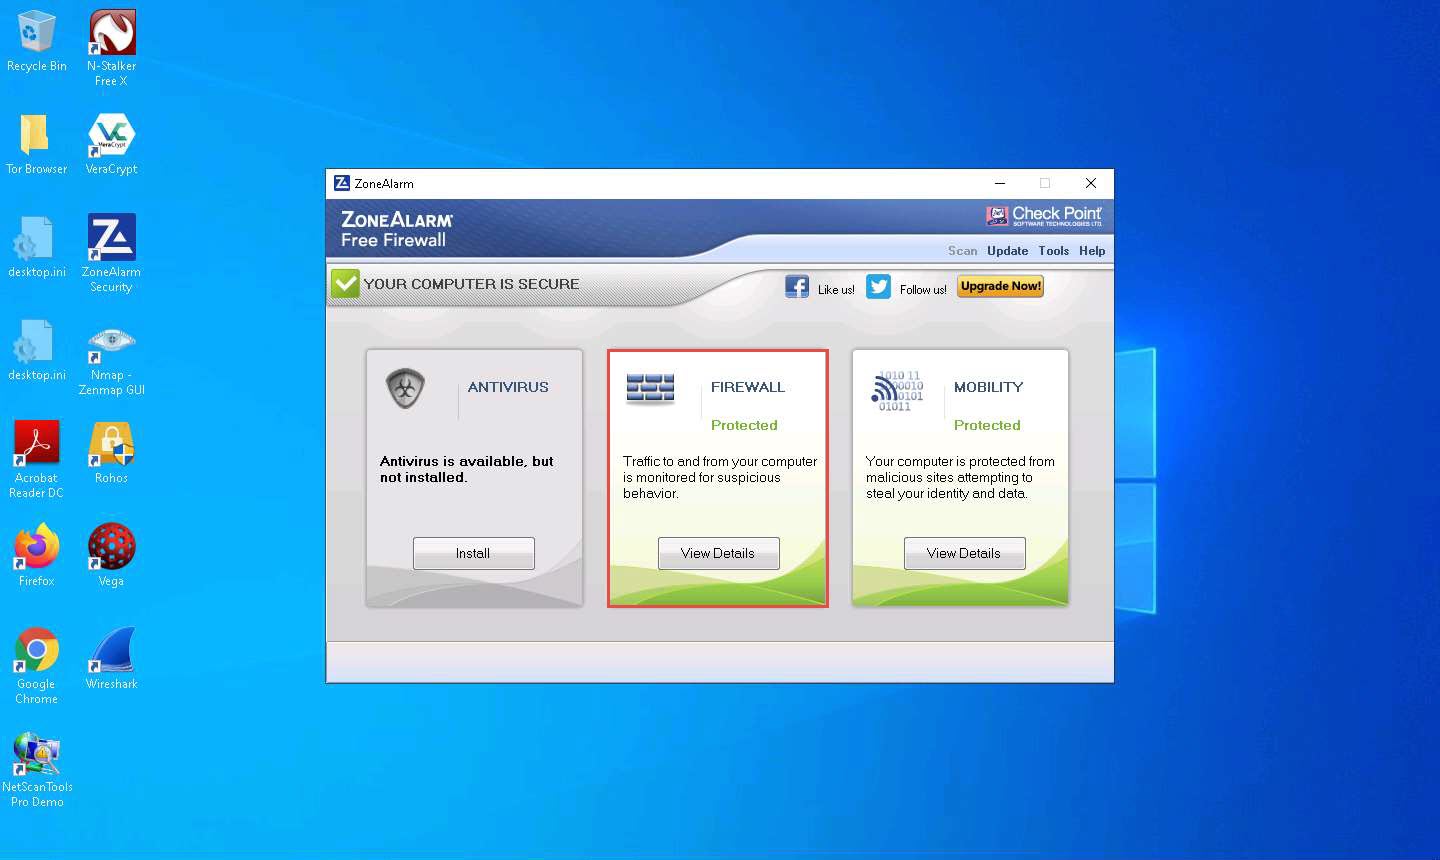
Task 2: Detect Malicious Network Traffic using ZoneAlarm FREE FIREWALL 2019
ZoneAlarm FREE Firewall 2019 blocks attackers and intruders from accessing your system. It manages and monitors all incoming and outgoing traffic and shields the network from hackers, malware, and other online threats that put network privacy at risk, and monitors programs for suspicious behavior spotting and stopping new attacks that bypass traditional anti-virus protection. This Firewall prevents identity theft by guarding your data, and erases your tracks allowing you to surf the web in complete privacy. Furthermore, it locks out attackers, blocks intrusions, and makes your PC invisible online. Additionally, it filters out annoying, as well as potentially dangerous, email.
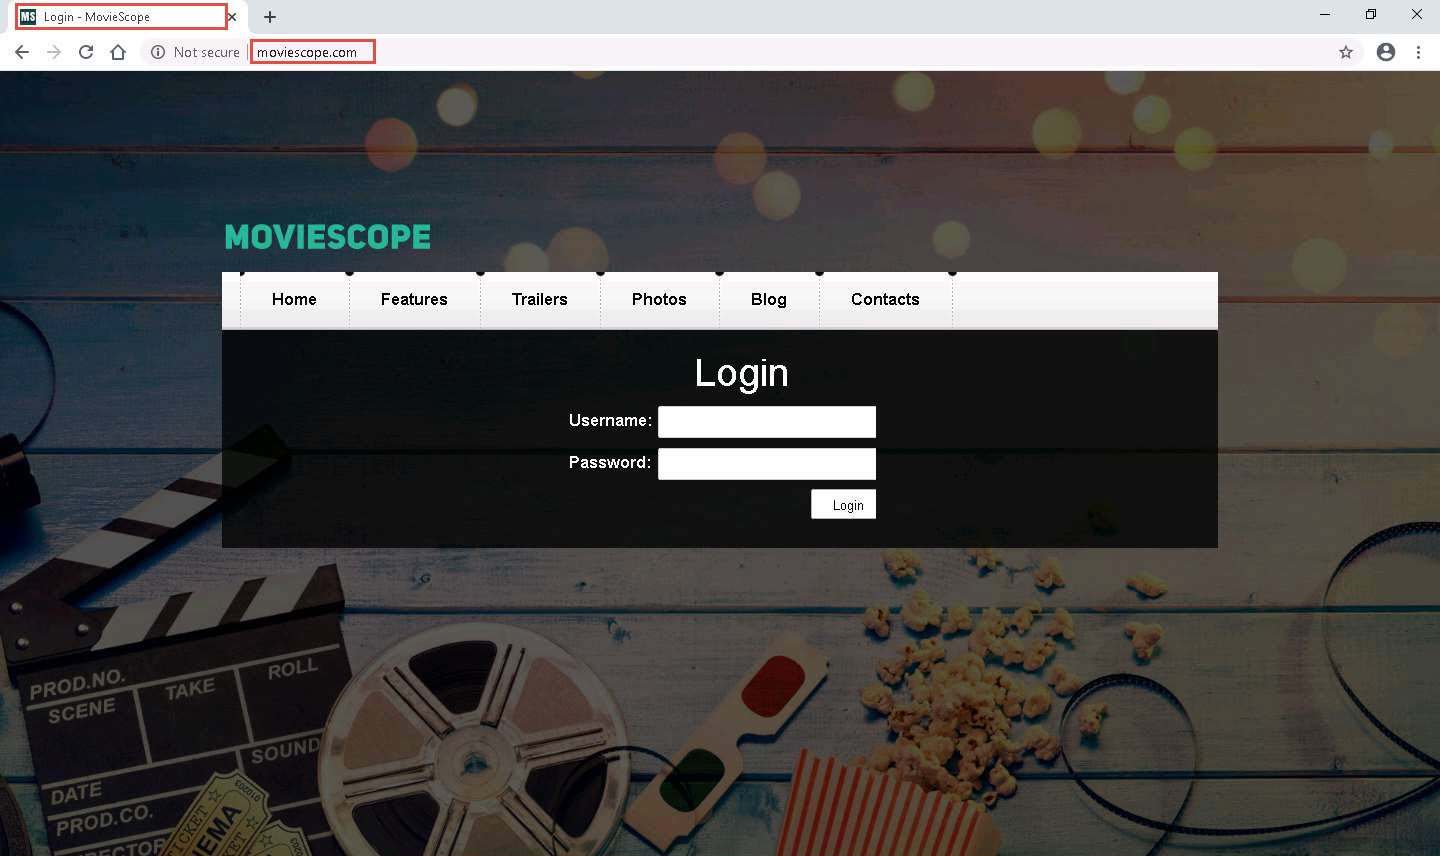
Before starting this task, we will browse an unwanted website in the Windows 10 machine. Assume that www.moviescope.com is an unwanted site that is not supposed to be browsed in your network.
www.moviescope.com is a local website that is hosted and configured in the Windows Server 2019 machine.
Click Windows 10 to switch to the Windows 10 machine.
Open any browser (here, Google Chrome) and place the cursor in the address bar and click on www.moviescope.com in the address bar and press Enter.
As you can observe that www.moviescope.com can be browsed in the Windows 10 machine.
In this task, we are going to block this site from browsing. Close the Google Chrome browser.
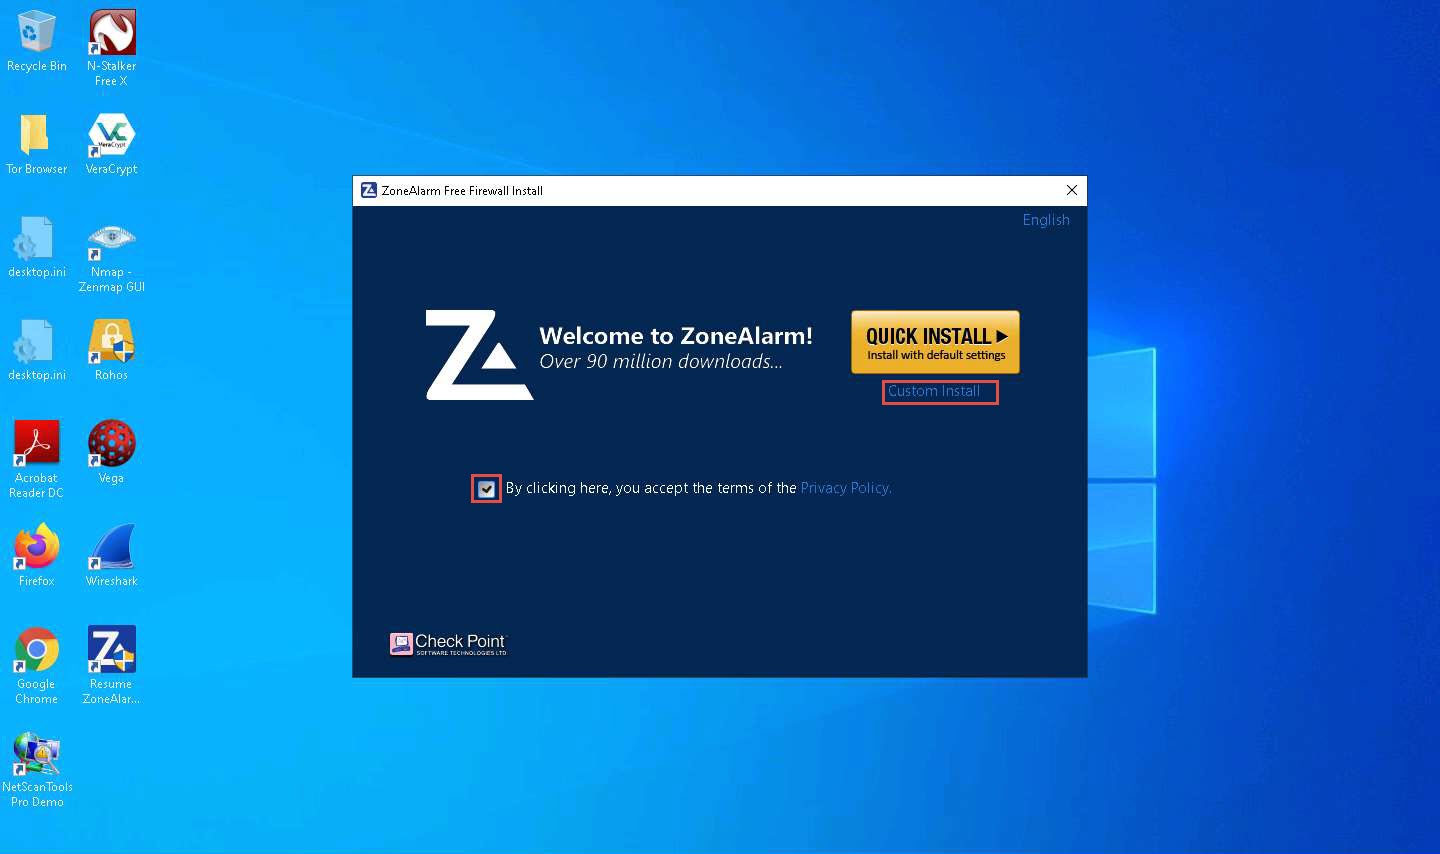
In the Windows 10 machine, navigate to D:\CEH-Tools\CEHv11 Module 12 Evading IDS, Firewalls, and Honeypots\Firewalls\ZoneAlarm FREE FIREWALL 2019 and double-click zafwSetupWeb_158_023_18219.exe to install ZoneAlarm FREE FIREWALL 2019.

If the User Account Control pop-up appears, click Yes.
The ZoneAlarm Free Firewall Install wizard appears; check By clicking here, you accept the terms of the Privacy Policy, and then click Custom Install.
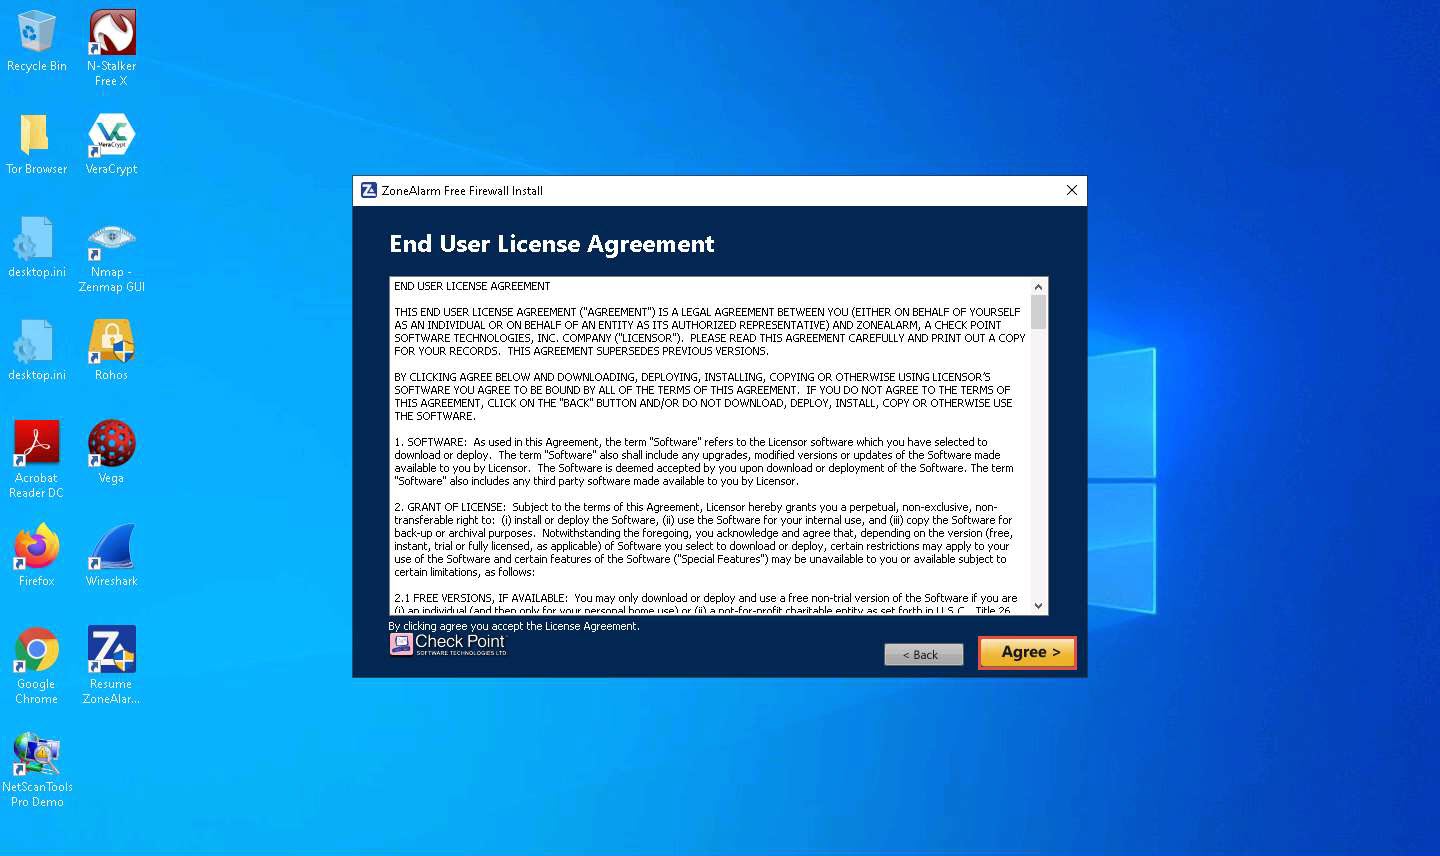
The End User License Agreement wizard appears; click Agree >.
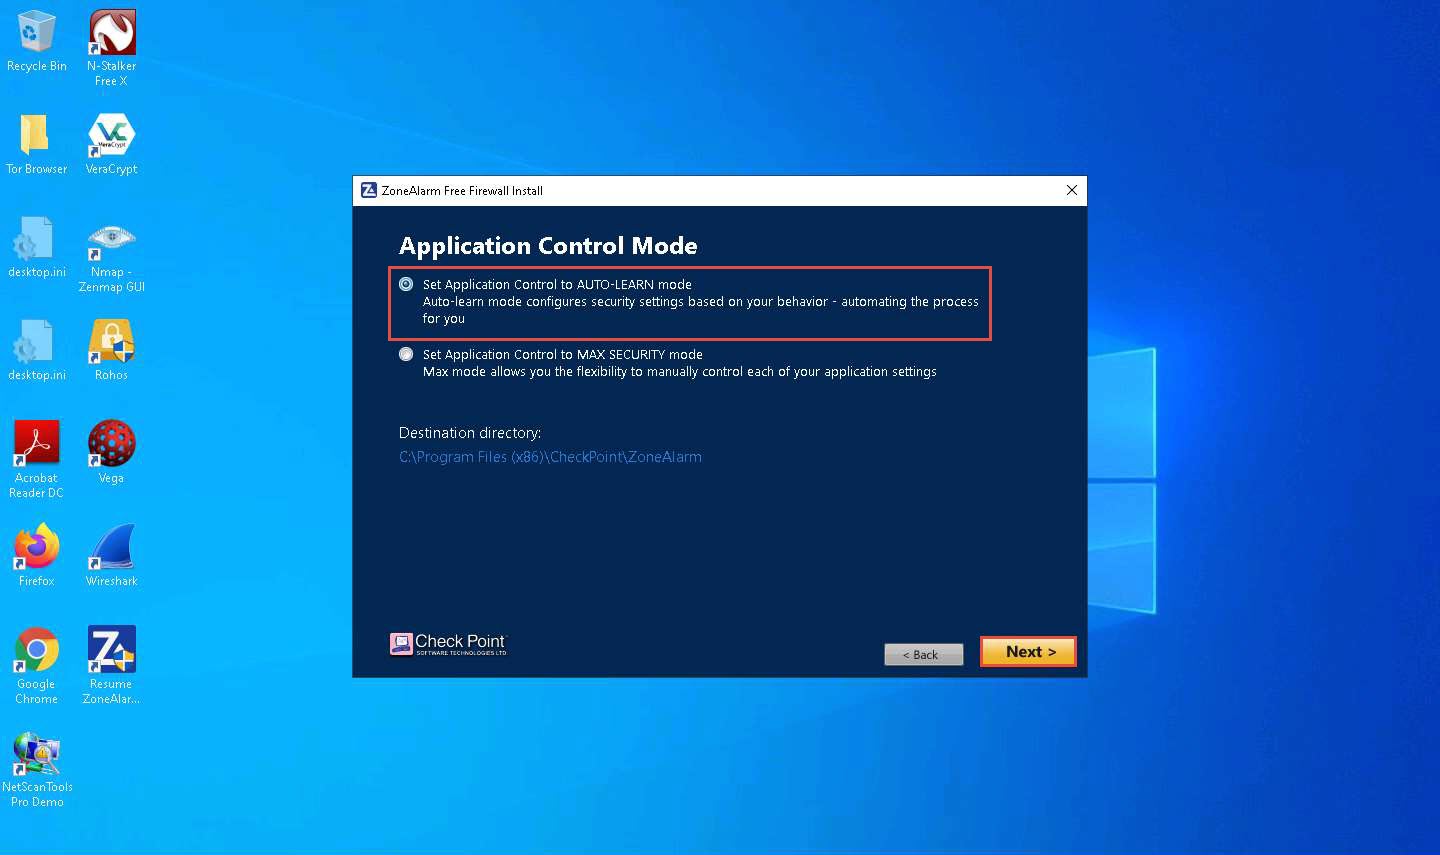
In the Application Control Mode wizard, ensure that the Set Application Control to AUTO-LEARN mode option is selected, and click Next >.
By choosing this mode, Zone Alarm Firewall configures the security settings based on behavior and automates this process for your network.
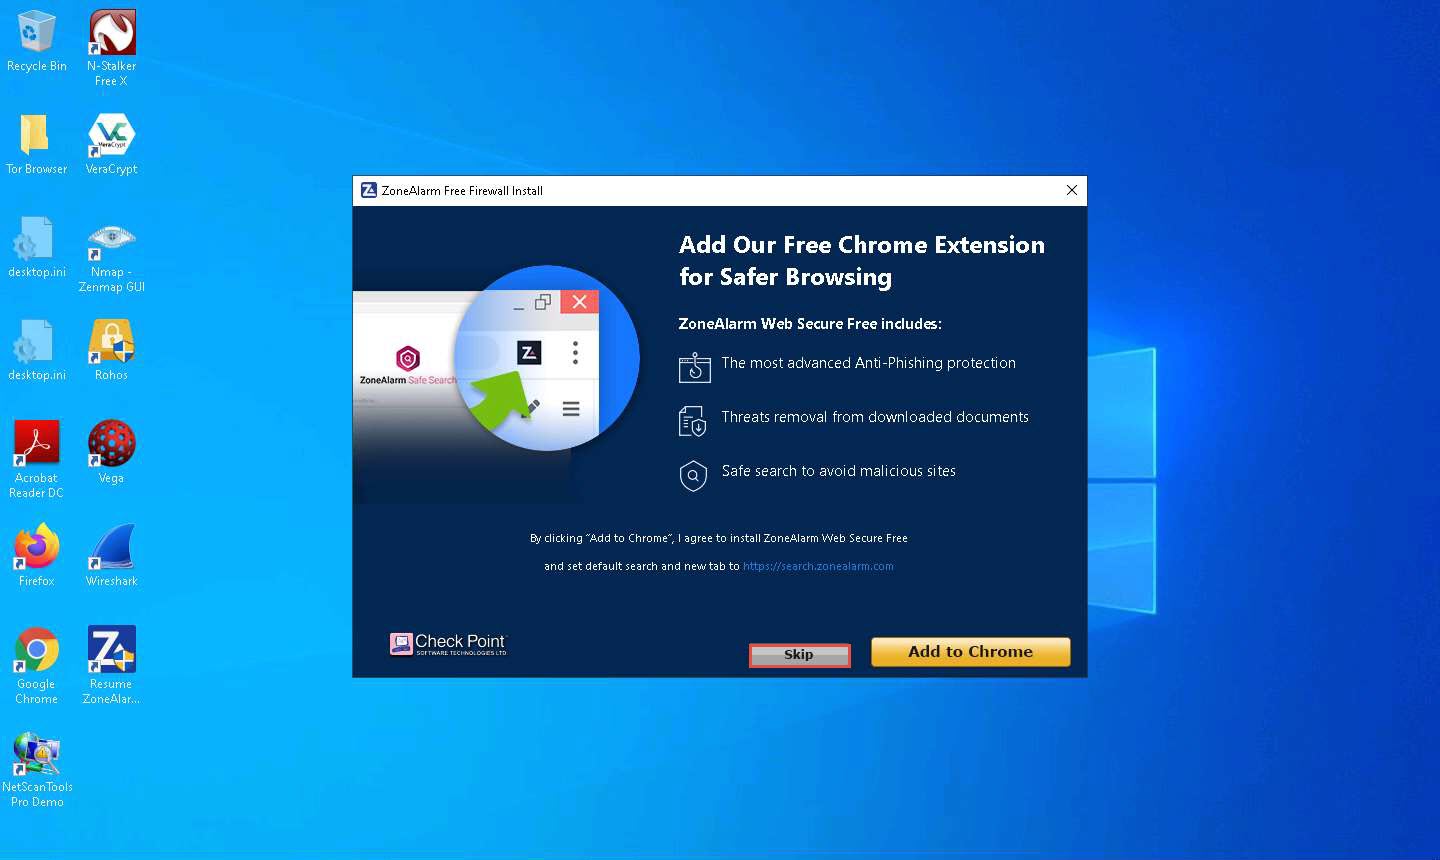
Click the Skip button in the Add our Free Chrome Extension for Safer Browsing wizard.
If you wish to enable this option, click Add to Chrome. In this task, we are choosing to skip this option.
ZoneAlarm Free Firewall starts downloading and configuring the components to your machine.
Wait until the installation is completed: this may take a few minutes to install.

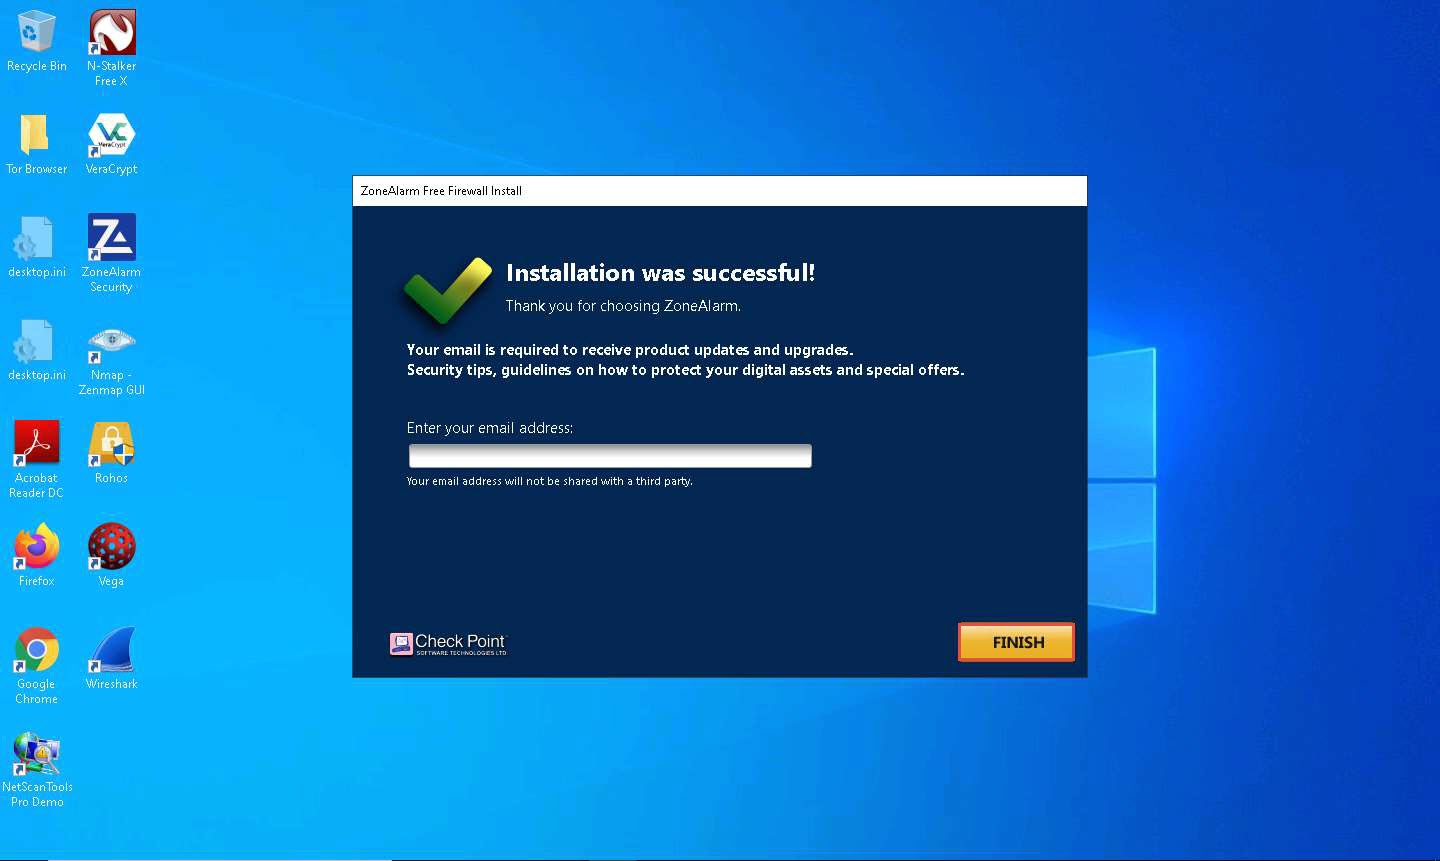
The Installation was Successful! wizard appears; click FINISH.
As soon as you click the Finish button, the ZoneAlarm webpage opens in your default browser window; close the browser.
The ZoneAlarm main window appears, as shown in the screenshot. Click the FIREWALL button to configure the firewall settings.
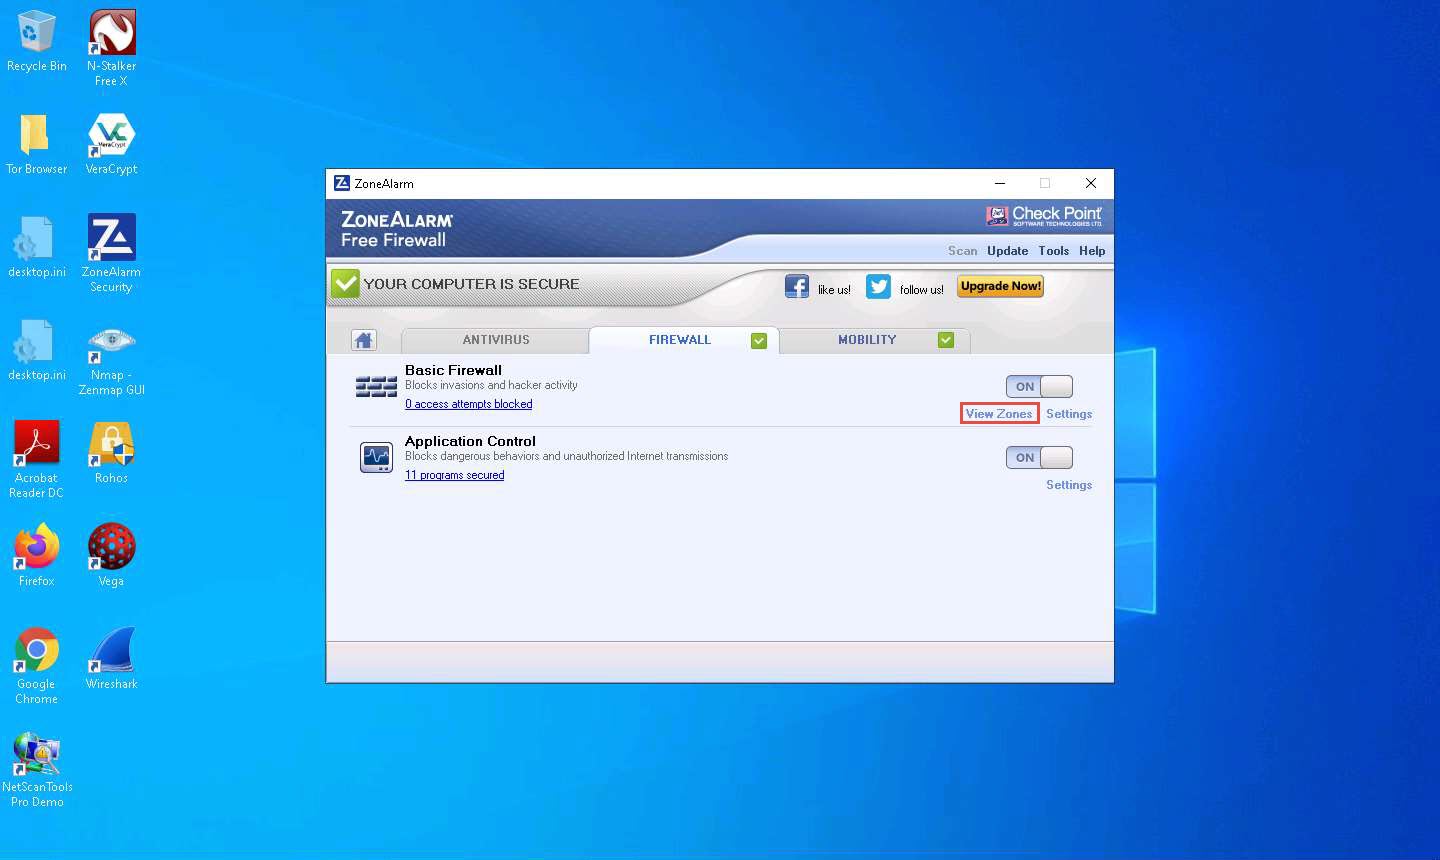
In the FIREWALL tab, click View Zones under the Basic Firewall section.
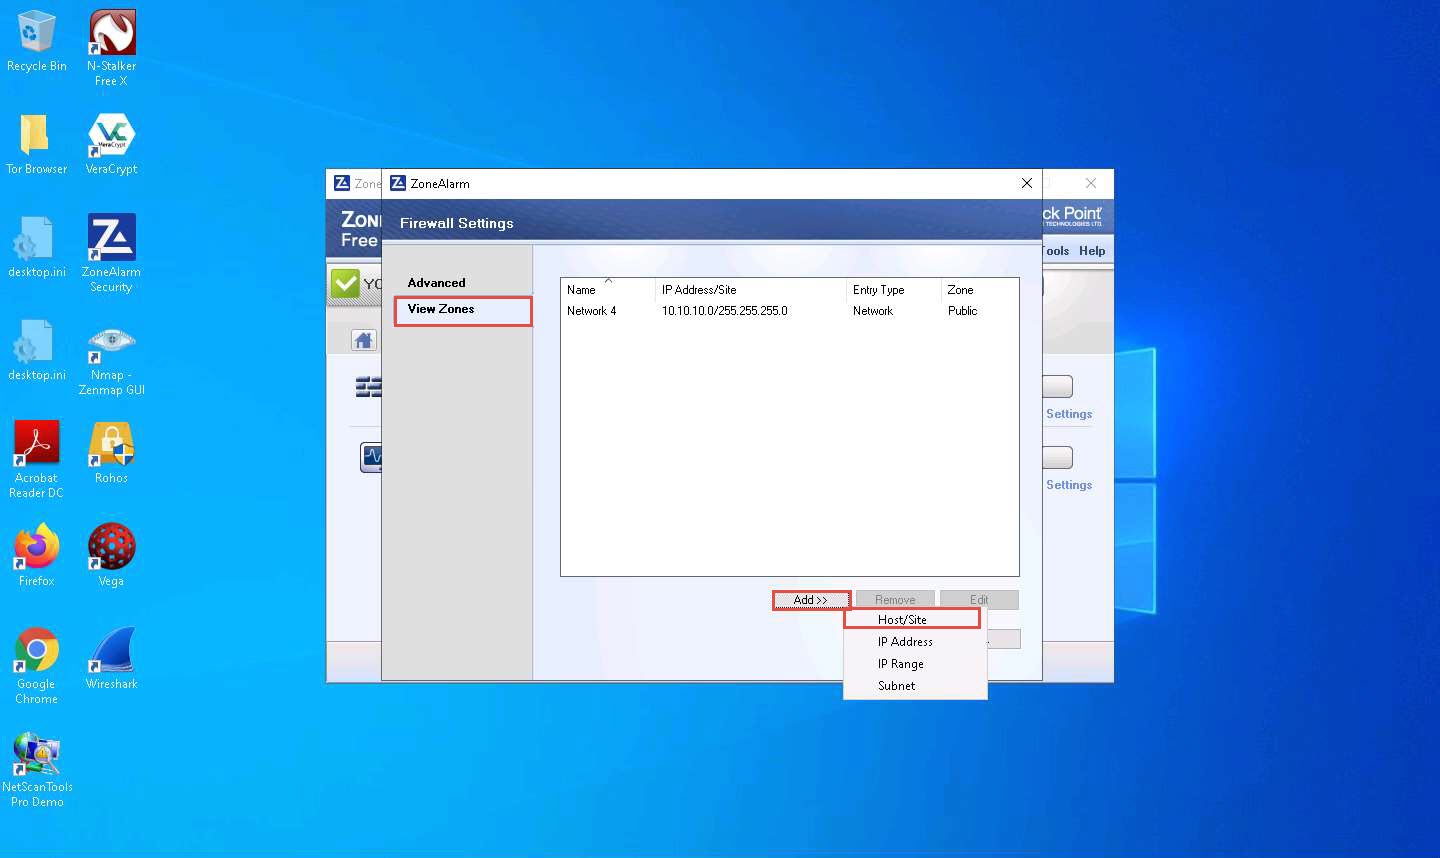
The Firewall Settings window appears with the View Zones tab selected; click Add >> and click the Host/Site option from the menu, as shown in the screenshot.
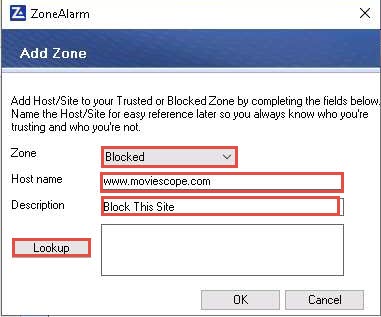
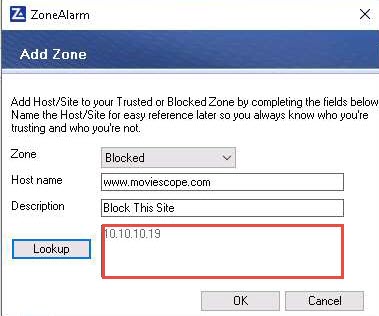
The Add Zone window appears; choose the following:
Zone: Blocked
Hostname: www.moviescope.com
Description: Block This Site
Click Lookup; by doing this, we are blocking unwanted sites from browsing
You can provide any site that you wish to block.
www.moviescope.com is the local website that is configured on Windows Server 2019.
As soon as you click Lookup, the IP address of www.moviescope.com appears in the text field; click OK.
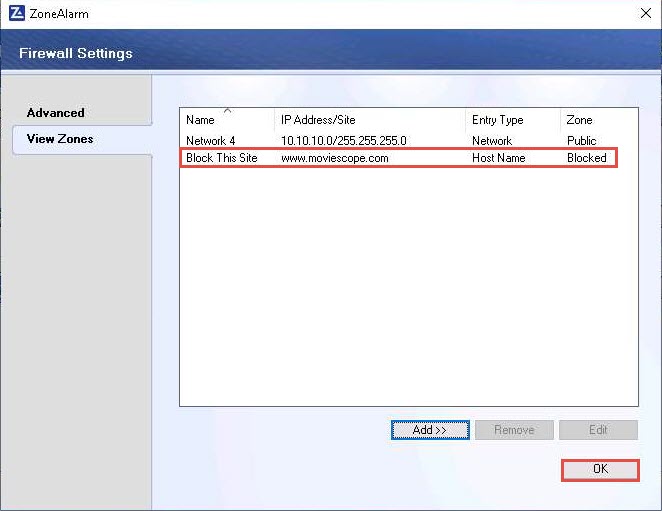
The newly added rule appears in the View Zones section, as shown in the screenshot; click OK.
Open any browser (here, Google Chrome) and now try to browse the blocked website, that is, www.moviescope.com.
As you have created a rule in ZoneAlarm Firewall to block www.moviescope.com from browsing, you will receive a message as Your Internet access is blocked.

This is how you can block access for unwanted sites from browsing.
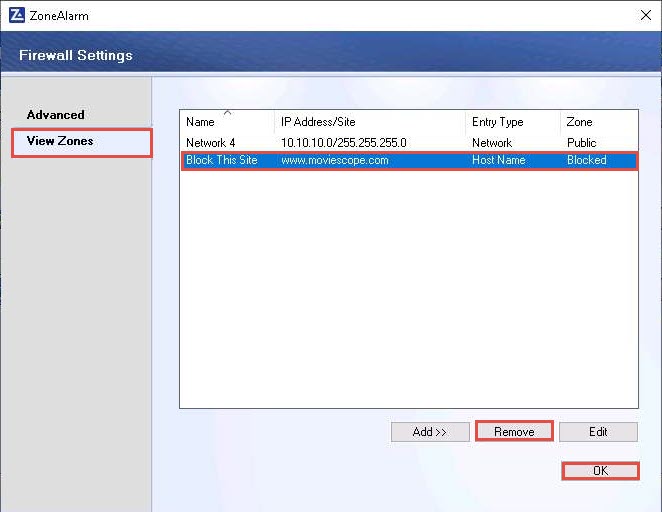
Before proceeding for the next task, go to the ZoneAlarm Firewall Settings window, select the newly created rule in the View Zones section, click Remove, and click OK.
If a Delete Confirmation pop-up appears, click Yes.
This will remove the block access for the www.moviescope.com site.
Close the ZoneAlarm main window.
Click Show hidden icon from the lower right section of Desktop. Right-click the ZoneAlarm icon and click Exit from the context menu.
If a Shut down pop-up appears, click Yes.
Restart the Windows 10 machine.
After the system reboots, click Ctrl+Alt+Delete. By default, Admin user account is selected, click Pa$$w0rd to enter the password and press Enter to log in..
Uninstall ZoneAlarm in the Windows 10 machine. To do so, launch Control Panel --> Programs and Features. In the Programs and Features window, choose ZoneAlarm Free Firewall and click Uninstall. Follow the wizard-driven uninstallation process to remove ZoneAlarm from the Windows 10 machine.
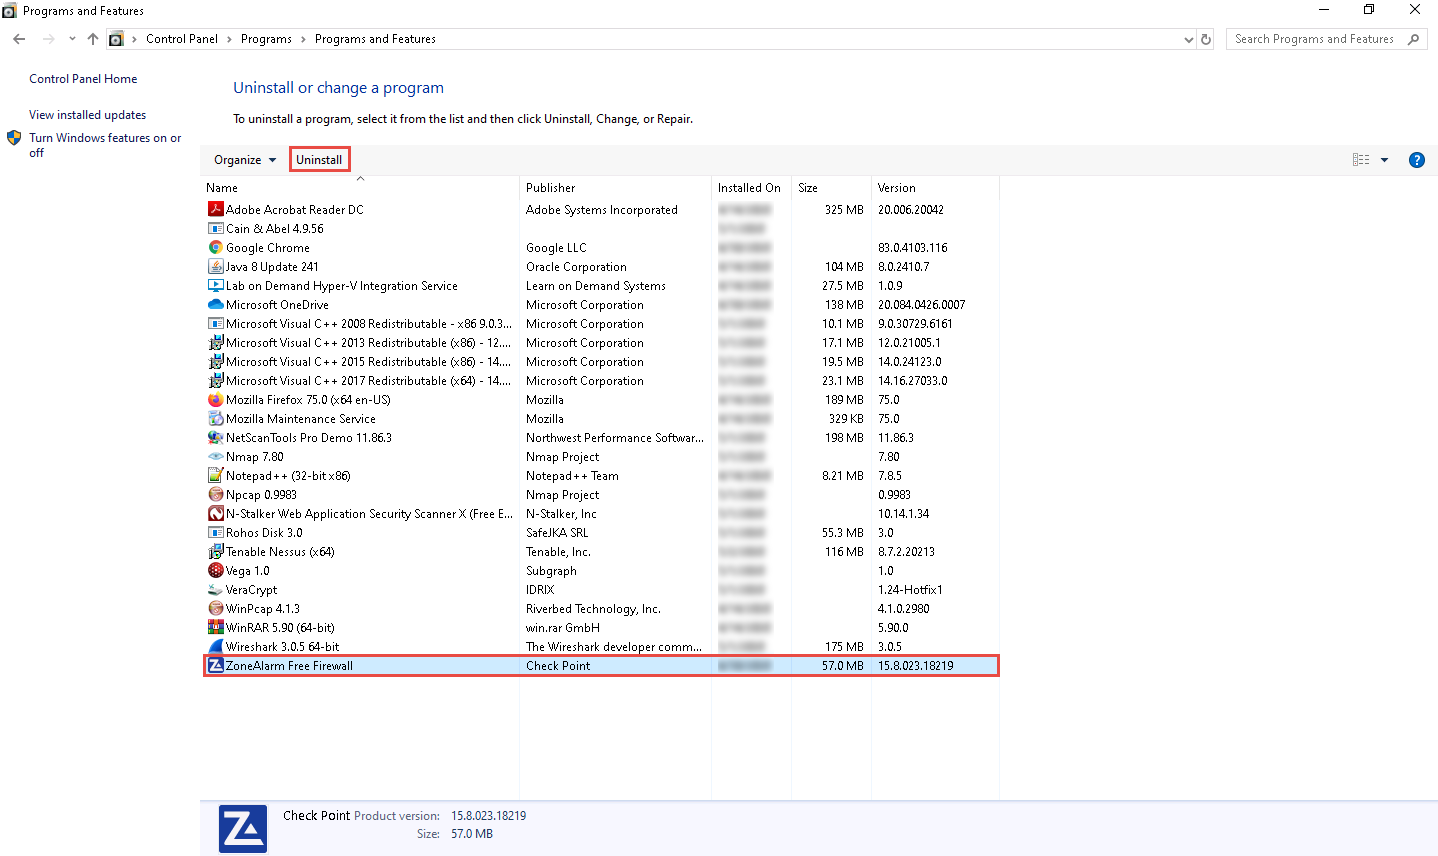
If a ZoneAlarm pop-up appears, click Yes to continue the uninstallation. After the uninstallation is completed, you will receive a prompt to restart the machine; click Yes to restart..
Once the system reboots, turn off the Windows Defender Firewall.
- In the Windows Defender Firewall window, click the Turn Windows Defender Firewall on or off link in the left pane of the window
- In the Customise Settings window, select the Turn off Windows Defender Firewall (not recommended) radio button for all Domain, Private and Public network settings, and then click OK
- Again, in the Windows Defender Firewall window, click Advanced settings link in the left pane
- Once the Windows Defender Firewall with Advanced Security appears on the screen, click the Windows Defender Firewall Properties link in the Overview section
- The Windows Defender Firewall with Advanced Security on Local Computer Properties window appears; in the Domain Profile tab, choose Off from the Firewall state drop-down list. Then, navigate to the Private Profile and Public Profile tabs and ensure that the Firewall state is Off. Click Apply, and then click OK
Close all open windows.
You can also use other firewalls such as ManageEngine Firewall Analyzer (https://www.manageengine.com), pfSense (https://www.pfsense.org), Sophos XG Firewall (https://www.sophos.com), and Comodo Firewall (https://personalfirewall.comodo.com) to block access to a particular website or IP address.
Task 3: Detect Malicious Network Traffic using HoneyBOT
HoneyBOT is a medium interaction honeypot for windows. A honeypot creates a safe environment to capture and interact with unsolicited traffic on a network. HoneyBOT is an easy-to-use solution that is ideal for network security research or as part of an early-warning IDS.
Here, we will use the HoneyBOT tool to detect malicious network traffic.
Click Windows Server 2016 to switch to the Windows Server 2016 machine. Click Ctrl+Alt+Delete to activate the machine. By default, Administration user profile is selected, click Pa$$w0rd to paste the password in the Password field and press Enter to login.
Alternatively, you can also click Pa$$w0rd under Windows Server 2016 machine thumbnail in the Resources pane or Click Type Text | Type Password button under Commands (thunder icon) menu.
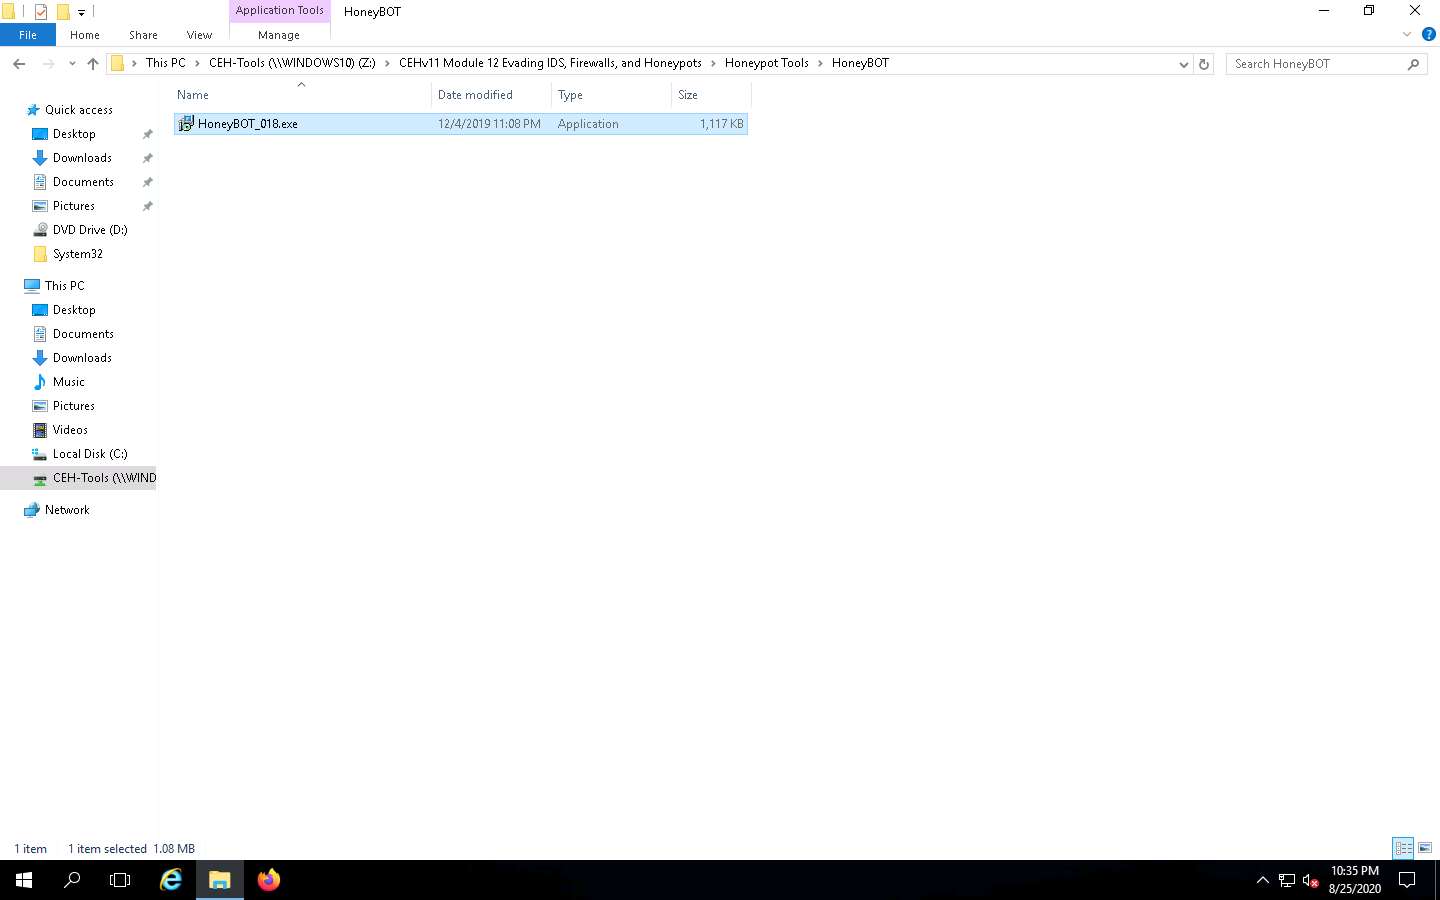
Navigate to Z:\CEHv11 Module 12 Evading IDS, Firewalls, and Honeypots\Honeypot Tools\HoneyBOT. Double-click HoneyBOT_018.exe to launch the HoneyBOT installer. Follow the wizard-driven steps to install HoneyBOT.
if the User Account Control window appears, click Yes.
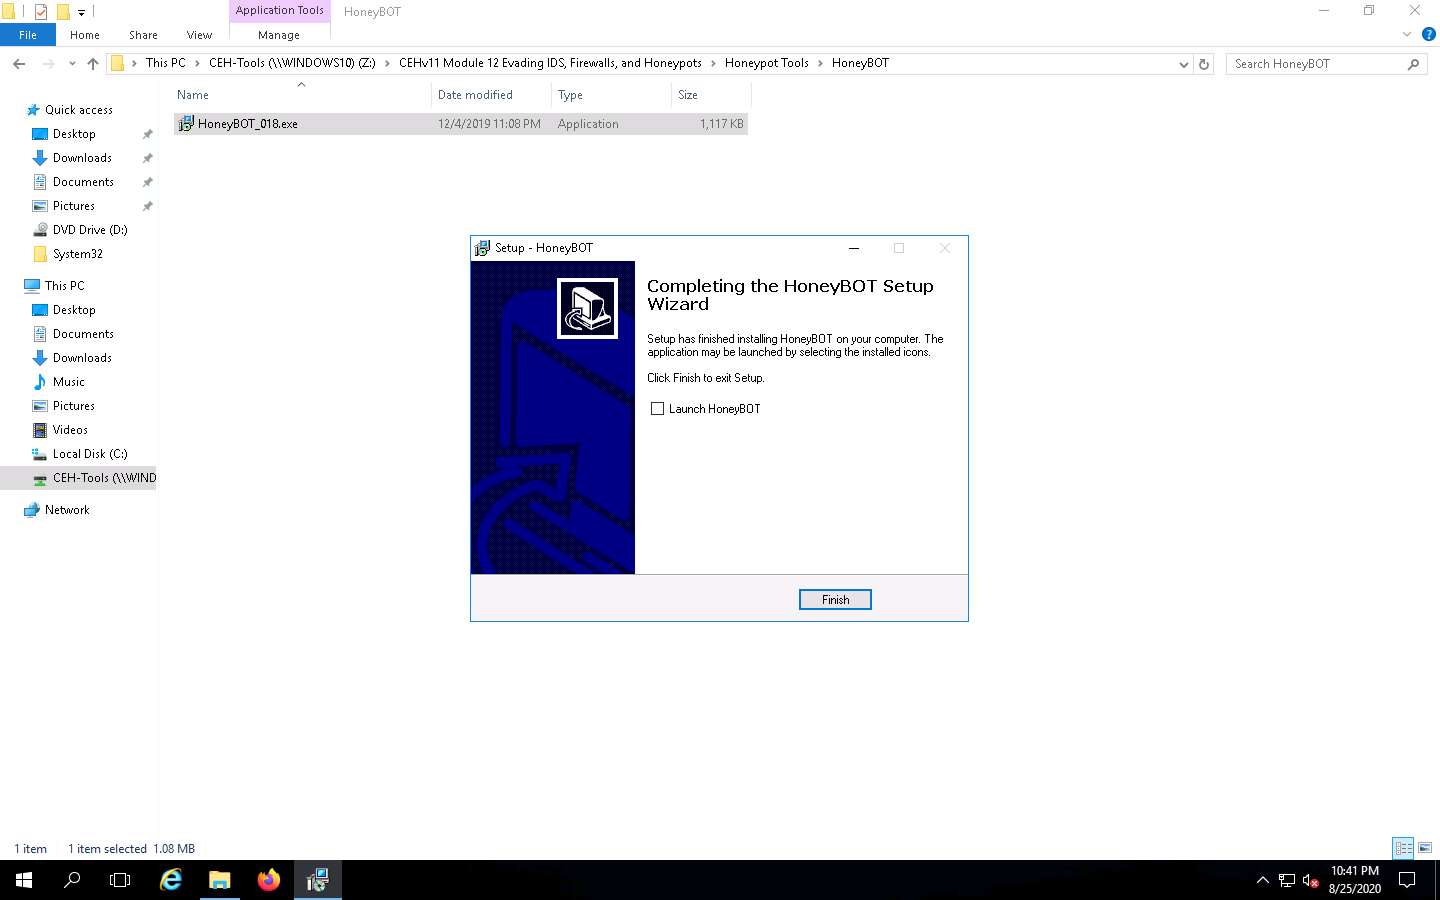
Once the installation of HoneyBOT completes, in the Completing the HoneyBot Setup Wizard window, uncheck the Launch HoneyBOT option,click Finish.
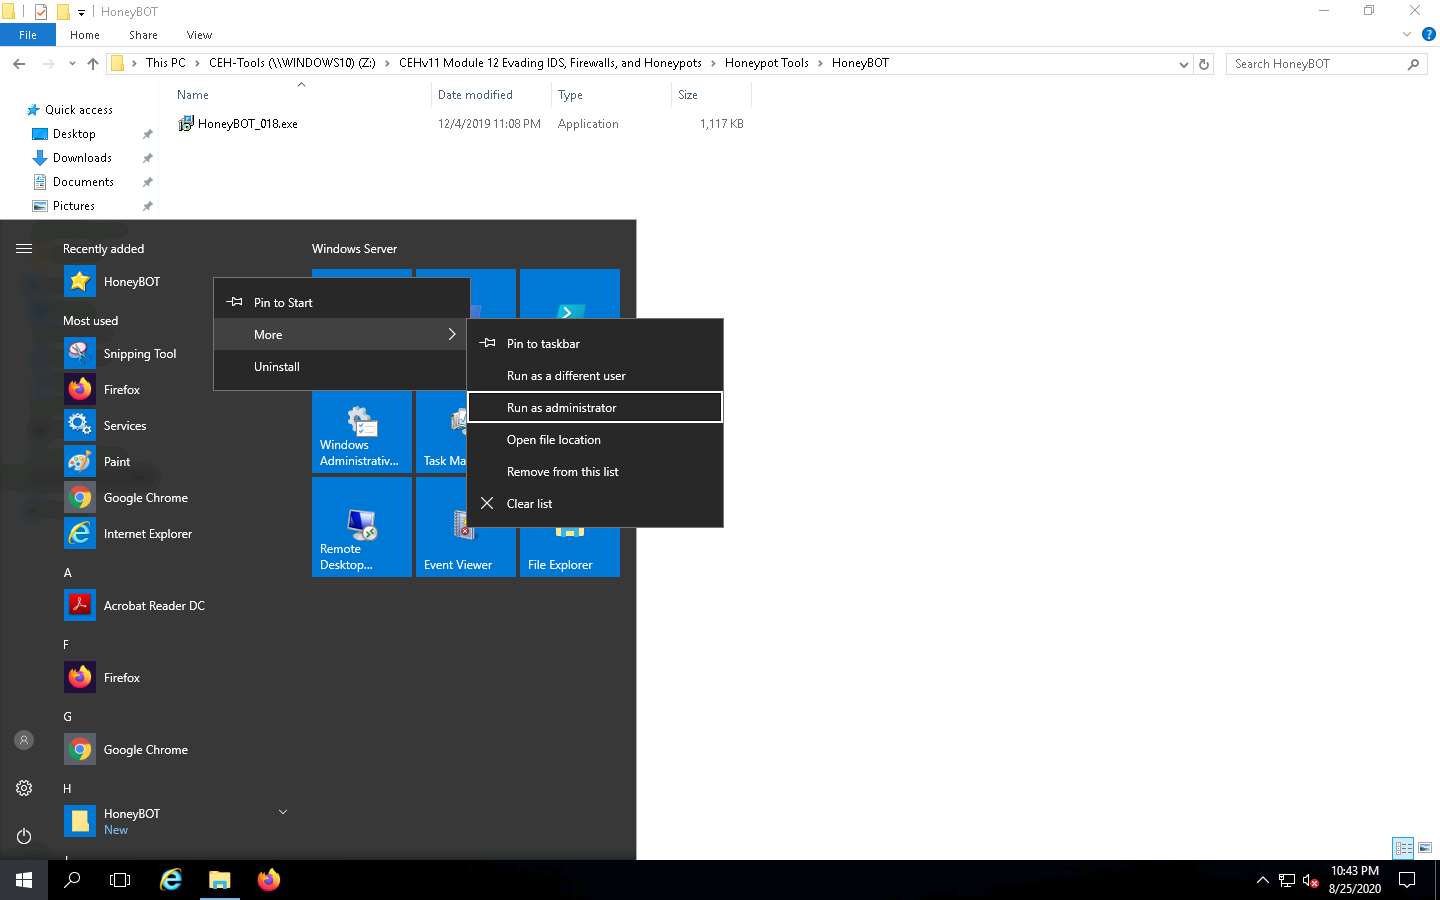
Now, click the Start icon from the left-bottom of Desktop. Under Recently added applications, right-click HoneyBOT --> More --> Run as administrator, as shown in the screenshot.
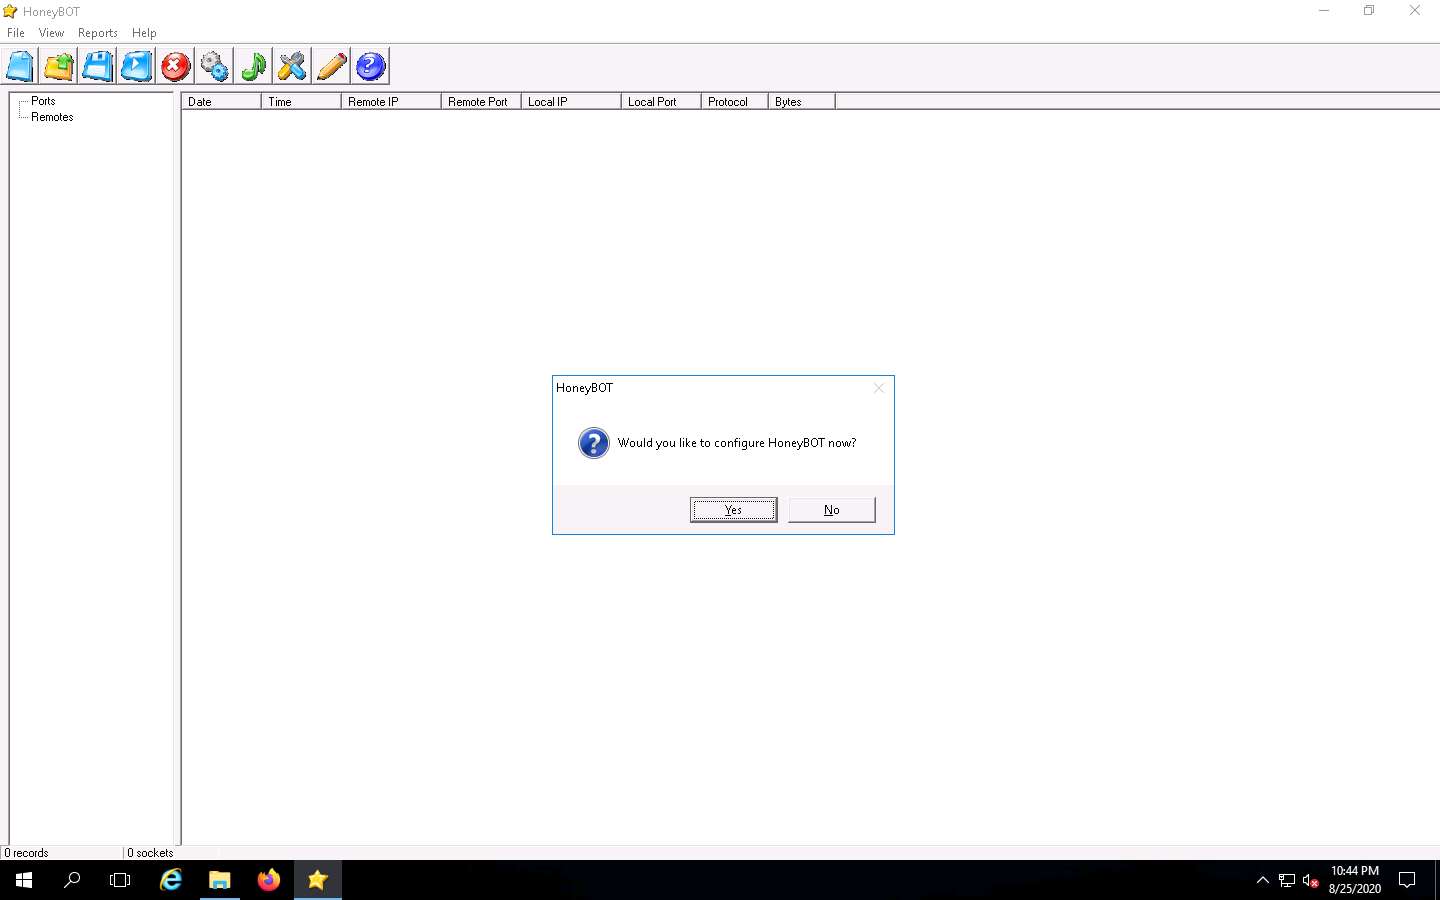
The HoneyBOT configuration pop-up appears; click Yes to configure HoneyBOT.
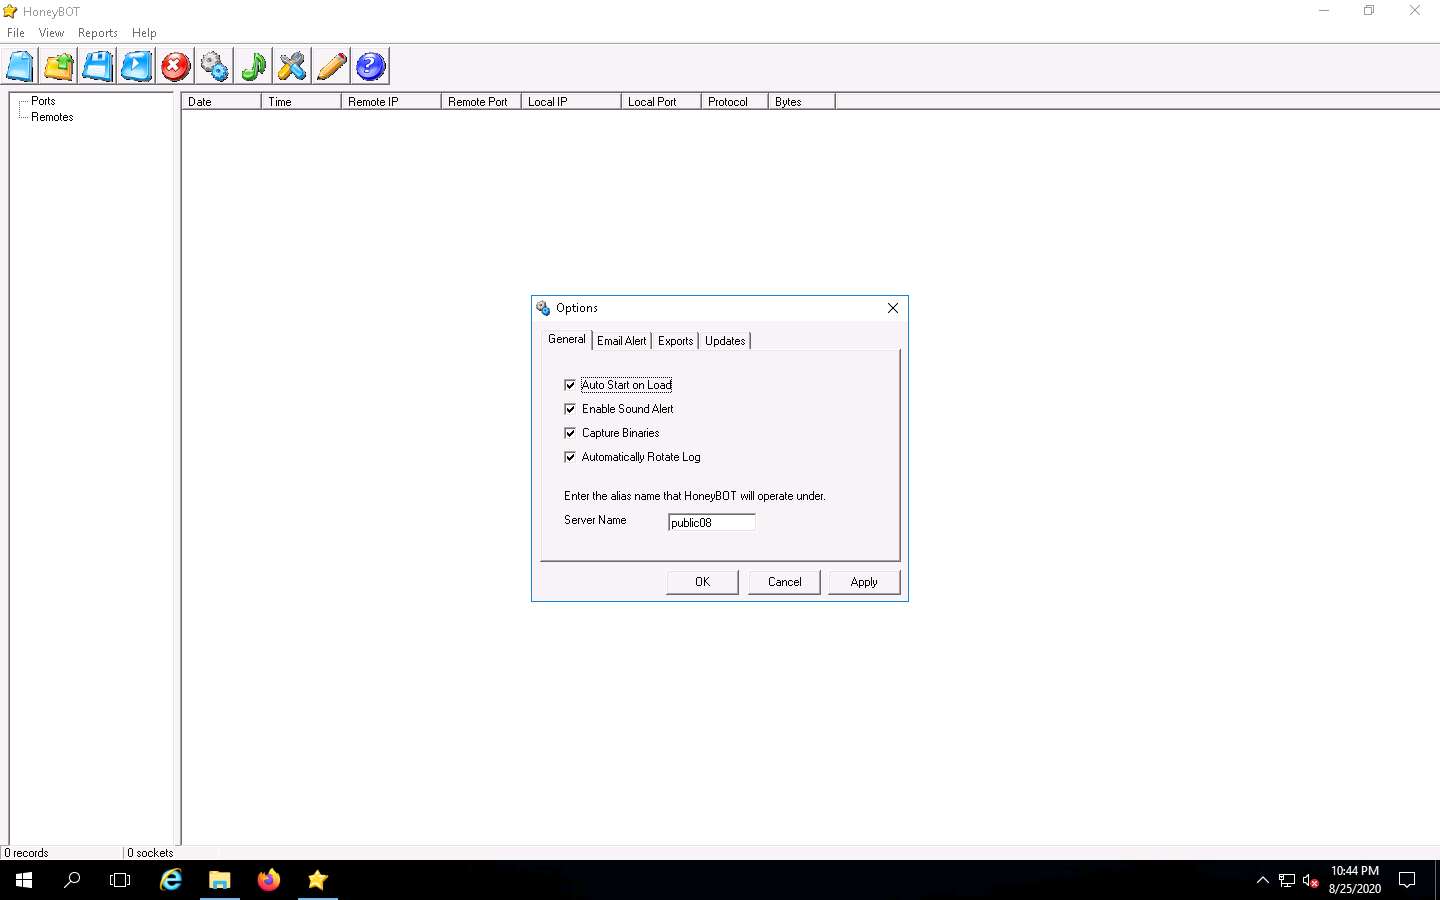
The HoneyBOT Options window appears with default options checked on the General settings tab. Leave the default settings or modify them accordingly.
In this task, we are leaving the settings on default for the General tab in the Options window.
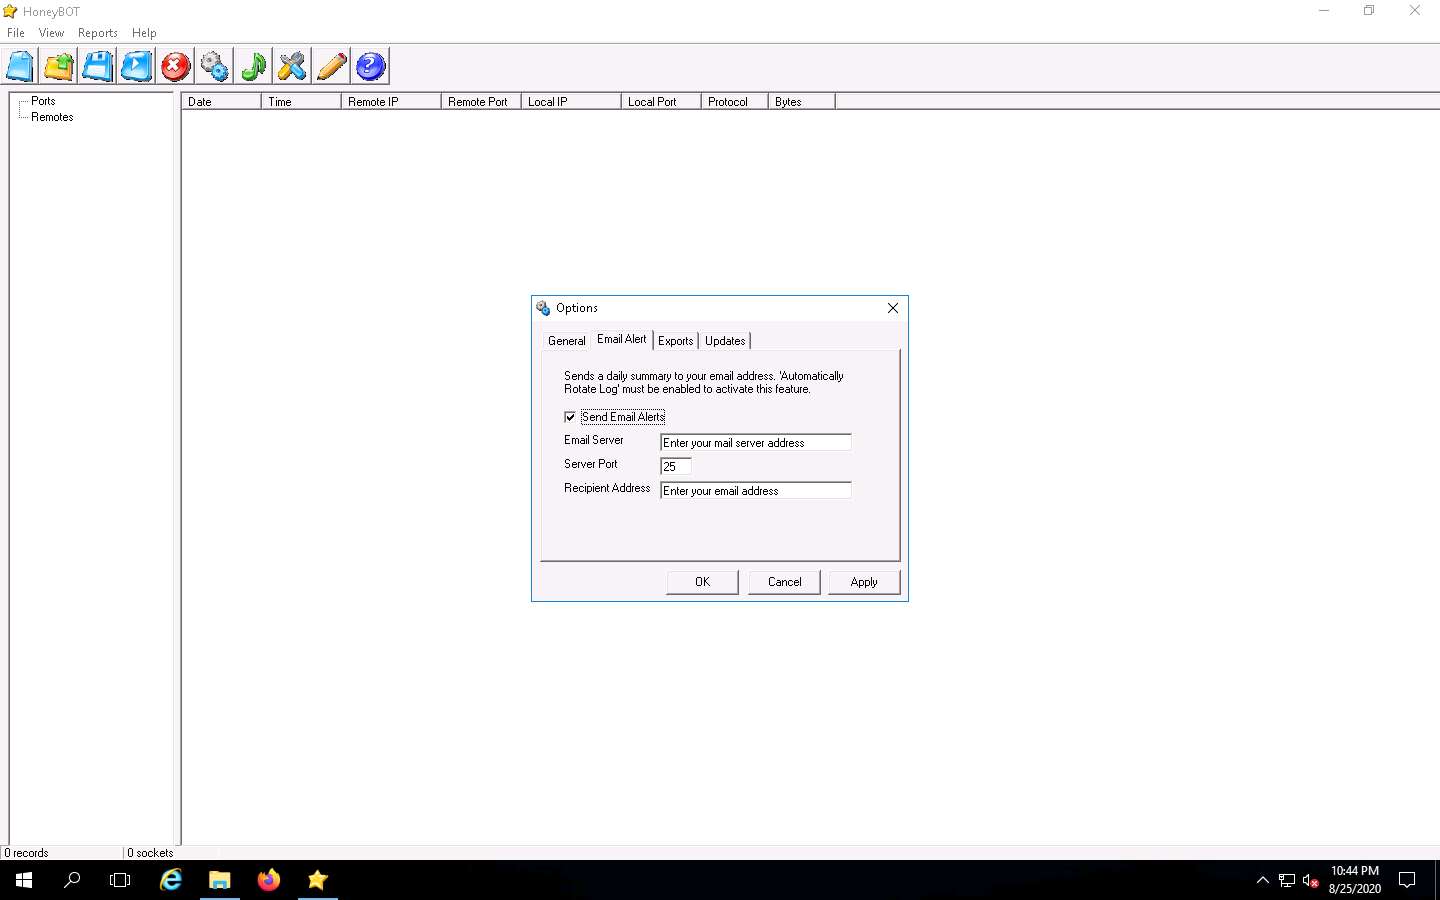
Click the Email Alert tab; if you want HoneyBOT to send you email alerts, check Send Email Alerts, and fill in the respective fields.
In this task, we will not be providing any details for email alerts.
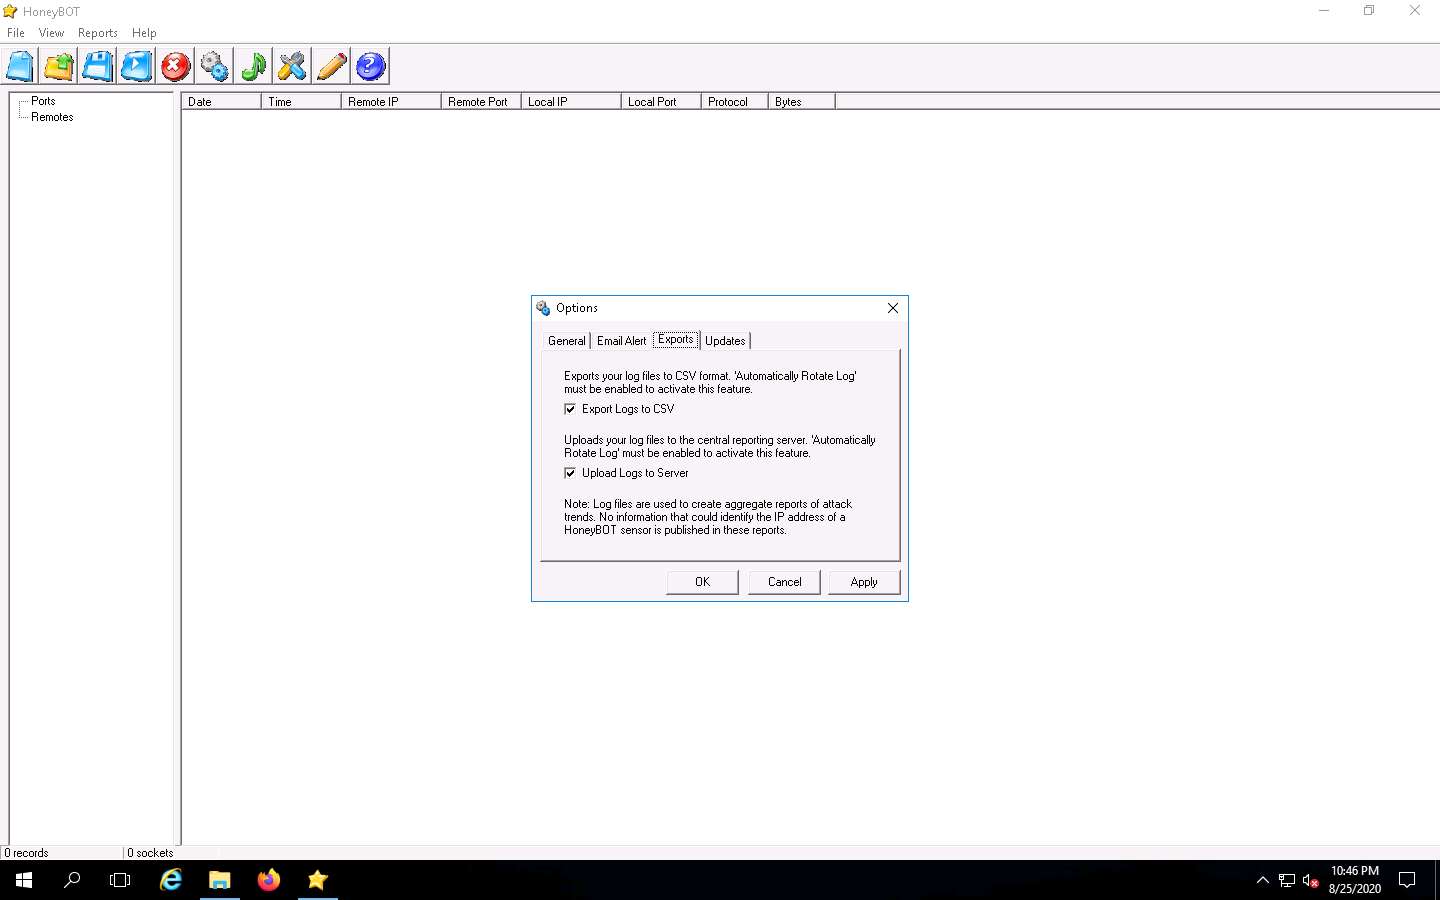
On the Exports tab, in which you can export the logs recorded by HoneyBOT, choose the required option to view the reports, and then proceed to the next step. (here, Export Logs to CSV and Upload Logs to Server checkbox are selected)
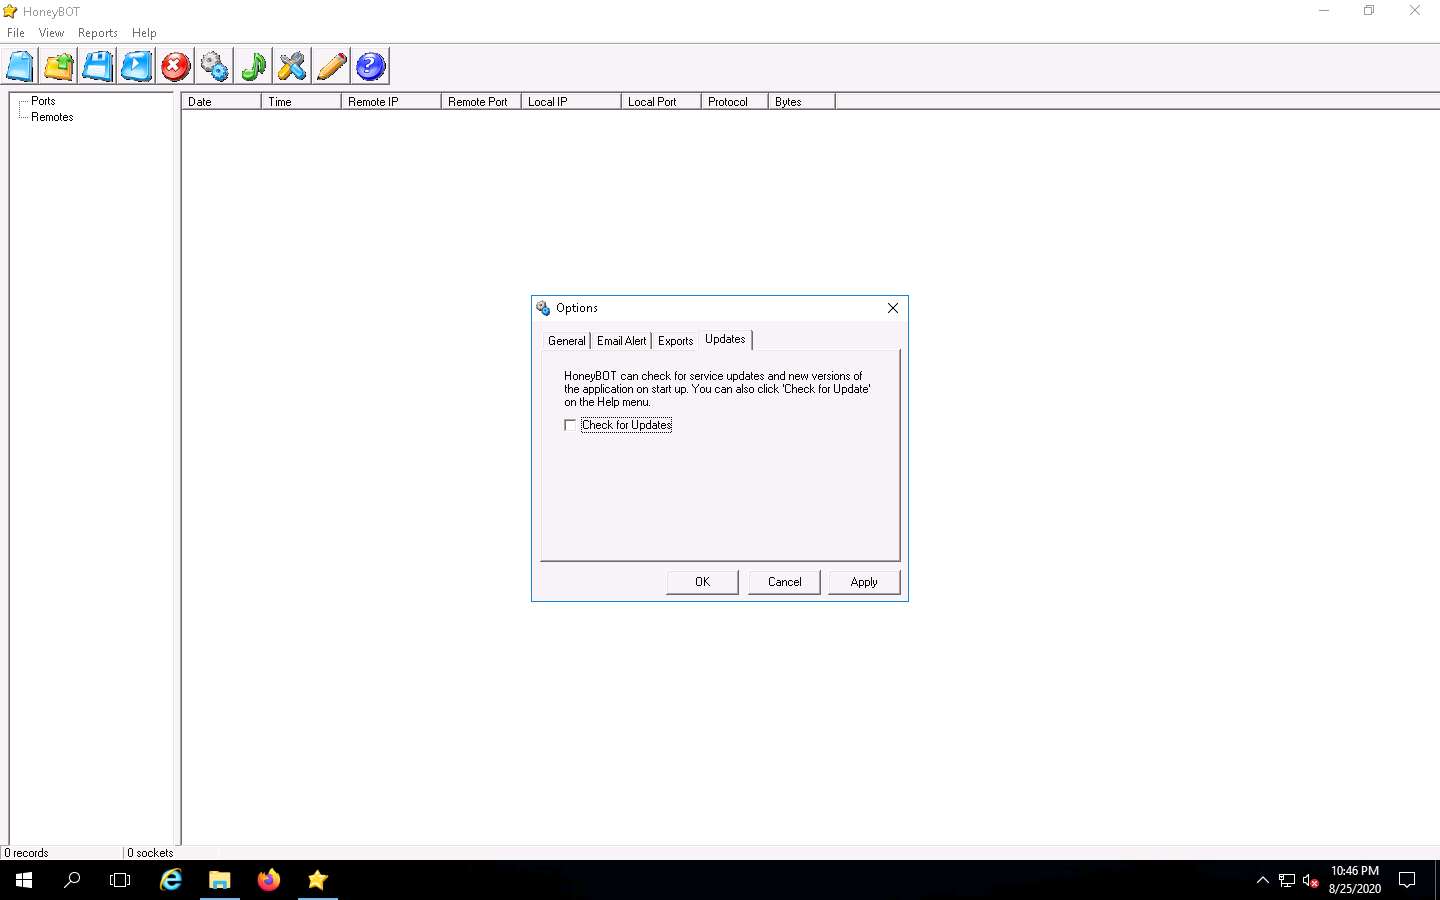
On the Updates tab, uncheck Check for Updates; click Apply and click OK to continue.
If a Bindings pop-up appears, click OK to continue.
The HoneyBOT main window appears, as shown in the screenshot.
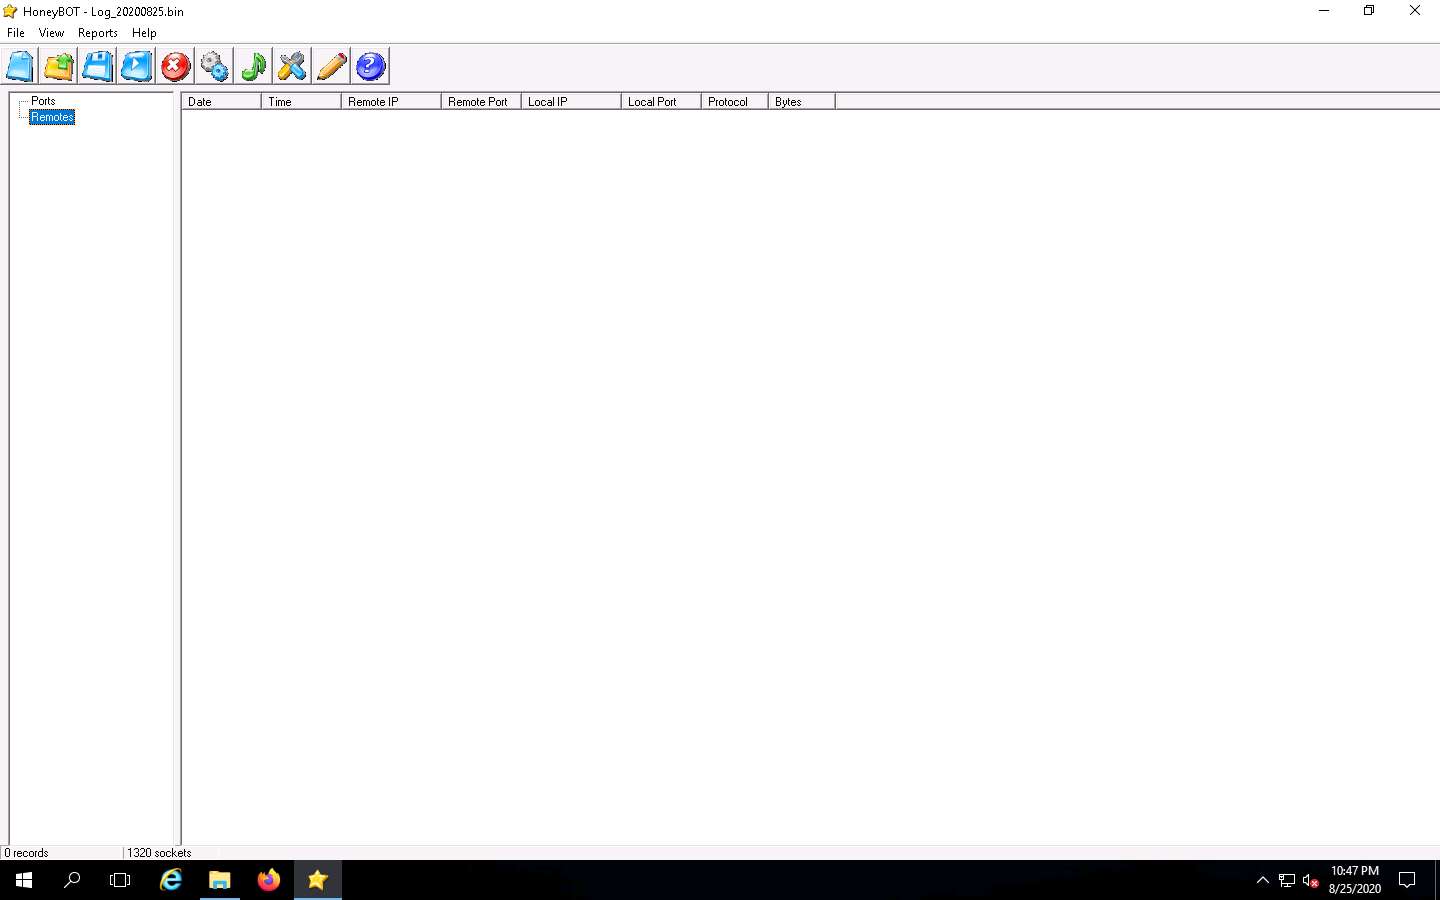
Now, leave the HoneyBOT window running on Windows Server 2016.
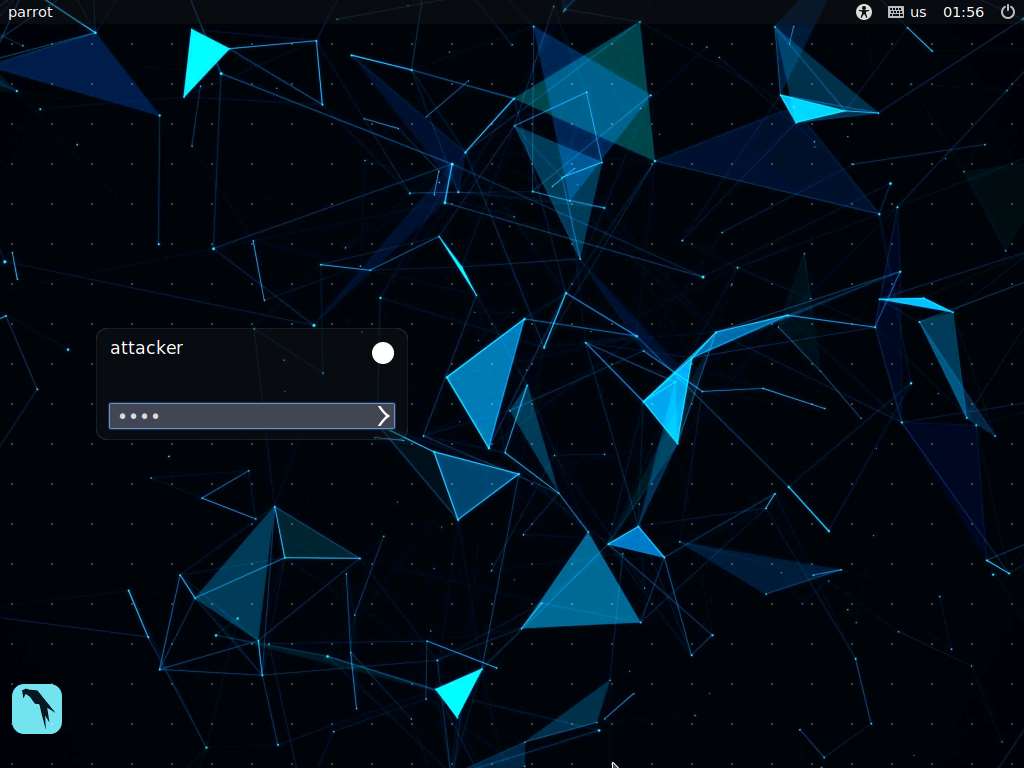
Click Parrot Security to switch to the Parrot Security machine.

In the login page, the attacker username will be selected by default. Enter password as toor in the Password field and press Enter to log in to the machine.
Click the MATE Terminal icon at the top of the Desktop window to open a Terminal window.
If a Question pop-up window appears asking you to update the machine, click No to close the window.
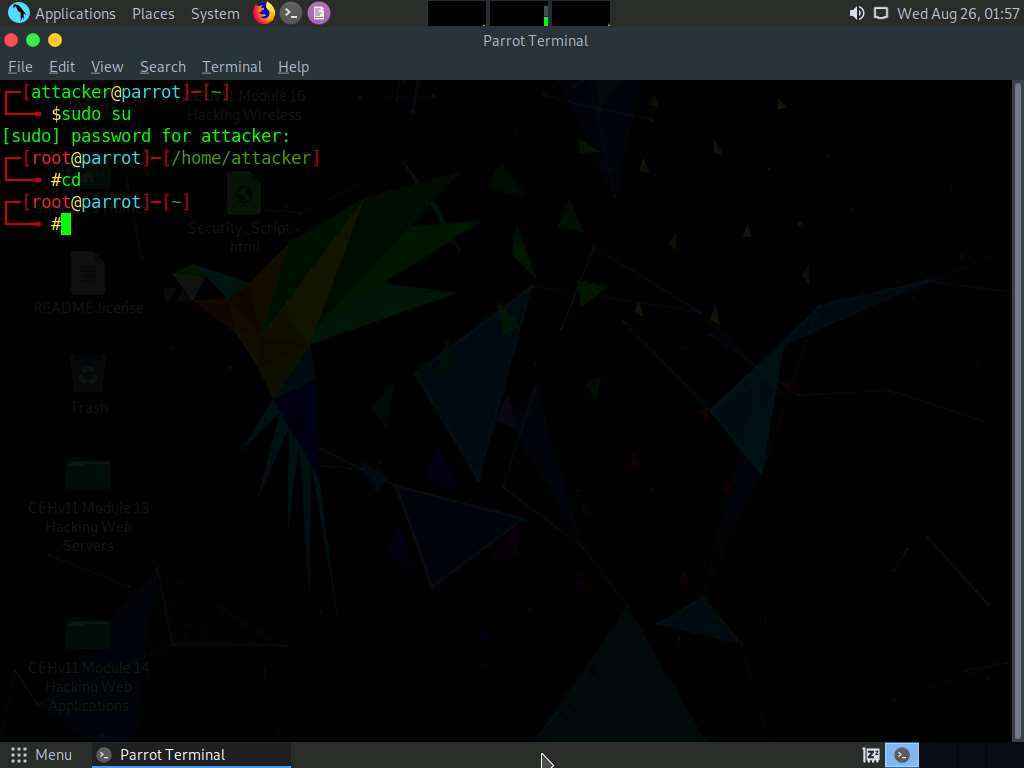
A Parrot Terminal window appears. In the terminal window, type sudo su and press Enter to run the programs as a root user.
In the [sudo] password for attacker field, type toor as a password and press Enter.
The password that you type will not be visible.
Now, type cd and press Enter to jump to the root directory.
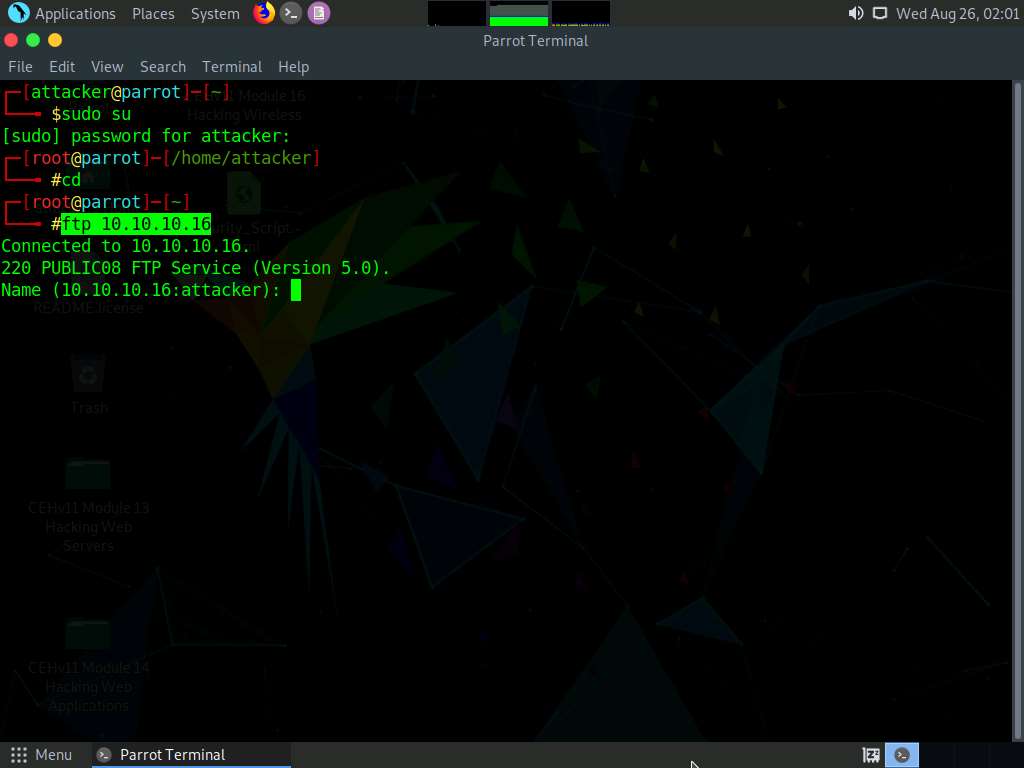
In the terminal window; type ftp [IP Address of the Windows Server 2016 machine] and press Enter.
You will be prompted for the ftp credentials of the Windows Server 2016 machine.
In this task, the IP address of Windows Server 2016 is 10.10.10.16; this may differ in your lab environment.
If Parrot Security sends an error message stating that the ftp command is not found, then install ftp with the “apt-get install ftp” command.
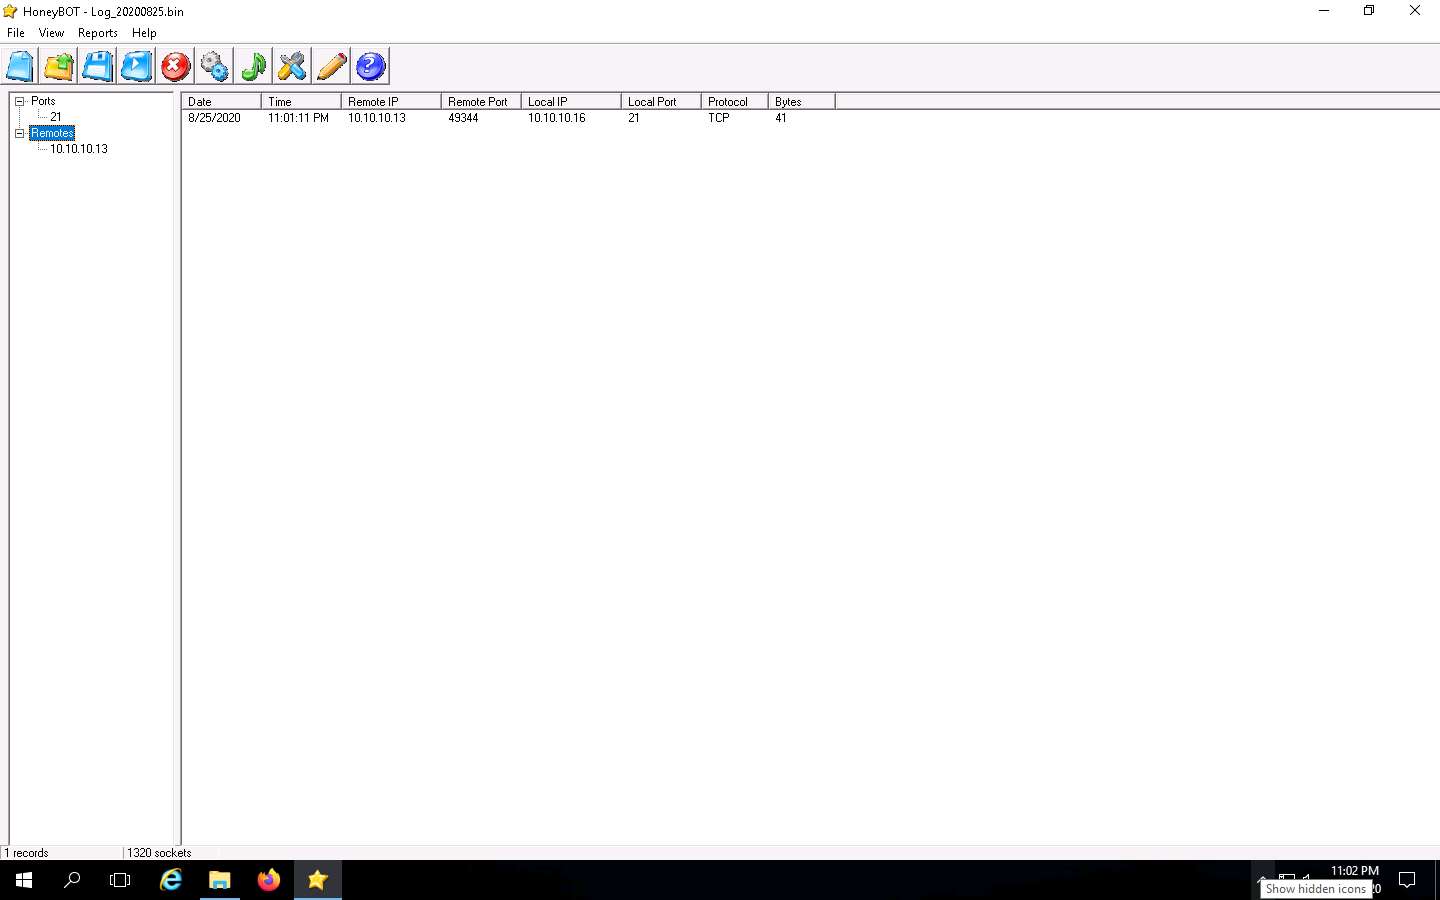
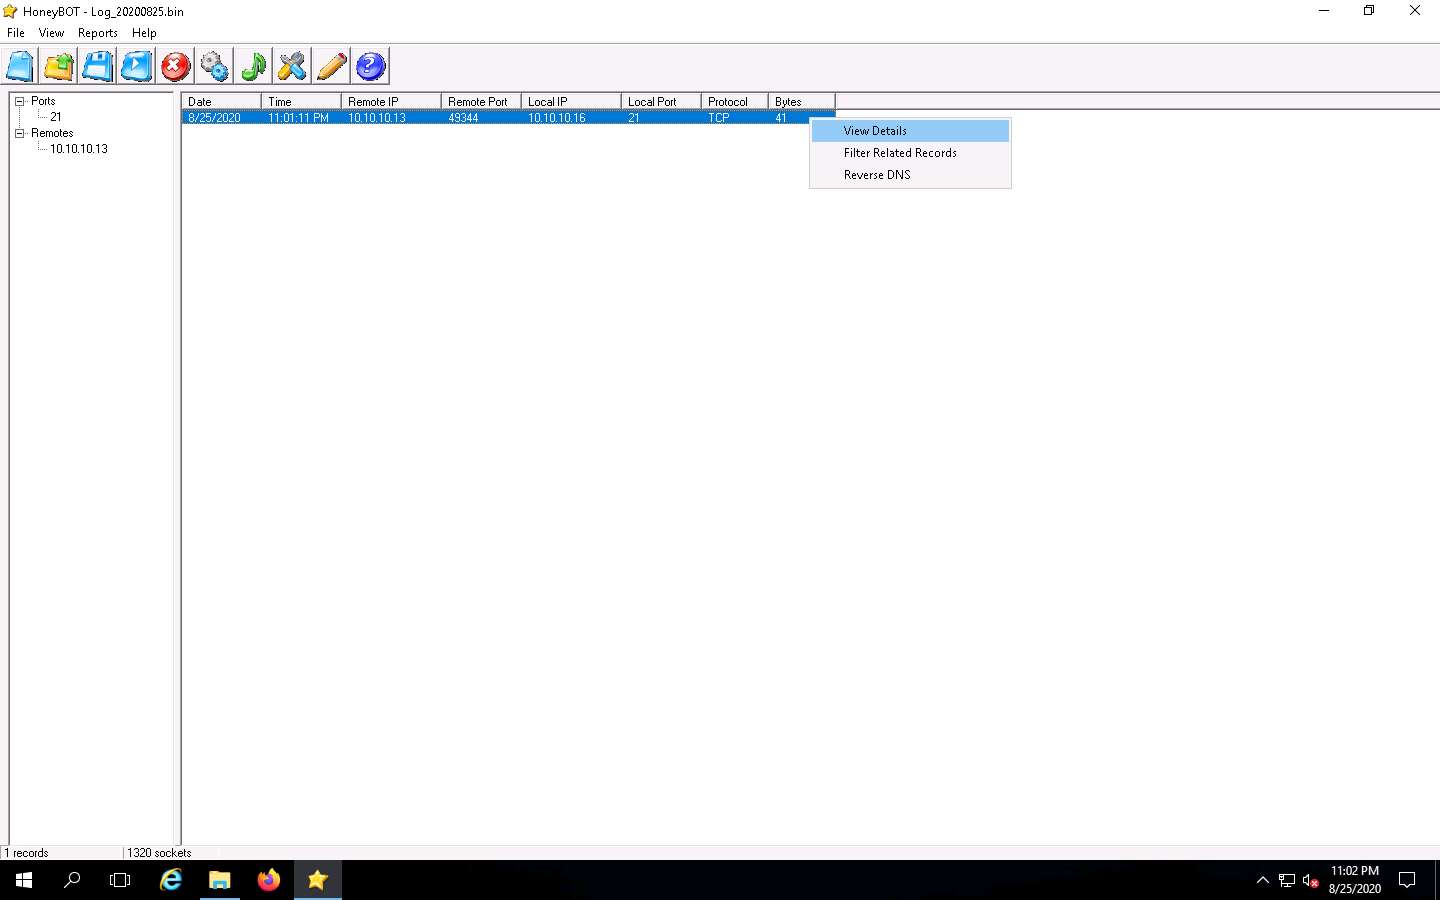
Click Windows Server 2016 to switch back to the Windows Server 2016 machine. In the HoneyBOT window, expand the Ports and Remotes node from the left-pane.
Under Ports, you can see the port numbers from which Windows Server 2016 received requests or attacks.
Under Remotes, you can view the recorded IP addresses through which Windows Server 2016 received requests.
Now, right-click any IP address or Port on the left, and click View Details, as shown in the screenshot, to view the complete details of the request or attack recorded by HoneyBOT.
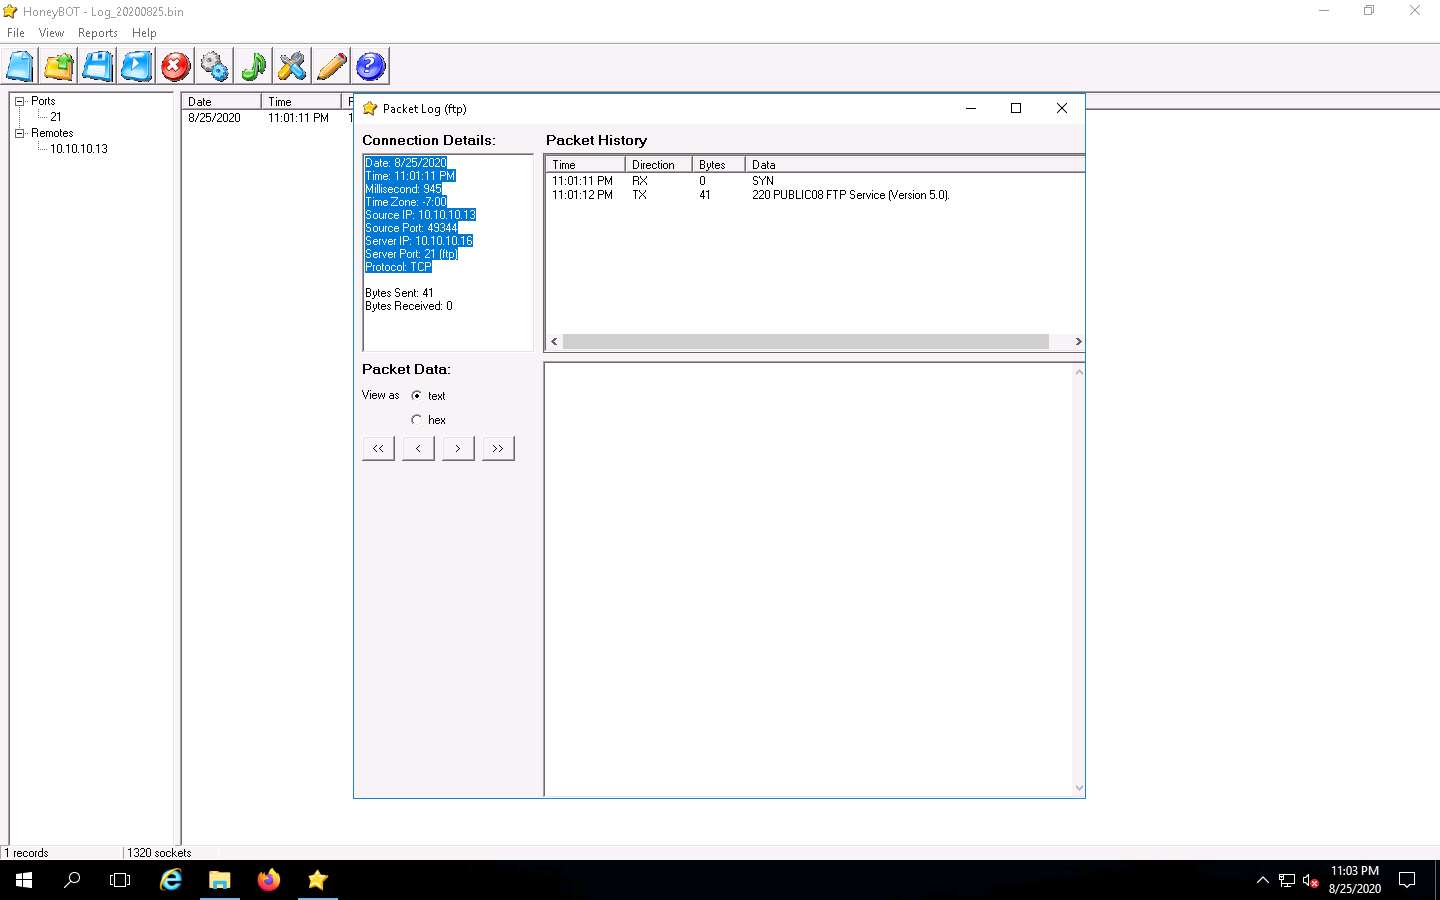
The Packet Log window appears, as shown in the screenshot. This displays the complete log details of the request captured by HoneyBOT.
In the screenshot, under Connection Details, you can view the Date and Time of the connection established as well as the protocol used.
Connection Details also shows the Source IP, Port, and Server Port, as shown below.
Simultaneously, you can run the telnet command on the Parrot Security machine and observe the log recorded by HoneyBOT on Windows Server 2016.
After the completion of this task, End the lab instance, re-launch it and continue with the next lab.
To End the lab instance, click on the Menu icon from the top-right corner of the screen and click End from the options. In the Are you sure you want to end this lab?, click Yes, end my lab.
The options to end the lab instance might differ in your lab environment.


Comments
Post a Comment