Lab 1: Gain Access to the Target System using Trojans
Lab 1: Gain Access to the Target System using Trojans
Module 07: Malware Threats
Lab 1: Gain Access to the Target System using Trojans
Task 1: Gain Control over a Victim Machine using the njRAT RAT Trojan
Attackers use Remote Access Trojans (RATs) to infect the target machine to gain administrative access. RATs help an attacker to
remotely access the complete GUI and control the victim’s computer without his/her awareness. They can perform screening and
camera capture, code execution, keylogging, file access, password sniffing, registry management, and other tasks. The virus
infects victims via phishing attacks and drive-by downloads and propagates through infected USB keys or networked drives. It
can download and execute additional malware, execute shell commands, read and write registry keys, capture screenshots, log
keystrokes, and spy on webcams.
njRAT is a RAT with powerful data-stealing capabilities. In addition to logging keystrokes, it is capable of accessing a
victim’s camera, stealing credentials stored in browsers, uploading and downloading files, performing process and file
manipulations, and viewing the victim’s desktop.
This RAT can be used to control Botnets (networks of computers), allowing the attacker to update, uninstall, disconnect,
restart, and close the RAT, and rename its campaign ID. The attacker can further create and configure the malware to spread
through USB drives with the help of the Command and Control server software.
refer to blog
---------------------------------------------------------------------------------------------------------------------------------------
Module 07: Malware Threats
Lab 1: Gain Access to the Target System using Trojans
Task 2: Hide a Trojan using SwayzCryptor and Make it Undetectable to Various Anti-Virus Programs
At present, numerous anti-virus software programs have been configured to detect malware such as Trojans, viruses, and worms.
Although security specialists keep updating the virus definitions, hackers continually try to evade or bypass them. One method
that attackers use to bypass AVs is to “crypt” (an abbreviation of “encrypt”) the malicious files using fully undetectable
crypters (FUDs). Crypting these files allows them to achieve their objectives, and thereby take complete control over the victim’s machine.
Crypter is a software that encrypts the original binary code of the .exe file to hide viruses, spyware, keyloggers, and RATs,
among others, in any kind of file to make them undetectable by anti-viruses. SwayzCryptor is an encrypter (or “crypter”) that
allows users to encrypt their program’s source code.
refer to blog
---------------------------------------------------------------------------------------------------------------------------------------
Module 07: Malware Threats
Lab 1: Gain Access to the Target System using Trojans
Task 3: Create a Server using the ProRat Tool
Attackers use malware to steal personal information, financial data, and business information from target systems. ProRat is a
“remote administration tool” created by the PRO Group. ProRat was written in the C programming language and is capable of working
with all Windows OSes. ProRat was designed to allow users to control their own computers remotely from other computers. However,
attackers have co-opted it for their own nefarious purposes. Some hackers take control of remote computer systems to conduct a
Denial-of-Service (DoS) attack, which renders the target system unavailable for normal personal or business use. These targeted
systems include high-profile web servers such as banks and credit card gateways.
As with other Trojan horses, ProRat uses a client and server. It opens a port on the computer that allows the client to
perform numerous operations on the server (the victim machine).
refer to blog
---------------------------------------------------------------------------------------------------------------------------------------
Module 07: Malware Threats
Lab 1: Gain Access to the Target System using Trojans
Task 4: Create a Trojan Server using Theef RAT Trojan
Theef is a Remote Access Trojan written in Delphi. It allows remote attackers access to the system via port 9871.
Theef is a Windows-based application for both client and server. The Theef server is a virus that you install on a target
computer, and the Theef client is what you then use to control the virus.
---------------------------------------------------------------------------------------------------------------------------------------
Lab Scenario
Attackers use digital Trojan horses to trick the victim into performing a predefined action on a computer. Trojans are activated upon users’ specific predefined actions, like unintentionally installing a piece of malicious software or clicking on a malicious link, and upon activation, it can grant attackers unrestricted access to all data stored on compromised information systems and cause potentially immense damage. For example, users could download a file that appears to be a movie, but, when opened, it unleashes a dangerous program that erases the hard drive or sends credit card numbers and passwords to the attacker.
Trojan horses work on the same level of privileges as victims. For example, if a victim has the privileges to delete files, transmit information, modify existing files, and install other programs (such as programs that provide unauthorized network access and execute privilege elevation attacks), once the Trojan infects that system, it will possess the same privileges. Furthermore, it can attempt to exploit vulnerabilities to increase its level of access, even beyond the user running it. If successful, the Trojan could use the increased privileges to install other malicious code on the victim’s machine.
An expert security auditor or ethical hacker needs to ensure that the organization’s network is secure from Trojan attacks by finding machines vulnerable to these attacks and making sure that anti-virus tools are properly configured to detect such attacks.
The lab tasks in this exercise demonstrate how easily hackers can gain access to the target systems in the organization and create a covert communication channel for transferring sensitive data between the victim computer and the attacker.
Lab Objectives
- Gain control over a victim machine using the njRAT RAT Trojan
- Hide a Trojan using SwayzCryptor and make it undetectable to various anti-virus programs
- Create a server using the ProRat Tool
- Create a Trojan server using Theef RAT Trojan
Overview of Trojans
In Ancient Greek mythology, the Greeks won the Trojan War with the aid of a giant wooden horse that the Greeks built to hide their soldiers. The Greeks left the horse in front of the gates of Troy. The Trojans, thinking that it was a gift from the Greeks that they had left before apparently withdrawing from the war, brought the horse into their city. At night, the hidden Greek soldiers emerged from the wooden horse and opened the city’s gates for their soldiers, who eventually destroyed the city of Troy.
Thus, taking its cue from this myth, a computer Trojan is a program in which malicious or harmful code is contained inside apparently harmless programming or data in such a way that it can gain control and cause damage such as ruining the file allocation table on your hard disk.
Task 1: Gain Control over a Victim Machine using the njRAT RAT Trojan
Attackers use Remote Access Trojans (RATs) to infect the target machine to gain administrative access. RATs help an attacker to remotely access the complete GUI and control the victim’s computer without his/her awareness. They can perform screening and camera capture, code execution, keylogging, file access, password sniffing, registry management, and other tasks. The virus infects victims via phishing attacks and drive-by downloads and propagates through infected USB keys or networked drives. It can download and execute additional malware, execute shell commands, read and write registry keys, capture screenshots, log keystrokes, and spy on webcams.
njRAT is a RAT with powerful data-stealing capabilities. In addition to logging keystrokes, it is capable of accessing a victim’s camera, stealing credentials stored in browsers, uploading and downloading files, performing process and file manipulations, and viewing the victim’s desktop.
This RAT can be used to control Botnets (networks of computers), allowing the attacker to update, uninstall, disconnect, restart, and close the RAT, and rename its campaign ID. The attacker can further create and configure the malware to spread through USB drives with the help of the Command and Control server software.
Here, we will use the njRAT Trojan to gain control over a victim machine.
The versions of the created client or host and appearance of the website may differ from what it is in this lab. However, the actual process of creating the server and the client is the same, as shown in this lab.
In this lab task, we will use the Windows 10 (10.10.10.10) machine as the attacker machine and the Windows Server 2016 (10.10.10.16) machine as the victim machine.
By default, Windows 10 machine selected, click Ctrl+Alt+Delete.
Alternatively, you can also click Ctrl+Alt+Delete button under Windows 10 machine thumbnail in the Resources pane or Click Ctrl+Alt+Delete button under Commands (thunder icon) menu.

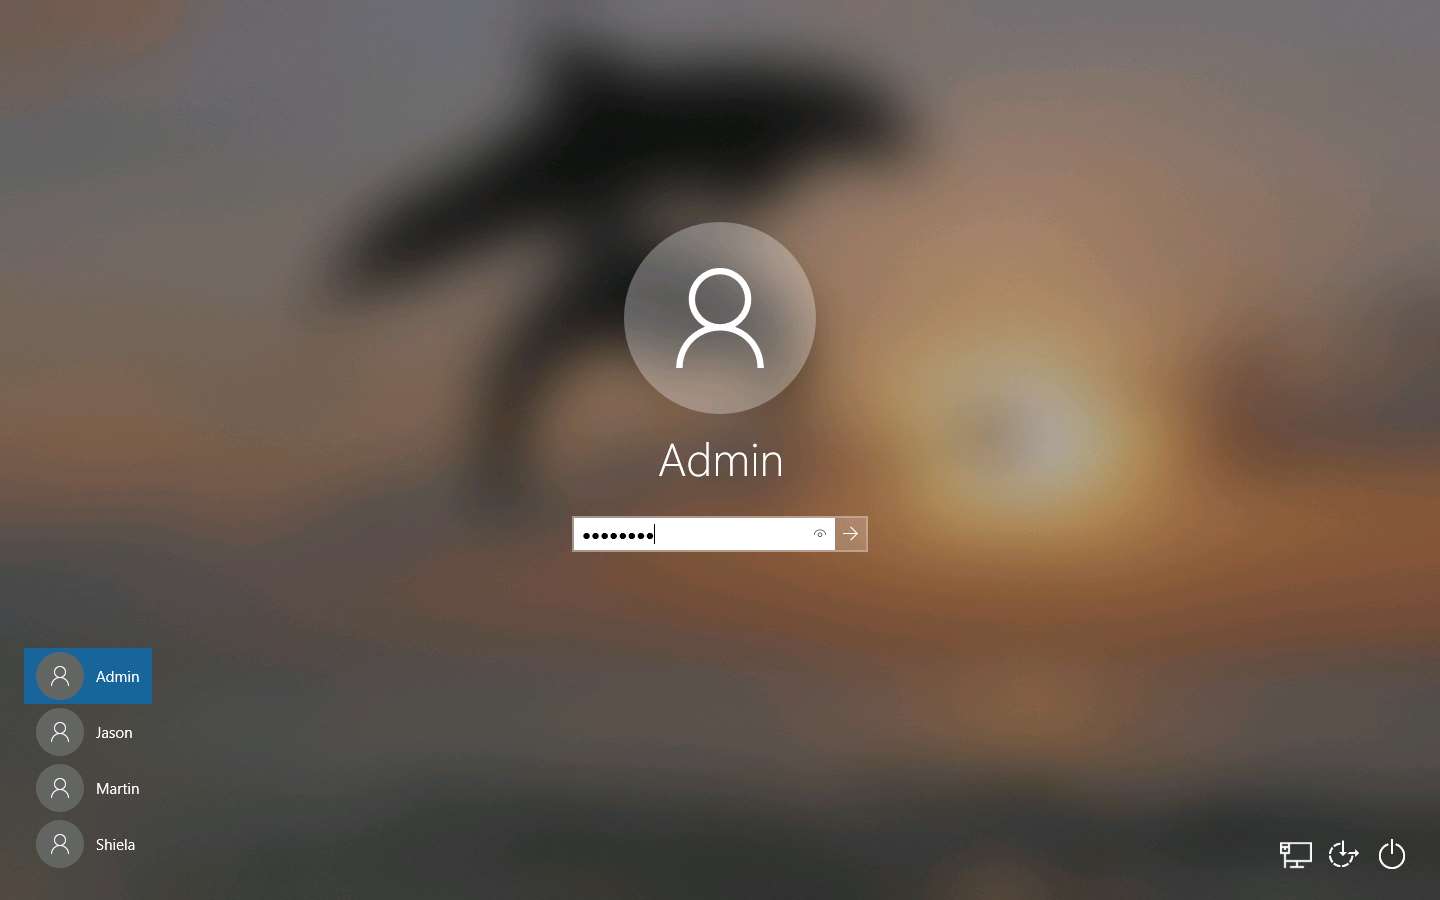
By default, Admin user profile is selected, click Pa$$w0rd to paste the password in the Password field and press Enter to login.
Alternatively, you can also click Pa$$w0rd under Windows 10 **machine thumbnail in the **Resources pane or Click Type Text | Type Password button under Commands (thunder icon) menu.
Networks screen appears, click Yes to allow your PC to be discoverable by other PCs and devices on the network.
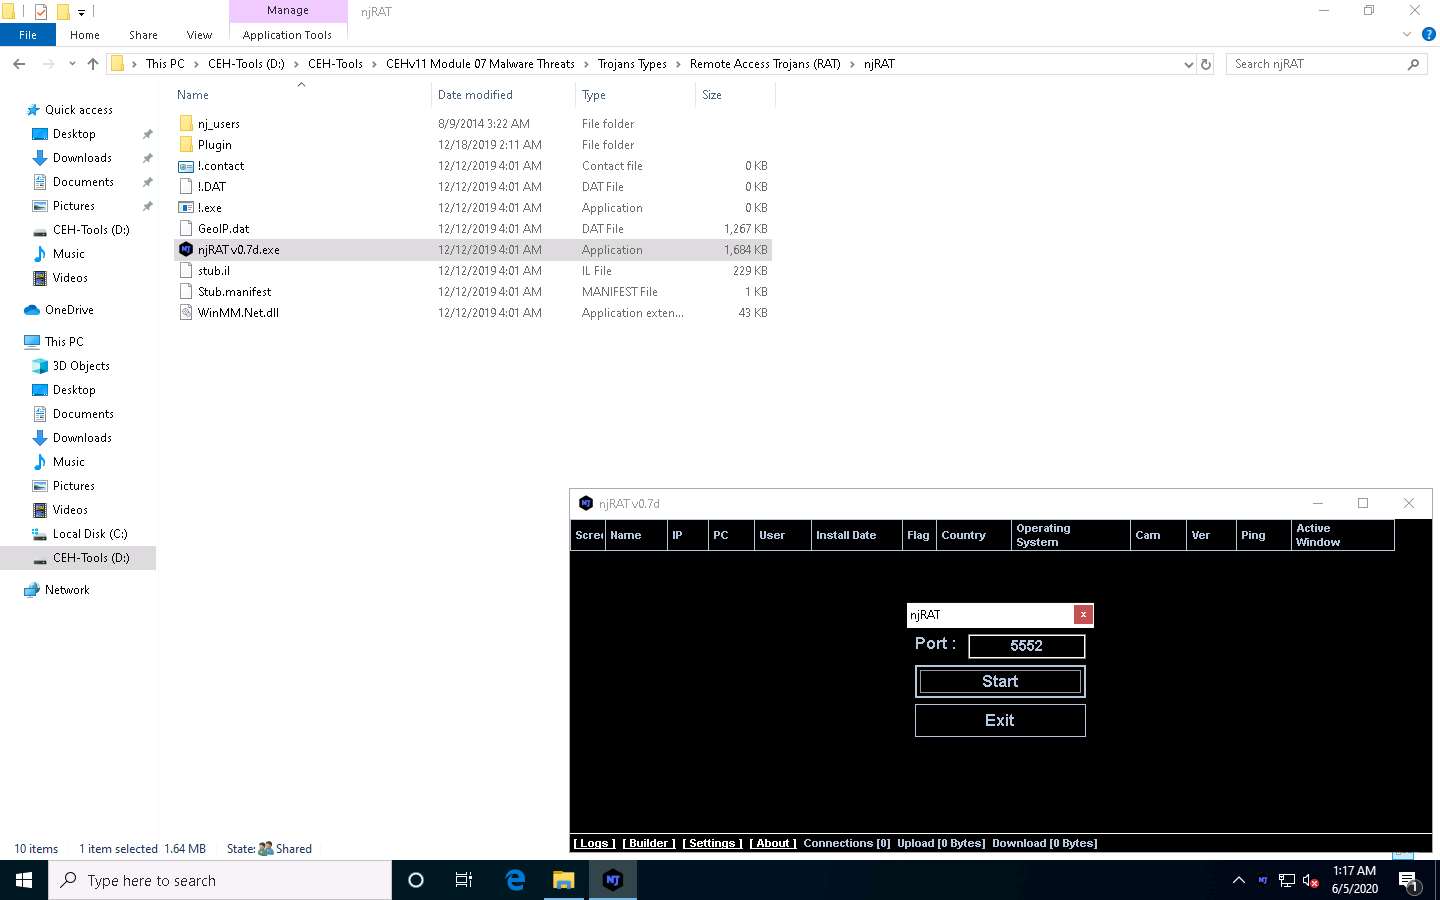
Navigate to D:\CEH-Tools\CEHv11 Module 07 Malware Threats\Trojans Types\Remote Access Trojans (RAT)\njRAT and double-click njRAT v0.7d.exe.
If a User Account Control window appears, click Yes.
If an Open File - Security Warning pop-up appears, click Run.
The njRAT GUI appears along with an njRAT pop-up, where you need to specify the port you want to use to interact with the victim machine. Enter the port number and click Start.
In this lab, the default port number 5552 has been chosen.
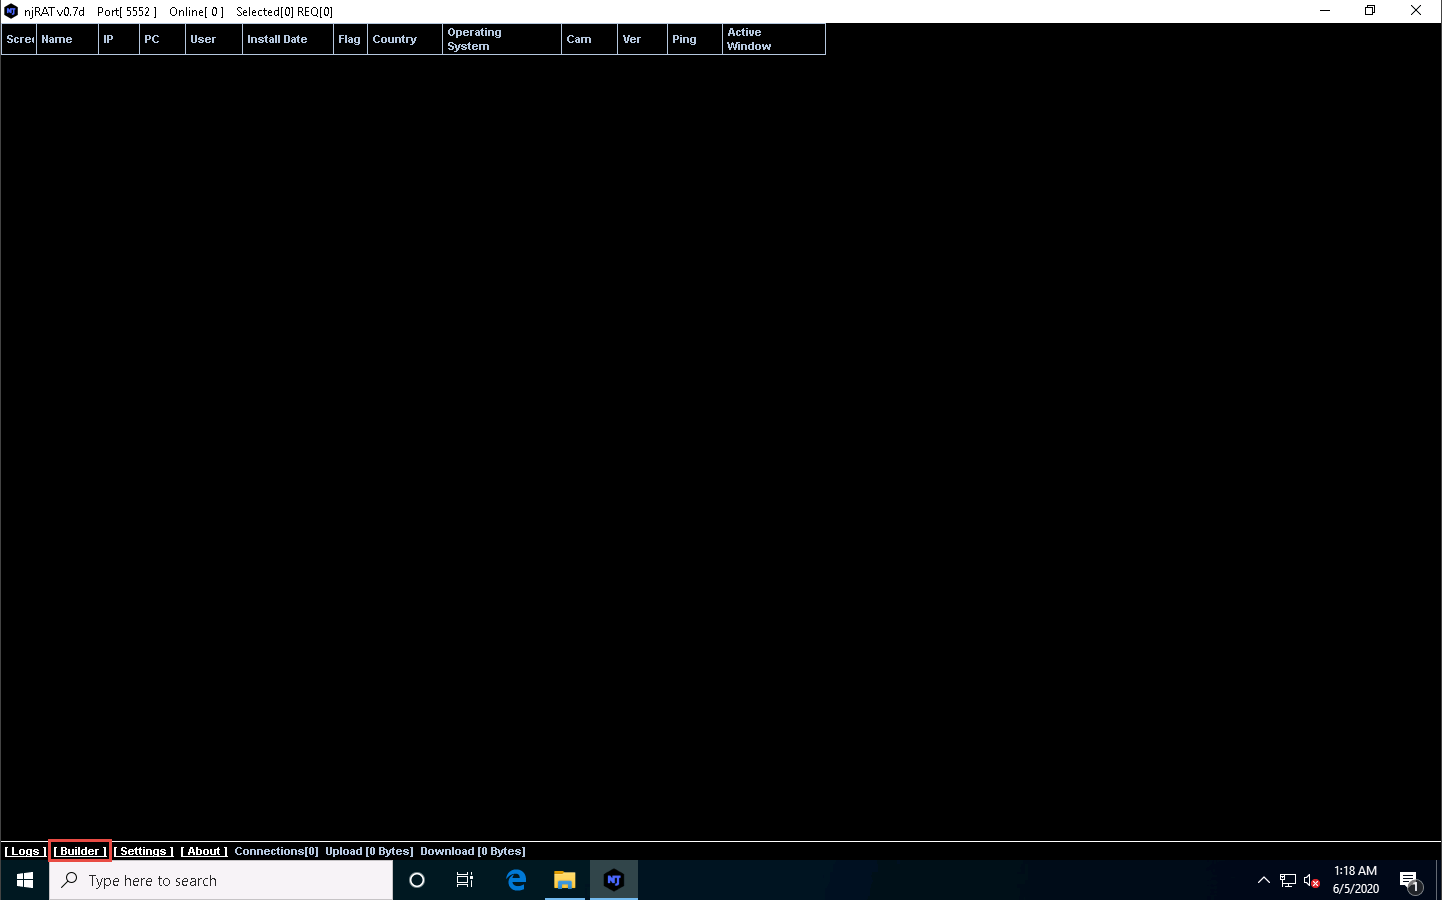
The njRAT GUI appears; click the Builder link located in the lower-left corner of the GUI to configure the exploit details.
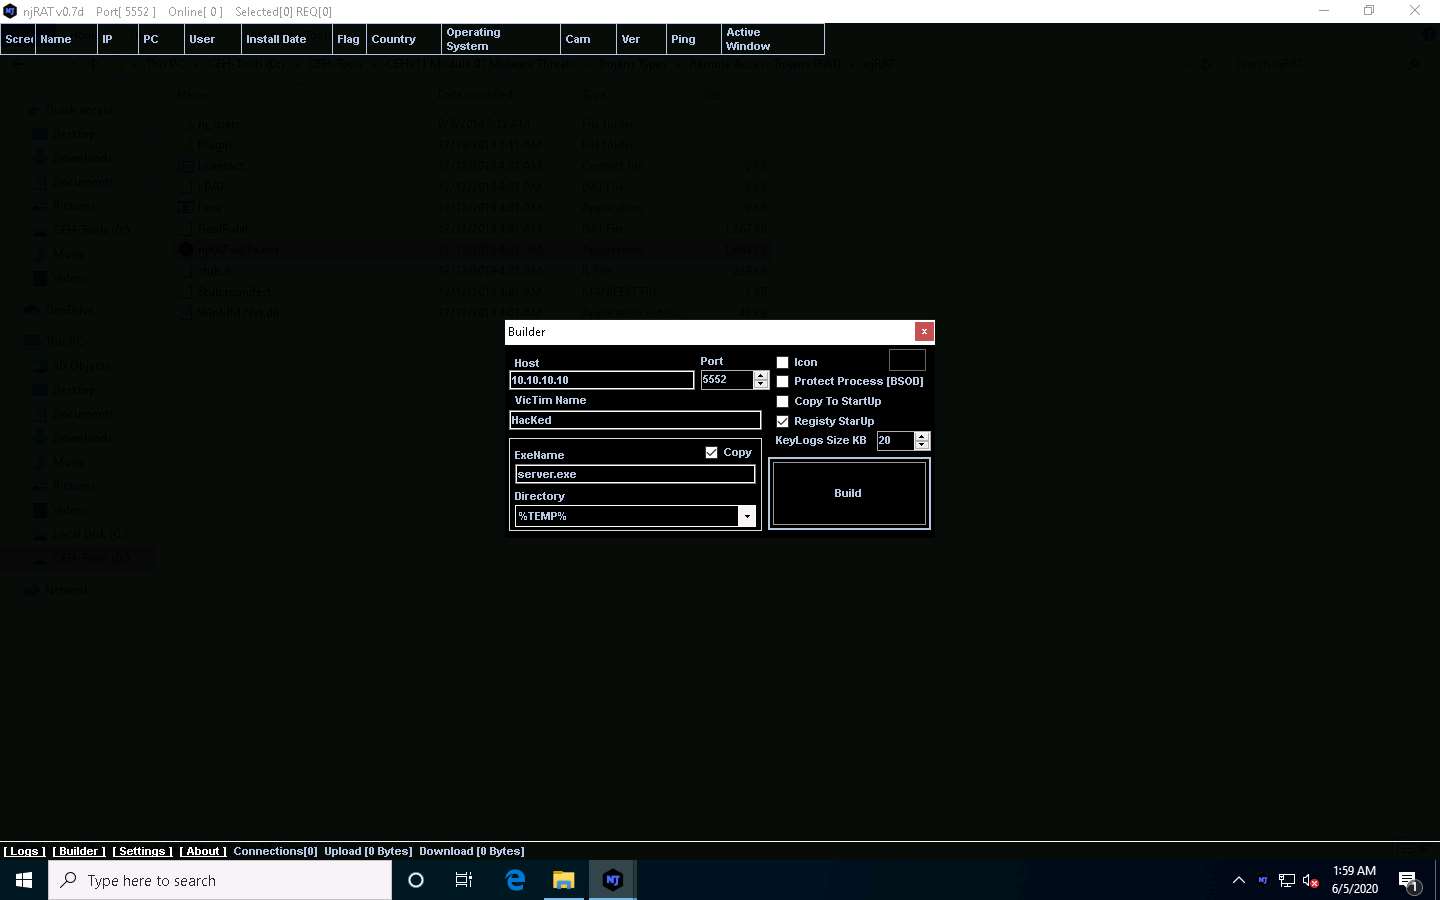
The Builder dialog-box appears; enter the IP address of the Windows 10 (attacker machine) machine in the Host field, check the option Registy StarUp, leave the other settings to default, and click Build.
In this lab, the IP address of the Windows 10 machine is 10.10.10.10. This IP address might vary in your lab environment.
The Save As window appears; specify a location to store the server, rename it, and click Save.
In this lab, the destination location chosen is Desktop, and the file is named Test.exe.
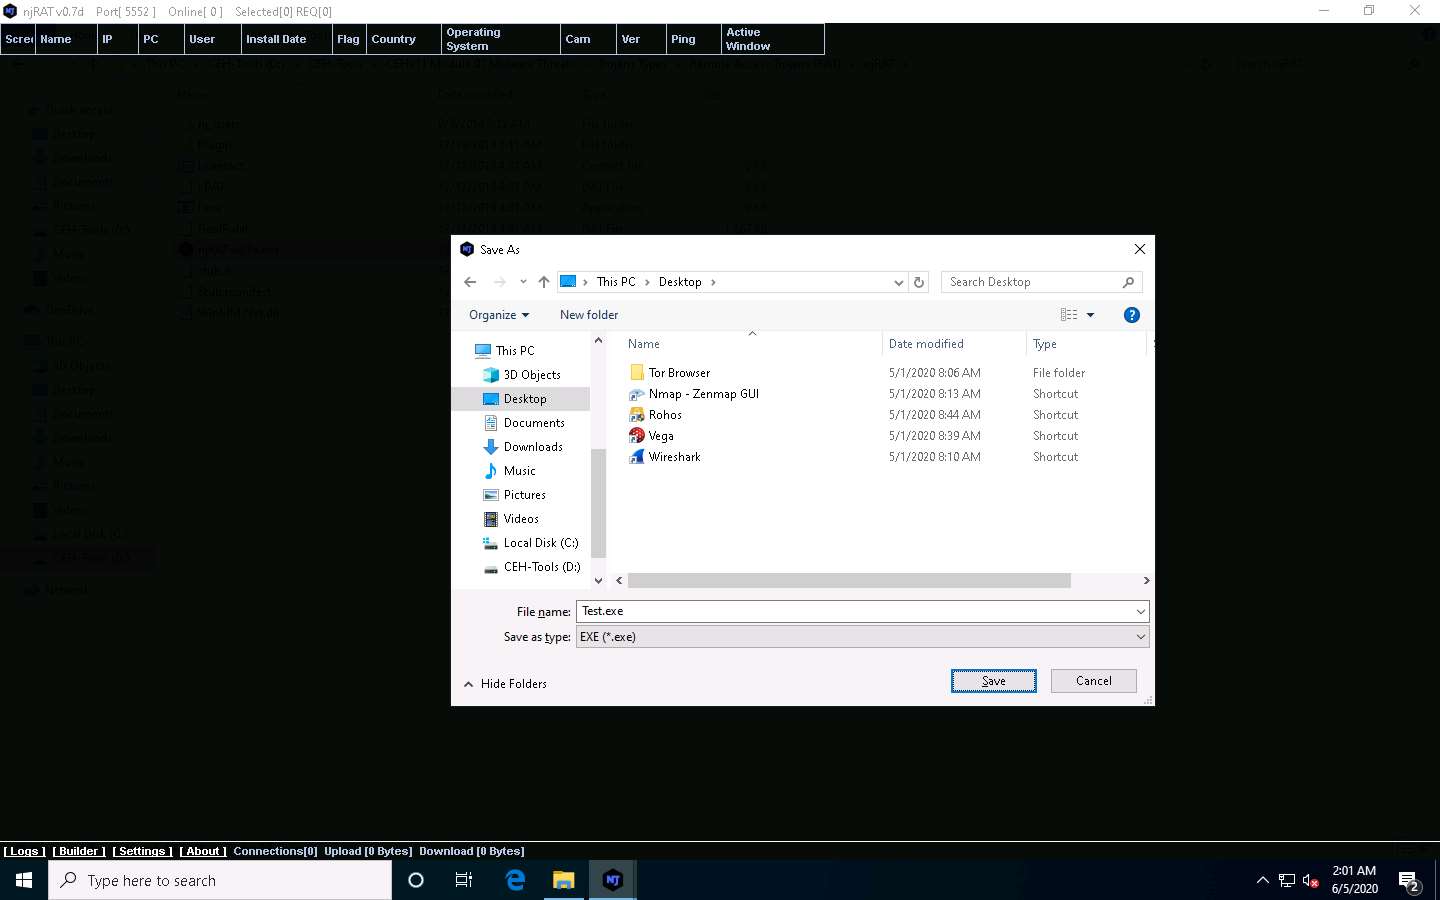
Once the server is created, the DONE! pop-up appears; click OK.
Now, use any technique to send this server to the intended target through email or any other source (in real-time, attackers send this server to the victim).
In this lab, we copied the Test.exe file to the shared network location (CEH-Tools) to share the file.
Click Windows Server 2016 to switch to the Windows Server 2016 machine. Click Ctrl+Alt+Delete to activate the machine, by default, CEH\Administrator account is selected, click Pa$$w0rd to enter the password and press Enter.
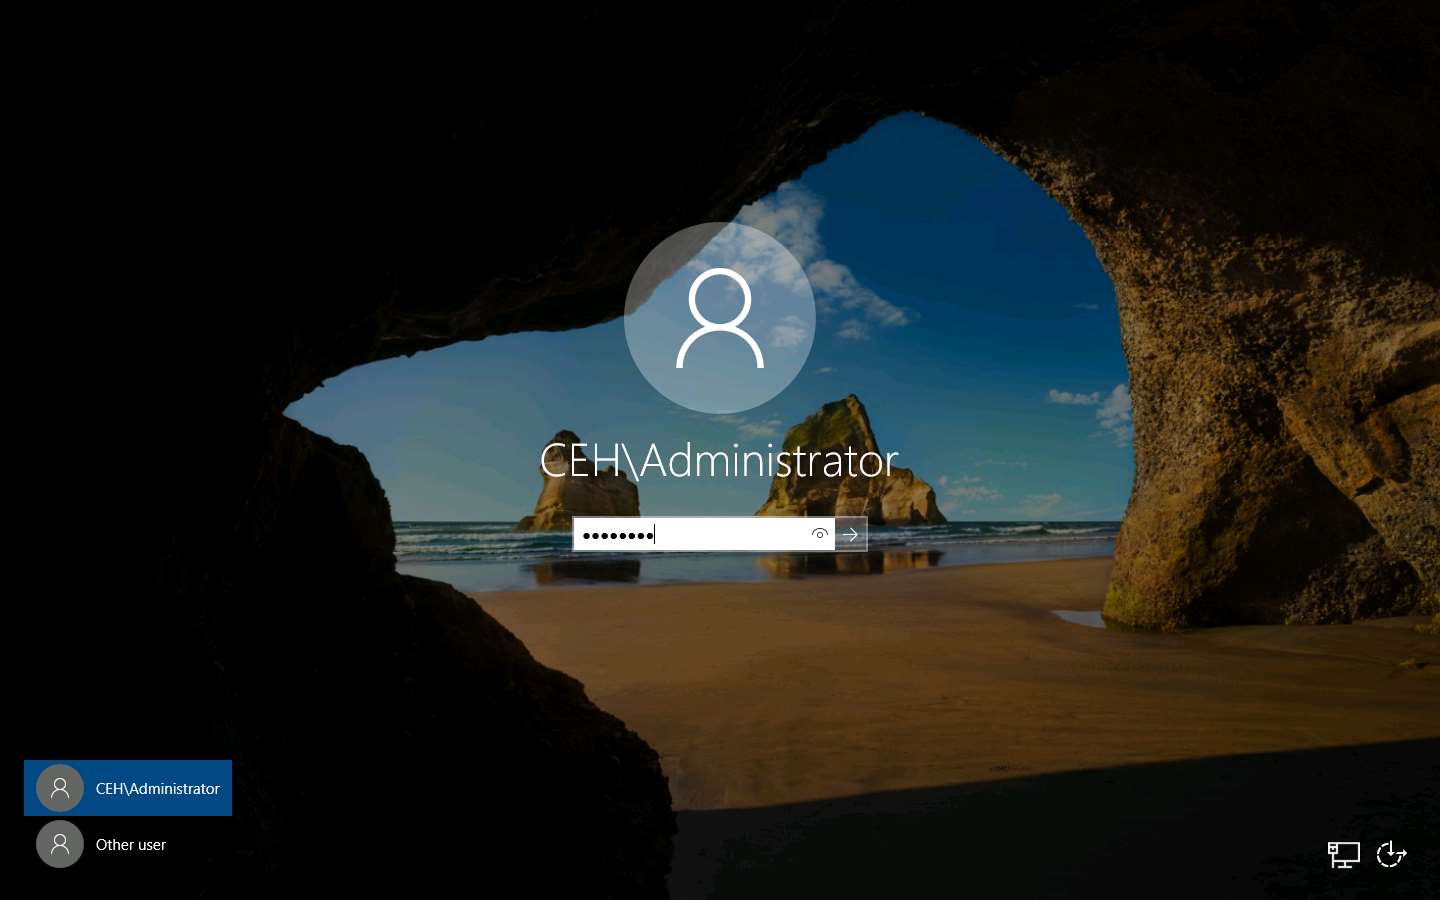
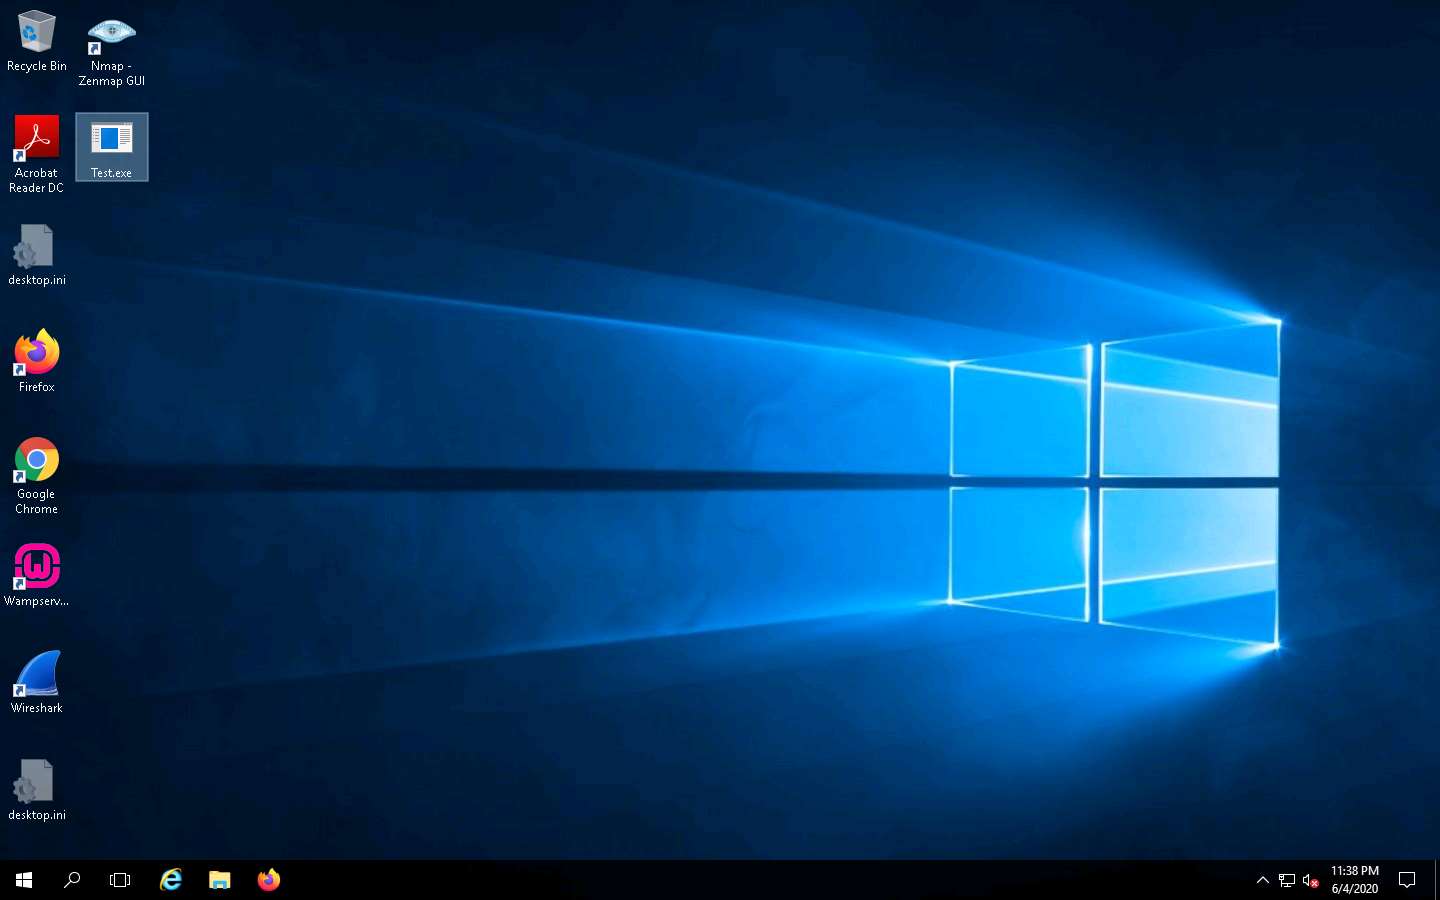
Navigate to the shared network location (CEH-Tools), and then Copy and Paste the executable file (Test.exe) onto the Desktop of Windows Server 2016.
Here, you are acting both as an attacker who logs into the Windows 10 machine to create a malicious server, and as a victim who logs into the Windows Server 2016 machine and downloads the server.
Double-click the server (Test.exe) to run this malicious executable.
Click Windows 10 to switch back to the Windows 10 machine. As soon as the victim (here, you) double-clicks the server, the executable starts running and the njRAT client (njRAT GUI) running in Windows 10 establishes a persistent connection with the victim machine, as shown in the screenshot.
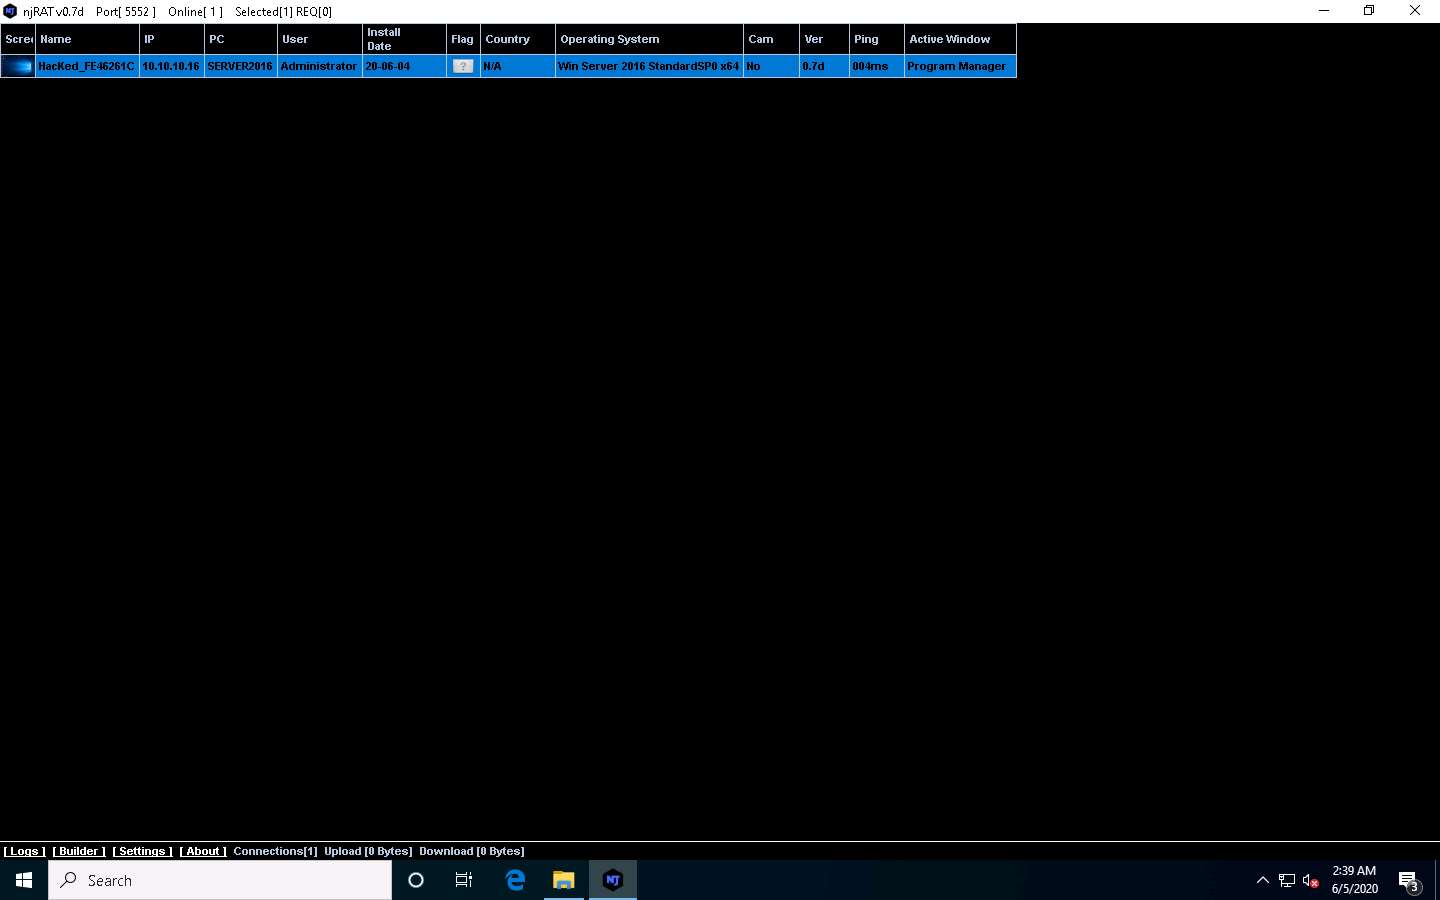
Unless the attacker working on the Windows 10 machine disconnects the server on their own, the victim machine remains under their control.
The GUI displays the machine’s basic details such as the IP address, User name, and Type of Operating system.
Right-click on the detected victim name and click Manager.
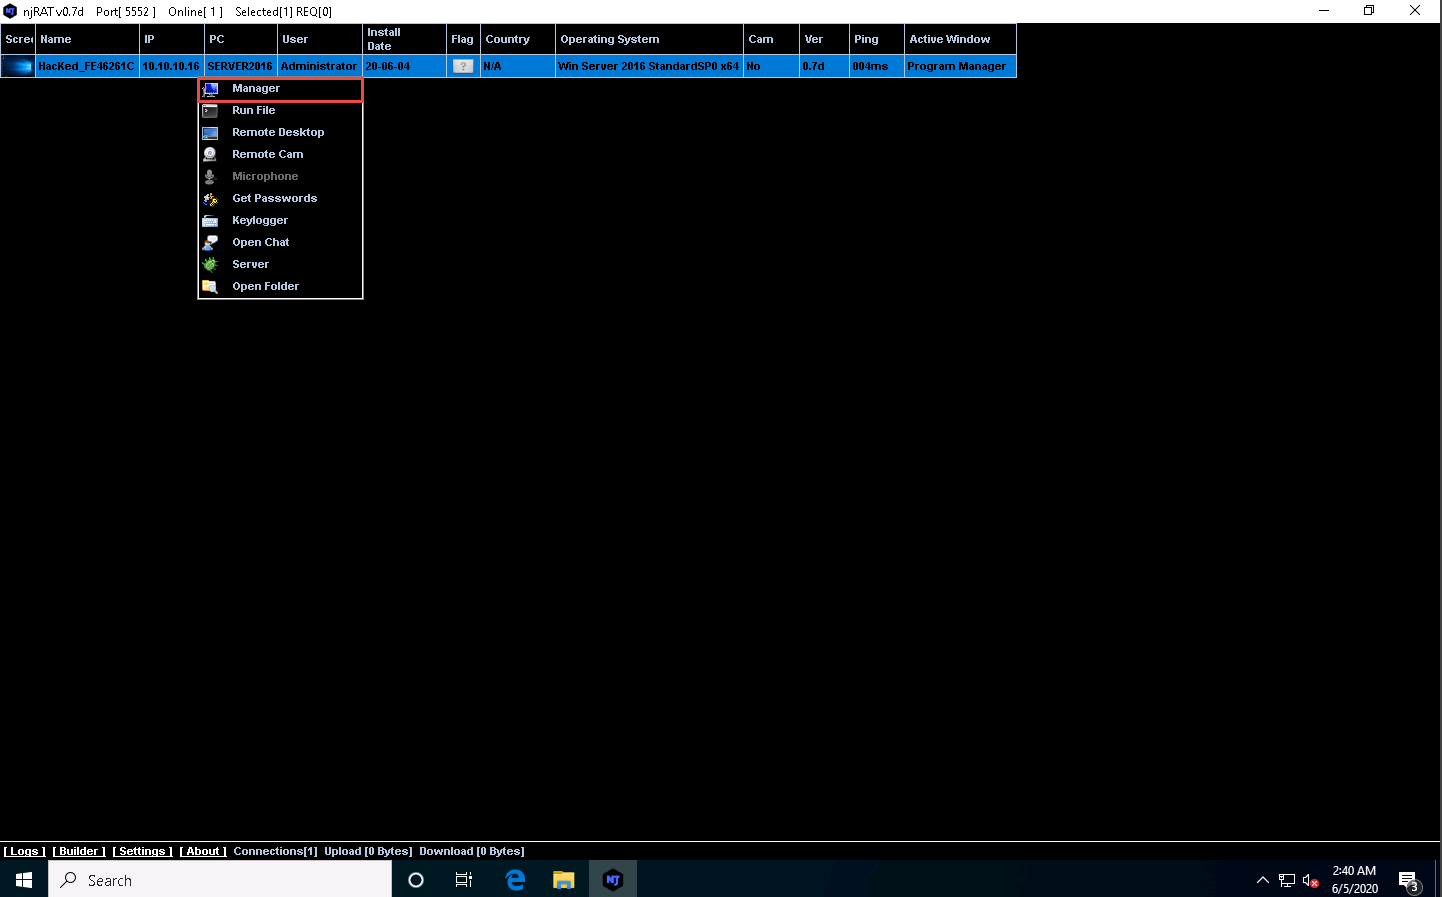
The manager window appears with File Manager selected by default.
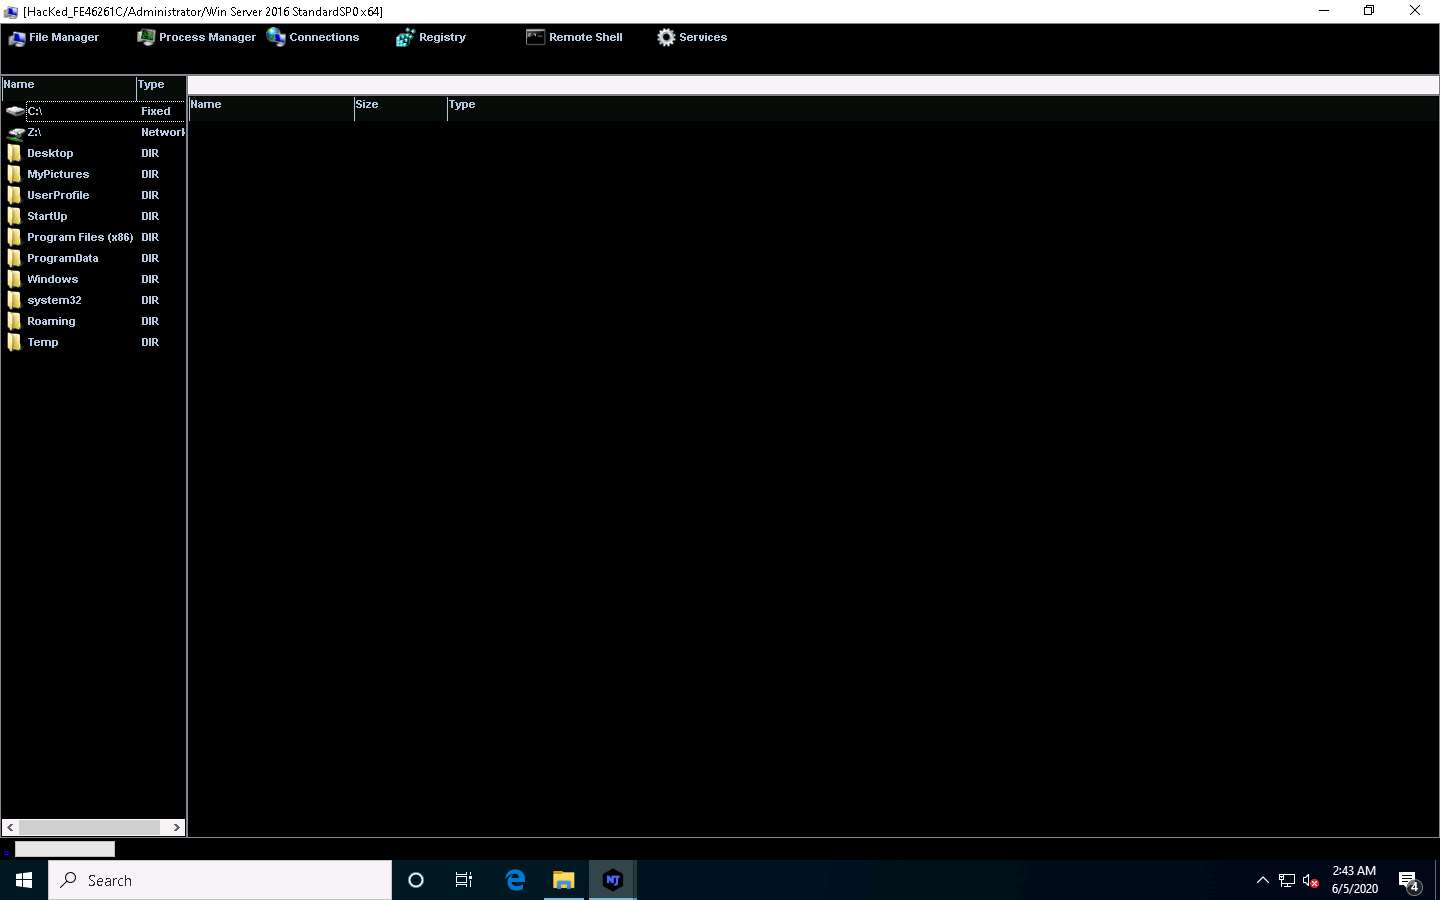
Double-click any directory in the left pane (here, ProgramData); all its associated files and directories are displayed in the right pane. You can right-click a selected directory and manipulate it using the contextual options.
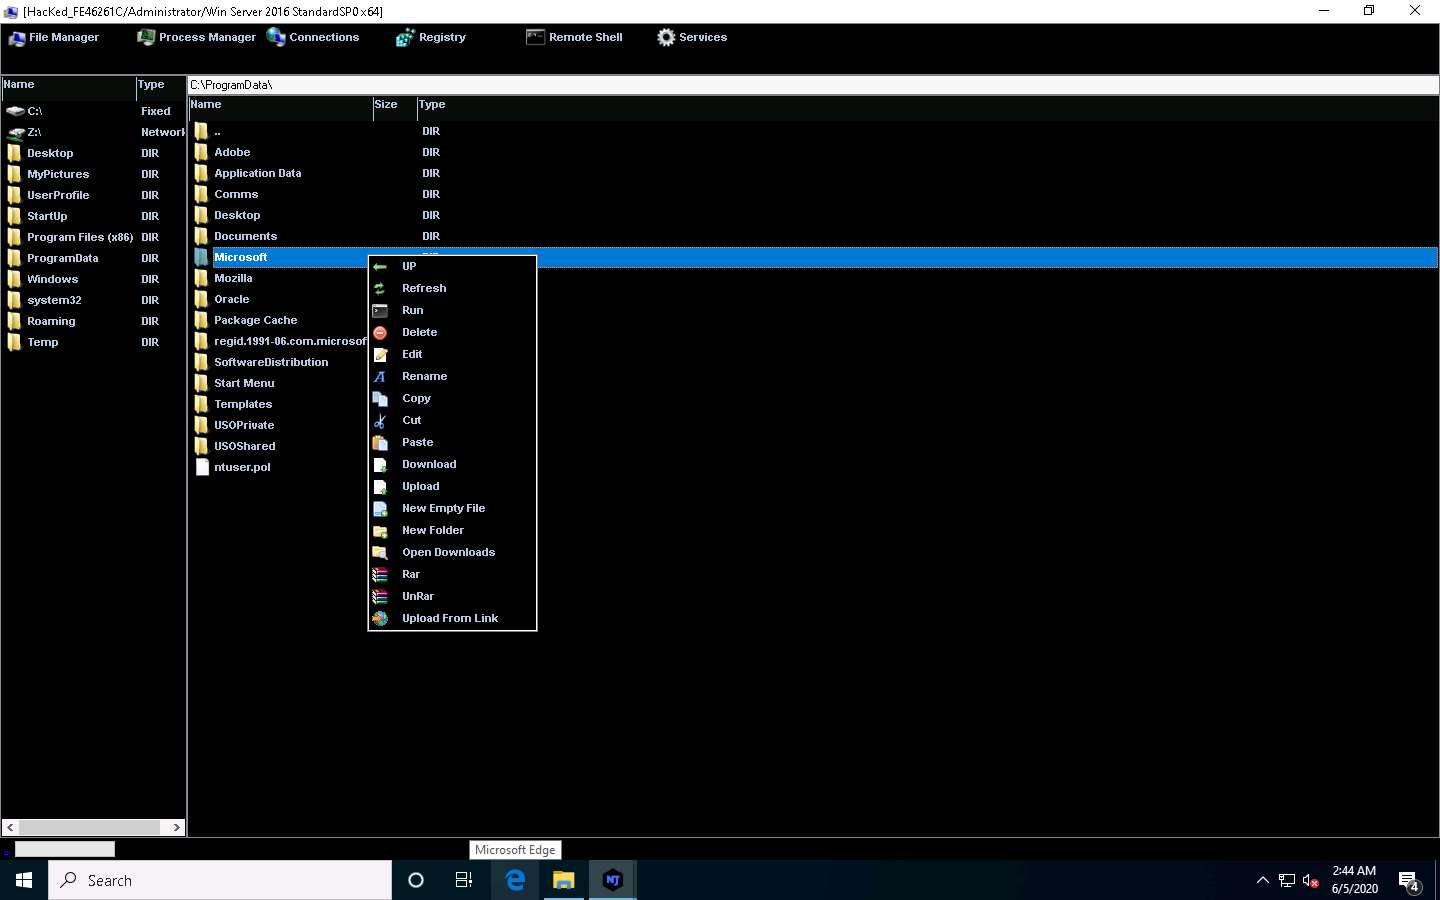
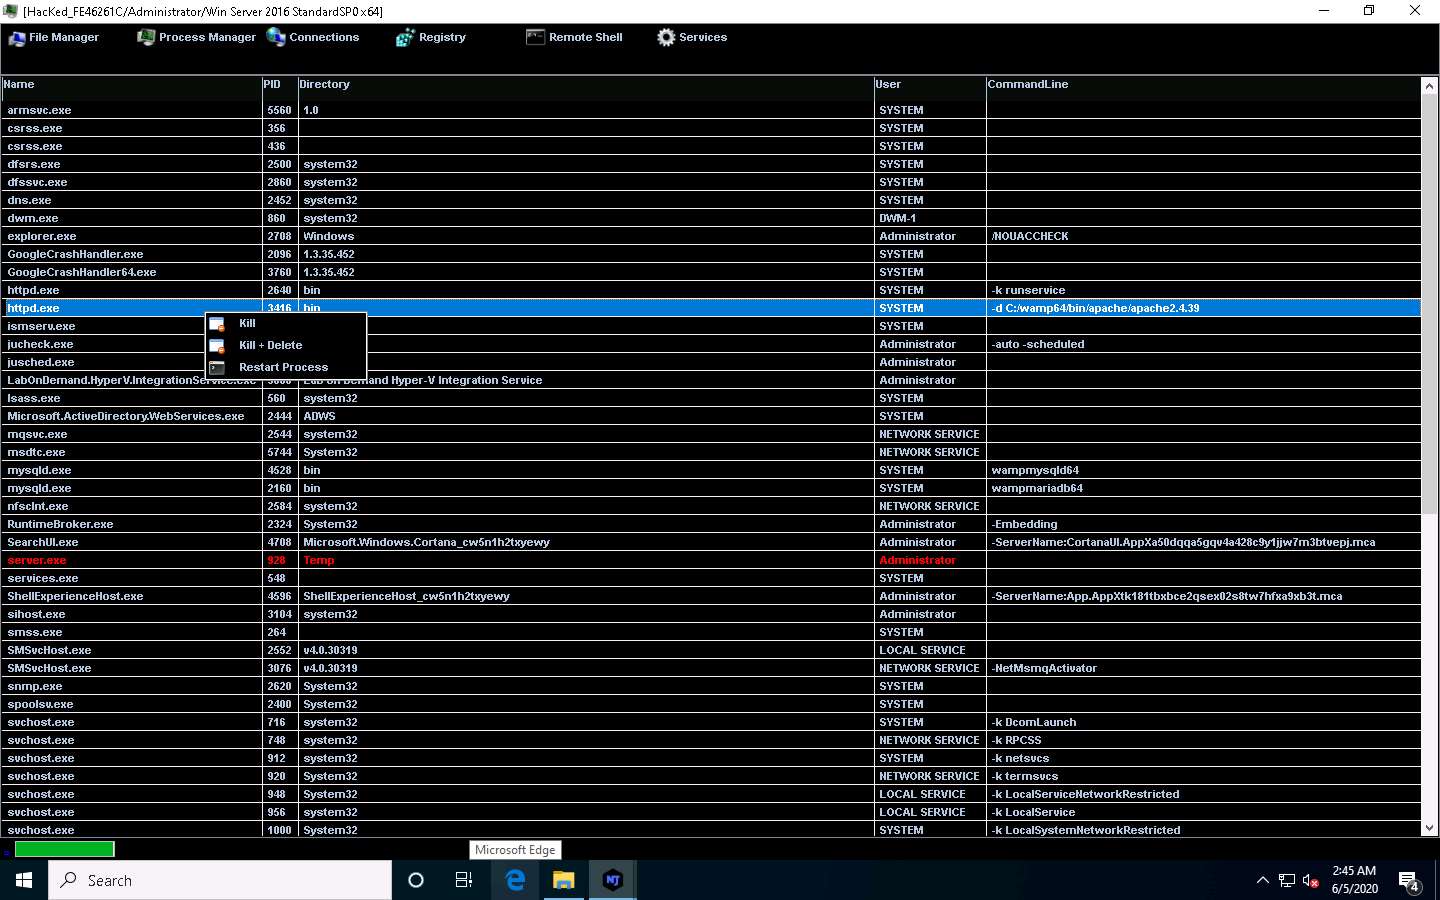
Click on Process Manager. You will be redirected to the Process Manager, where you can right-click on a selected process and perform actions such as Kill, Delete, and Restart.
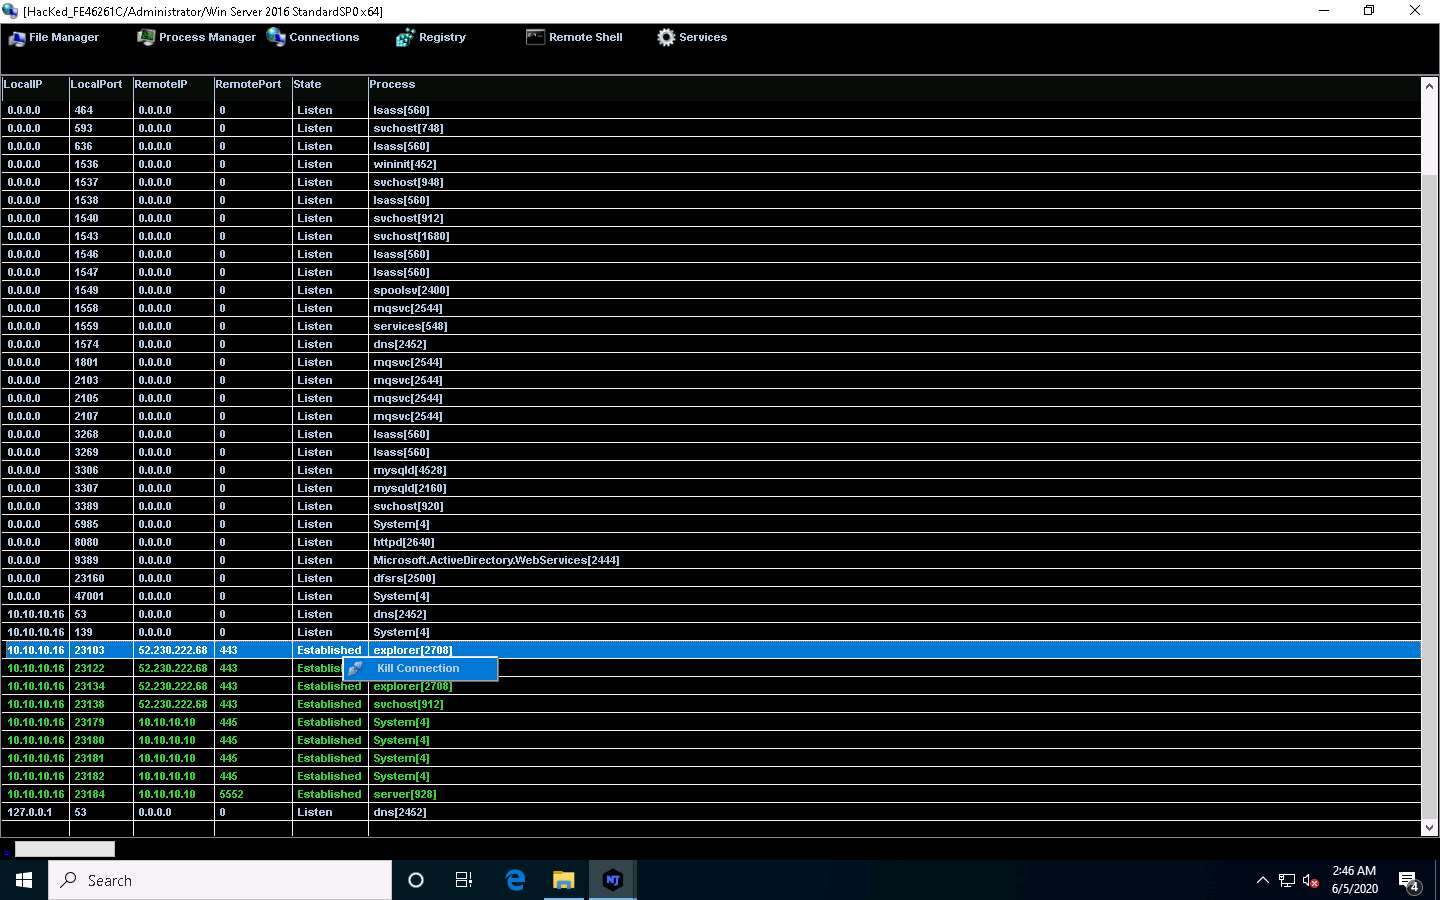
Click on Connections, select a specific connection, right-click on it, and click Kill Connection. This kills the connection between two machines communicating through a particular port.
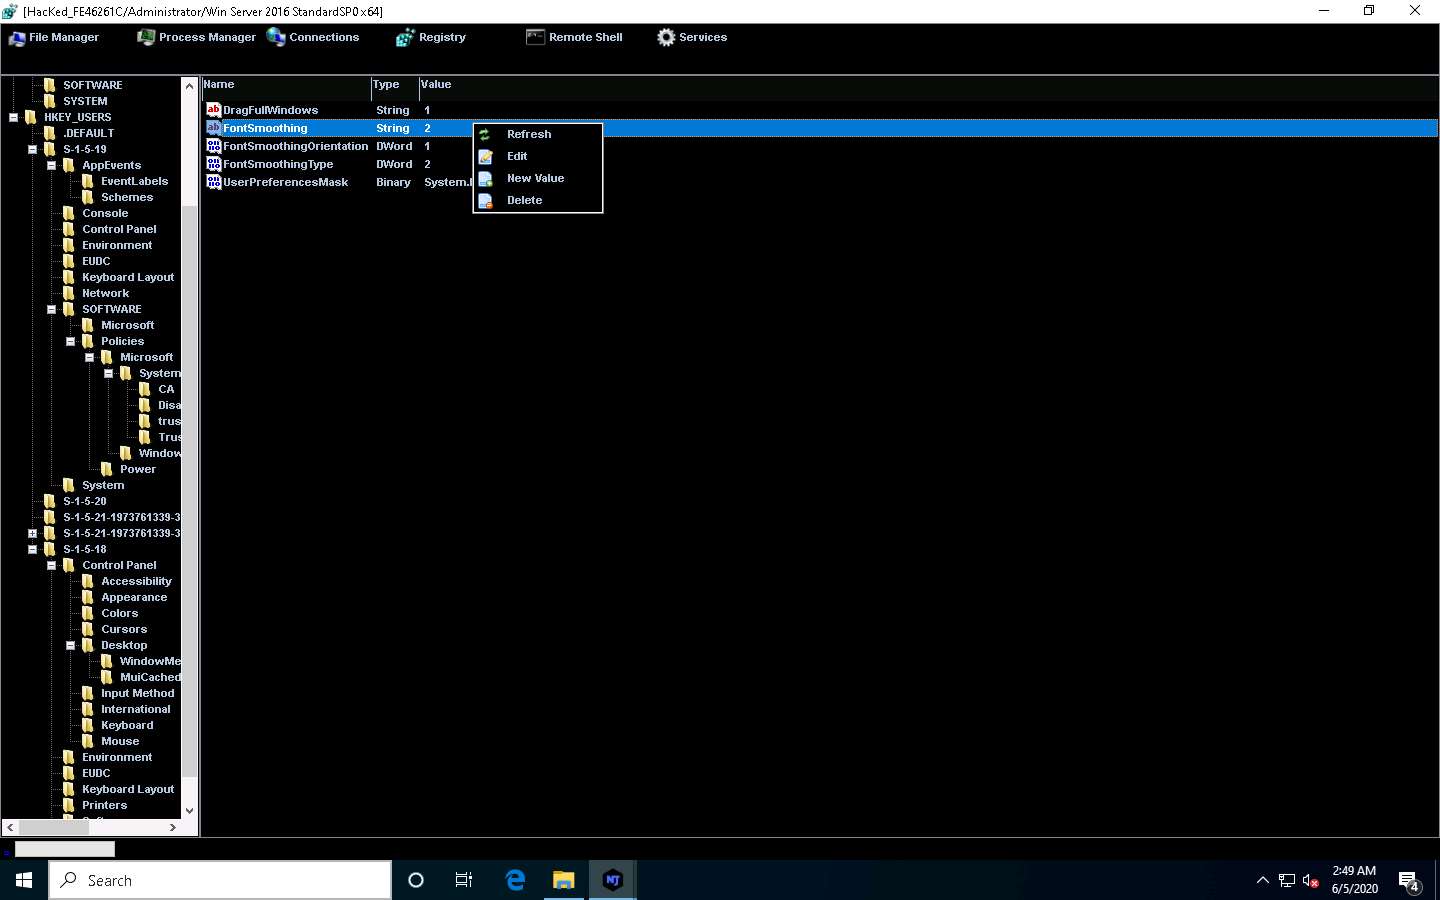
Click on Registry, choose a registry directory from the left pane, and right-click on its associated registry files.
A few options appear for the files; you can use these to manipulate them.
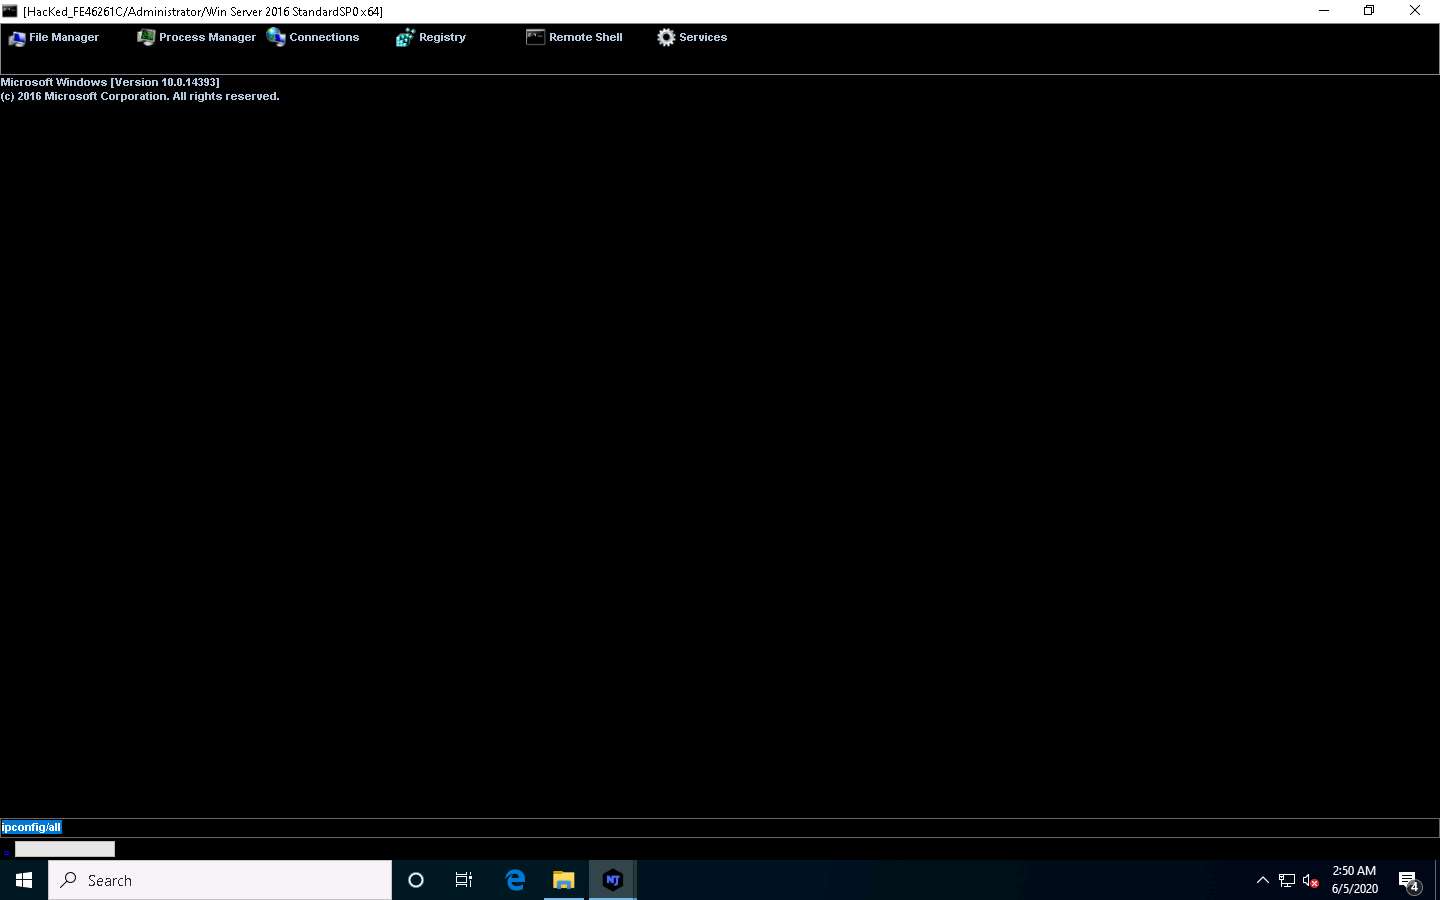
Click Remote Shell. This launches a remote command prompt for the victim machine (Windows Server 2016).
Type the command ipconfig/all and press Enter.
This displays all interfaces related to the victim machine, as shown in the screenshot.
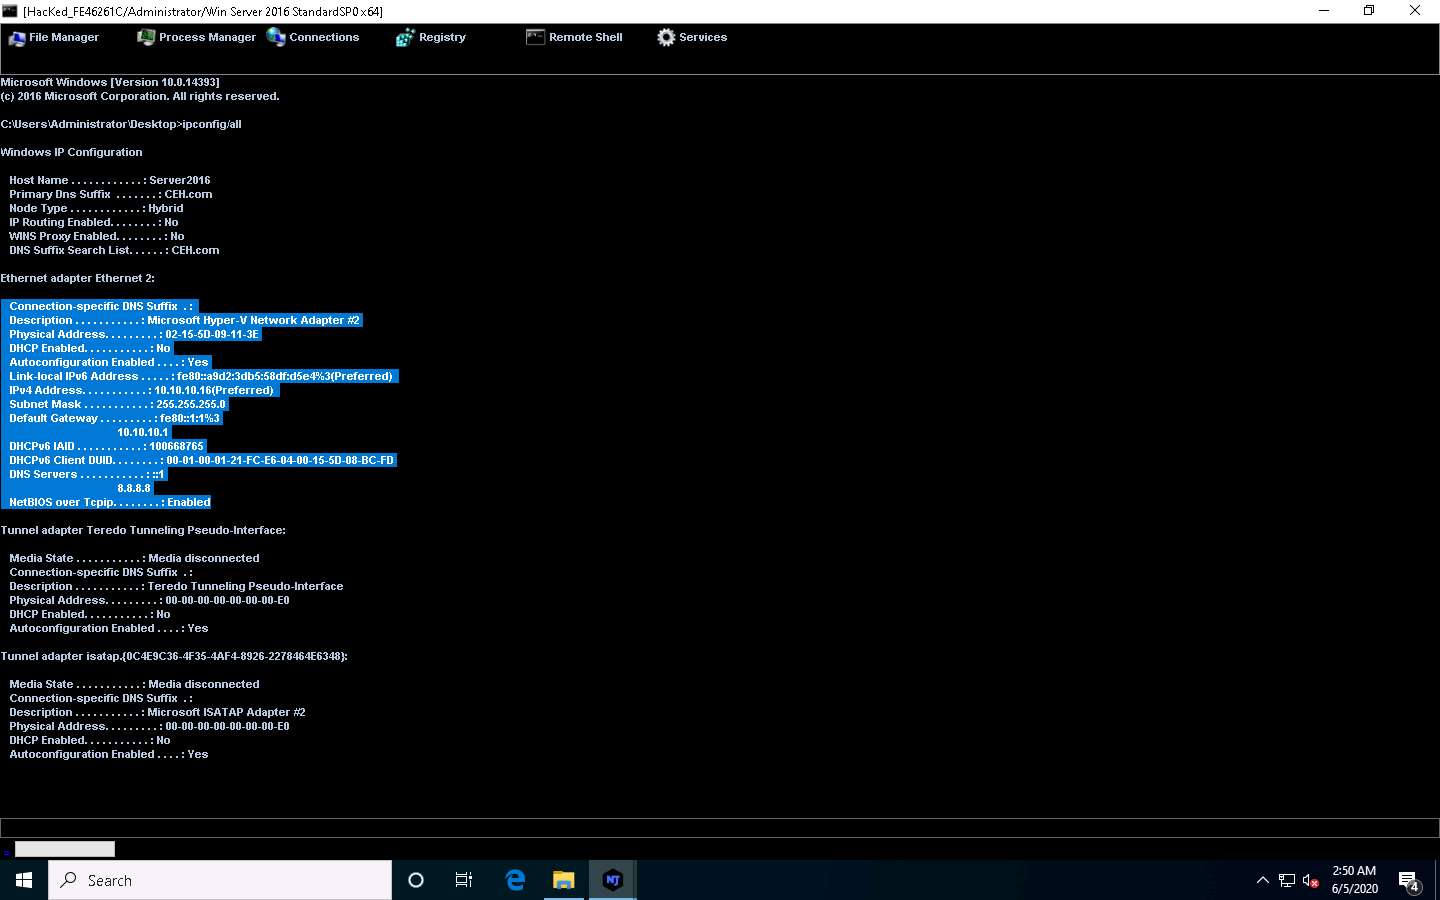
Similarly, you can issue all other commands that can be executed in the command prompt of the victim machine.
In the same way, click Services. You will be able to view all services running on the victim machine. In this section, you can use options to start, pause, or stop a service.
Close the Manager window.
Now, right-click on the victim name, click Run File, and choose an option from the drop-down list to execute scripts or files remotely from the attacker machine.
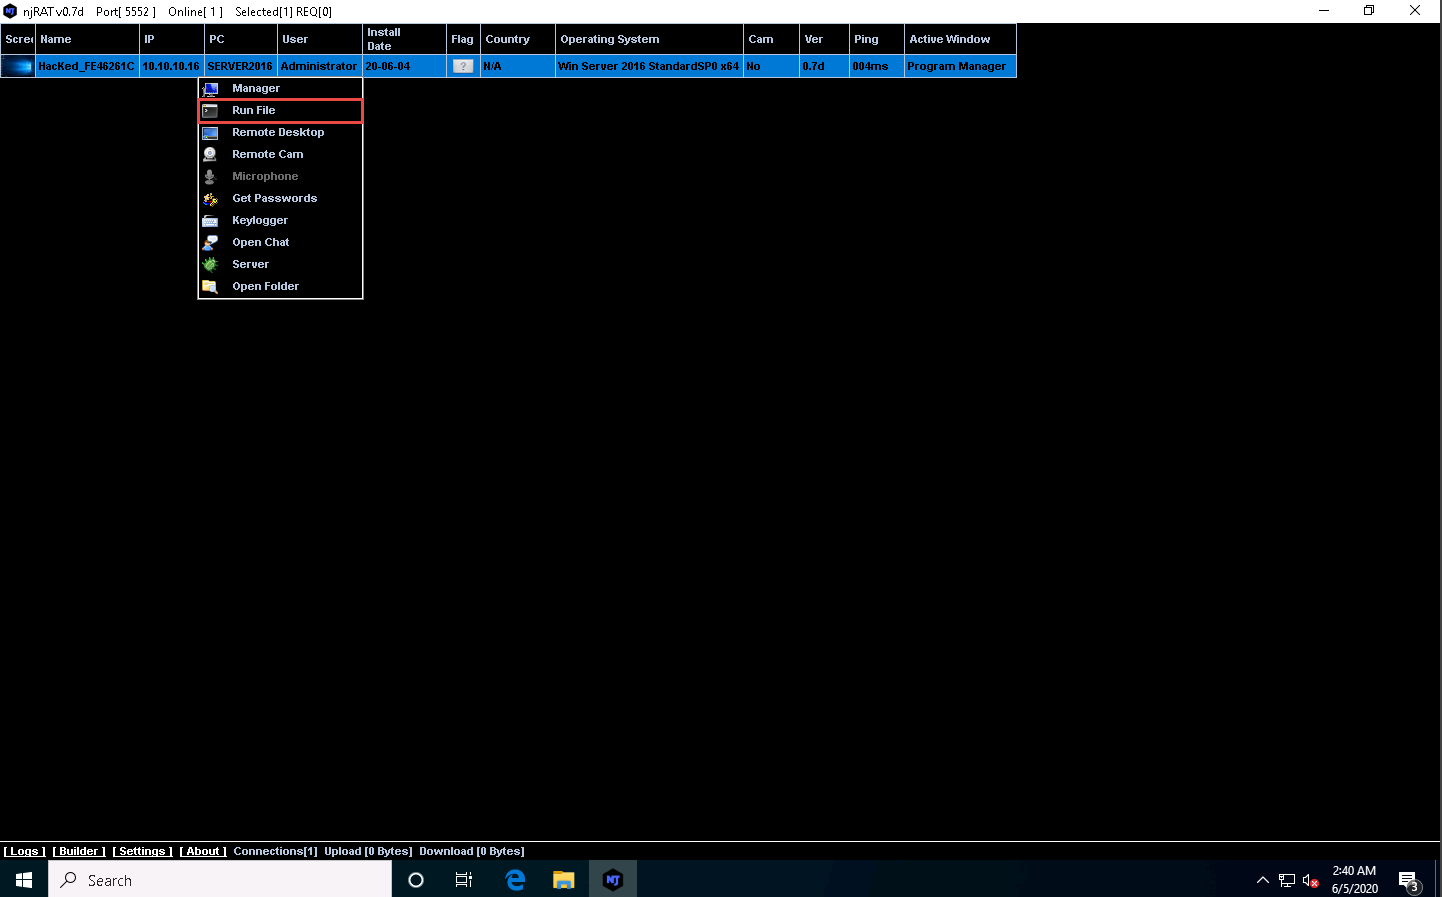
Right-click on the victim name, and then select Remote Desktop.
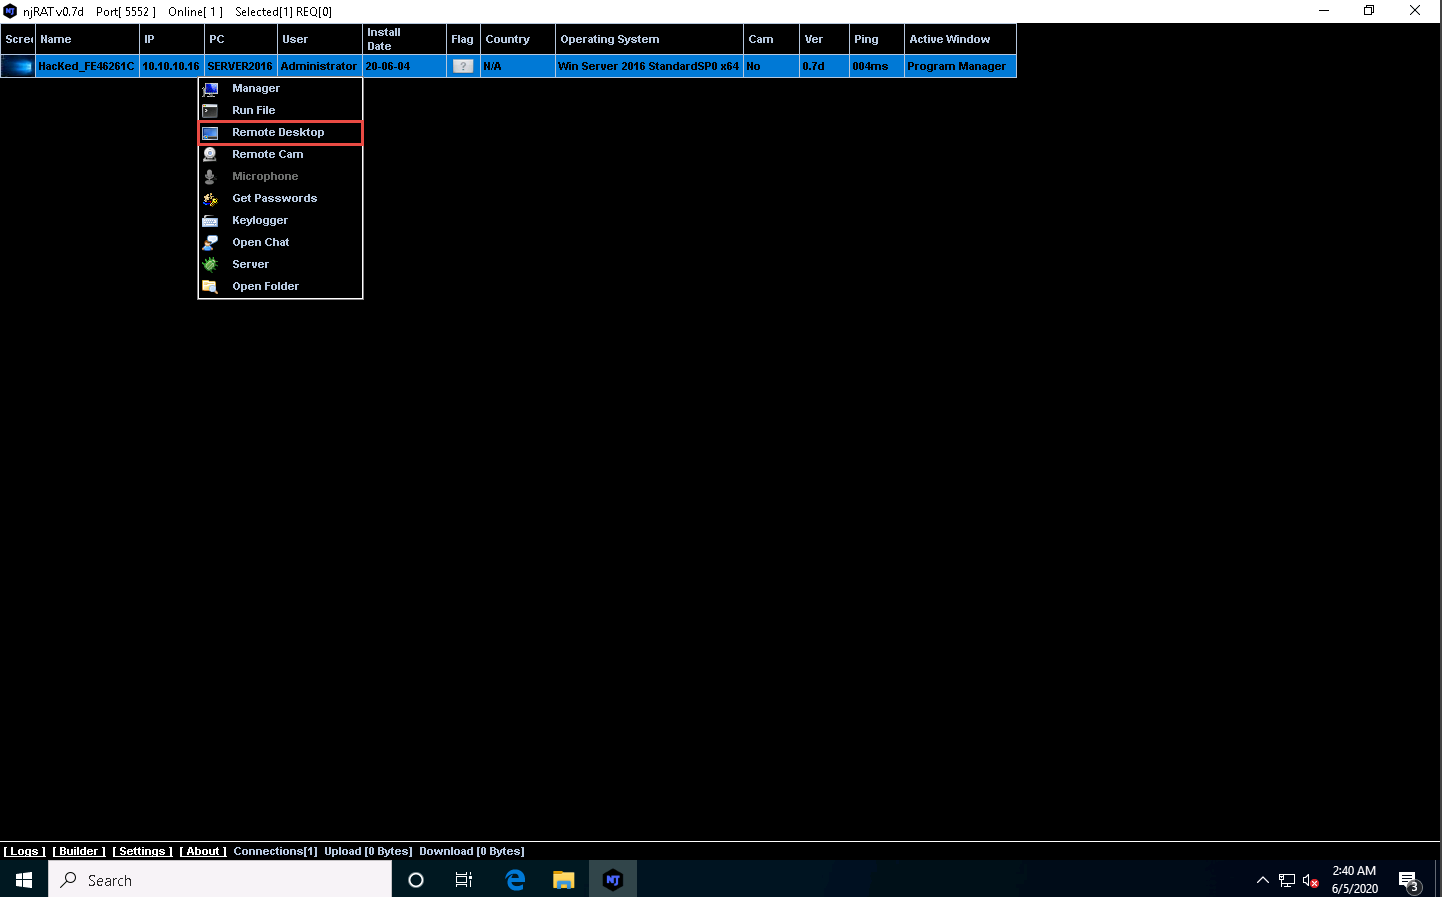
This launches a remote desktop connection without the victim’s awareness.
A Remote Desktop window appears; hover the mouse cursor to the top-center area of the window. A down arrow appears; click it.
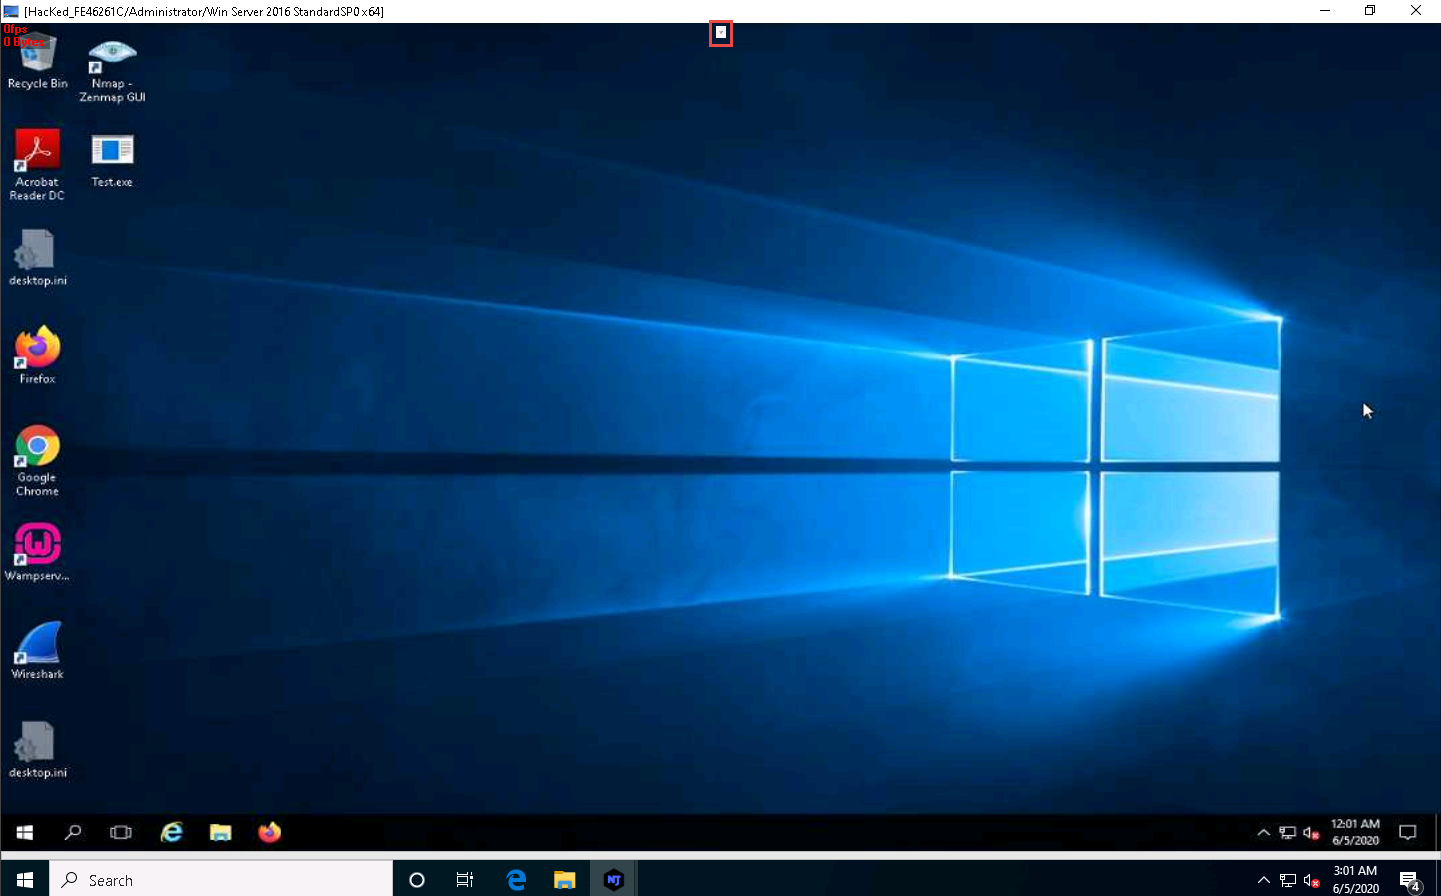
A remote desktop control panel appears; check the Mouse option.

Now, you will be able to remotely interact with the victim machine using the mouse.
If you want to create any files or write any scripts on the victim machine, you need to check the Keyboard option.
On completing the task, close the Remote Desktop window.
In the same way, right-click on the victim name, and select Remote Cam and Microphone to spy on them and track voice conversations.

Click Windows Server 2016 to switch to the Windows Server 2016 machine. Assume that you are a legitimate user and perform a few activities such as logging into any website or typing some text in text documents.
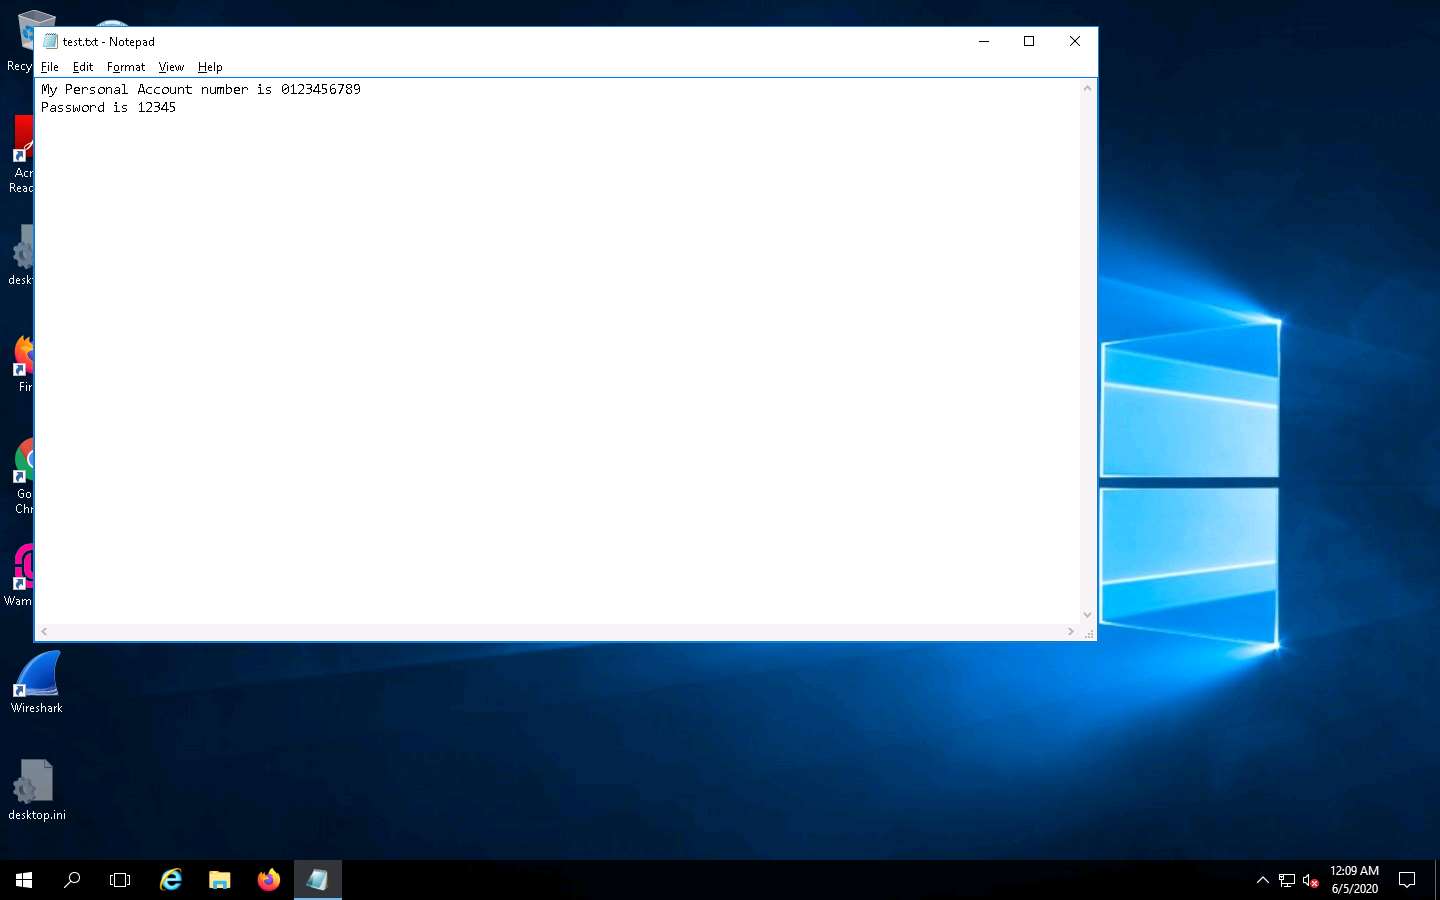
Click Windows 10 to switch back to the Windows 10 machine, right-click on the victim name, and click Keylogger.

The Keylogger window appears; wait for the window to load.
The window displays all the keystrokes performed by the victim on the Windows Server 2016 machine, as shown in the screenshot.
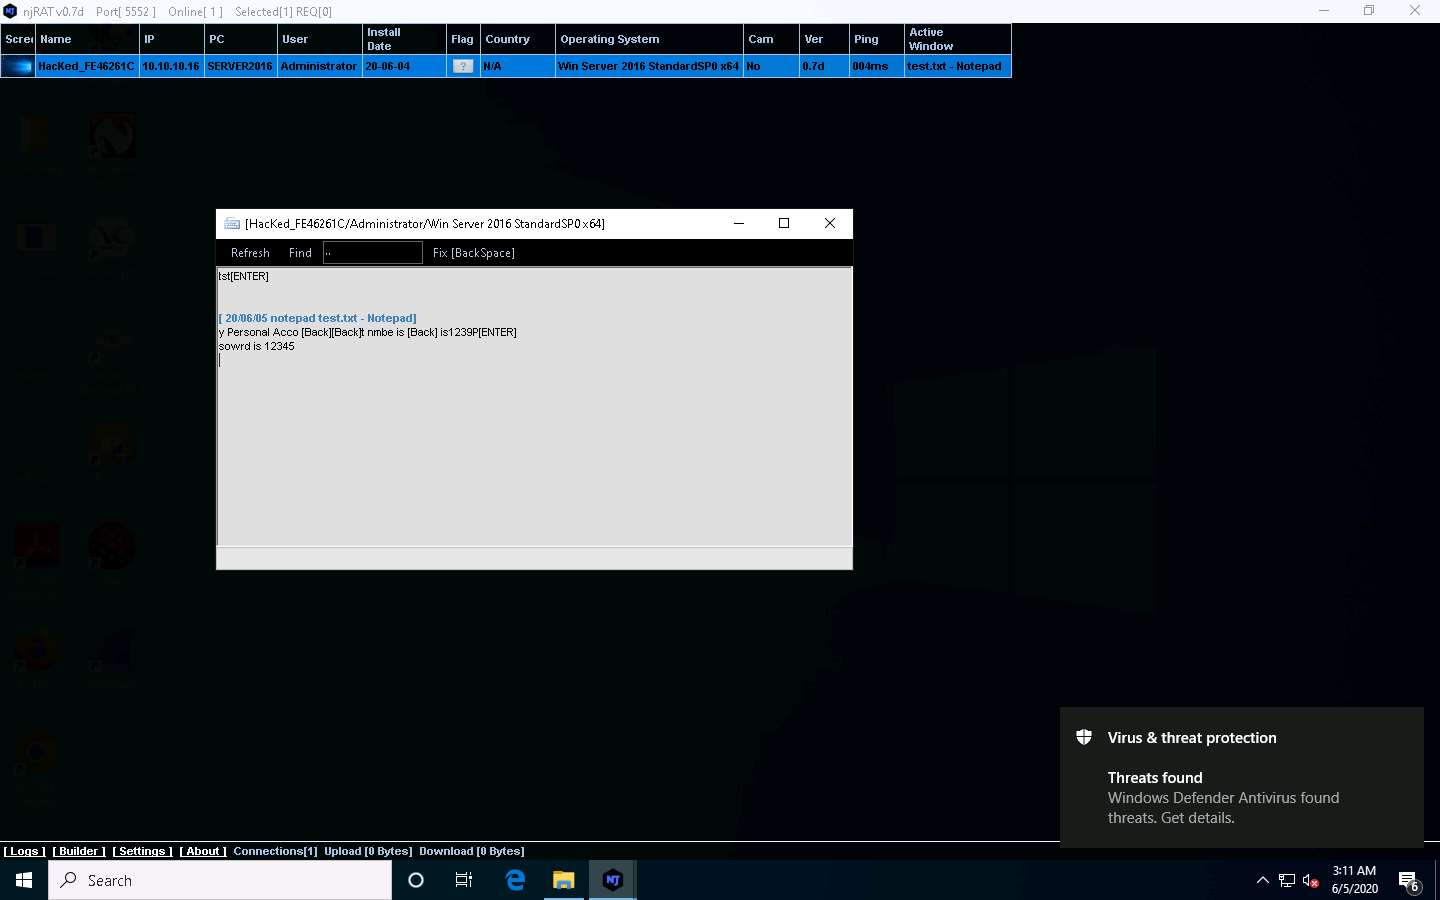
Close the Keylogger window.
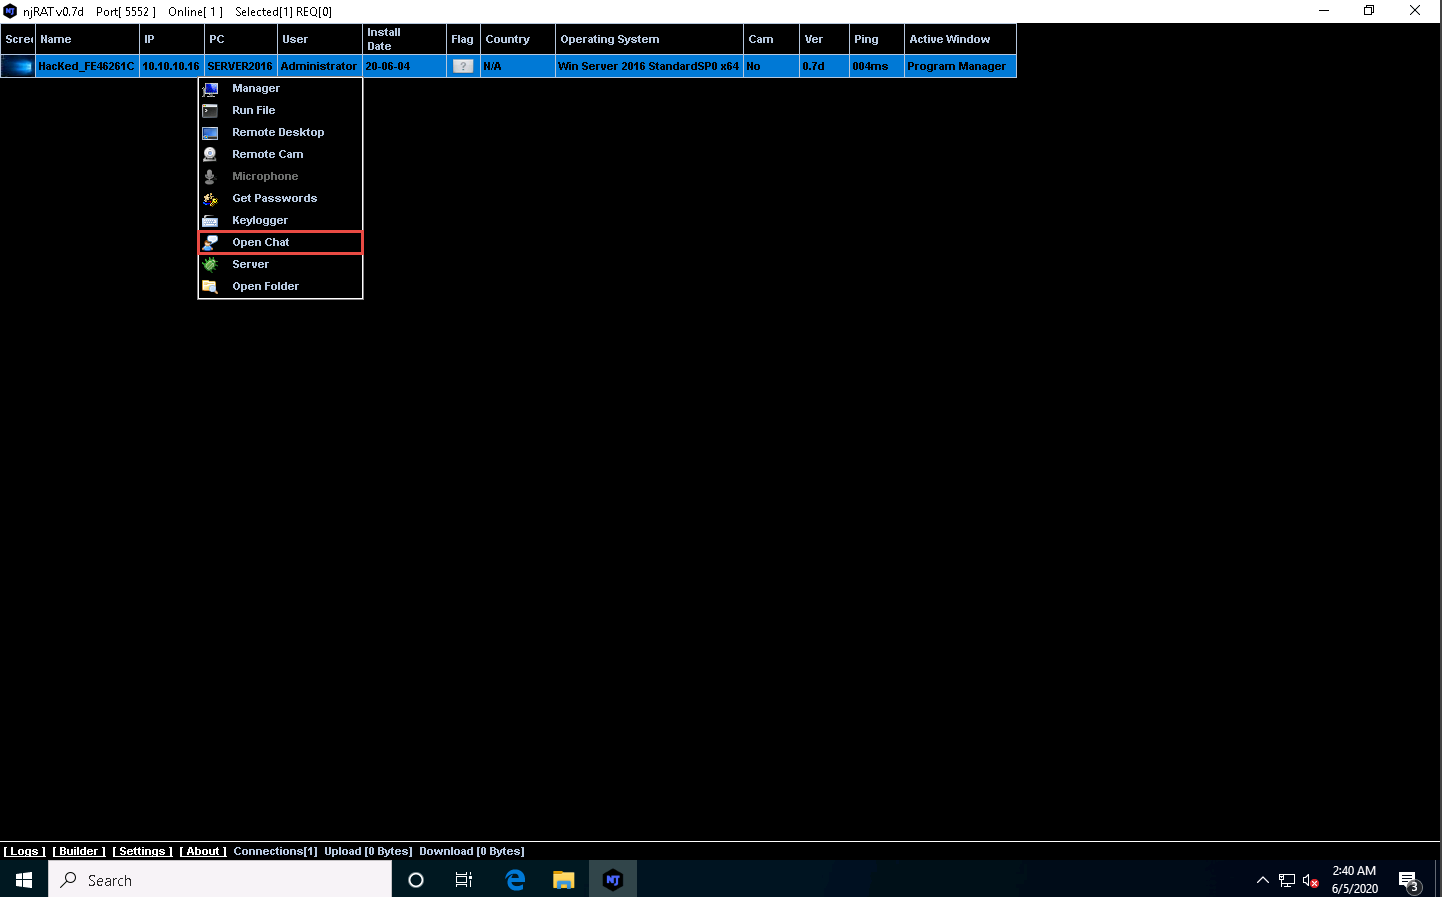
Right-click on the victim name, and click Open Chat.
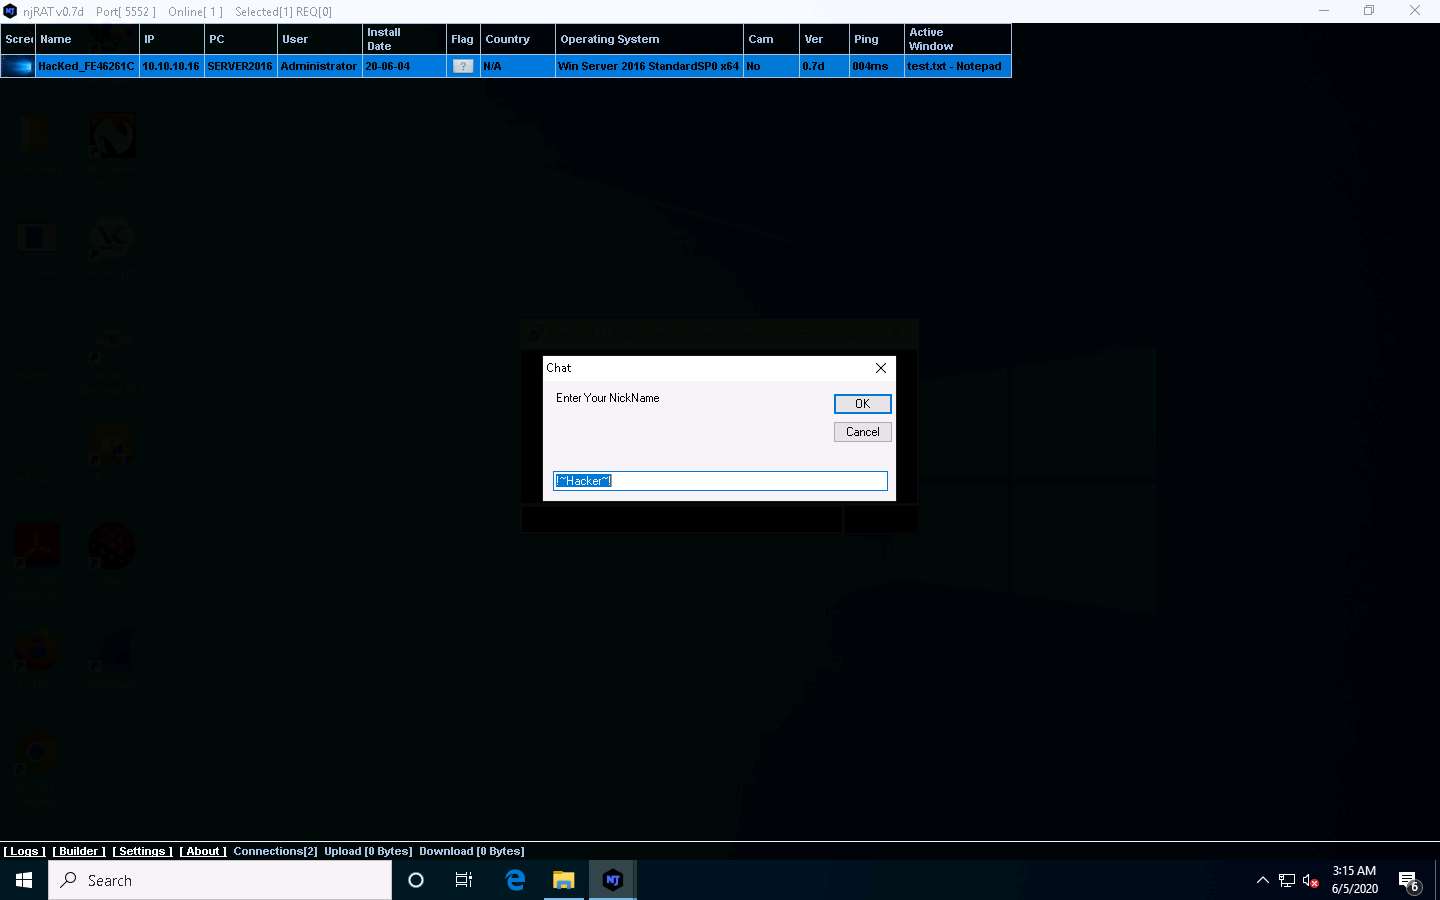
A Chat pop-up appears; enter a nickname (here, Hacker) and click OK.
A chat box appears; type a message, and then click Send.

In real-time, as soon as the attacker sends the message, a pop-up appears on the victim’s screen (Windows Server 2016), as demonstrated in the screenshot.
Click Windows Server 2016 to switch to the Windows Server 2016 machine, you can observe the message from the hacker appears on the screen.
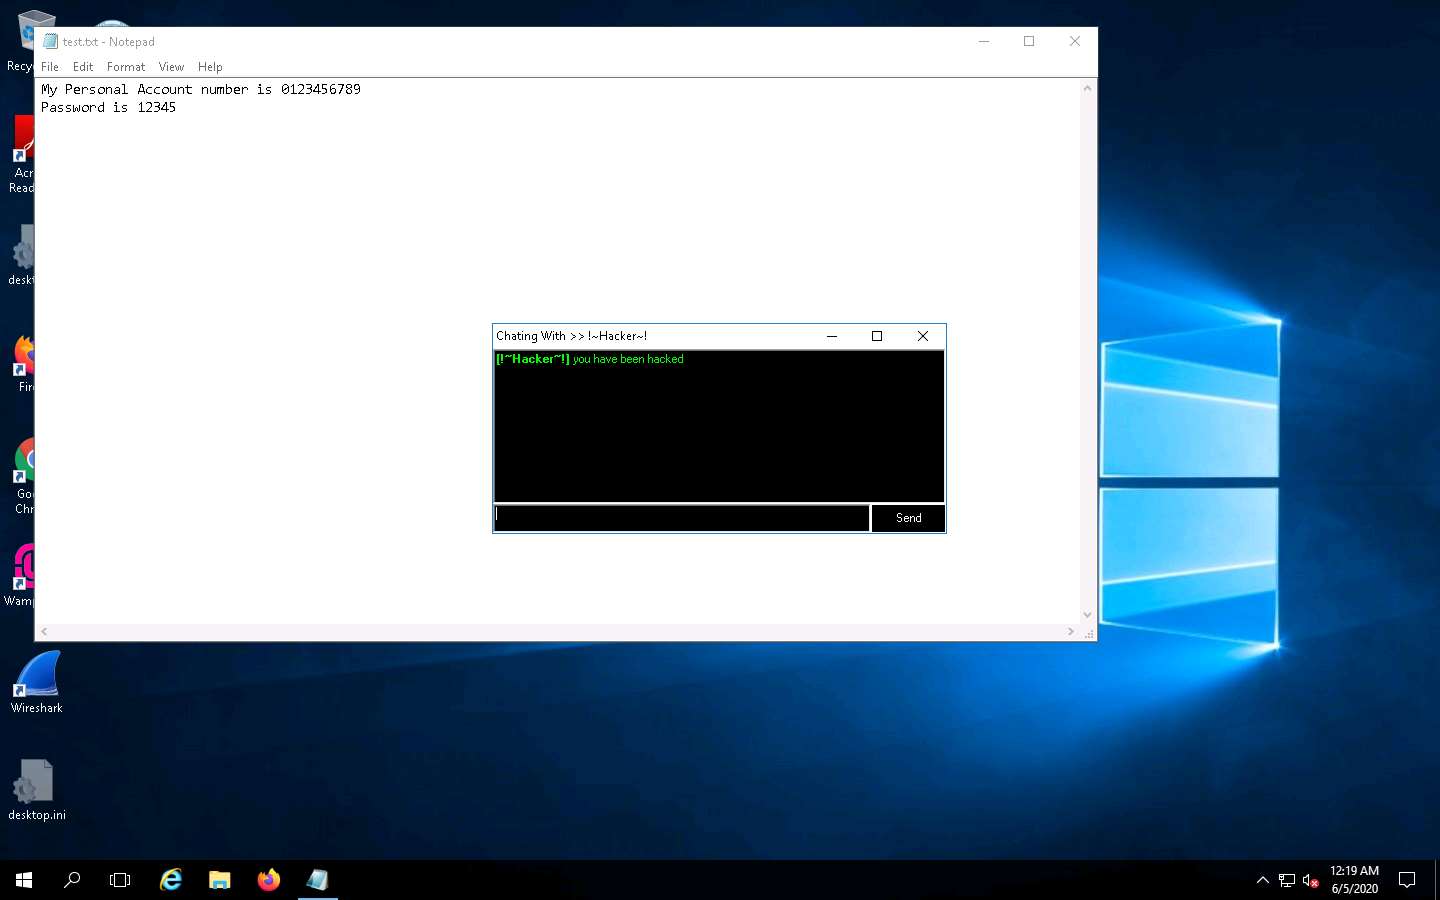
Seeing this, the victim becomes alert and attempts to close the chatbox. Irrespective of what the victim does, the chatbox remains for open as long as the attacker uses it.
Surprised by the behavior, the victim (you) attempts to break the connection by restarting the machine. As soon as this happens, njRAT loses its connection with Windows Server 2016, as the machine is shut down in the process of restarting.

Click Windows 10 to switch back to the attacker machine (Windows 10); you can see that the connection with the victim machine is lost.
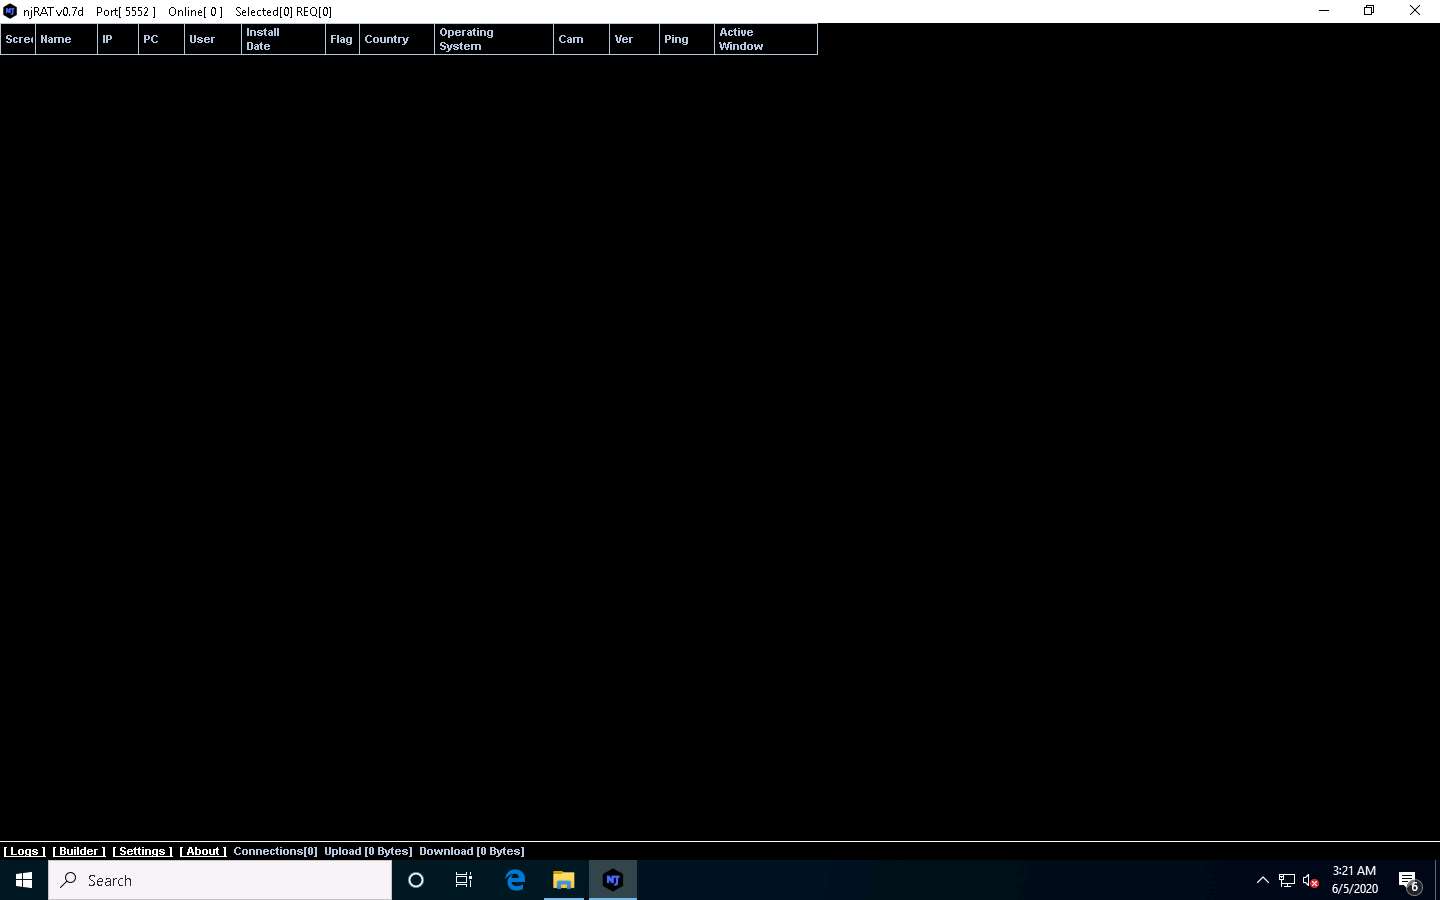
However, as soon as the victim logs in to their machine, the njRAT client automatically establishes a connection with the victim, as shown in the screenshot.
Click Windows Server 2016 to switch to the victim machine (Windows Server 2016). Click Ctrl+Alt+Delete to activate the machine, by default, CEH\Administrator account is selected, click Pa$$w0rd to enter the password and press Enter.
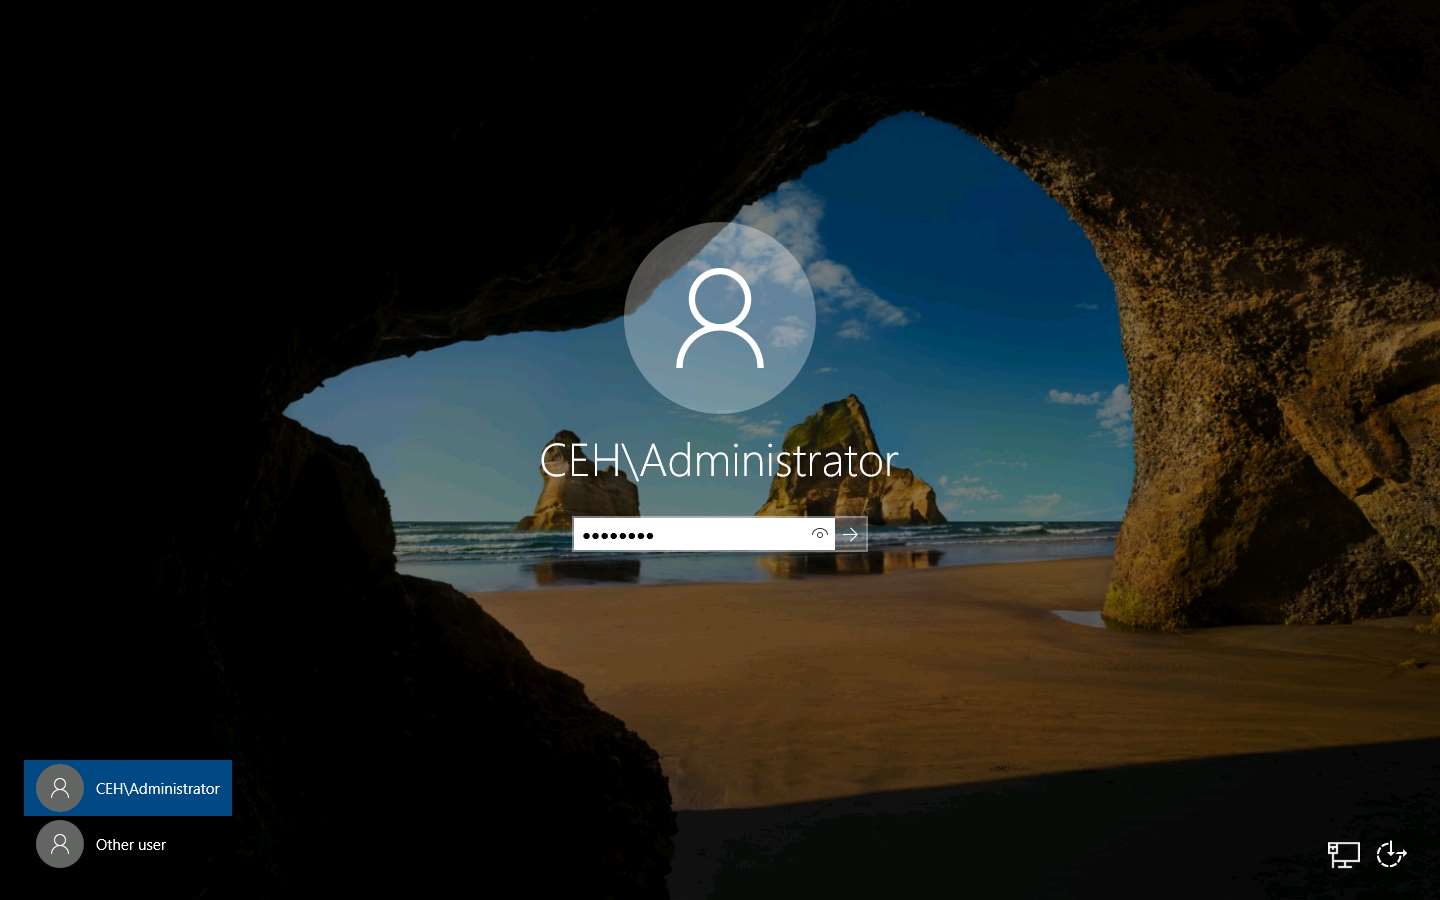
Click Windows 10 to switch back to the attacker machine (Windows 10); you can see that the connection has been re-established with the victim machine.
It might take some time to establish a connection with the victim.
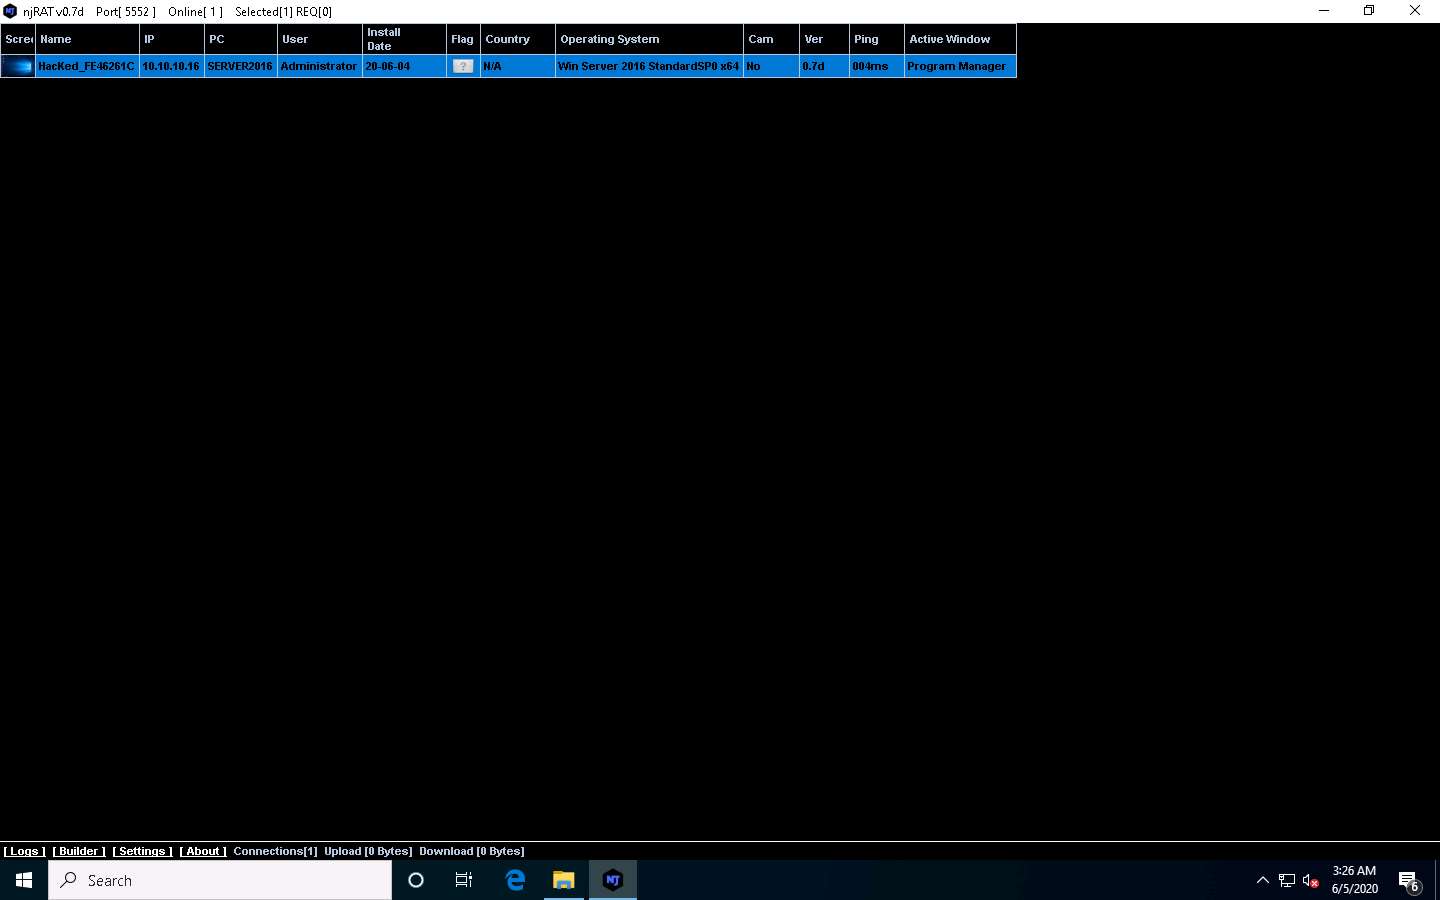
The attacker, as usual, makes use of the connection to access the victim machine remotely and perform malicious activity.
On completion of this lab, click Windows Server 2016 to switch to the Windows Server 2016 machine, launch Task Manager, look for the server.exe (32 bit) process, and click End task.
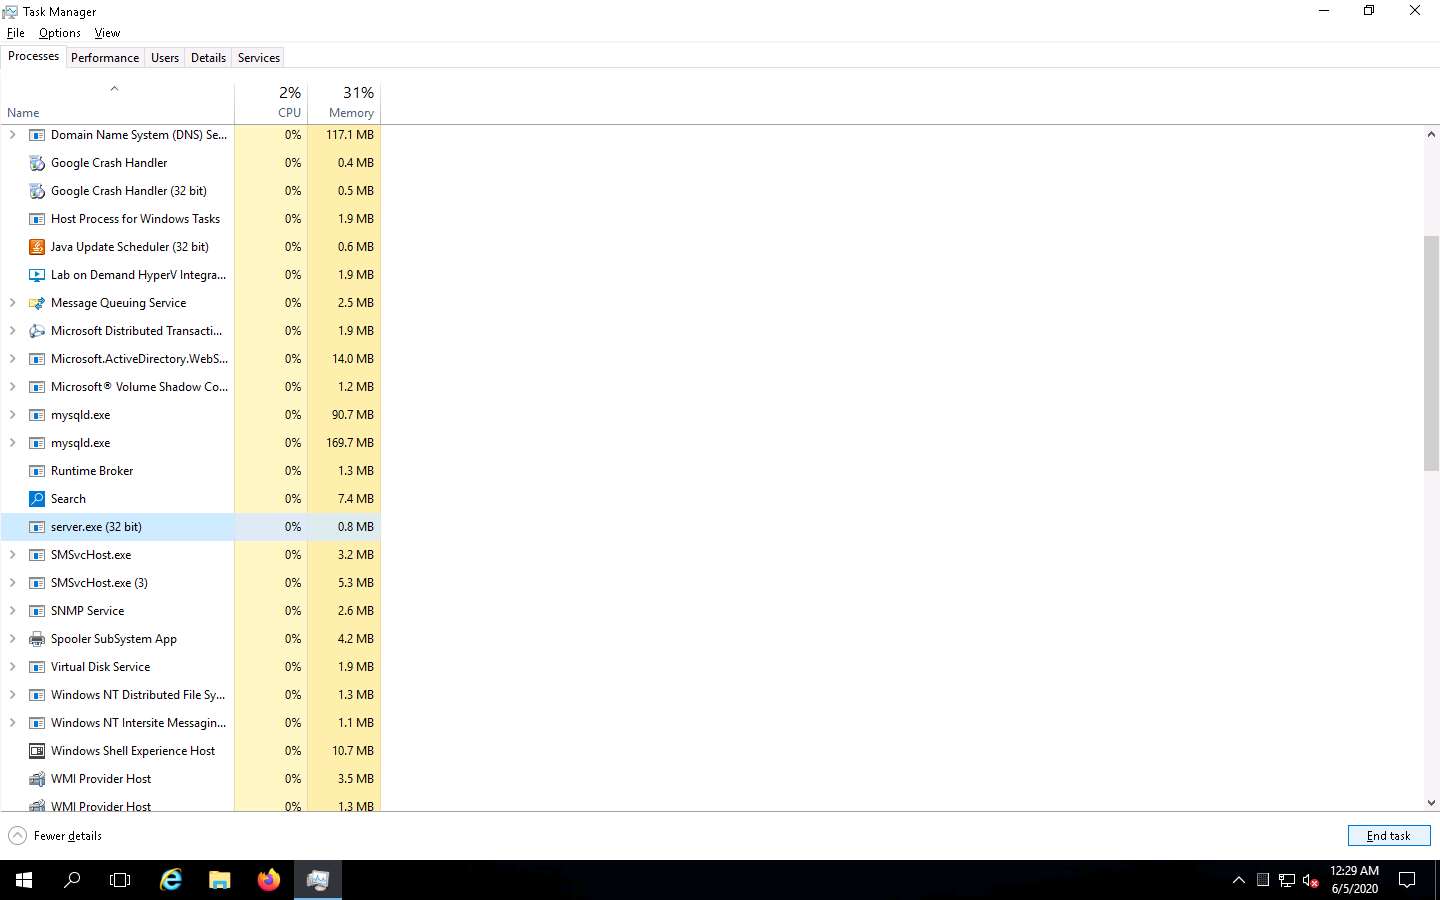
This concludes the demonstration of how to create a Trojan using njRAT Trojan to gain control over a victim machine.
Task 2: Hide a Trojan using SwayzCryptor and Make it Undetectable to Various Anti-Virus Programs
At present, numerous anti-virus software programs have been configured to detect malware such as Trojans, viruses, and worms. Although security specialists keep updating the virus definitions, hackers continually try to evade or bypass them. One method that attackers use to bypass AVs is to “crypt” (an abbreviation of “encrypt”) the malicious files using fully undetectable crypters (FUDs). Crypting these files allows them to achieve their objectives, and thereby take complete control over the victim’s machine.
Crypter is a software that encrypts the original binary code of the .exe file to hide viruses, spyware, keyloggers, and RATs, among others, in any kind of file to make them undetectable by anti-viruses. SwayzCryptor is an encrypter (or “crypter”) that allows users to encrypt their program’s source code.
Here, we will use the SwayzCryptor to hide a Trojan and make it undetectable by anti-virus software.
Click Windows 10 to switch to the Windows 10 machine, open any web browser (here, Google Chrome).In the address bar of the browser place your mouse cursor and click https://www.virustotal.com and press Enter.
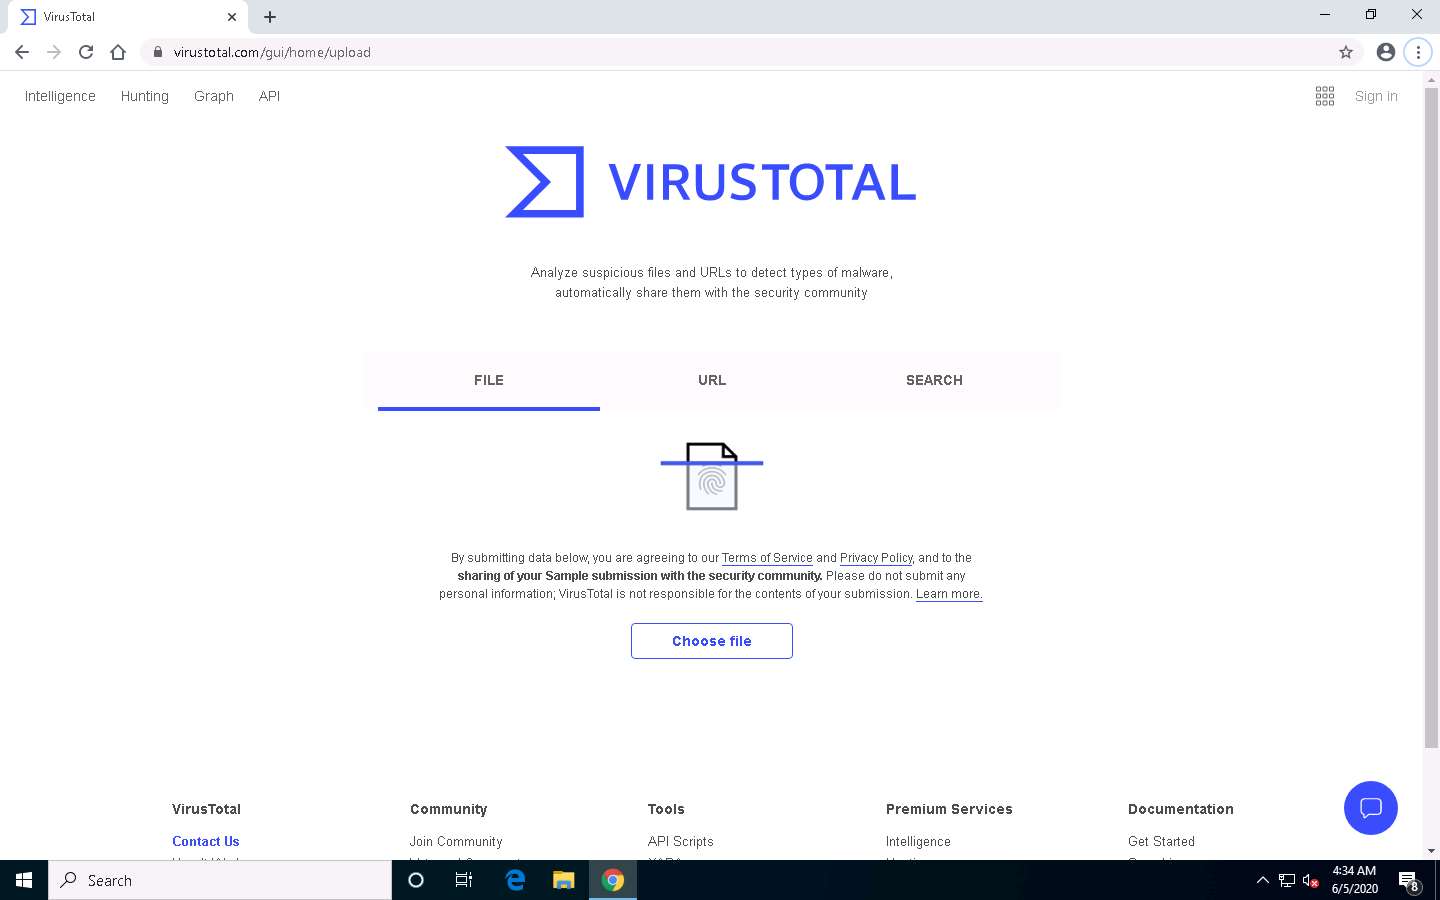
The VirusTotal main analysis site appears; click Choose file to upload a virus file.
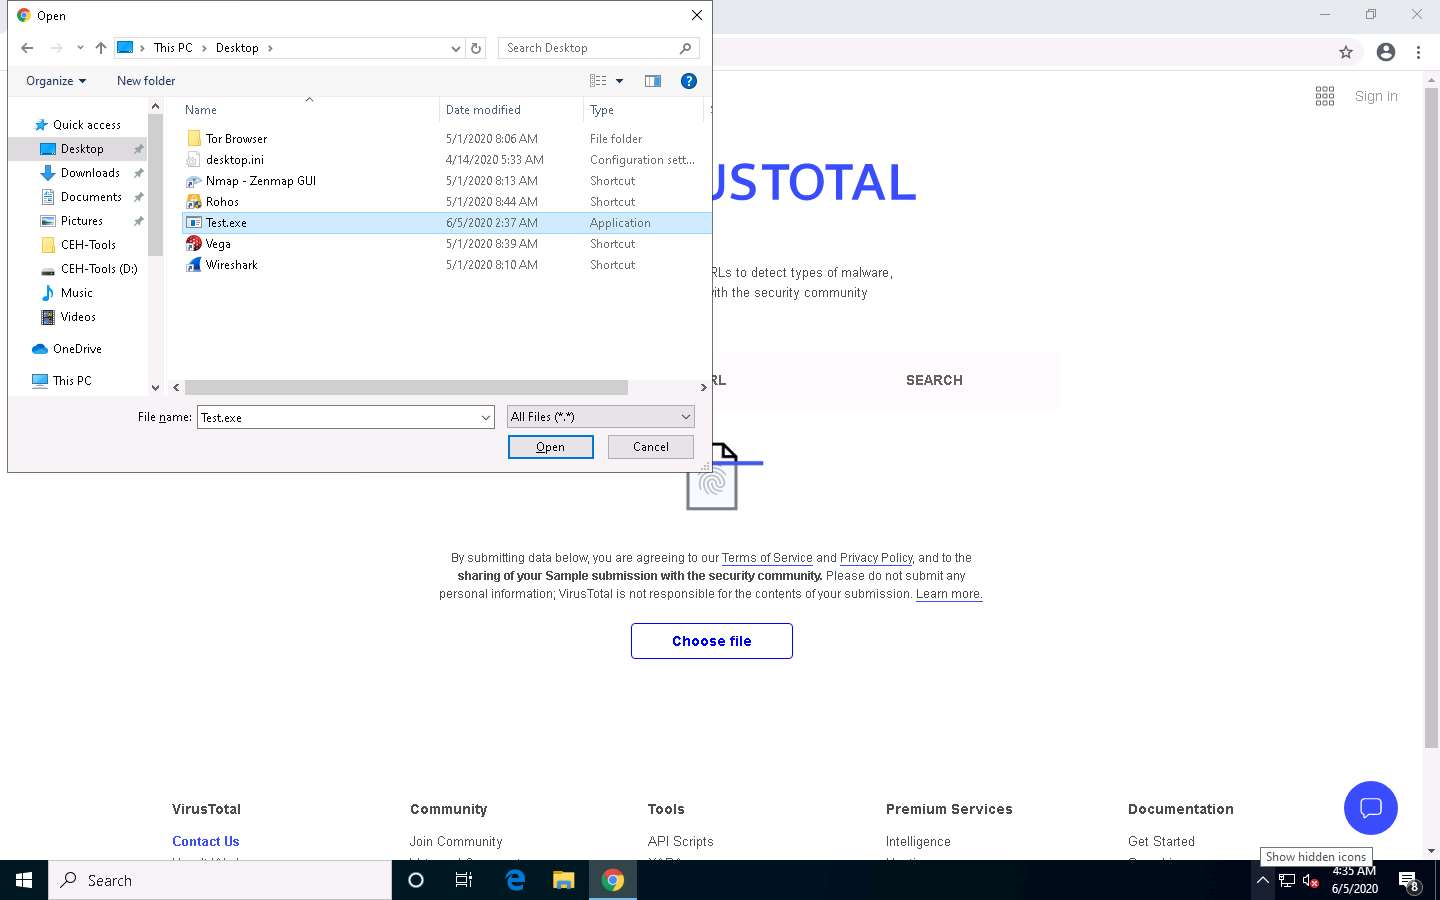
An Open dialog box appears; navigate to the location where you saved the malware file Test.exe in the previous lab (Desktop), select it, and click Open.
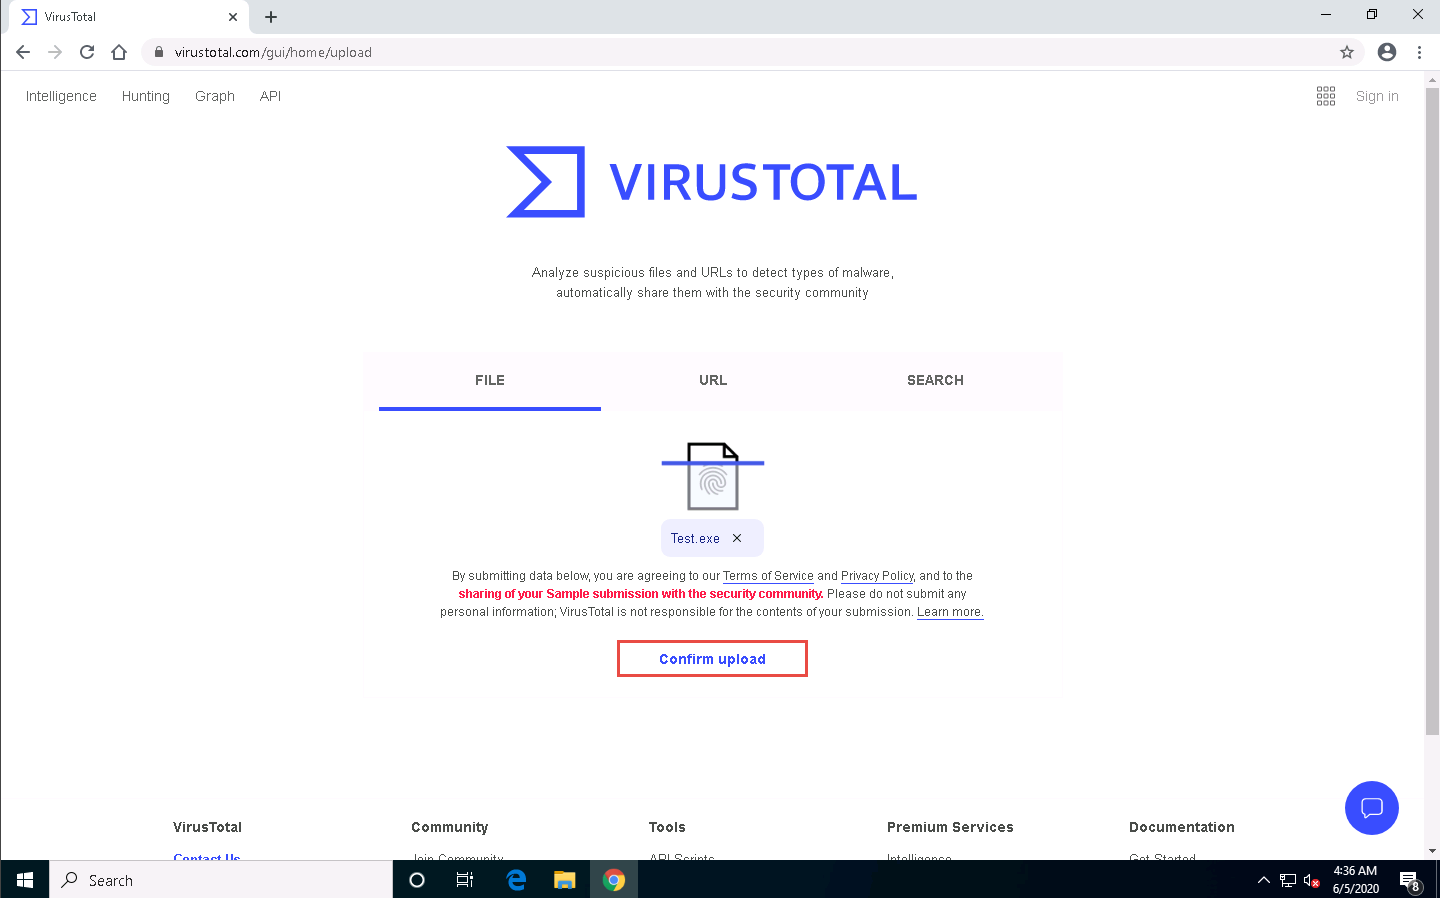
Click Confirm upload on the VirusTotal page.
The VirusTotal uploads the file, scans it with the various anti-virus programs in its database, and displays the scan result, as shown in the screenshot.
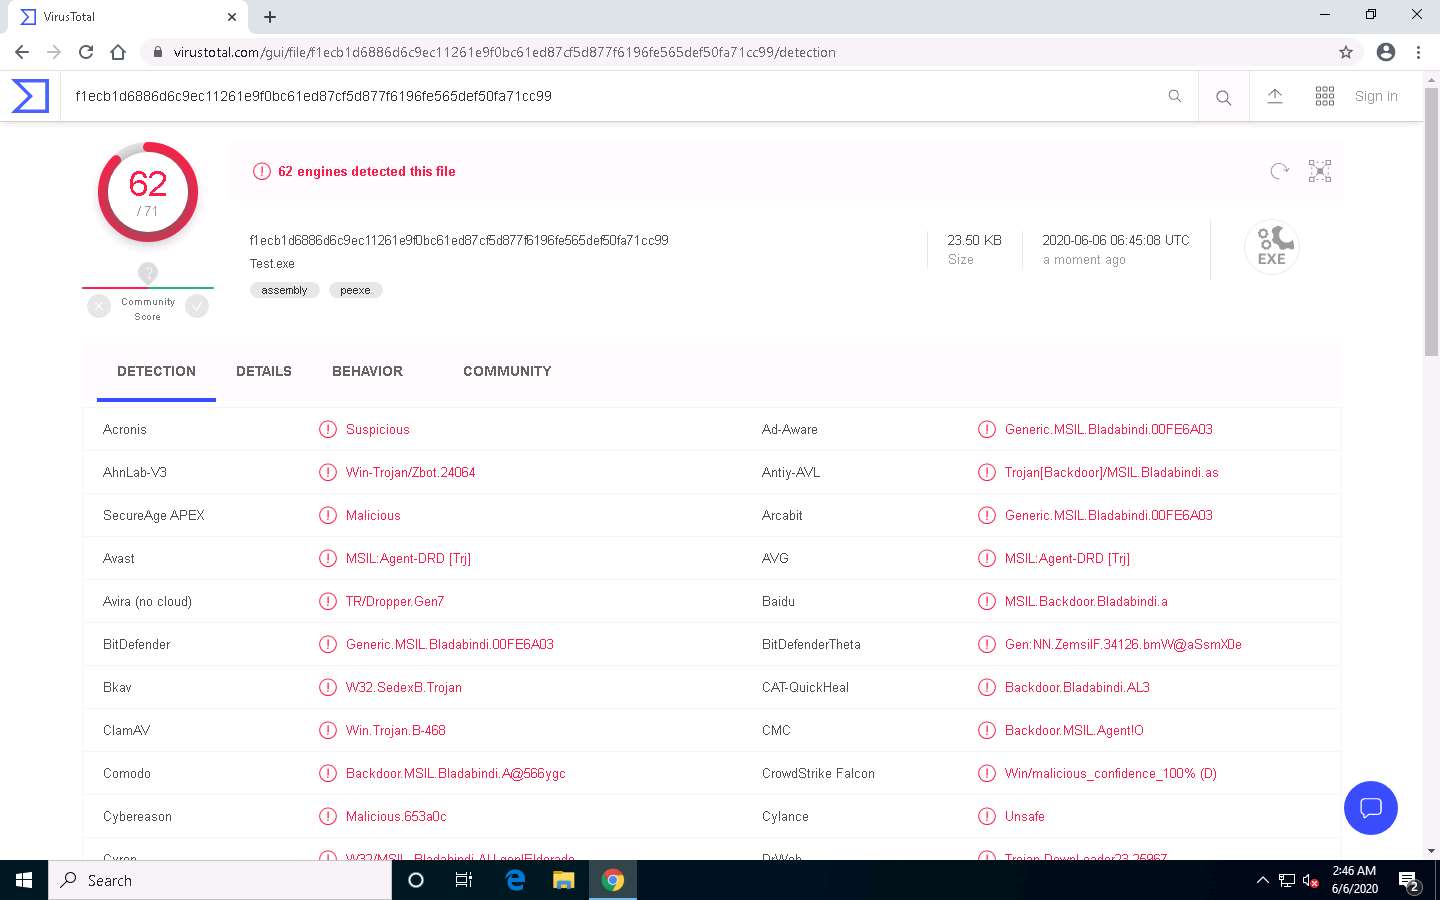
You can see that 62 out of 71 anti-virus programs have detected Test.exe as a malicious file. Minimize the web browser window.
The detection ratio might vary in your lab environment.
Go to D:\CEH-Tools\CEHv11 Module 07 Malware Threats\Crypters\SwayzCryptor and double-click SwayzCryptor.exe.
The SwayzCryptor GUI appears; click ellipses icon below File to select the Trojan file.
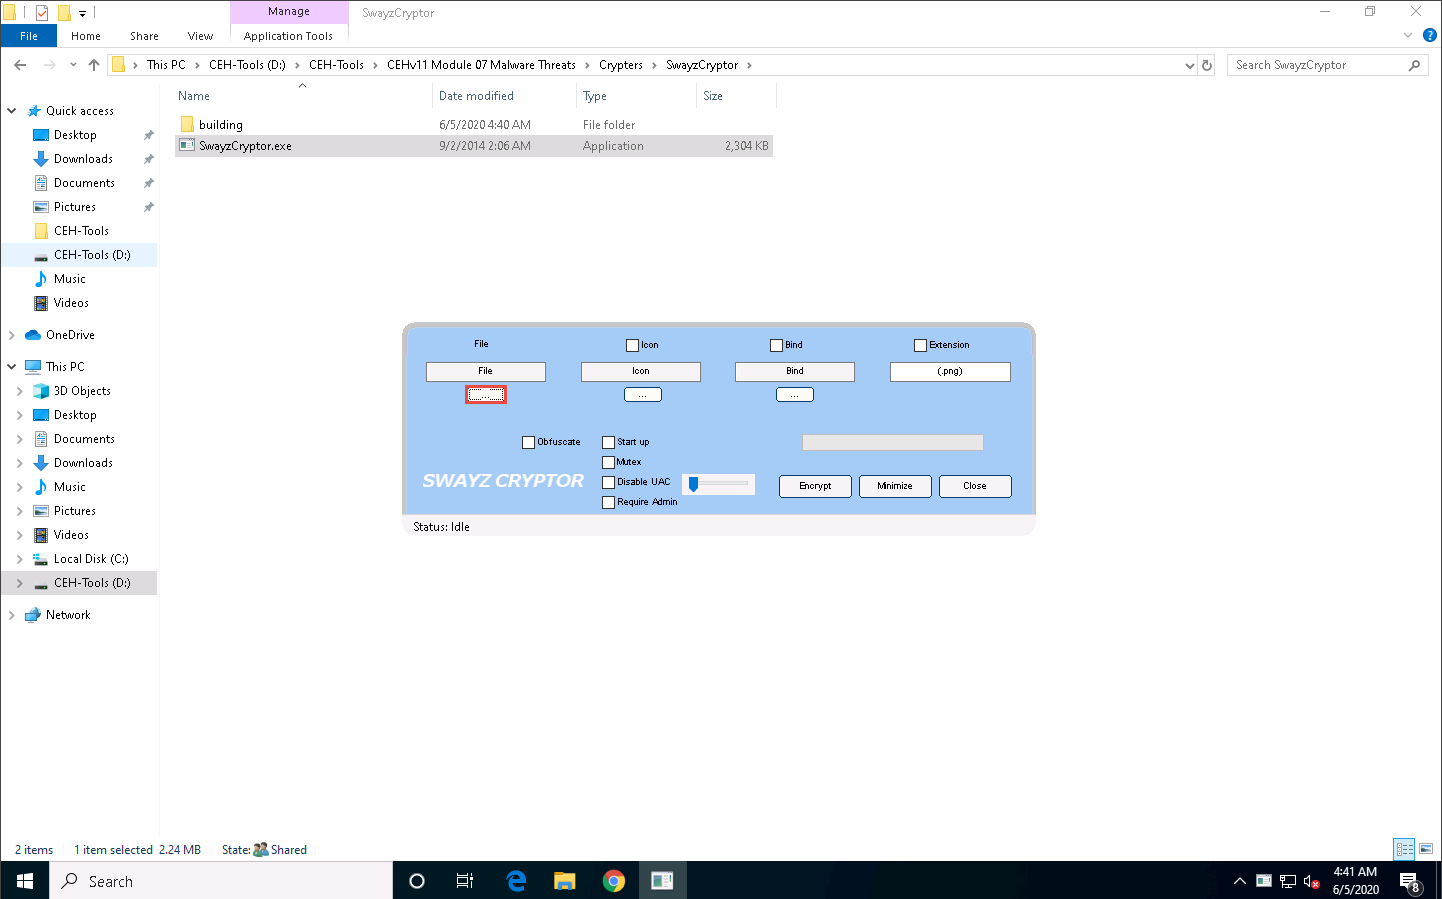
The Select a File dialog-box appears; navigate to the location of Test.exe (Desktop), select it, and click Open.
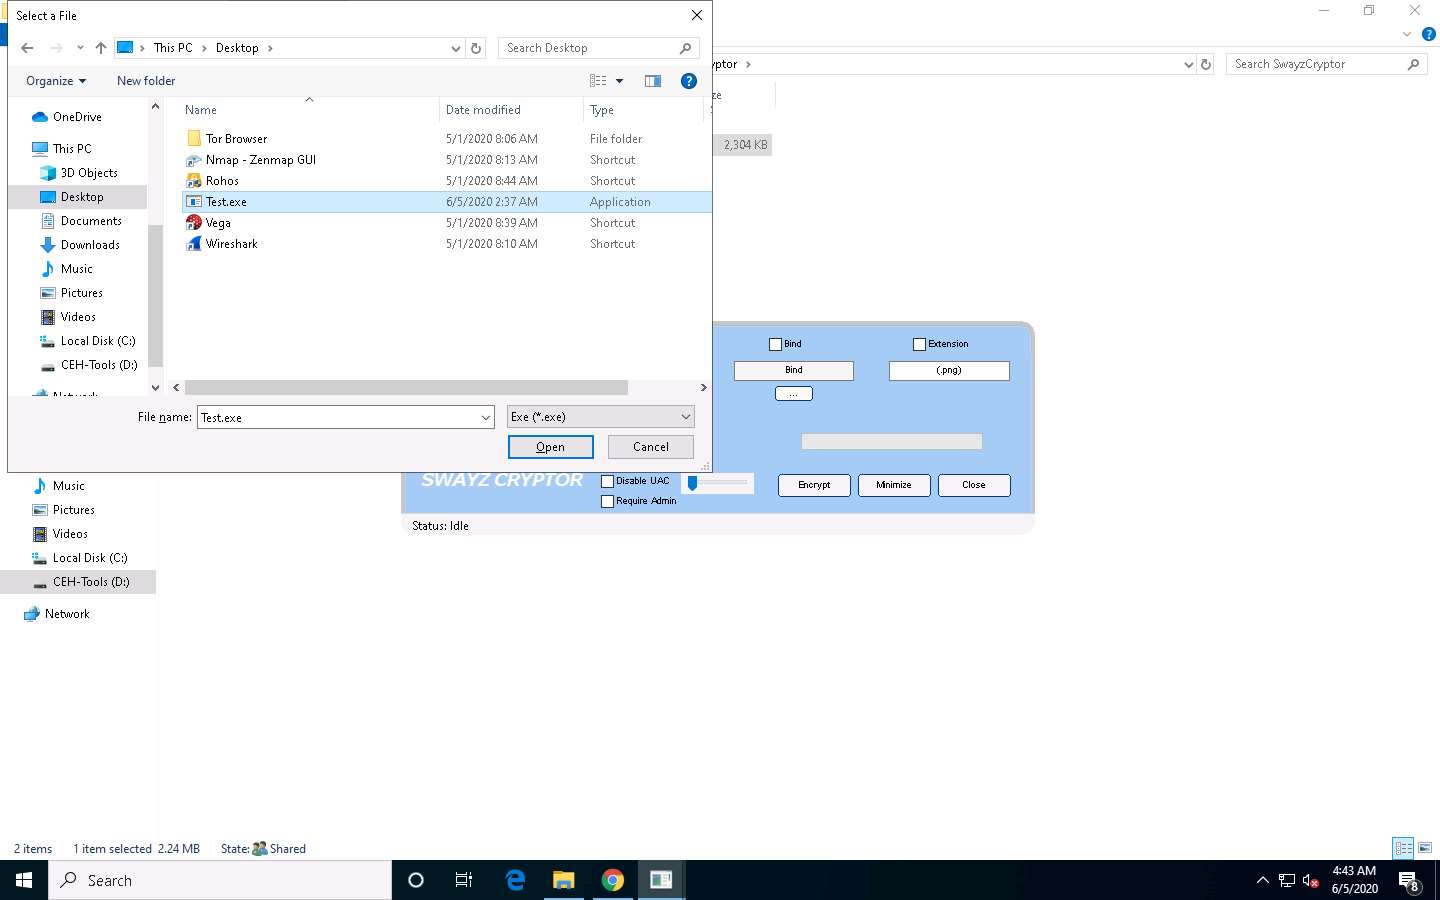
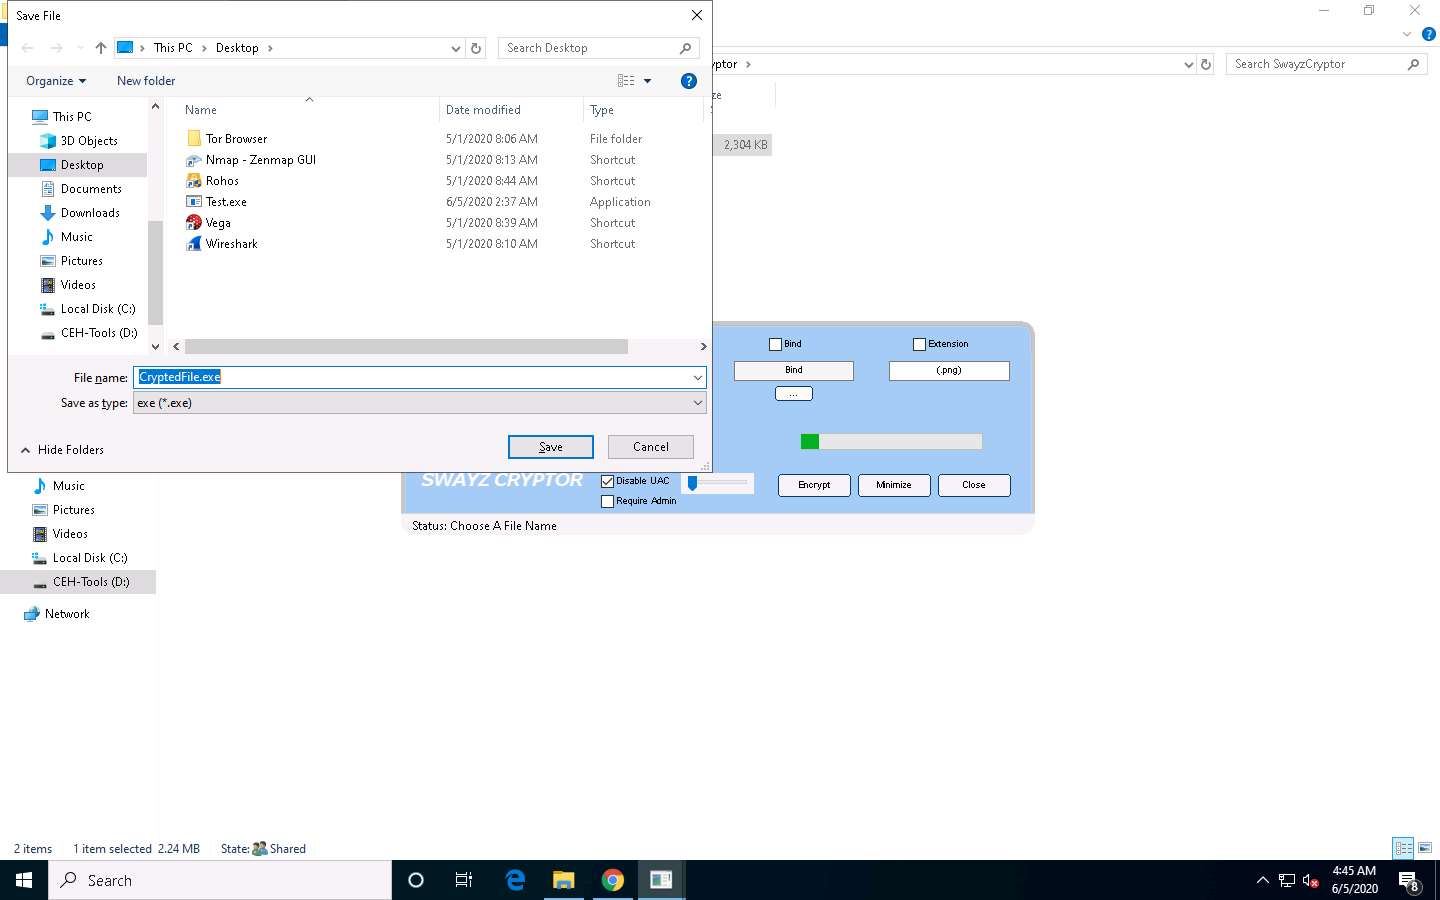
Once the file is selected, check the options Start up, Mutex, and Disable UAC, and then click Encrypt.

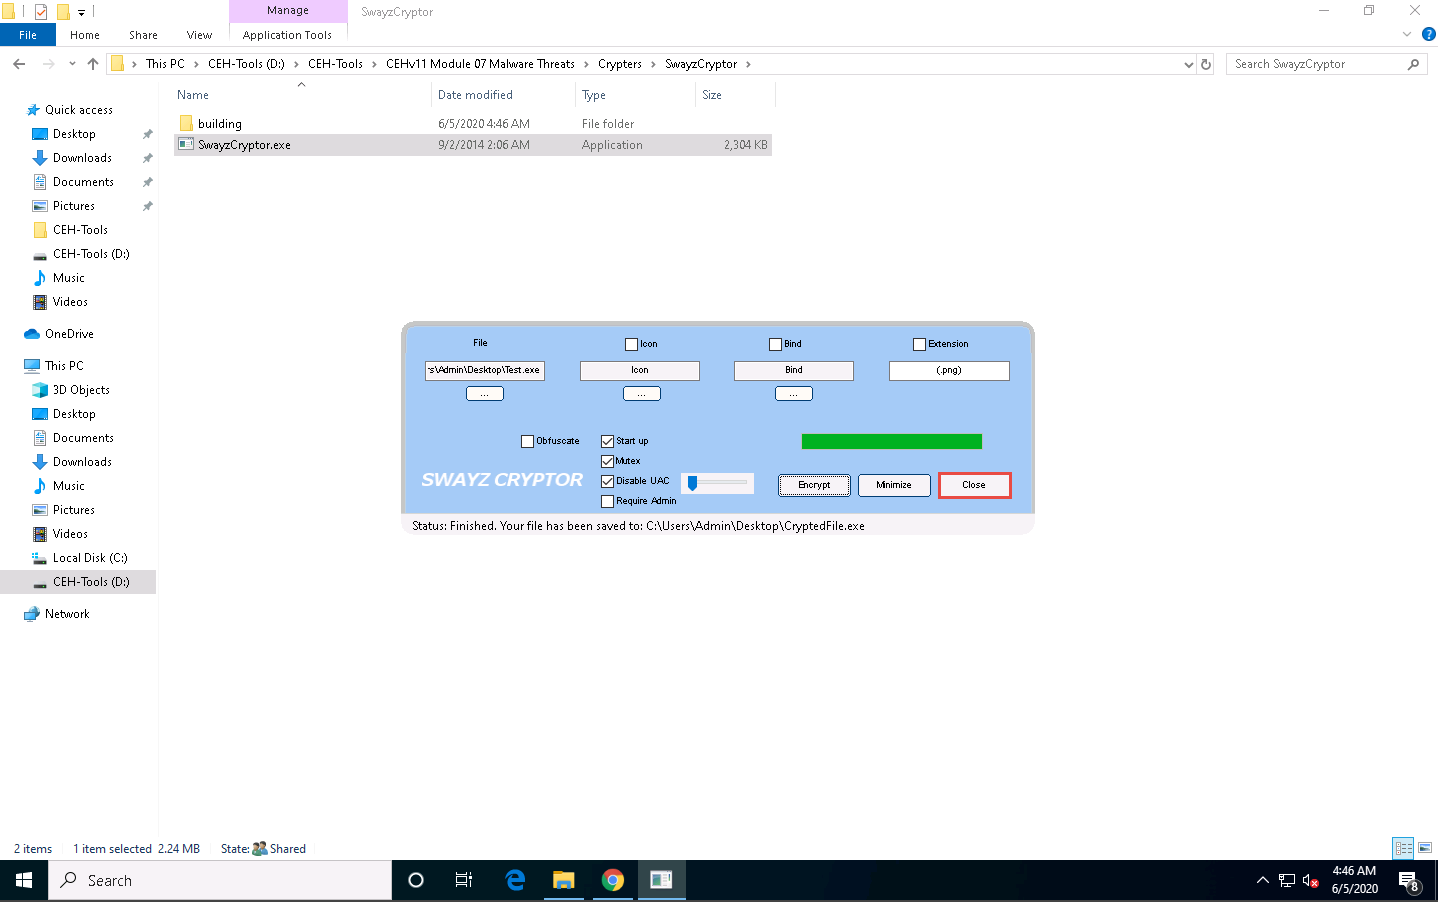
The Save File dialog-box appears; select the location where you want to store the crypted file (here, Desktop), leave the file name set to its default (CryptedFile), and click Save.
Once the encryption is finished, click Close.
Maximize the web browser (here, Google Chrome). In the VirusTotal analysis page, click the Upload file icon in the top-right corner of the page.
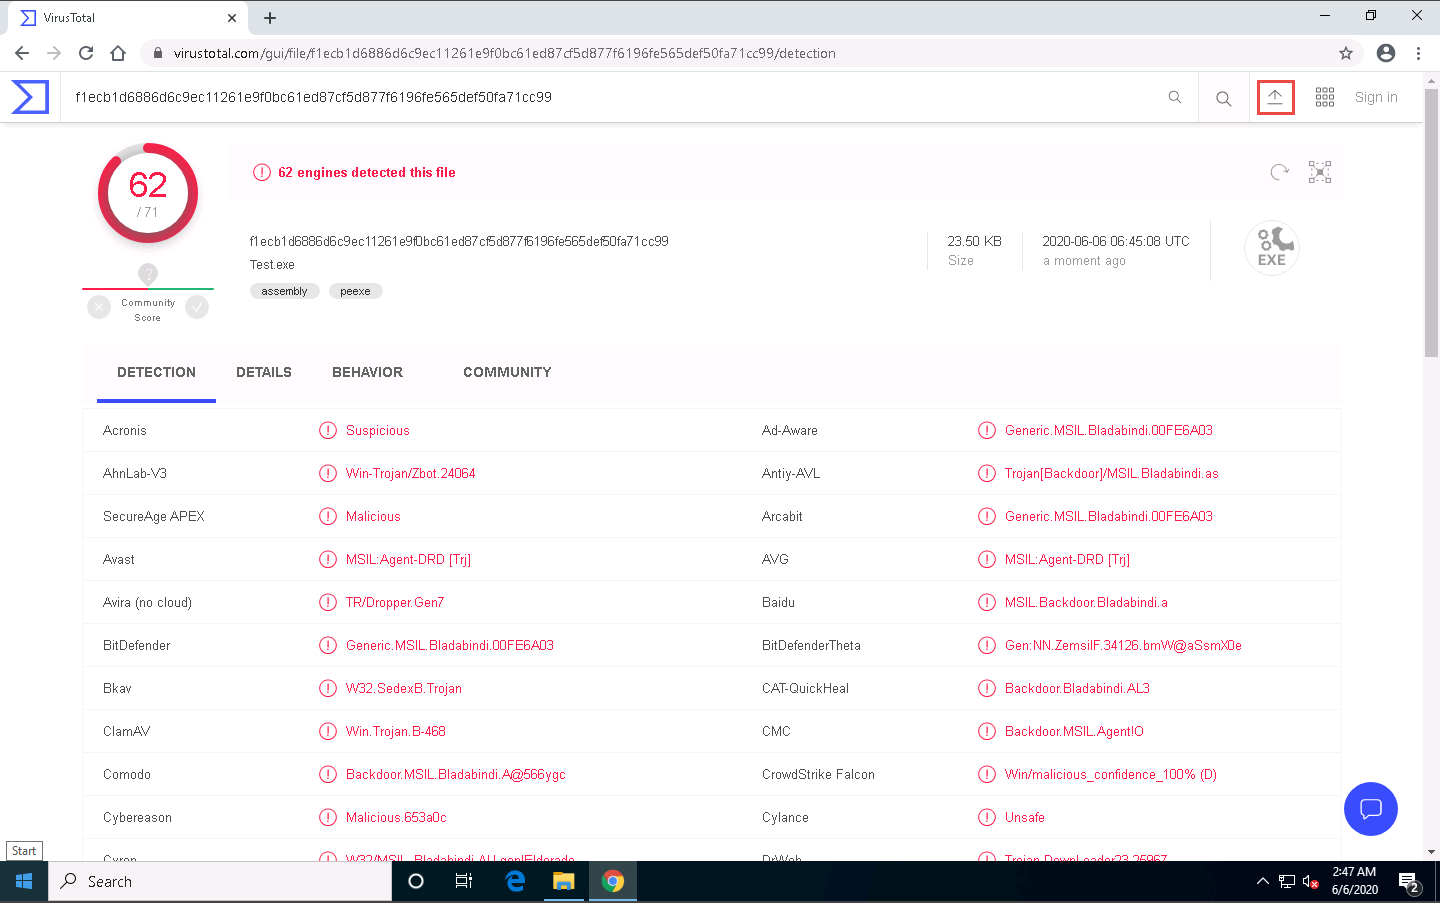
An Open dialog-box appears; navigate to the location where you saved the encrypted file CryptedFile.exe (Desktop), select the file, and click Open.
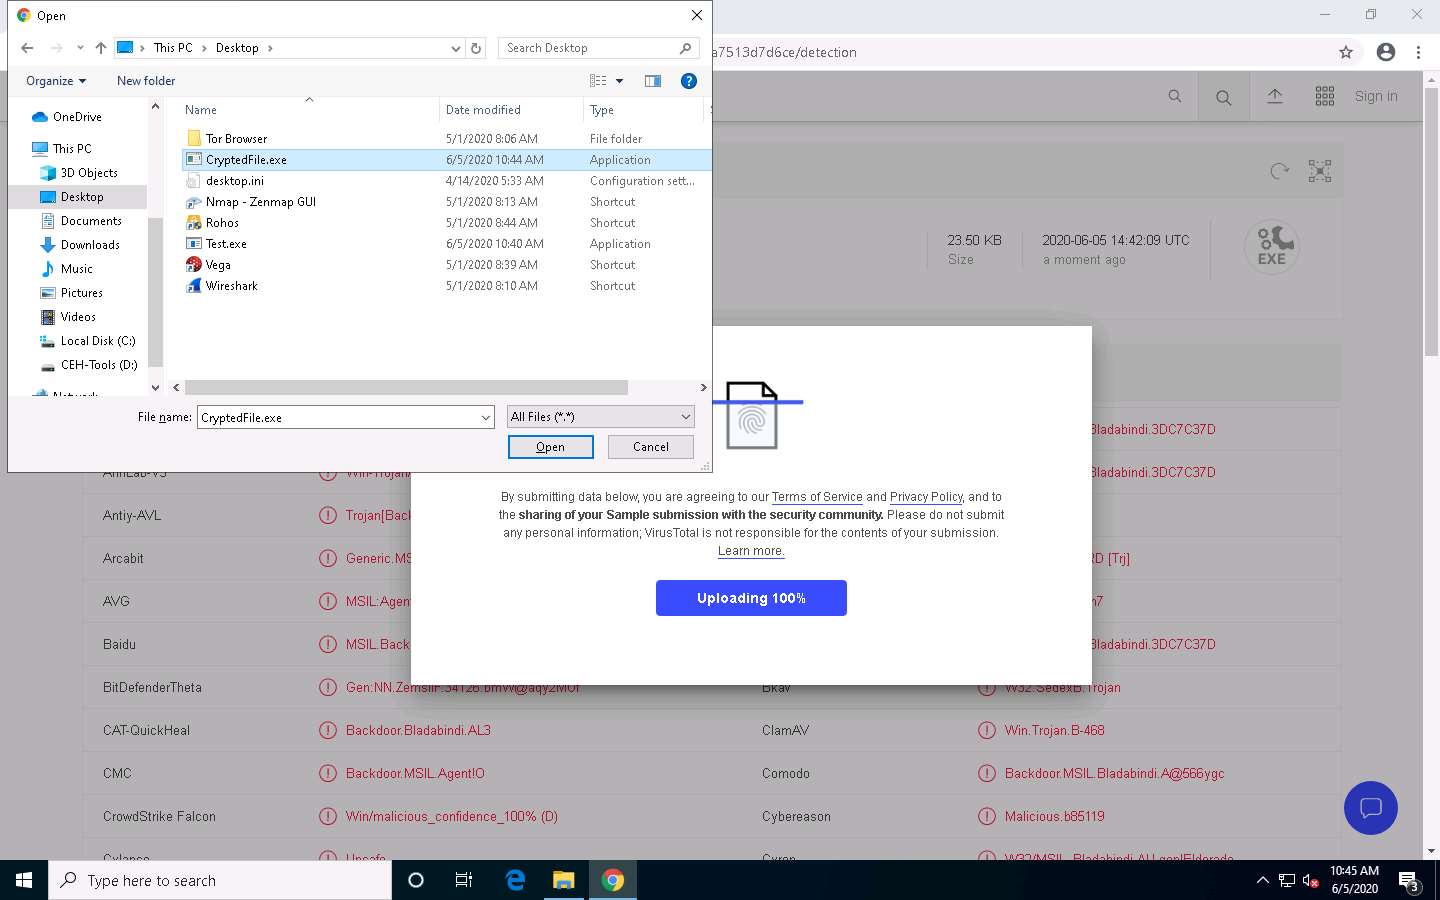
Click Confirm upload.
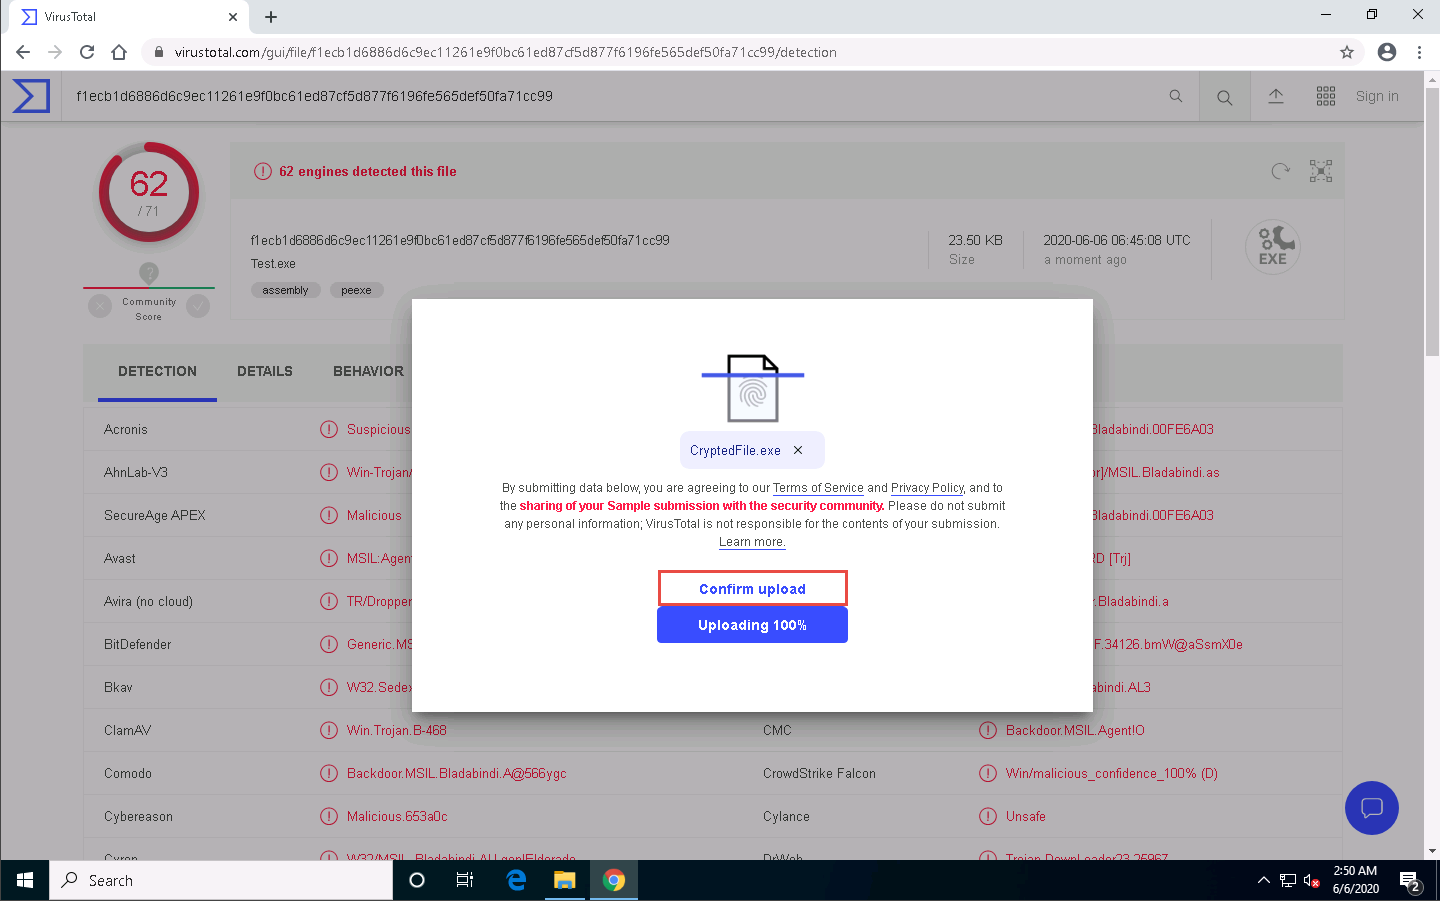
VirusTotal uploads the file and begins to scan it with the various anti-virus programs in its database. It displays the scan result, as shown in the screenshot.
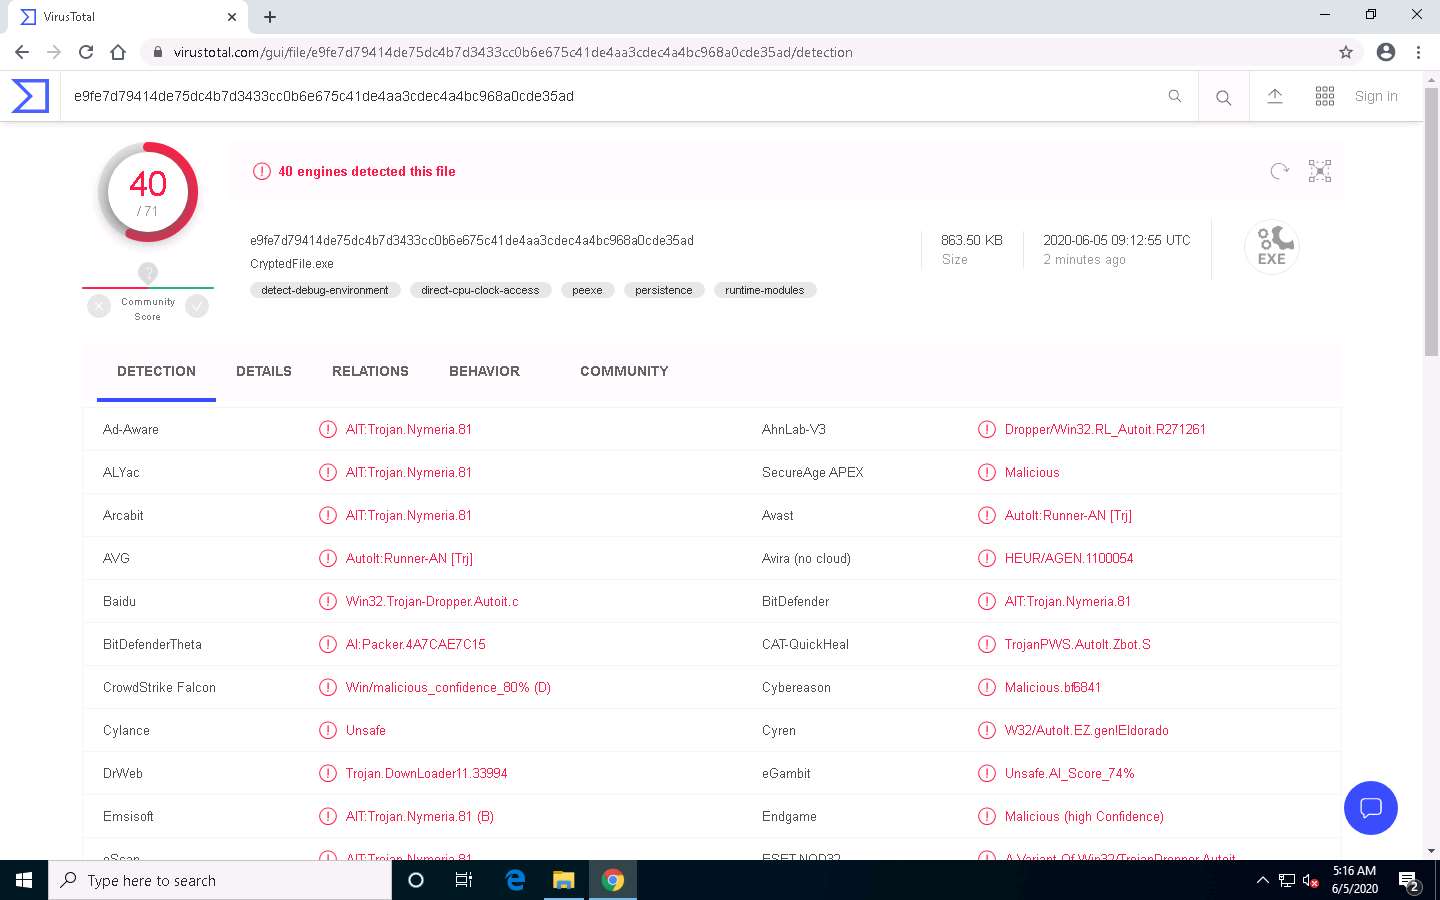
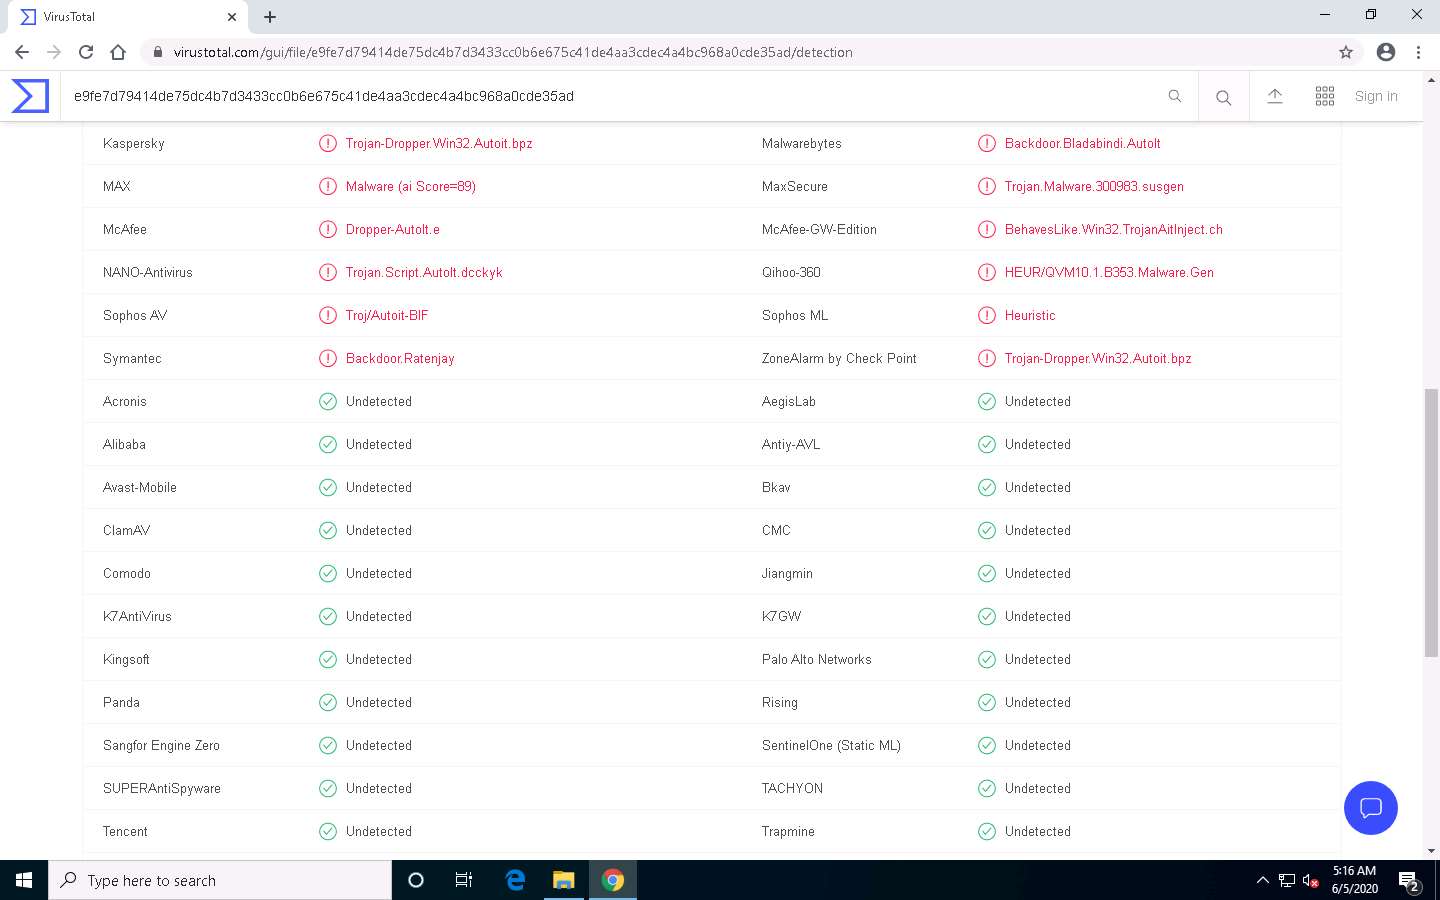
Only a few anti-virus programs have detected CryptedFile.exe as a malicious file. Minimize or close the browser window.
Now, we will test the functioning of a Crypted file (CryptedFile.exe).
Go to D:\CEH-Tools\CEHv11 Module 07 Malware Threats\Trojans Types\Remote Access Trojans (RAT)\njRAT, double-click the njRAT v0.7d.exe file and launch njRAT by choosing the default port number 5552, and then click Start.
In this exercise, we have already created a crypted file (CryptedFile.exe), built using njRAT.
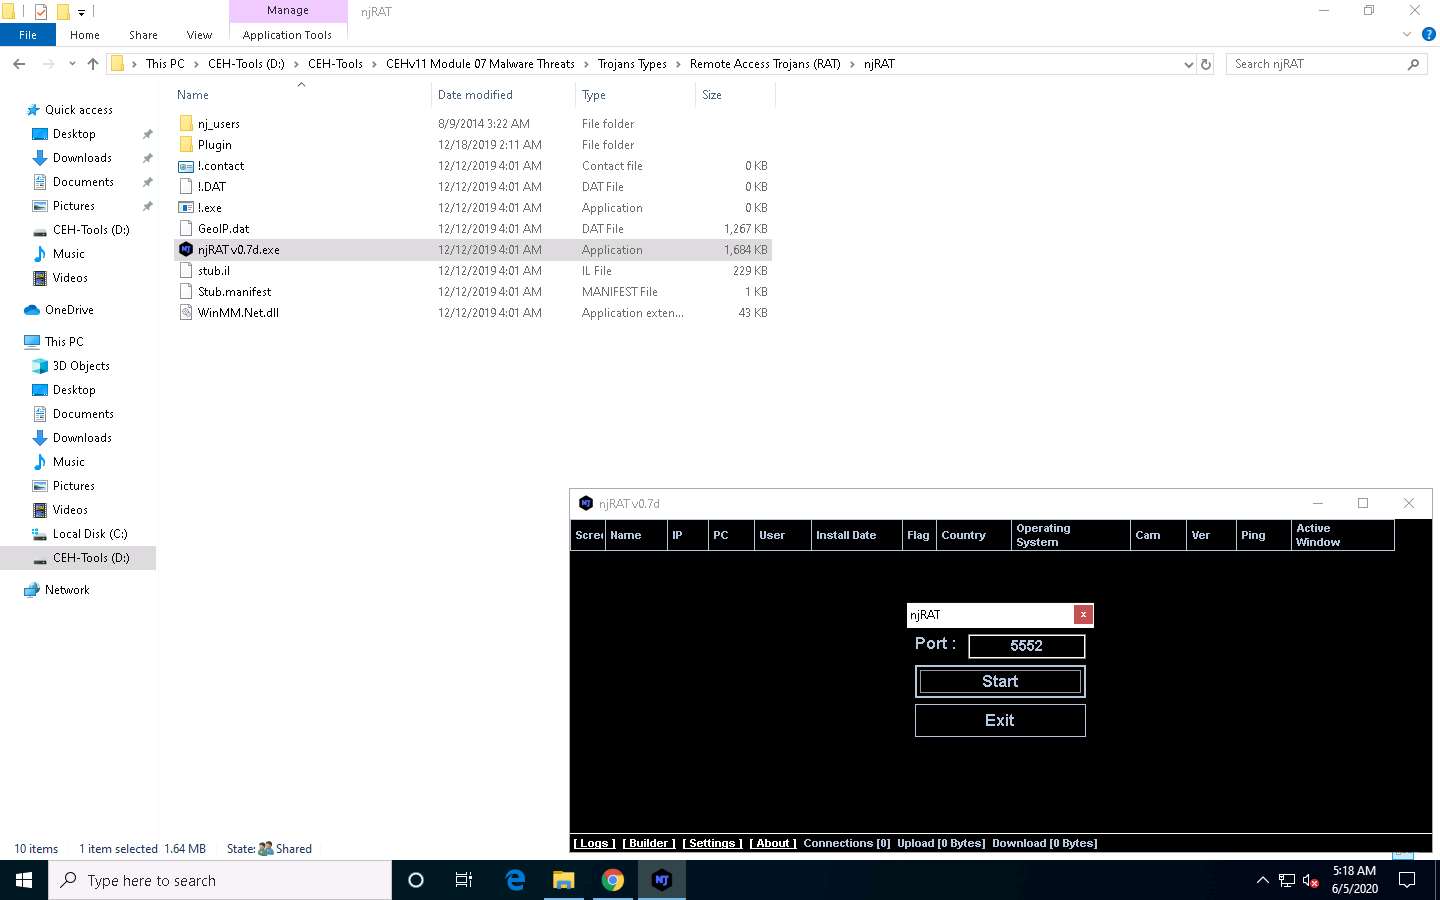
Use any technique to send CryptedFile.exe to the intended target—through email or any other source (In real-time, attackers send this server to the victim).
In this lab, we copied the CryptedFile.exe file to the shared network location (CEH-Tools) to share the file.
Click Windows Server 2016 to switch to the Windows Server 2016 machine.
Navigate to the shared network location (CEH-Tools), and then Copy and Paste the executable file (CryptedFile.exe), in which the attacker (here, you) sent the server executable, to the Desktop of Windows Server 2016.
Here, you are acting both as the attacker who logs into the Windows 10 machine to create a malicious server and as the victim who logs into the Windows Server 2016 machine and downloads the server.
Double-click CryptedFile.exe to run this malicious executable.
If You must restart your computer to turn off User Account Control pop-up appears in the right-bottom corner of the window, then Restart the Windows Server 2016 machine and click Ctrl+Alt+Delete to activate the machine, by default, CEH\Administrator account is selected, click Pa$$w0rd to enter the password and press Enter.
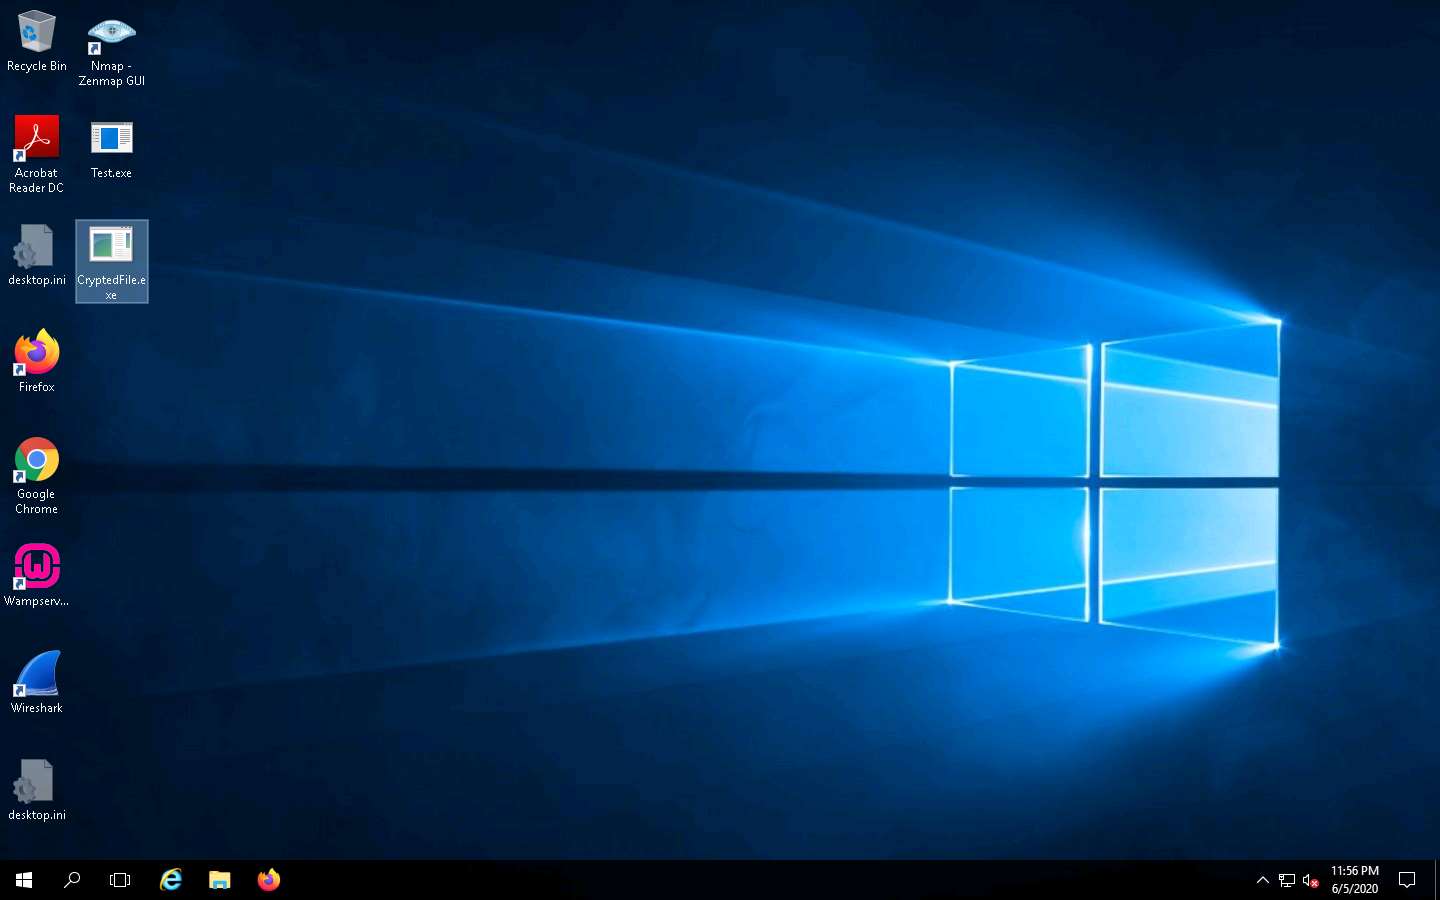
As soon as the victim (here, you) double-clicks the server, the executable starts running, and the njRAT client (njRAT GUI) running on the Windows 10 machine establishes a persistent connection with the victim machine.
Click Windows 10 to switch to the Windows 10 machine and in the njRAT window you can observe that the connection has been established with the victim machine.
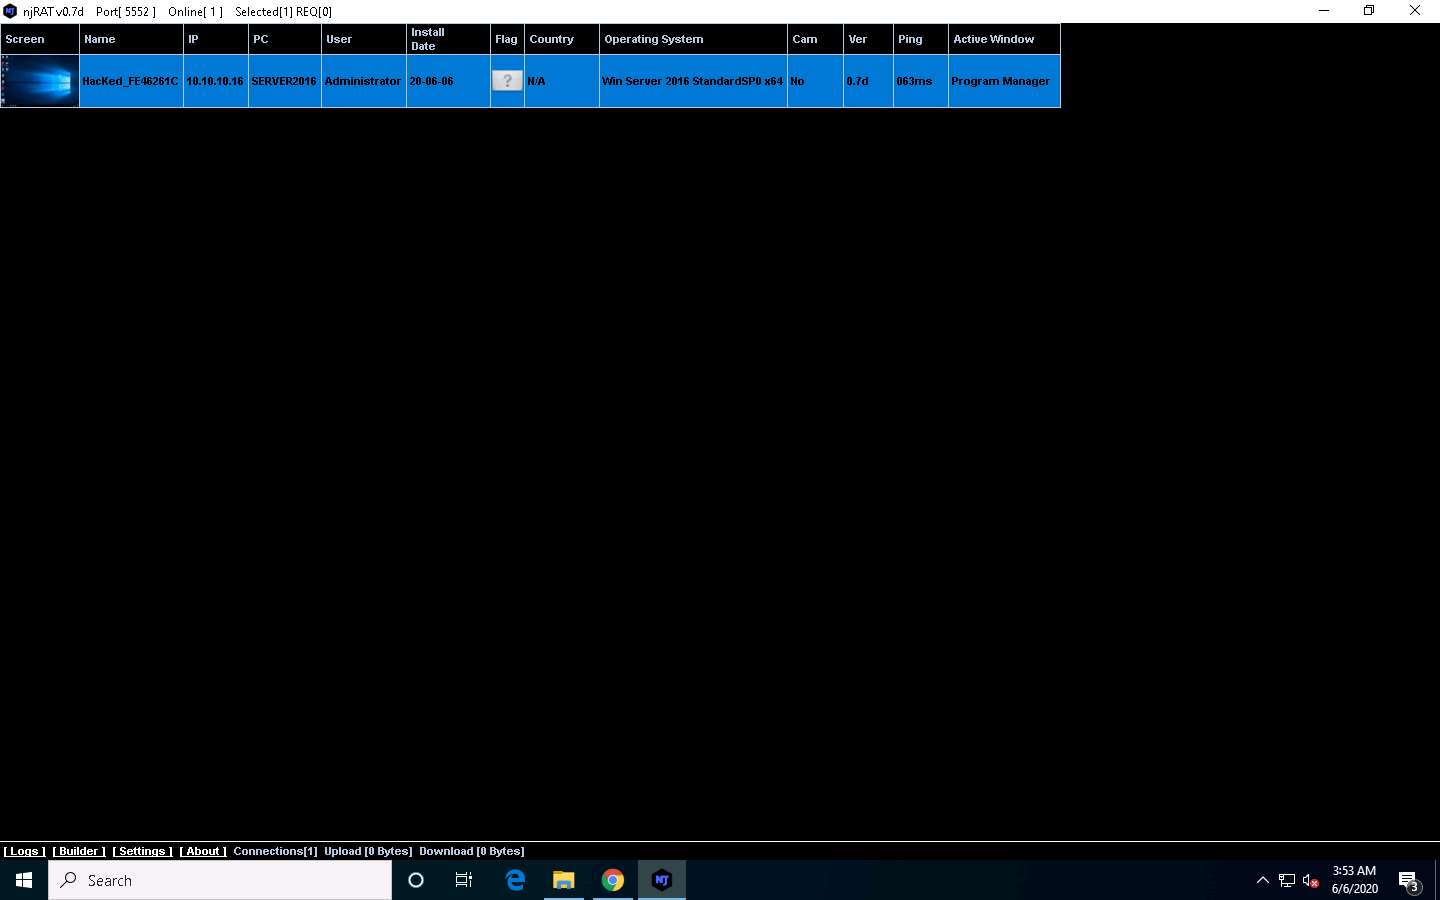
Unless the attacker working on the Windows 10 machine disconnects the server on their own, the victim machine remains under their control.
Thus, you have created an undetectable Trojan that can bypass the anti-virus and firewall programs, as well as be used to maintain a persistent connection with the victim.
On completion of this lab, click Windows Server 2016 to switch to the Windows Server 2016 machine, launch Task Manager, look for the server.exe (32 bit) process, and click End task on the Windows Server 2016 machine.
This concludes the demonstration of how to hide a Trojan using SwayzCryptor to make it undetectable to various anti-virus programs.
Task 3: Create a Server using the ProRat Tool
Attackers use malware to steal personal information, financial data, and business information from target systems. ProRat is a “remote administration tool” created by the PRO Group. ProRat was written in the C programming language and is capable of working with all Windows OSes. ProRat was designed to allow users to control their own computers remotely from other computers. However, attackers have co-opted it for their own nefarious purposes. Some hackers take control of remote computer systems to conduct a Denial-of-Service (DoS) attack, which renders the target system unavailable for normal personal or business use. These targeted systems include high-profile web servers such as banks and credit card gateways.
As with other Trojan horses, ProRat uses a client and server. It opens a port on the computer that allows the client to perform numerous operations on the server (the victim machine).
Some of ProRat’s malicious actions on the victim’s machine include:
- Logging keystrokes
- Stealing passwords
- Taking full control over files
- Drive formatting
- Opening and closing the DVD tray
- Hiding the taskbar, desktop, and start button
- Viewing system information
An ethical hacker or pen tester can use ProRat to audit their own network against remote access Trojans.
The versions of the created client or host, and the appearance of the website may differ from this lab. However, the actual process of creating the server and client is as shown in this lab.
Click Windows 10 to switch to the Windows 10 machine.
Navigate to D:\CEH-Tools\CEHv11 Module 07 Malware Threats\Trojans Types\Remote Access Trojans (RAT)\ProRat and double-click the ProRat.exe file.
If an Open File - Security Warning pop-up appears, click Run.
The ProRat main window appears, as shown in the screenshot.
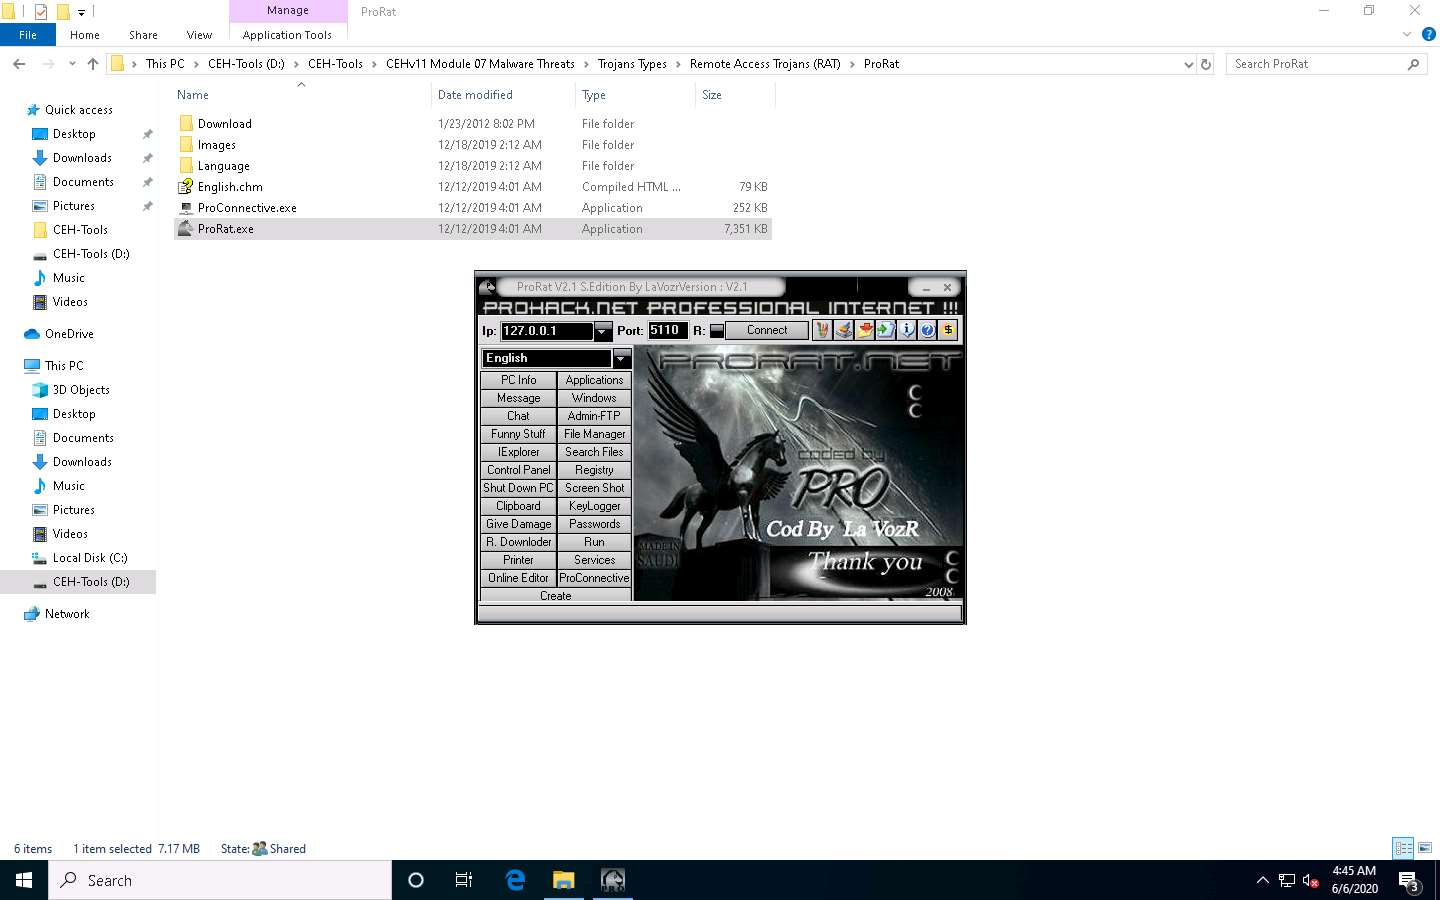
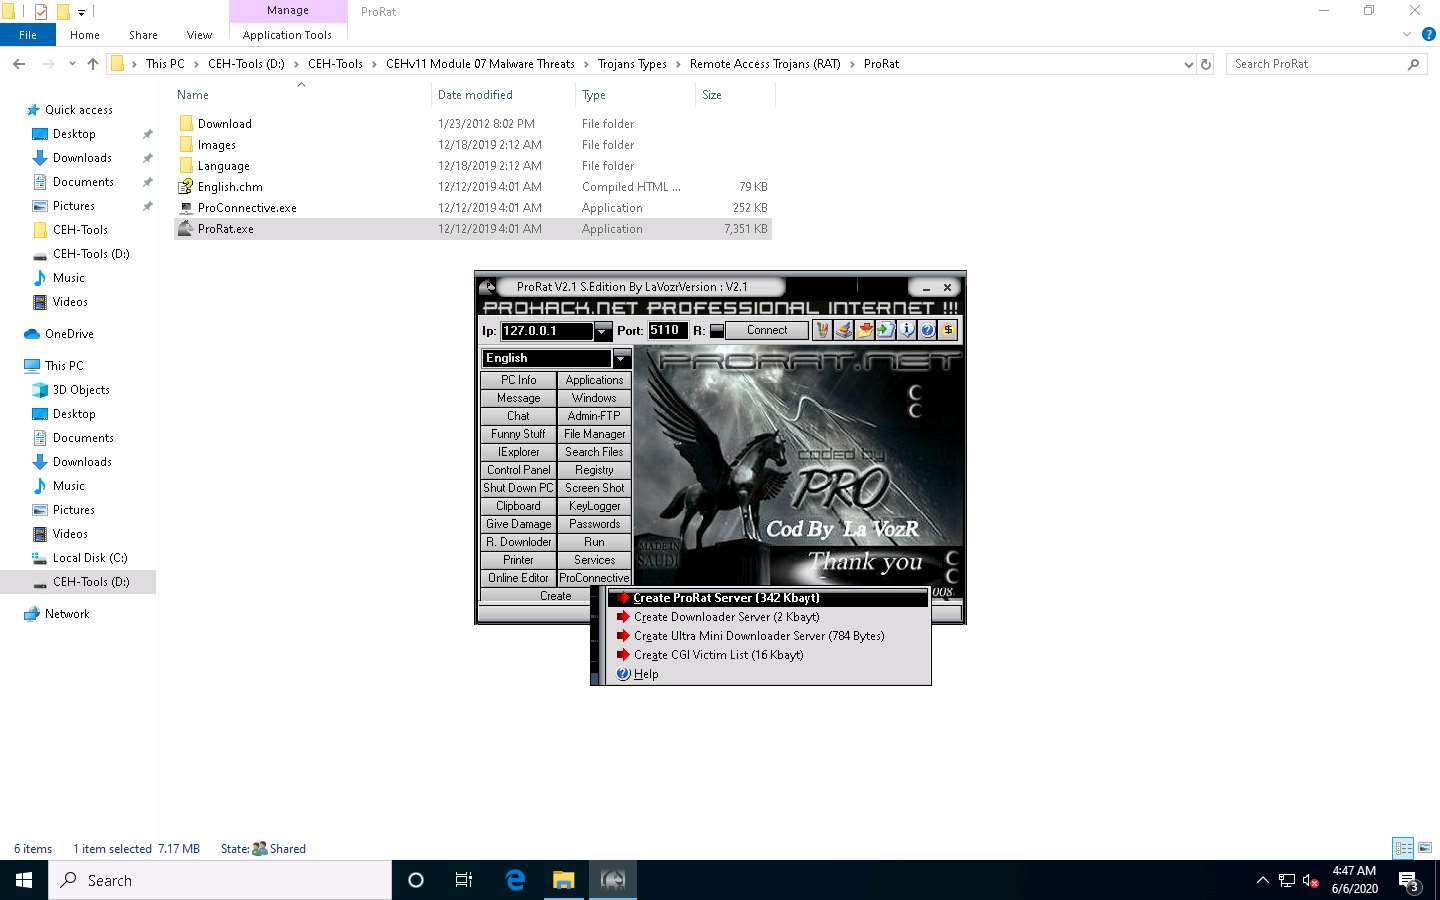
Click Create, and then click the Create ProRat Server (342 Kbayt) option to create a ProRat server.
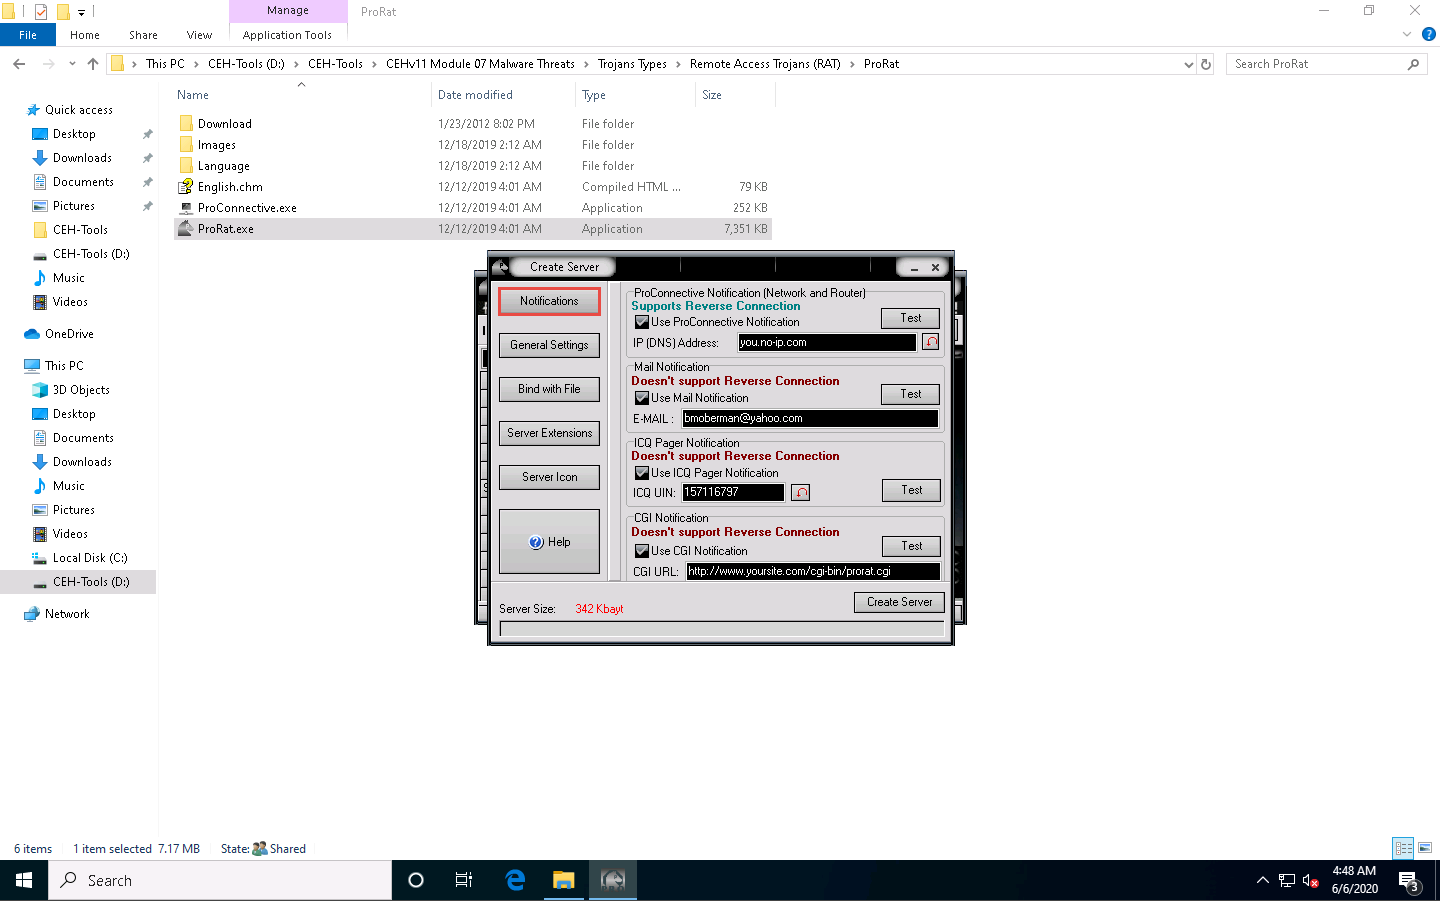
The Create Server window appears. In Notifications, leave the settings to default.
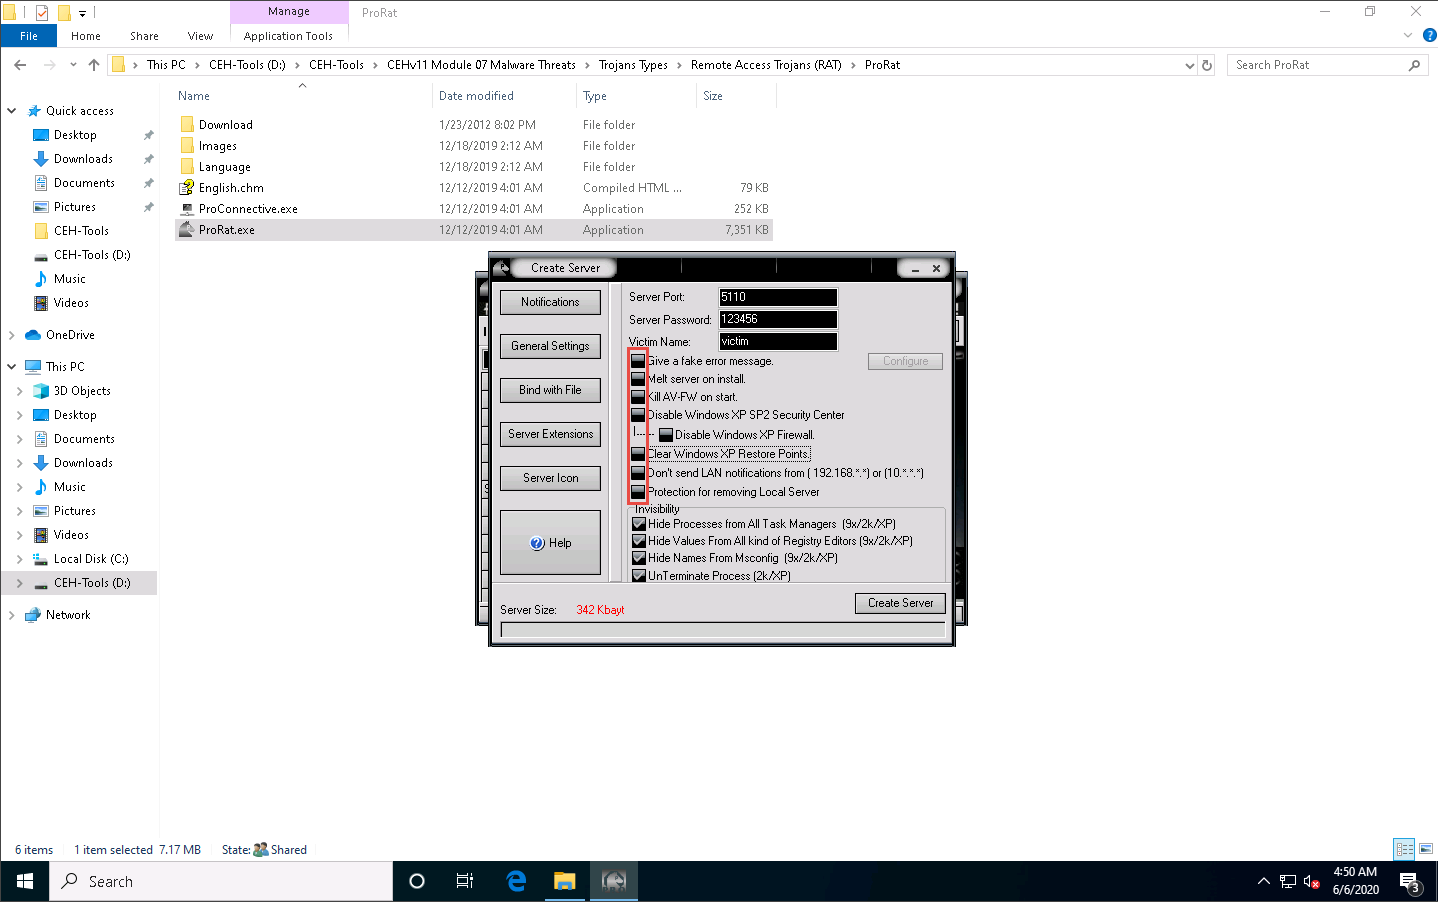
Click on the General Settings button to configure features such as Server Port, Server Password, Victim Name, and port number. In this lab, the default settings are chosen. Note down the Server password.
Uncheck the highlighted options under the Victim Name field, as shown in the screenshot.
Click on the Bind with File button to bind the server with a file. In this lab, we are using a .jpg file to bind the server.
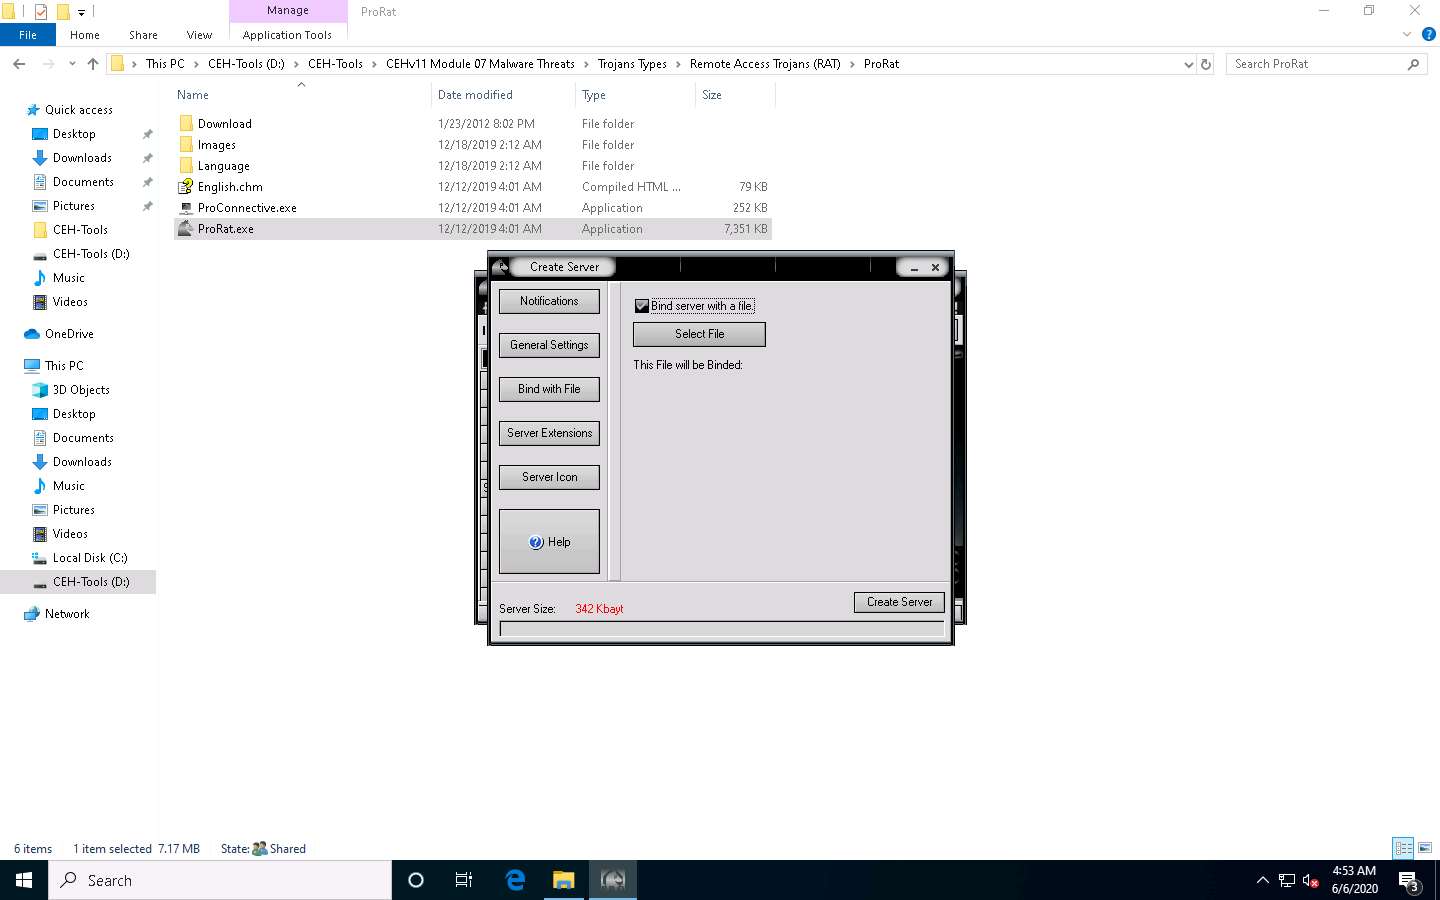
Check the Bind server with a file option and then click the Select File button.
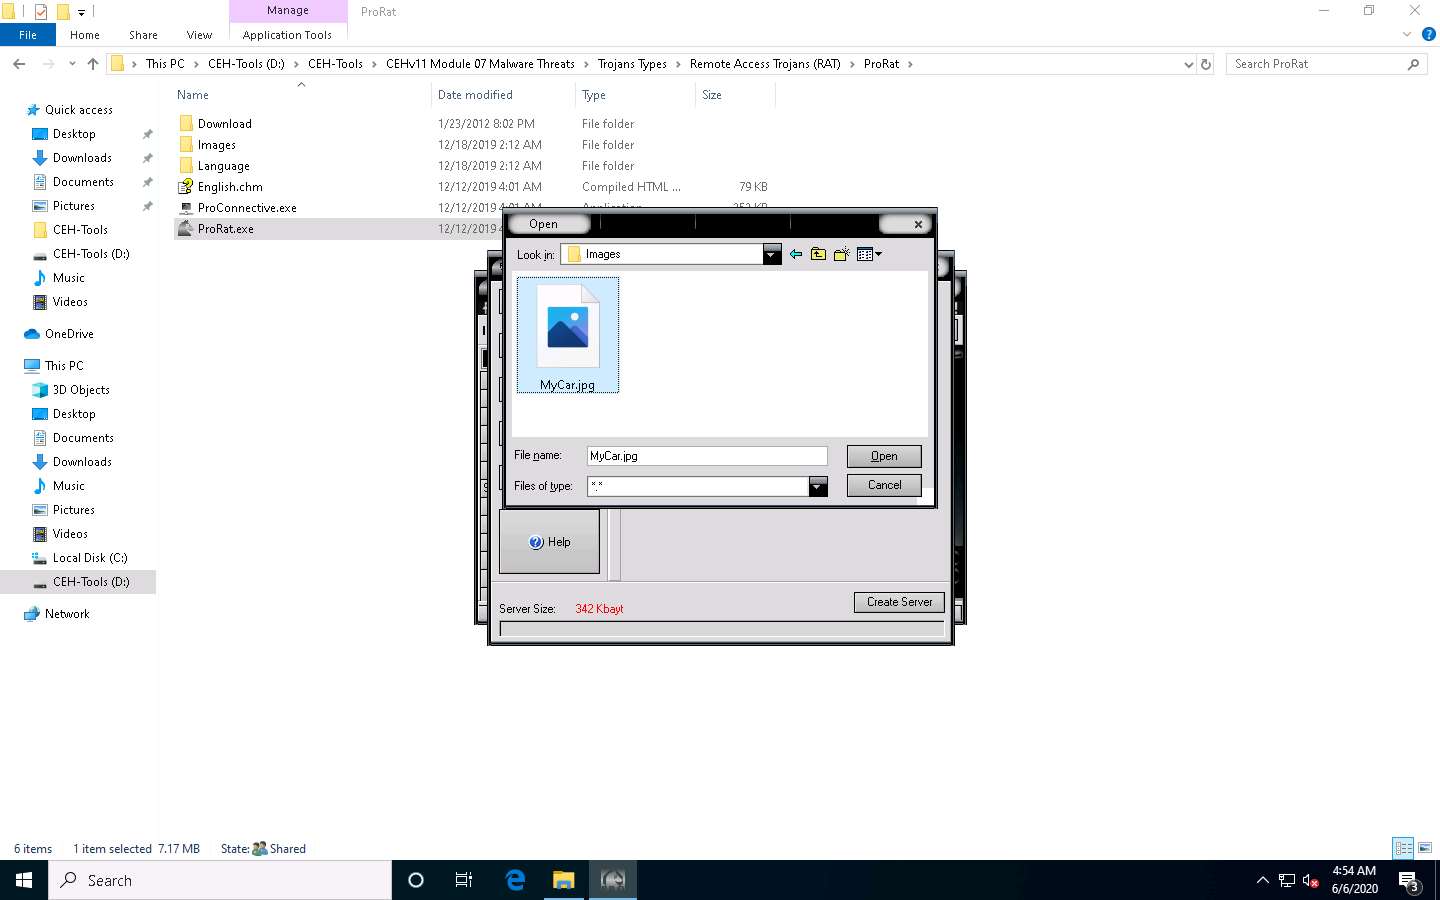
An open pop-up window appears; navigate to D:\CEH-Tools\CEHv11 Module 07 Malware Threats\Trojans Types\Remote Access Trojans (RAT)\ProRat\Images and select MyCar.jpg in the browser window. Click Open to bind the file.
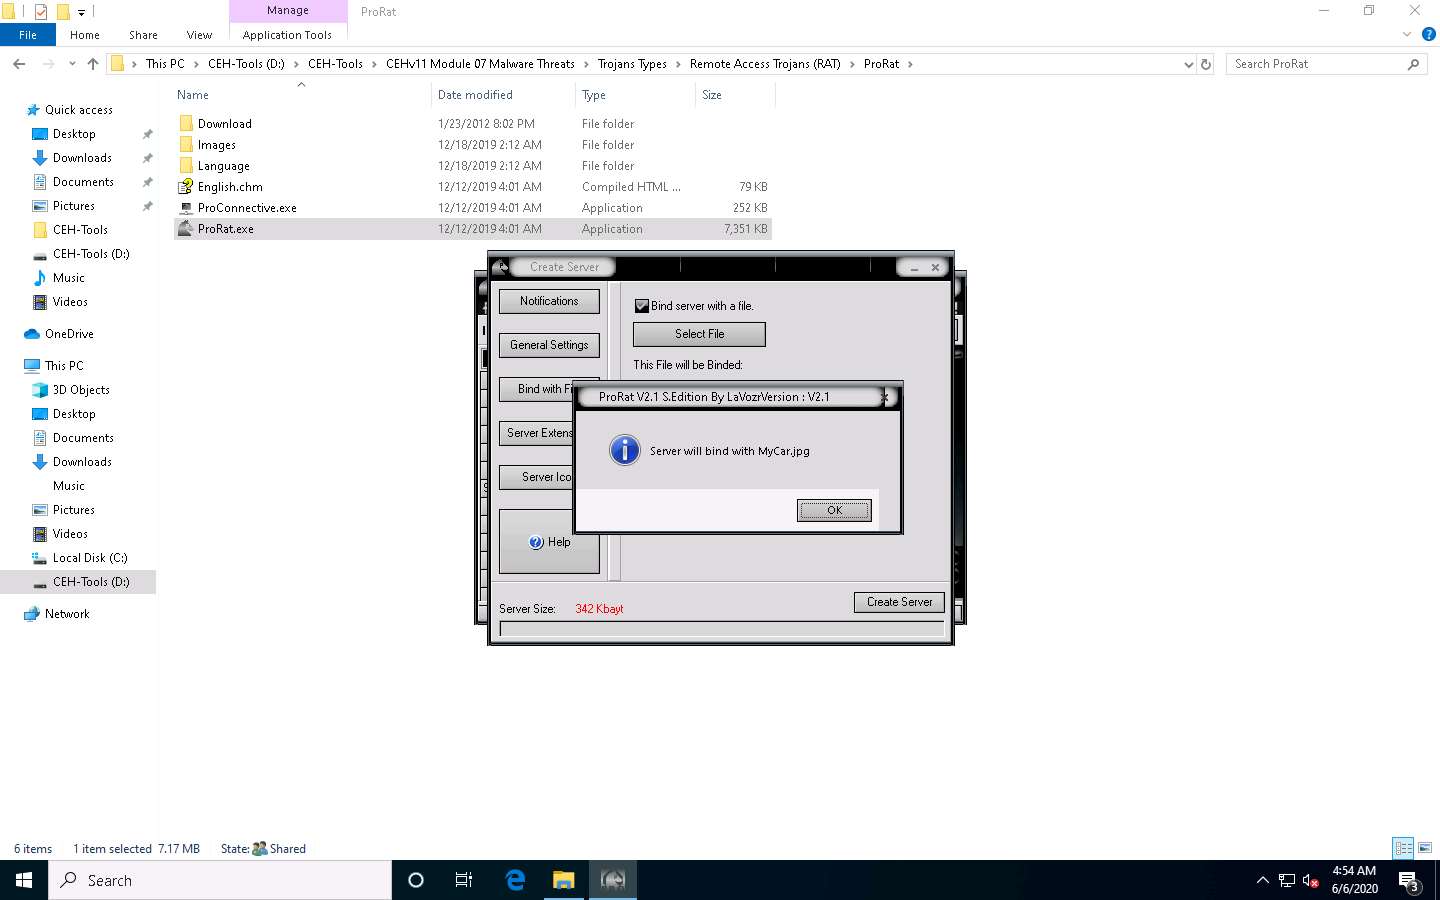
A pop-up displays the prompt: Server will bind with MyCar.jpg; click OK.
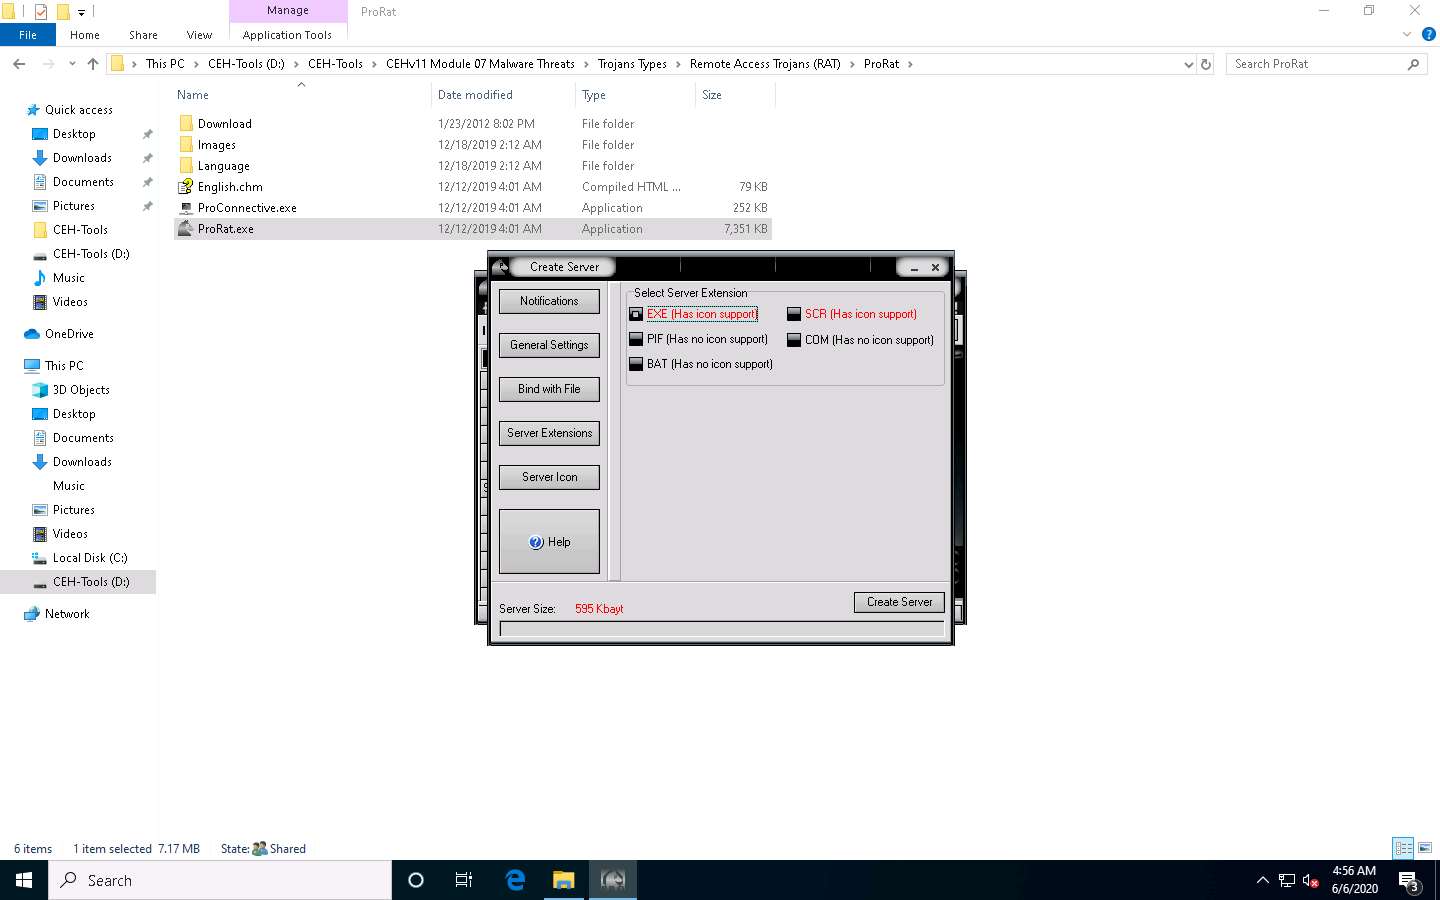
Click the Server Extensions button.
Under Select Server Extension, ensure that the EXE (Has icon support) checkbox is ticked.
Click the Server Icon button. Under Server Icon, select any icon, and click Create Server.
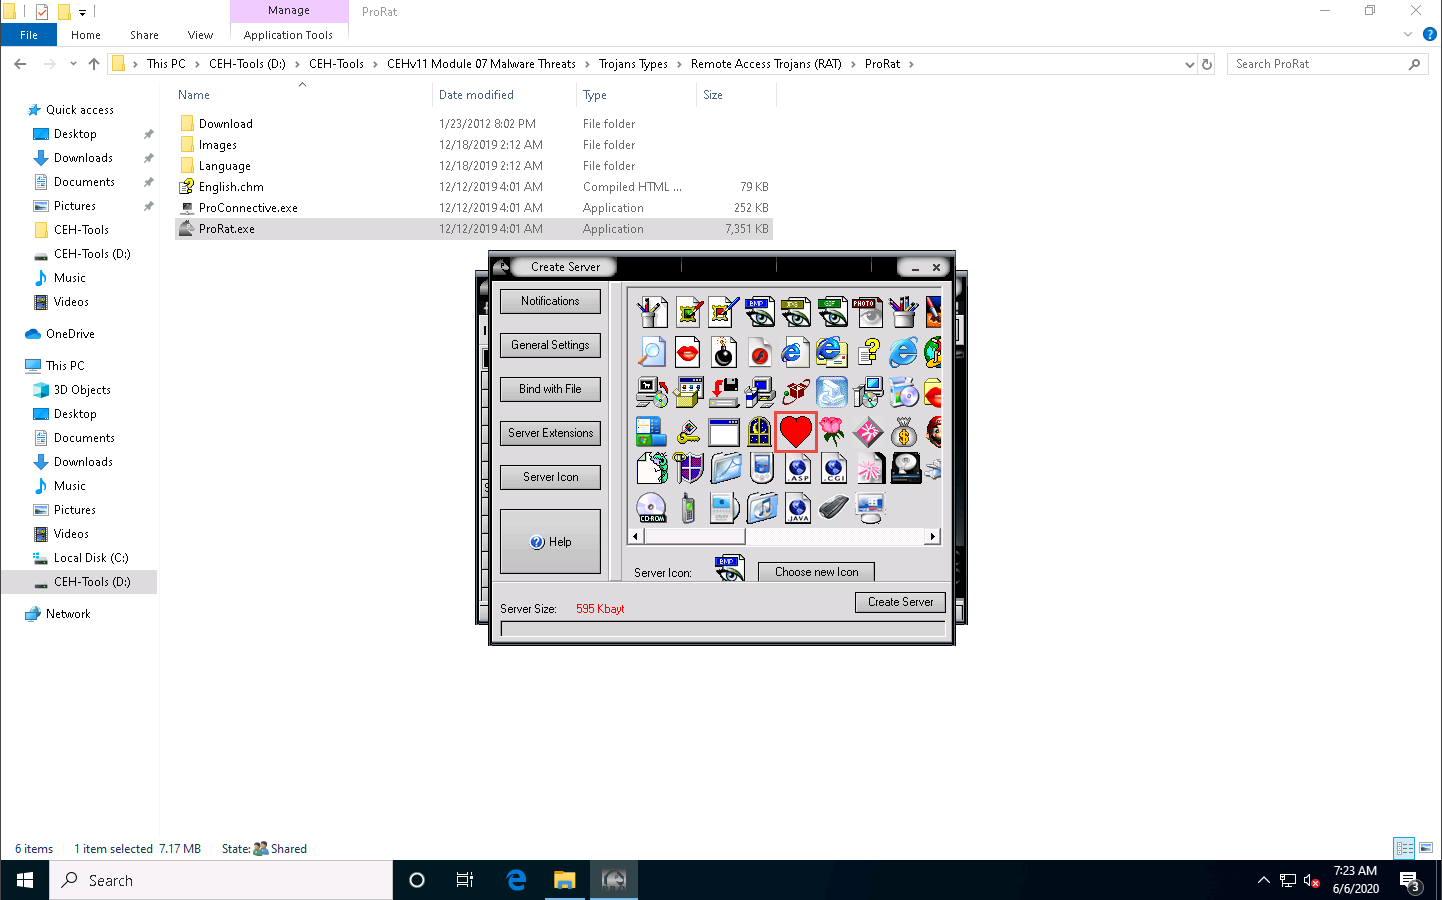
A pop-up states that the server has been created; click OK.
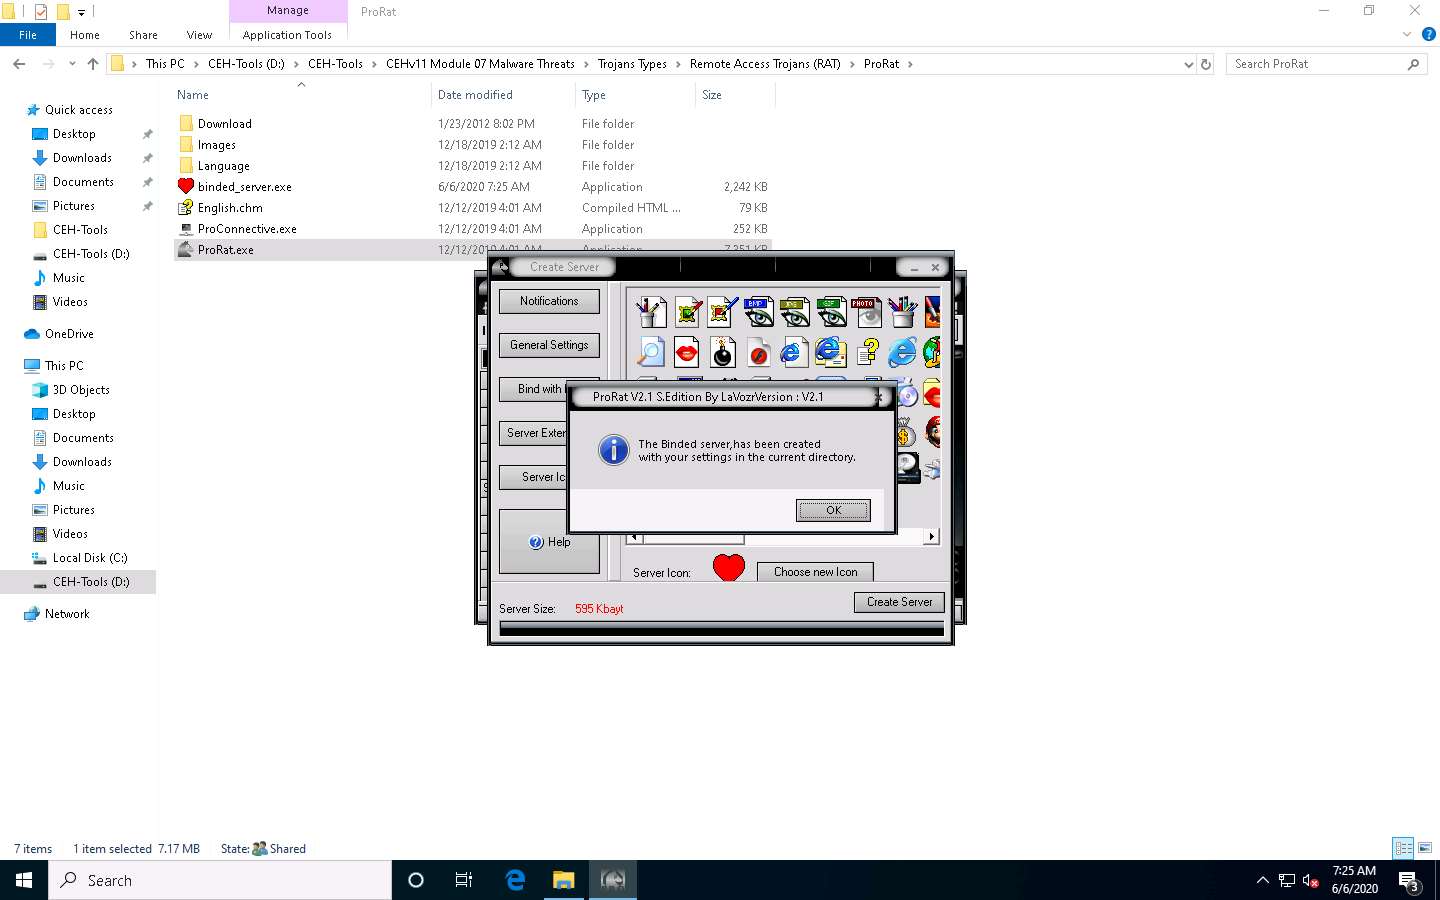
The created server will be saved at D:\CEH-Tools\CEHv11 Module 07 Malware Threats\Trojans Types\Remote Access Trojans (RAT)\ProRat. This server is named binded_server.exe by default. Close ProRat’s Create Server window.
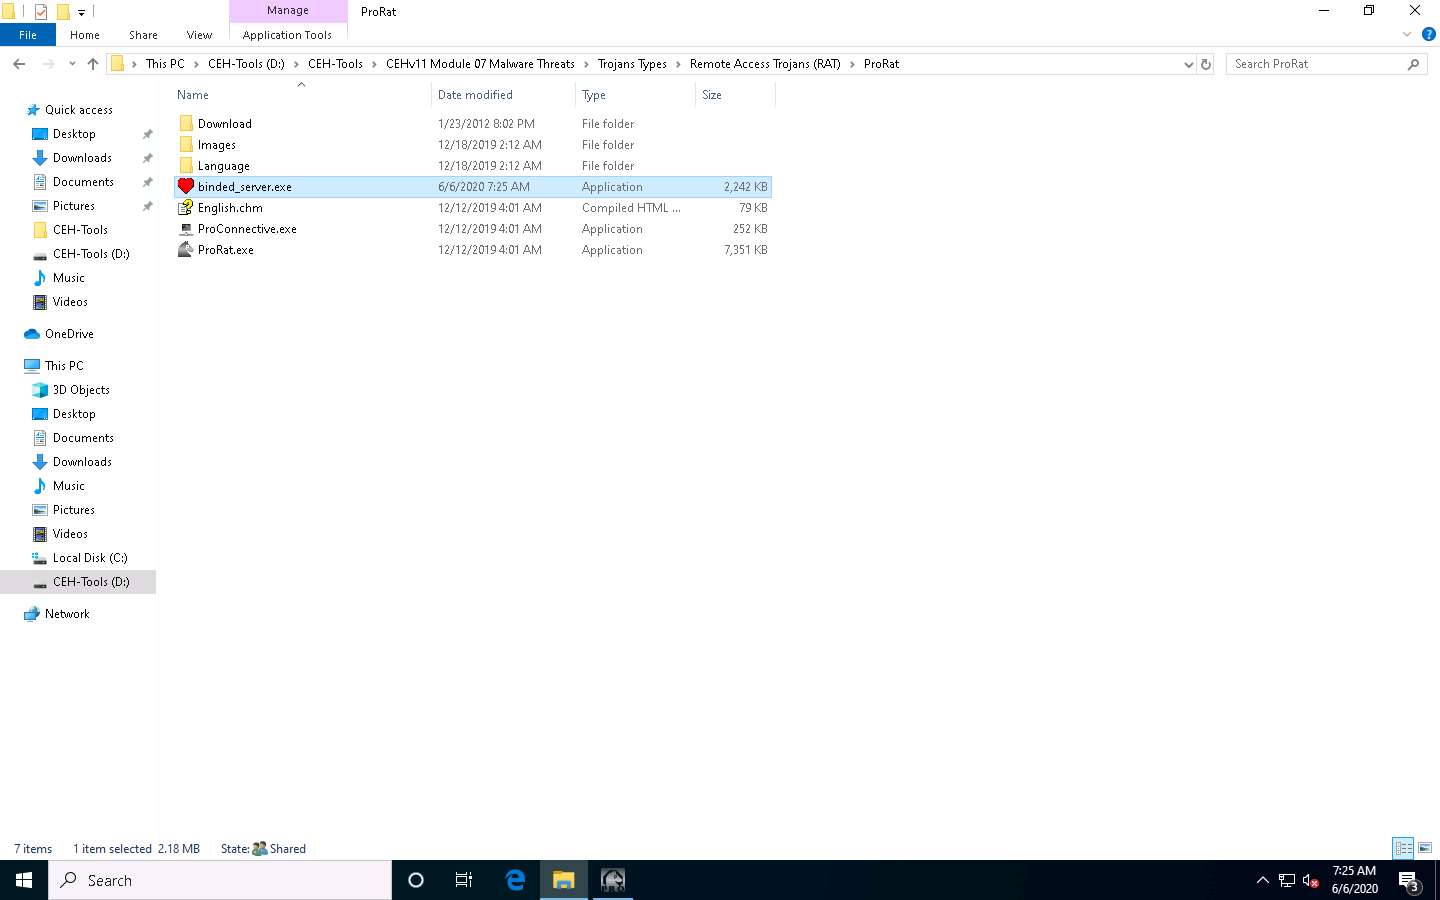
In real-time, hackers may craft such servers and send them by email or other communication media to the victim’s machine.
You need to zip the file before emailing it, as you cannot attach .exe files on some mail servers.
Click Windows Server 2016 to switch to the Windows Server 2016 machine. Click Ctrl+Alt+Delete to activate the machine, by default, CEH\Administrator account is selected, click Pa$$w0rd to enter the password and press Enter.
Navigate to Z:\CEHv11 Module 07 Malware Threats\Trojans Types\Remote Access Trojans (RAT)\ProRat and double-click binder_server.exe.
If an Open File - Security Warning pop-up appears, click Run.
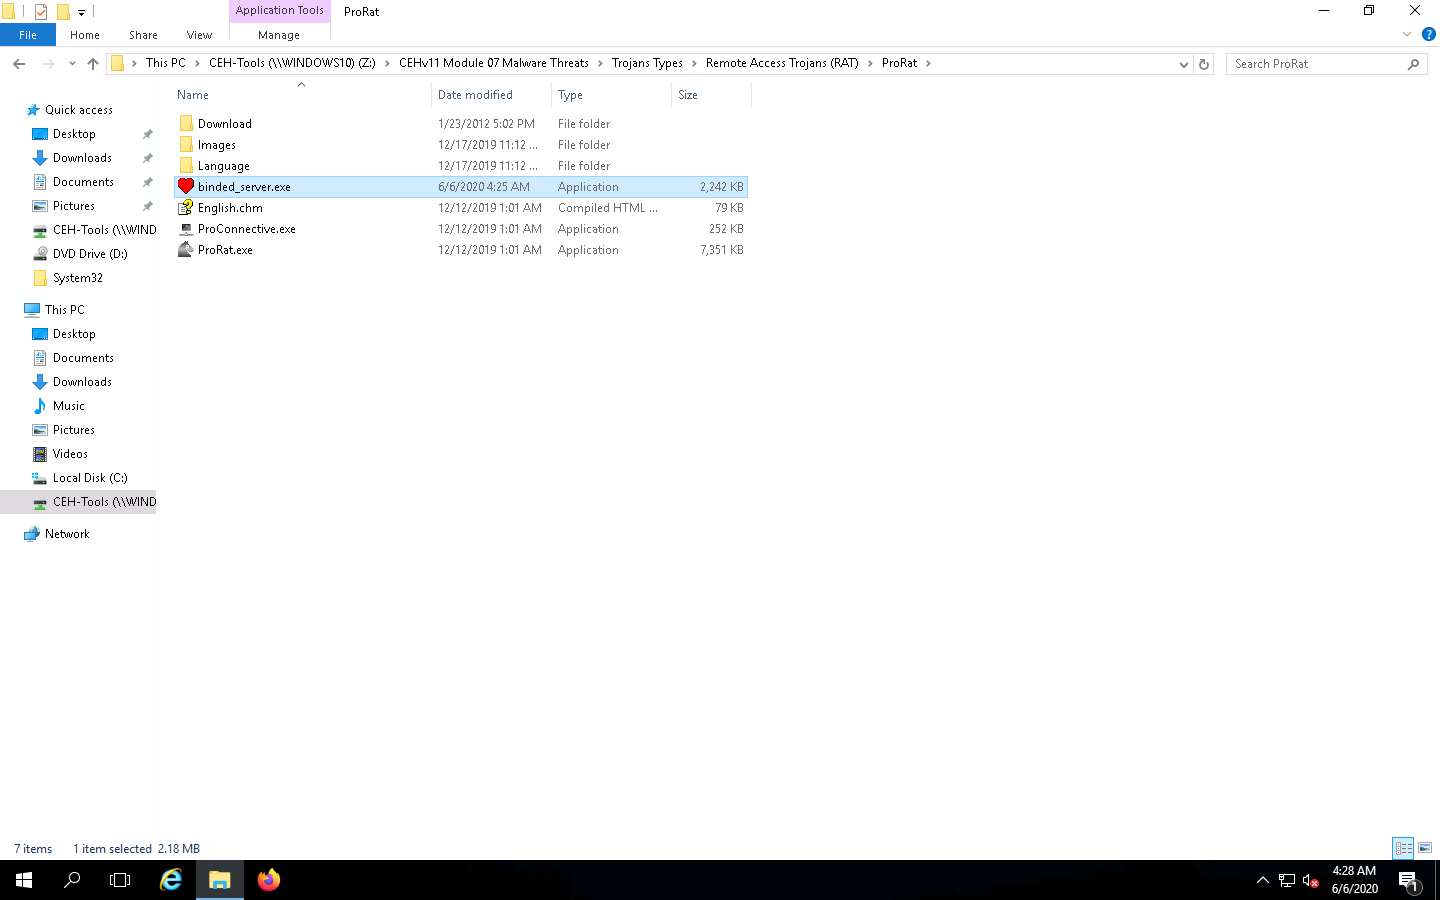
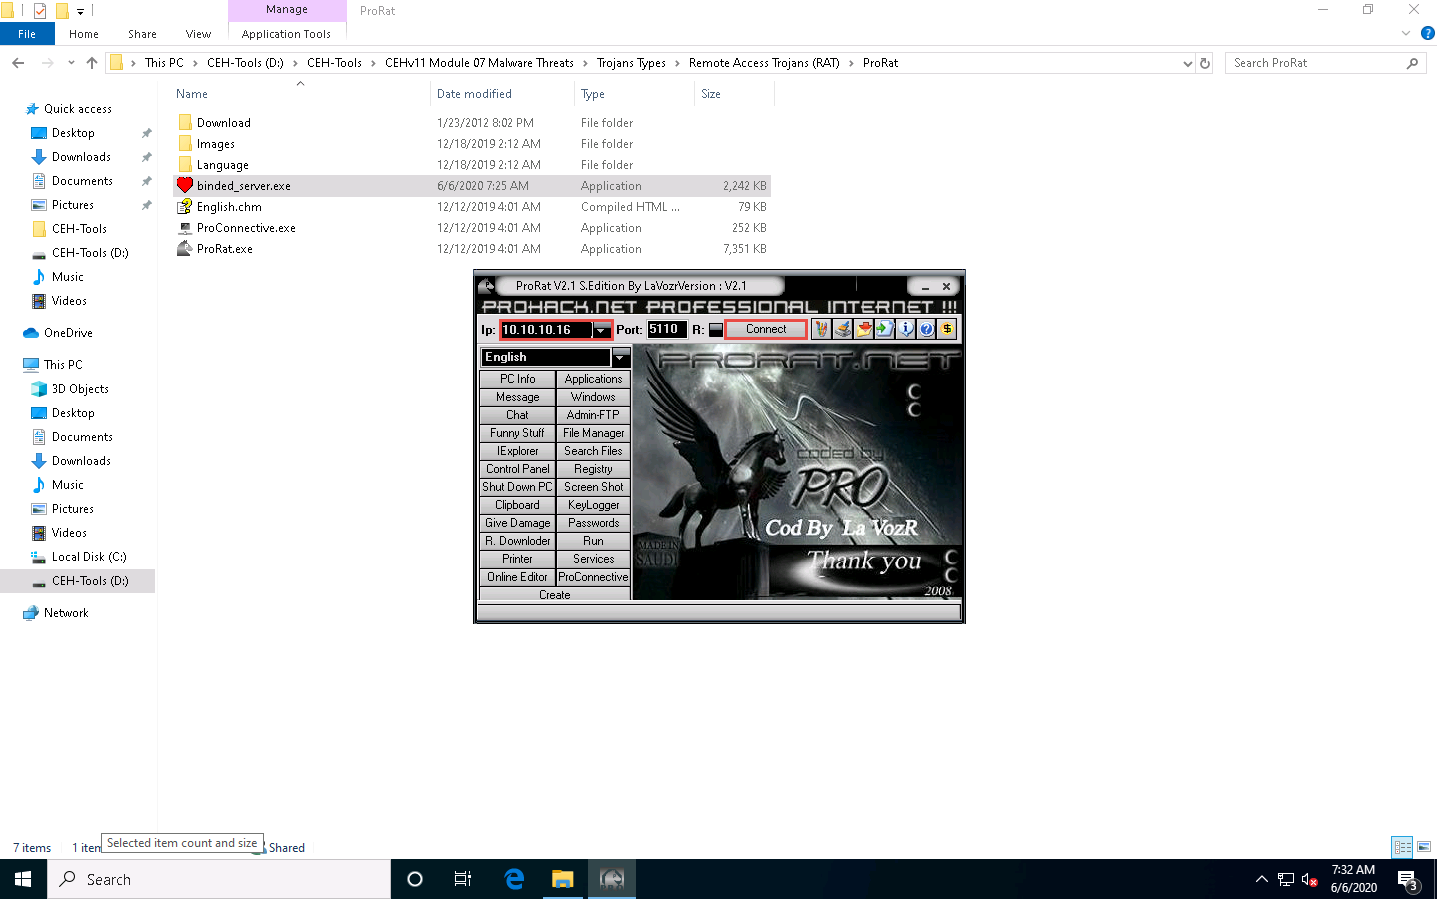
Click Windows 10 to switch back to the Windows 10 machine, and enter the IP address of Windows Server 2016 in the Ip field; keep the default port number in the ProRat main window, and click Connect.
In this lab, the IP address of Windows Server 2016 is 10.10.10.16.
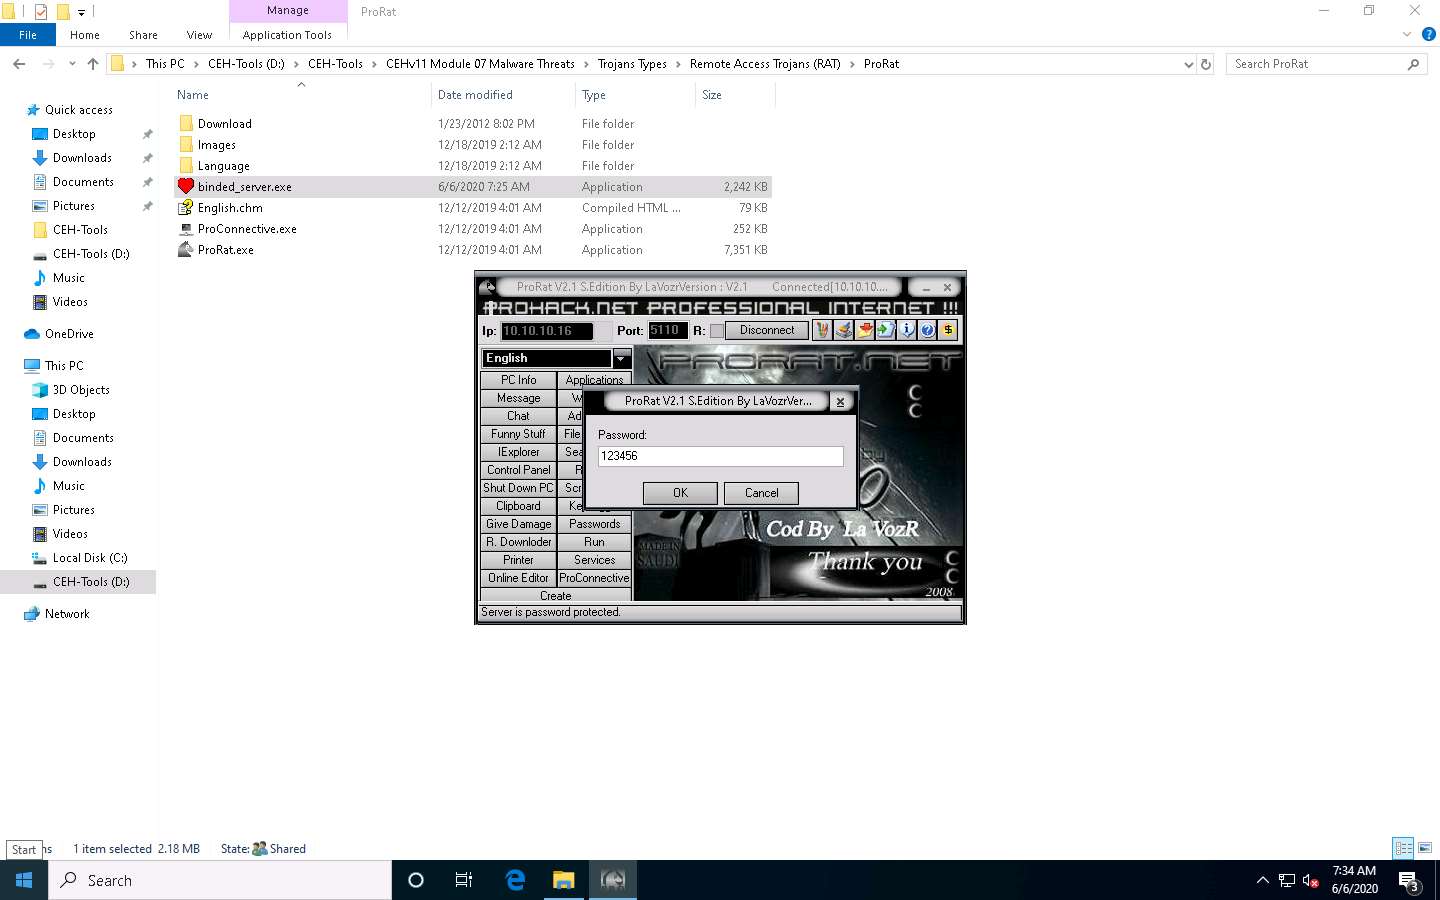
Enter the password you noted down when creating the server and click OK.
Now, you are connected to the victim machine.
ProRat begins to monitor user activities. It records all passwords, keystrokes, and other sensitive data.
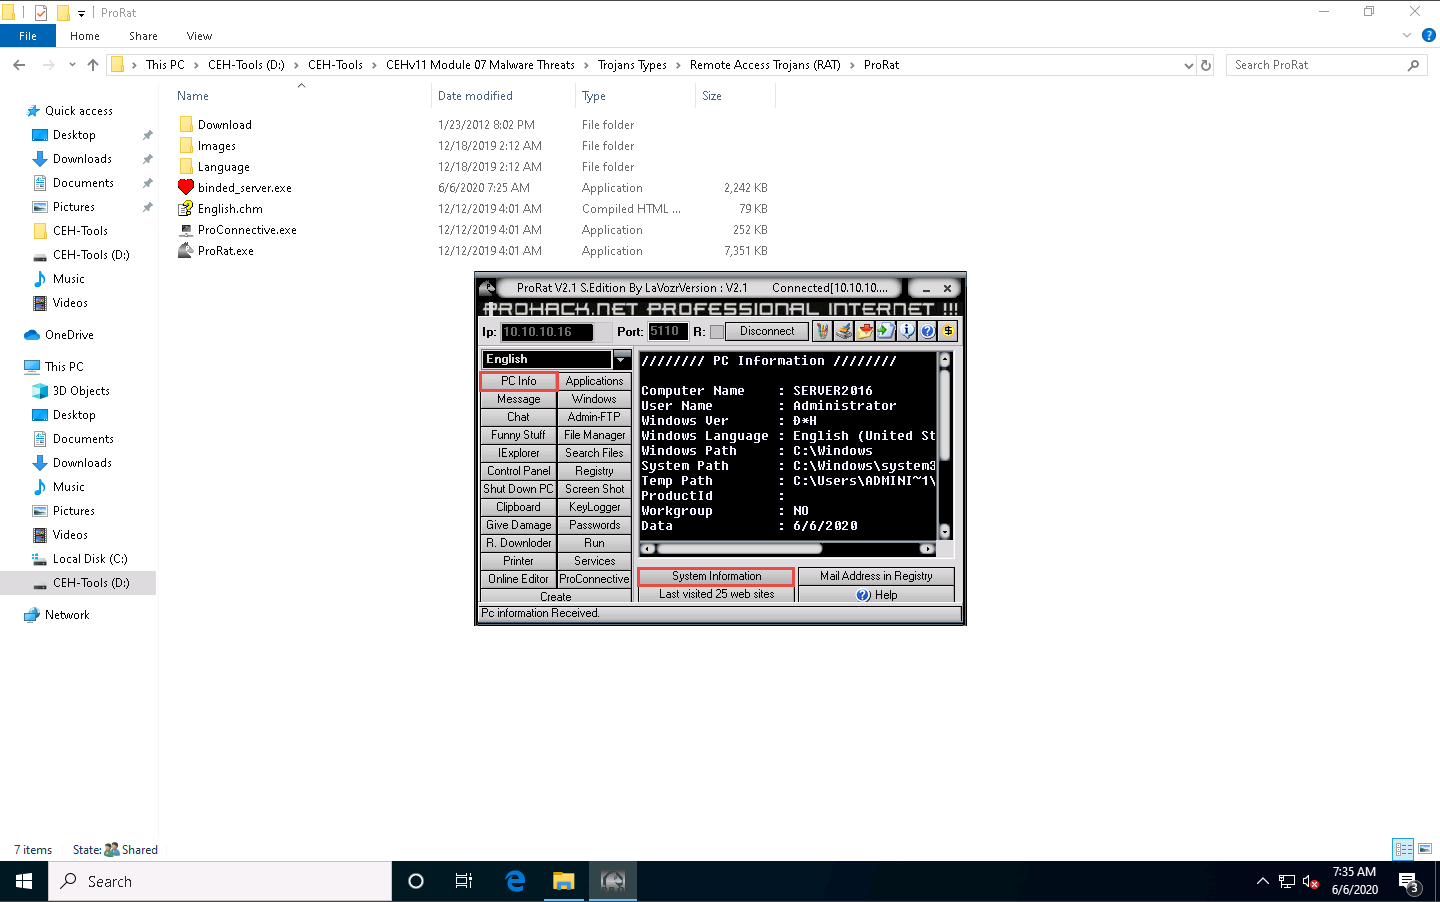
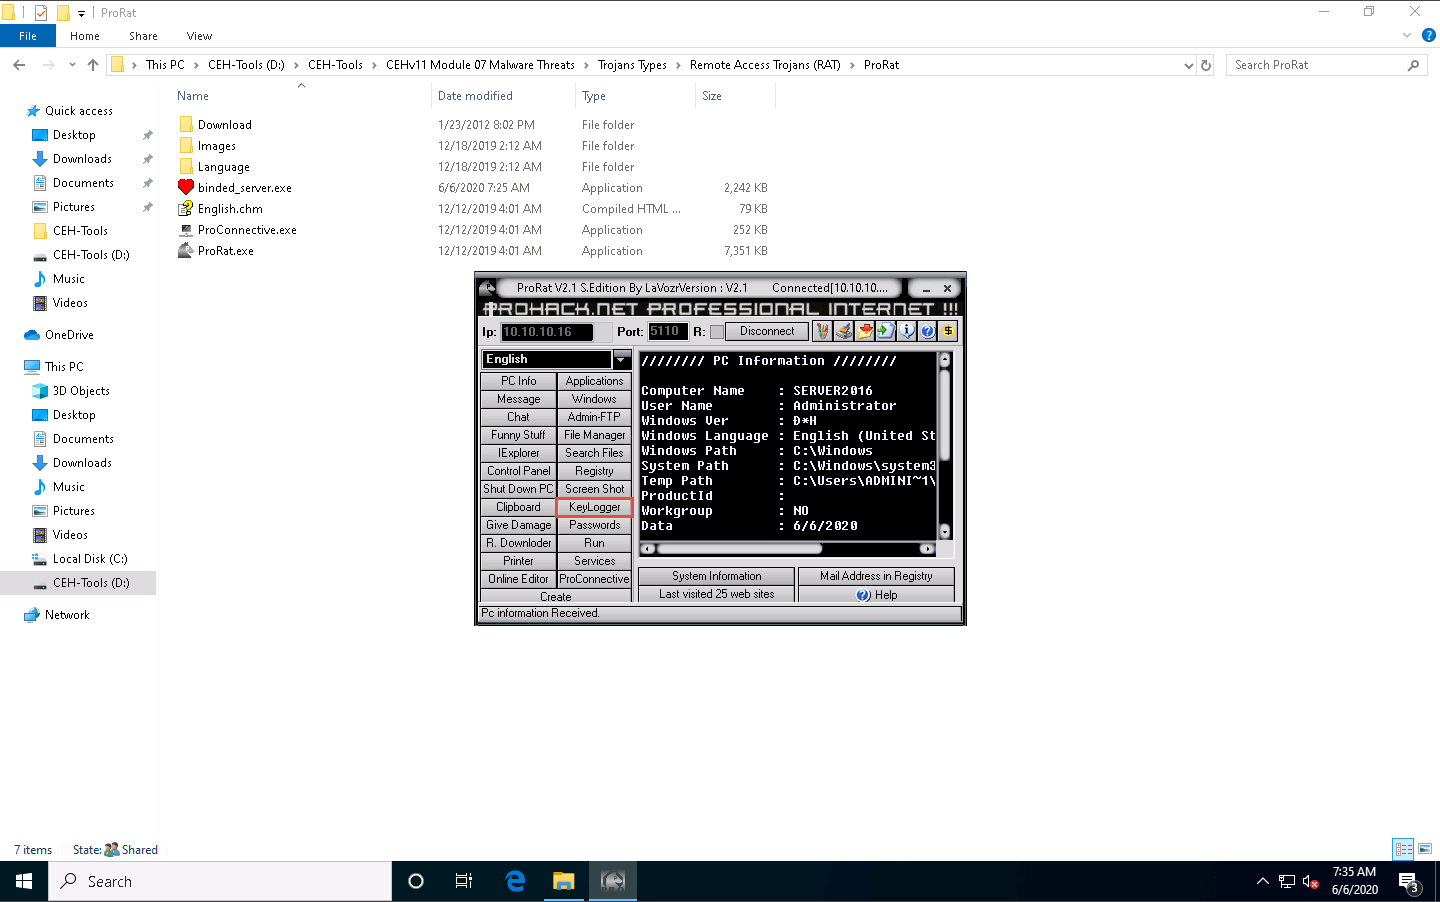
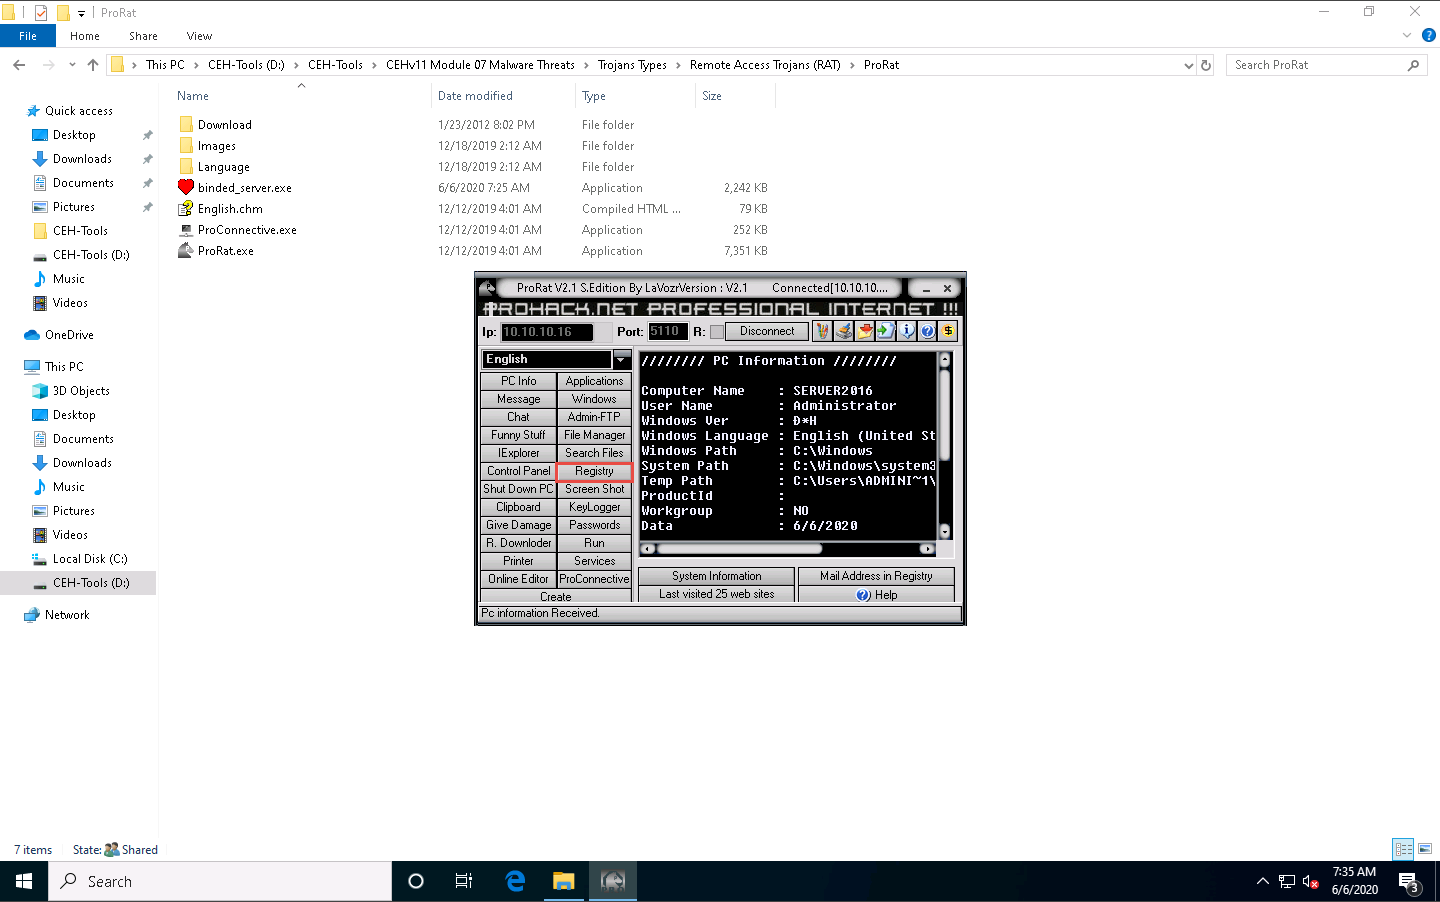
To test the connection, click PC Info, and choose System Information.
ProRat displays the information of the victim machine, as shown in the screenshot.
Click on KeyLogger to steal the user passwords for the online system. This will read the keystrokes performed on the victim machine.
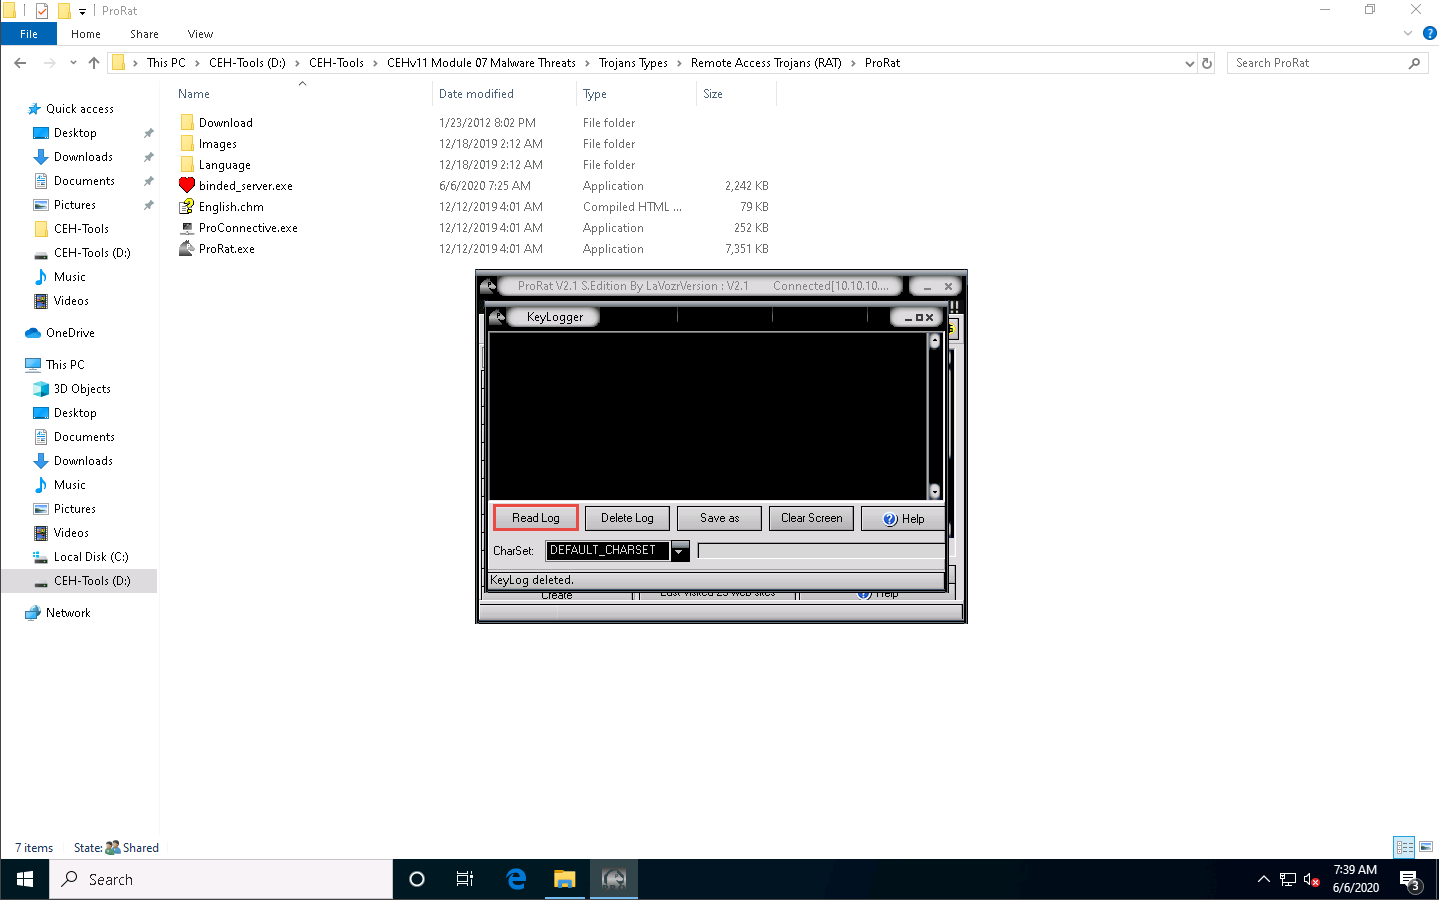
The KeyLogger window appears; click Read Log to view the key logs created by the target user on the victim machine.
Click Windows Server 2016 to switch to the Windows Server 2016 machine. Click Ctrl+Alt+Delete to activate the machine, by default, CEH\Administrator account is selected, click Pa$$w0rd to enter the password and press Enter. Navigate to the Desktop and open Notepad or a browser window, and type any text.
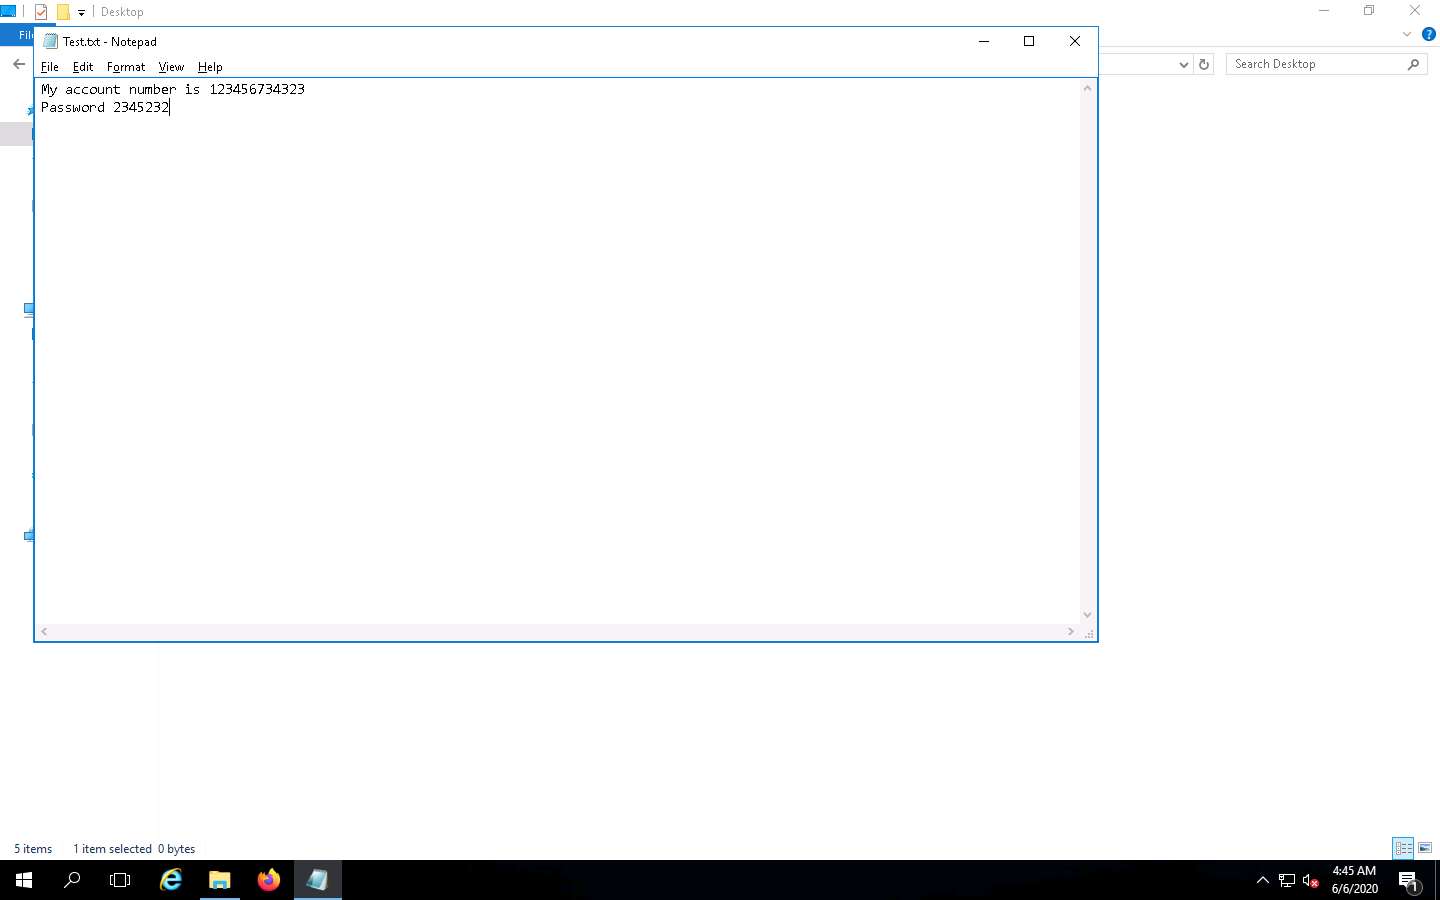
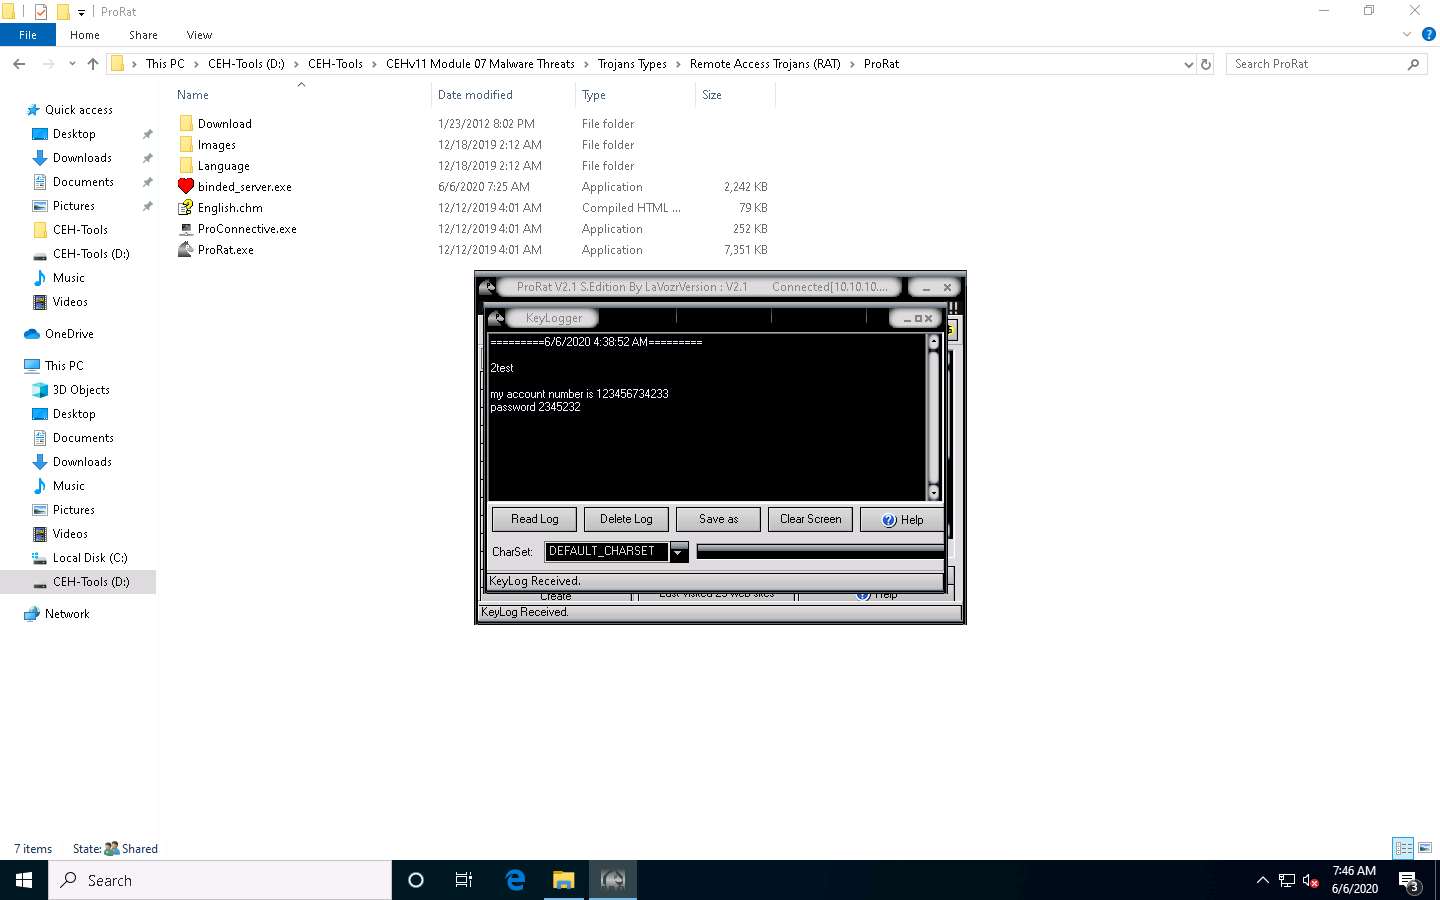
While the victim is writing a message or entering a username and password, you can capture the log entity.
Now, click Windows 10 to switch to the Windows 10 machine, and periodically click Read Log to check for keystrokes logged from the victim machine. Close the KeyLogger window.
ProRat Keylogger will not read special characters.
Now, click the Registry button to view the registry editor of the Windows Server 2016 machine.
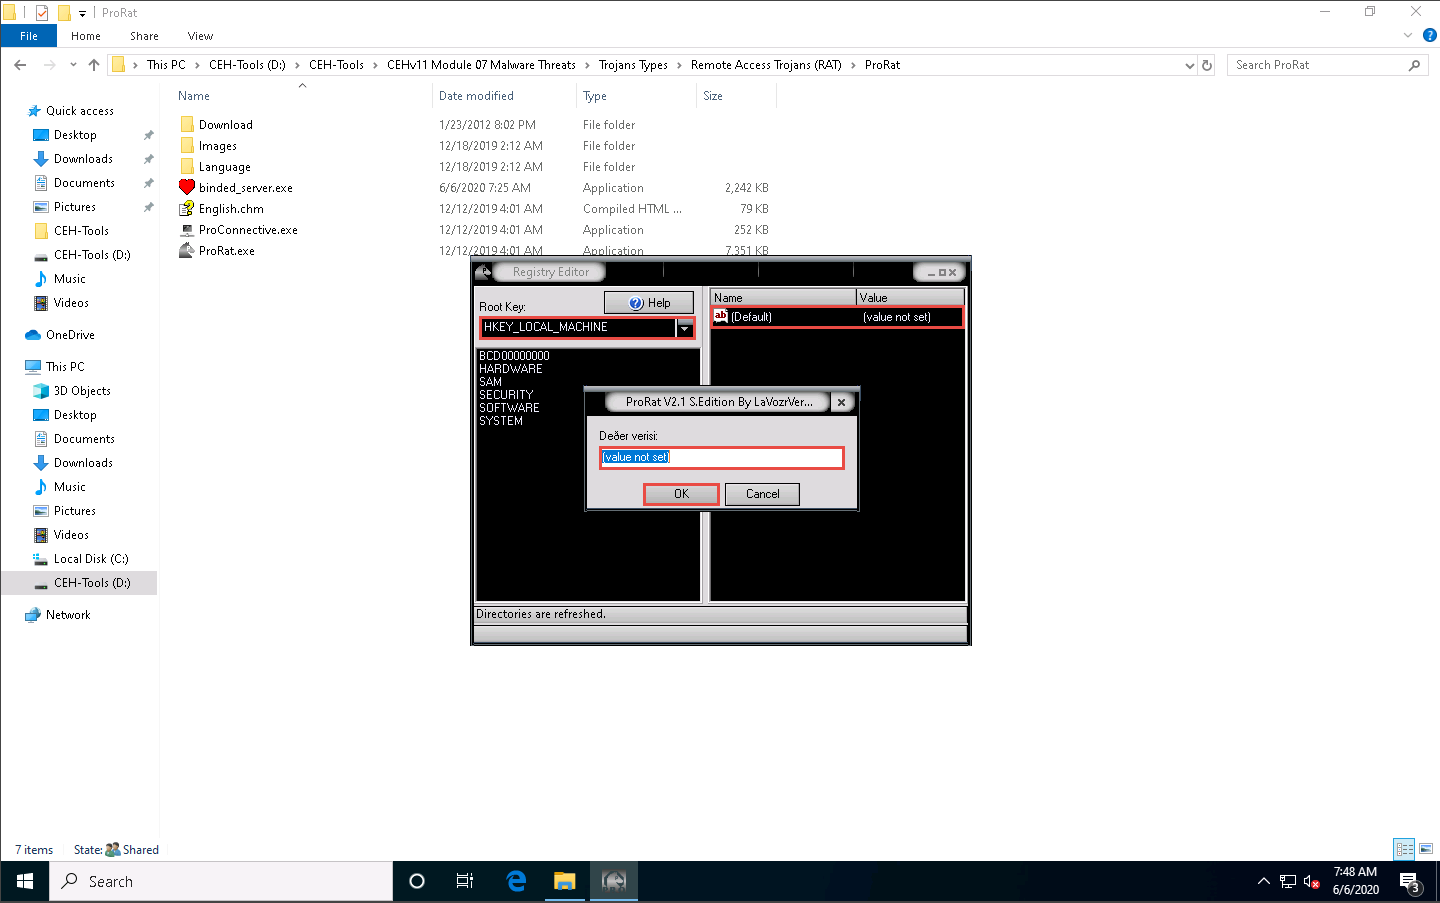
The Registry Editor window appears, where you can choose the Registry Editor from the Root Key drop-down list. You can see and also modify the registry of the victim’s machine, as shown in the screenshot.
Close the Registry related windows and switch back to the ProRat main window.
In the same way, you can make use of the other options that allow you to explore and control the victim machine.
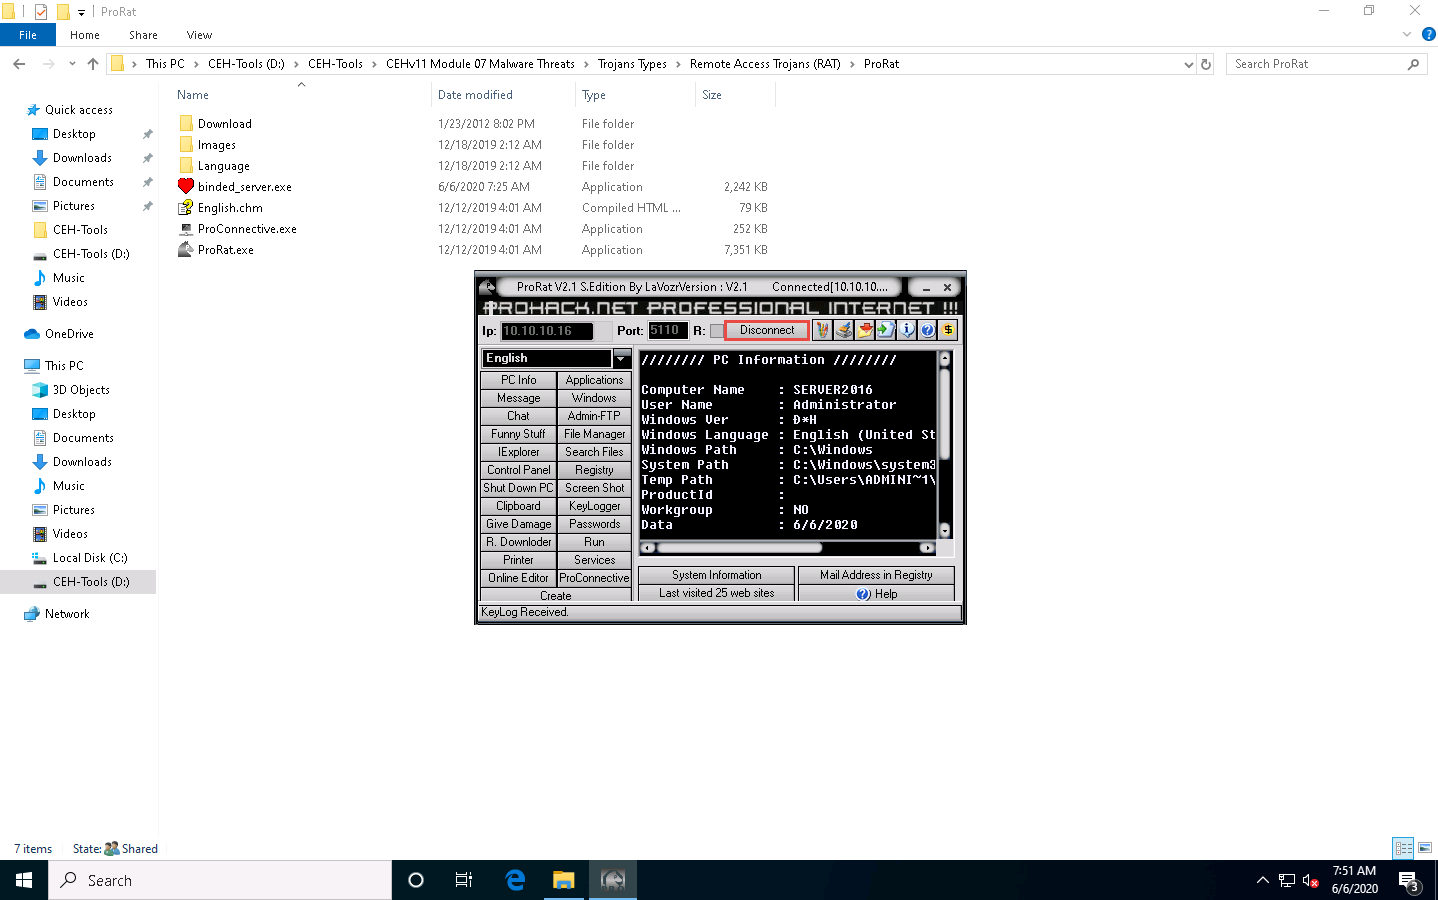
On the Windows 10 machine, click Disconnect in the ProRat window.
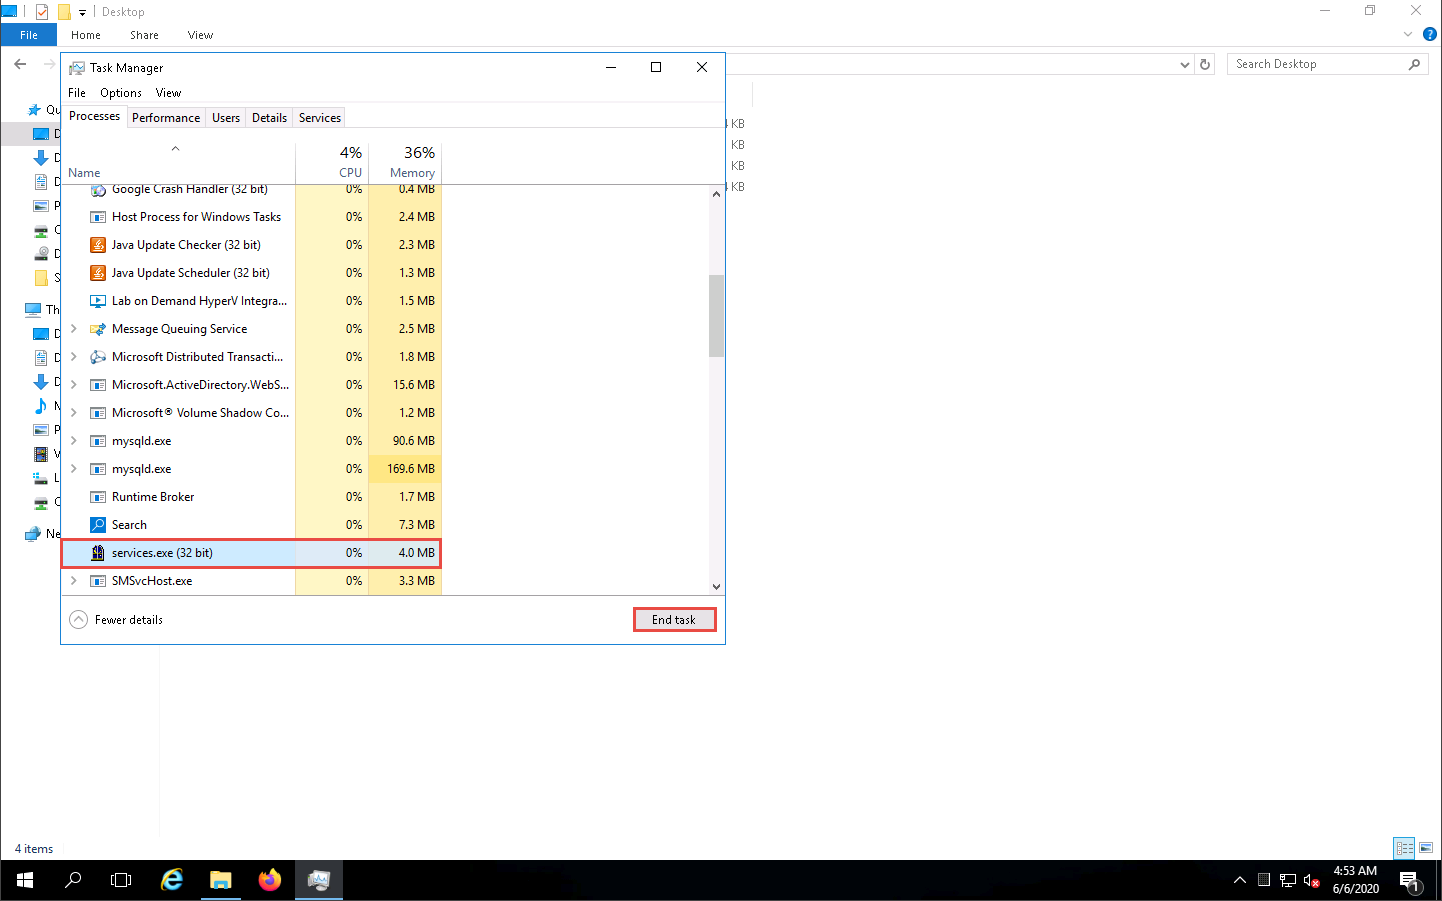
On completion of this lab, click Windows Server 2016 to switch to the Windows Server 2016 machine, launch Task Manager, look for the server.exe (32 bit) process, and click End task.
Task 4: Create a Trojan Server using Theef RAT Trojan
Theef is a Remote Access Trojan written in Delphi. It allows remote attackers access to the system via port 9871. Theef is a Windows-based application for both client and server. The Theef server is a virus that you install on a target computer, and the Theef client is what you then use to control the virus.
The versions of the created client or host, and the appearance of its website, may differ from that of this lab. However, the actual process of creating the server and the client is the same.
Generally, an attacker might send a server executable to the victim machine and entice the victim into running it. In this lab, for demonstration purposes, we are directly executing the file on the victim machine, Windows Server 2016.
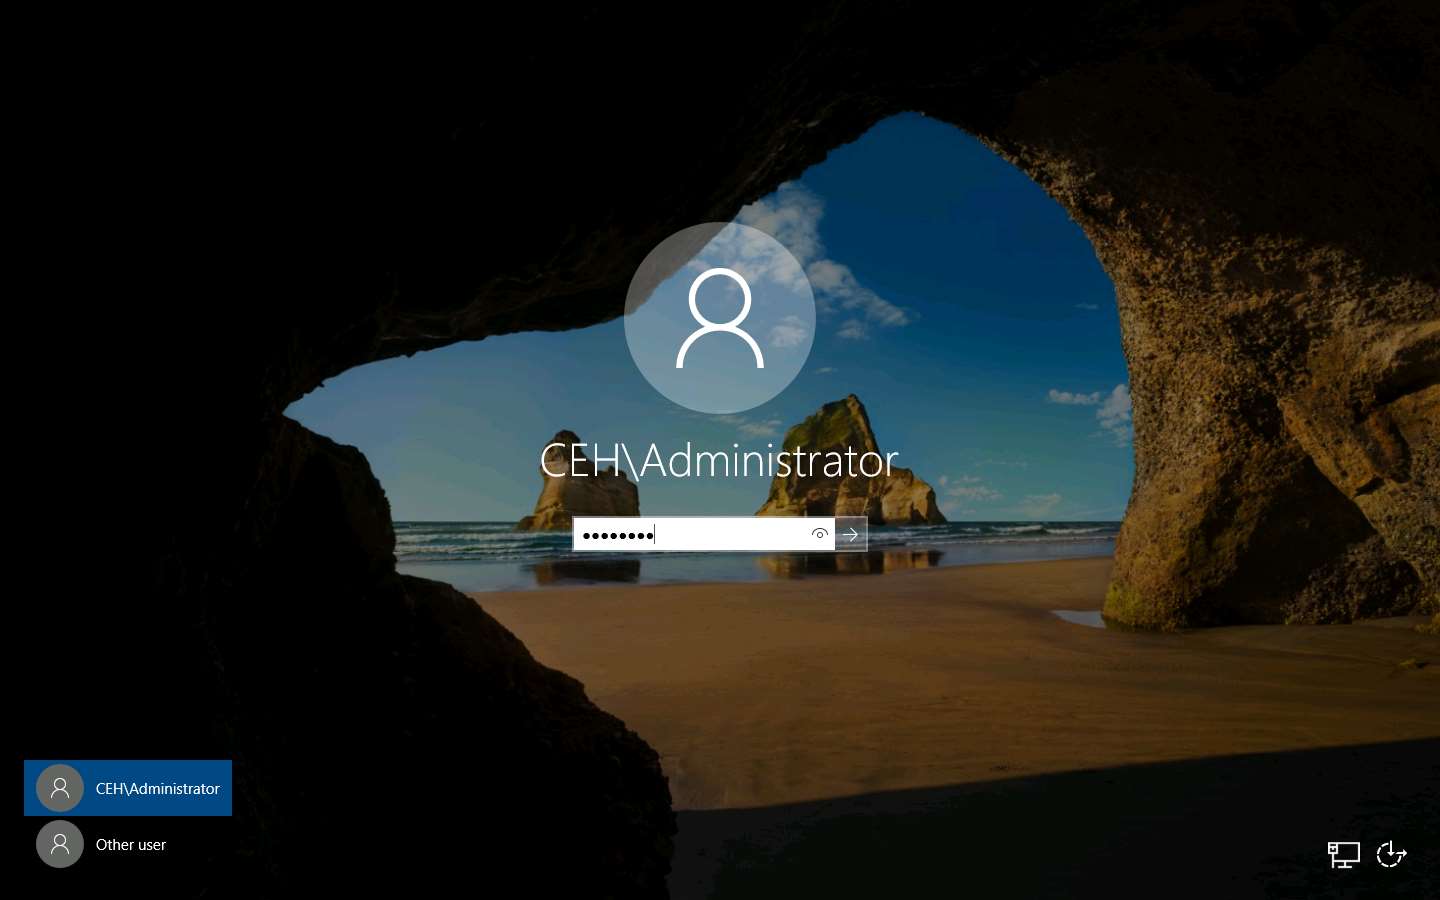
Click Windows Server 2016 to switch to the Windows Server 2016 machine. Click Ctrl+Alt+Delete to activate the machine, by default, CEH\Administrator account is selected, click Pa$$w0rd to enter the password and press Enter.
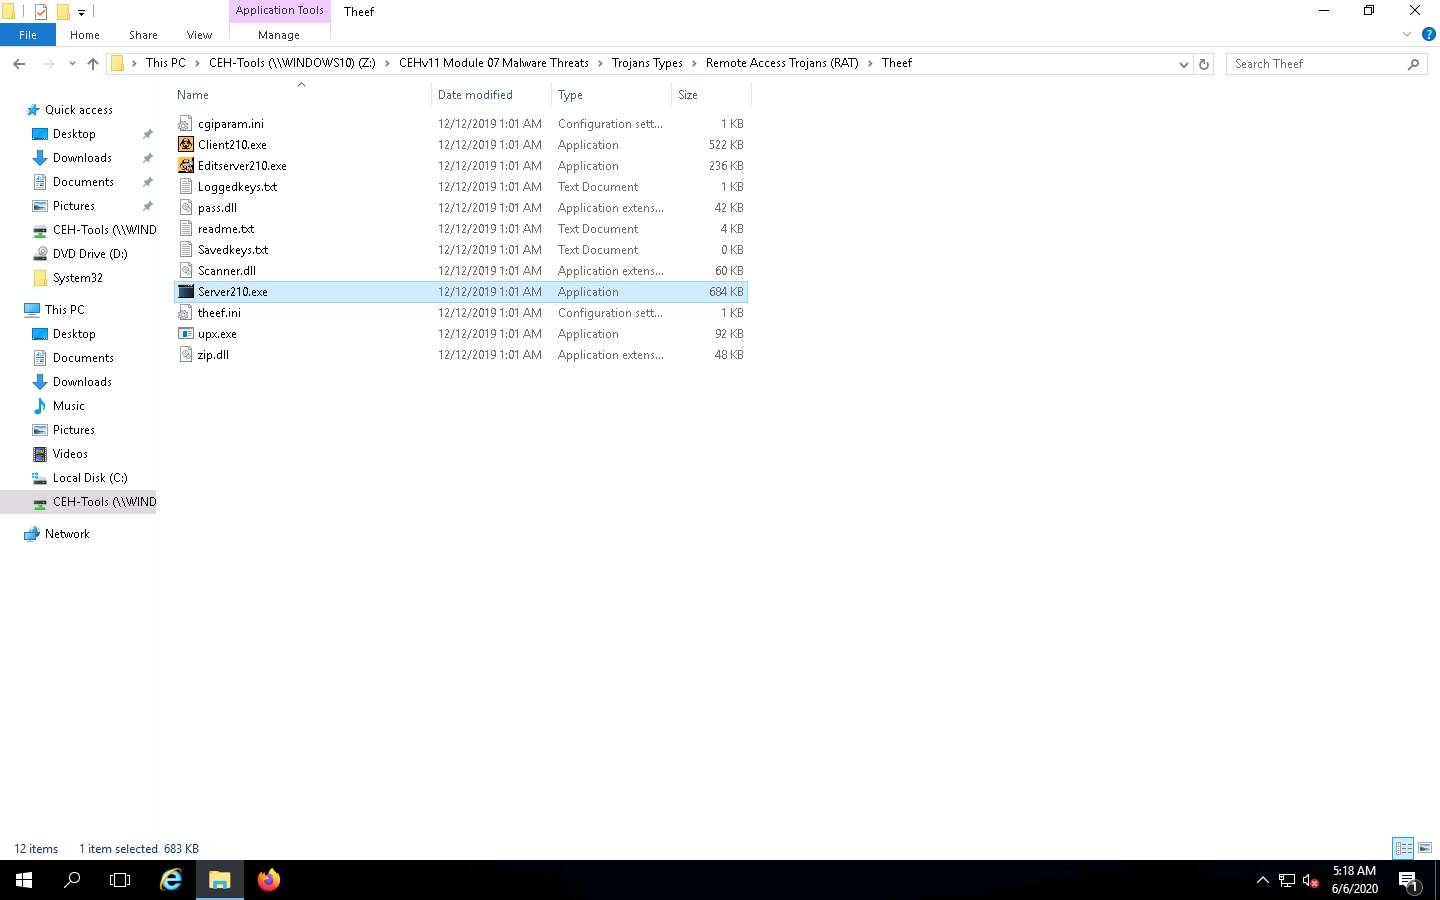
Navigate to Z:\CEHv11 Module 07 Malware Threats\Trojans Types\Remote Access Trojans (RAT)\Theef and double-click Server210.exe to run the Trojan on the victim machine.
If an Open File - Security Warning pop-up appears, click Run.
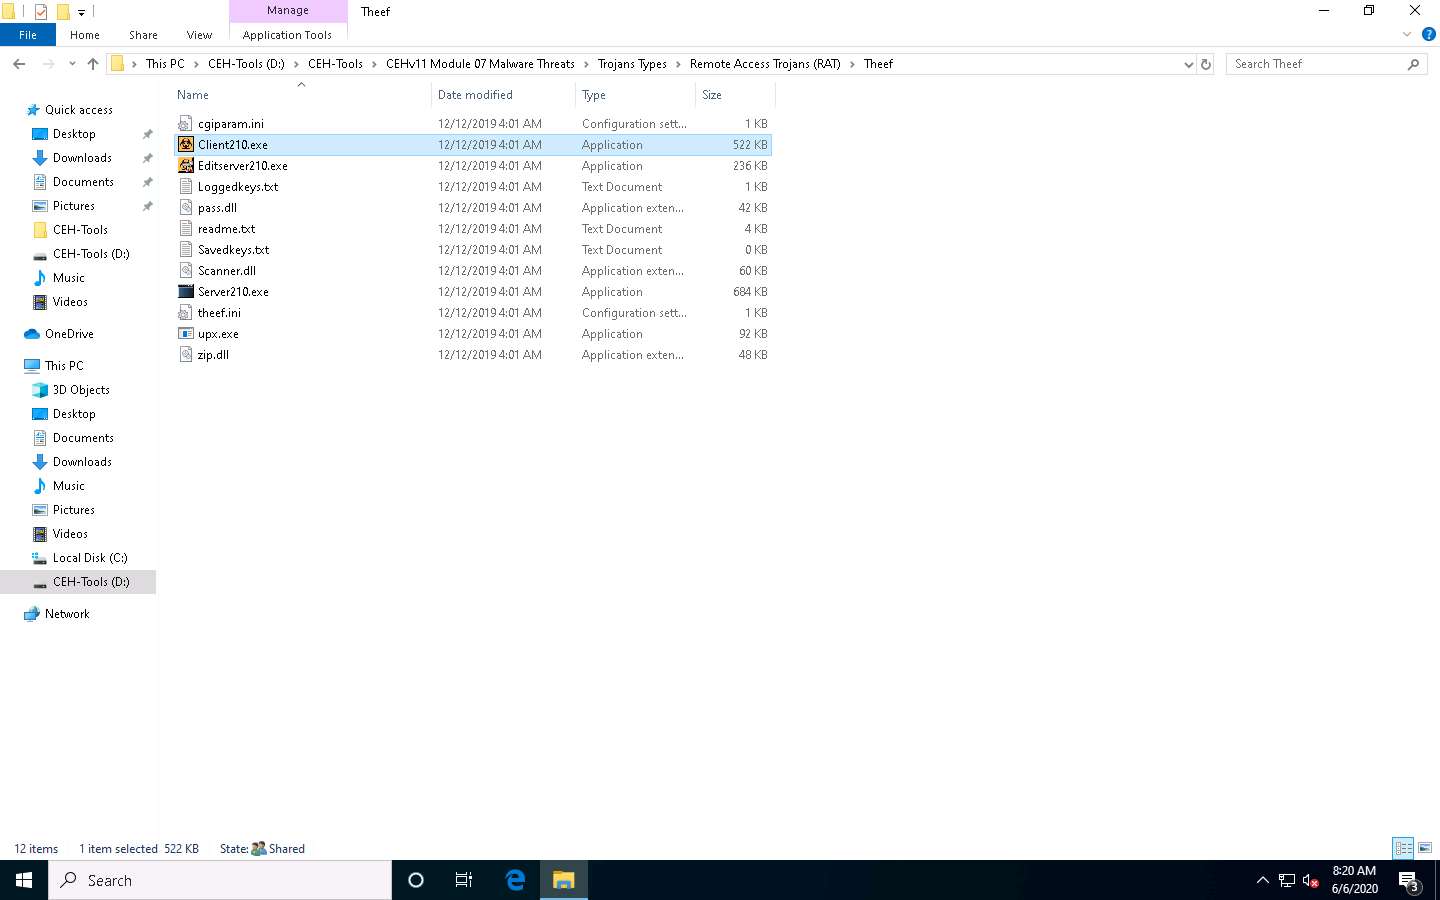
Now, click Windows 10 to switch to the Windows 10 machine (as an attacker).
Navigate to D:\CEH-Tools\CEHv11 Module 07 Malware Threats\Trojans Types\Remote Access Trojans (RAT)\Theef and double-click Client210.exe to access the victim machine remotely.
The Theef main window appears, as shown in the screenshot.
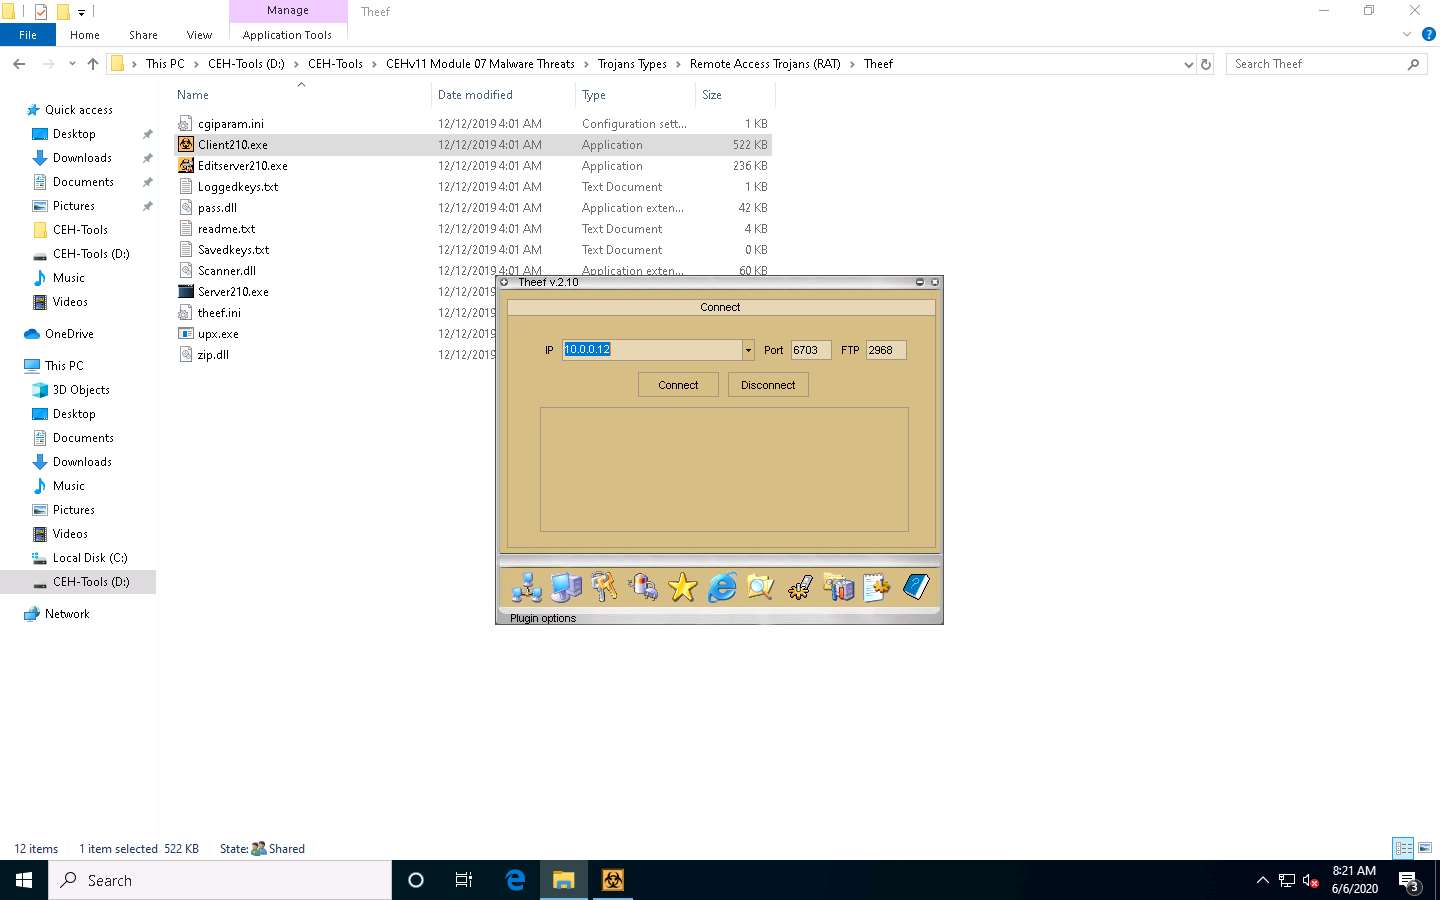
Enter the IP address of the target machine (here, Windows Server 2016) in the IP field (10.10.10.16), and leave the Port and FTP fields set to default; click Connect.
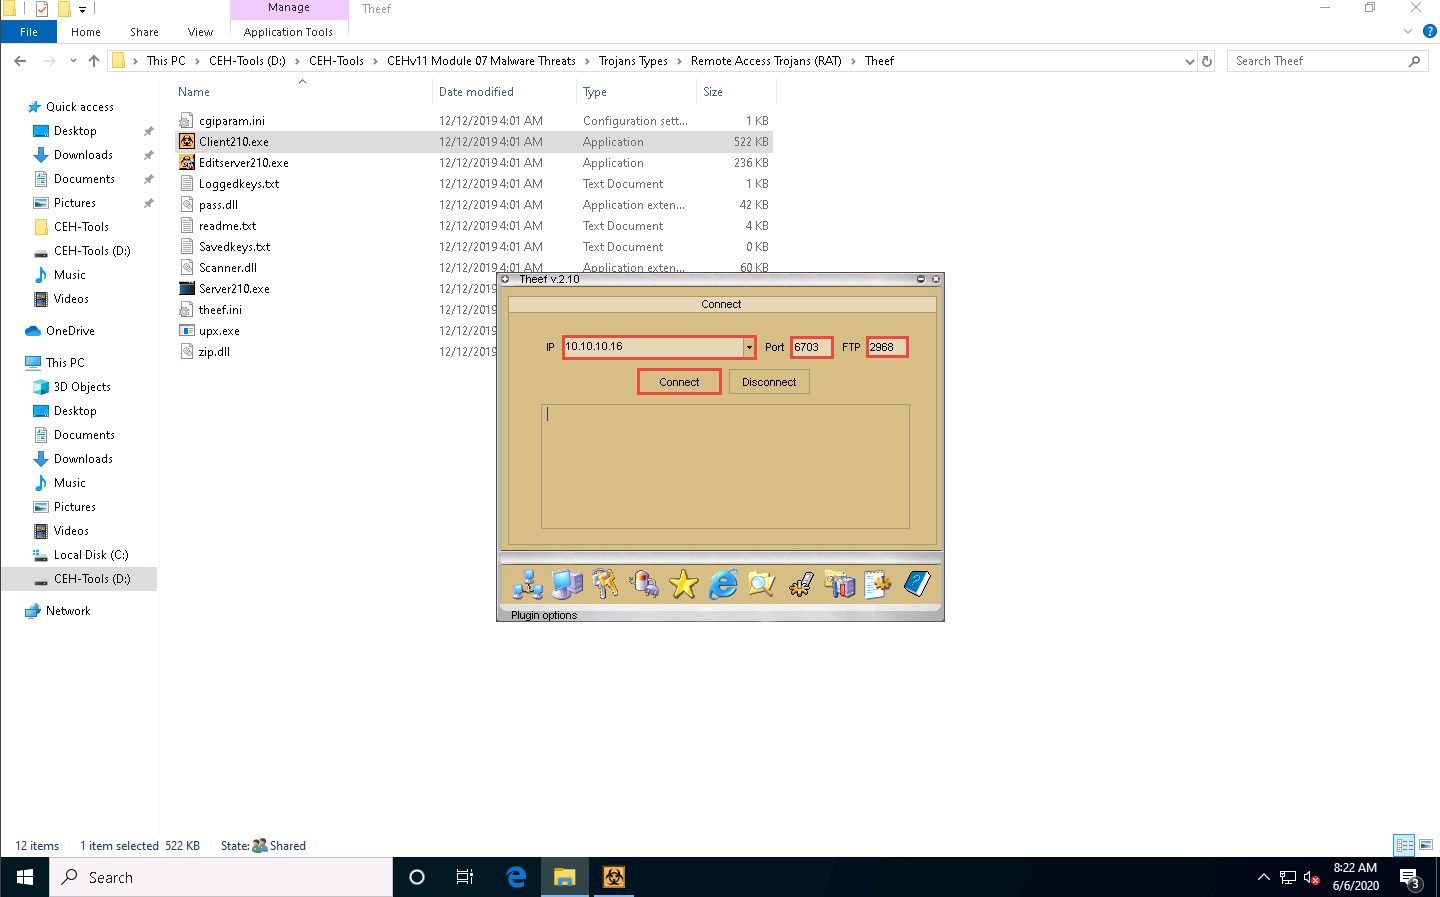
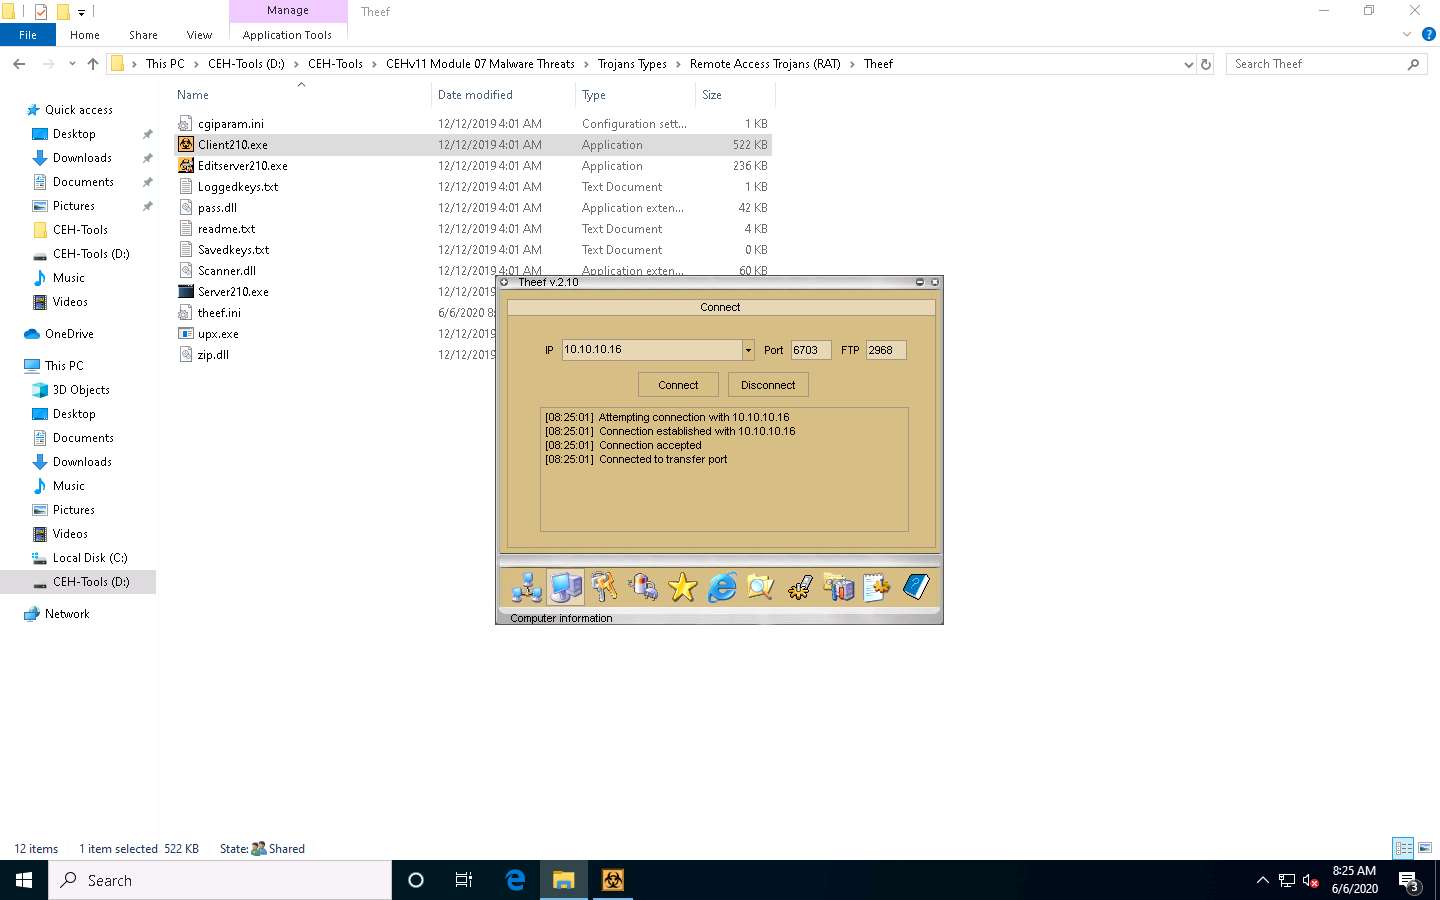
Now, from Windows 10, you have successfully established a remote connection with the Windows Server 2016 machine.
To view the computer’s information, click the Computer Information icon from the lower part of the window.
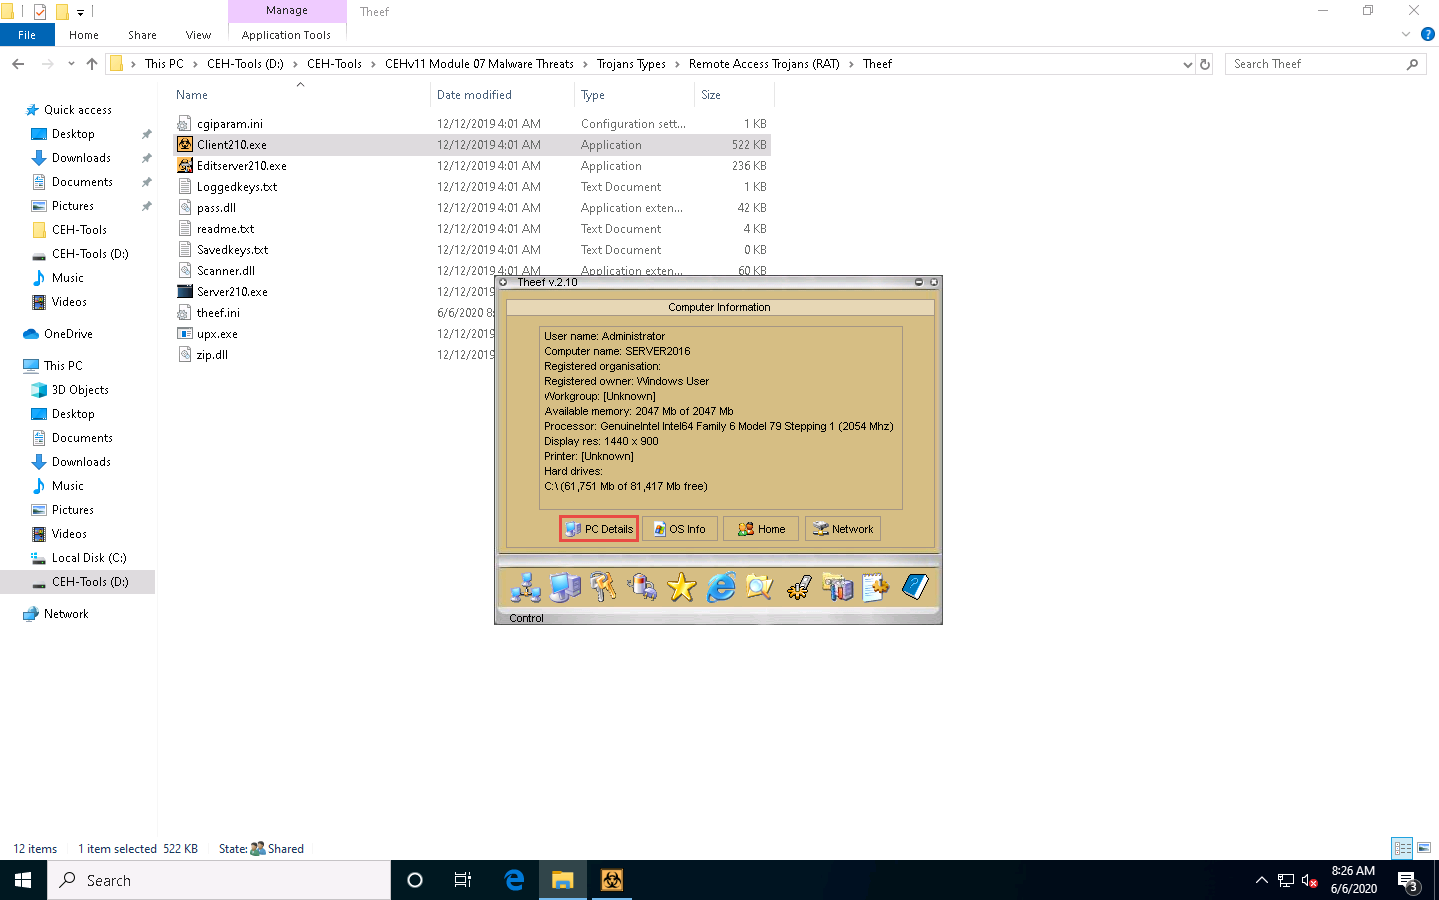
In Computer Information, you can view PC Details, OS Info, Home, and Network by clicking their respective buttons.
Here, for example, selecting PC Details reveals computer-related information.
Click the Spy icon to perform various operations on the target machine.
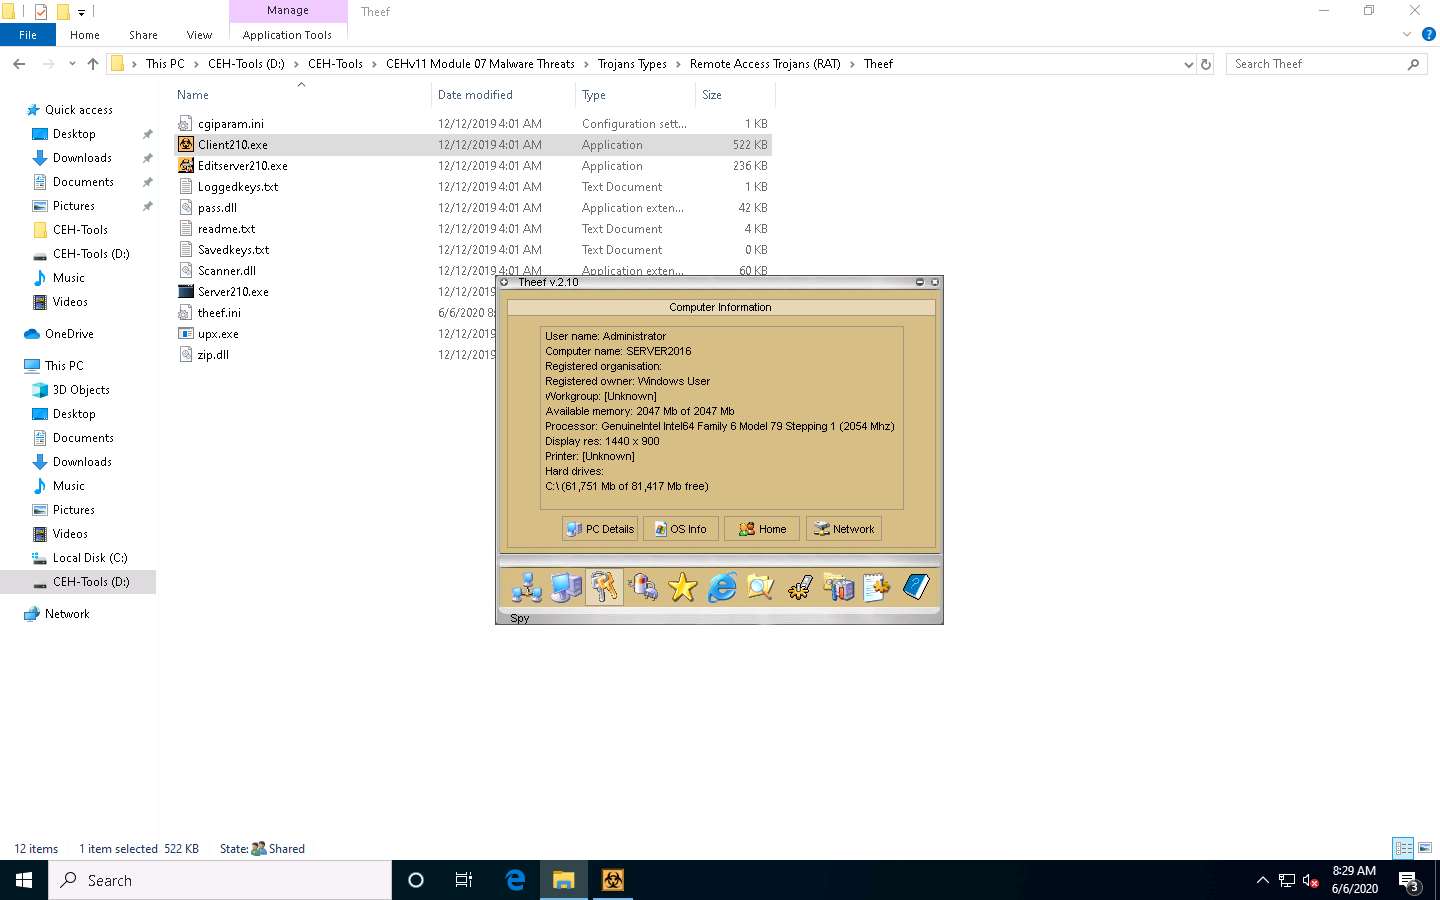
You can perform various operations such as capture screens, log keys, view processes, view the task manager, use the webcam, and use the microphone on the victim machine by selecting their respective options.
Here, for instance, selecting Task Manager views the tasks running on the target machine.
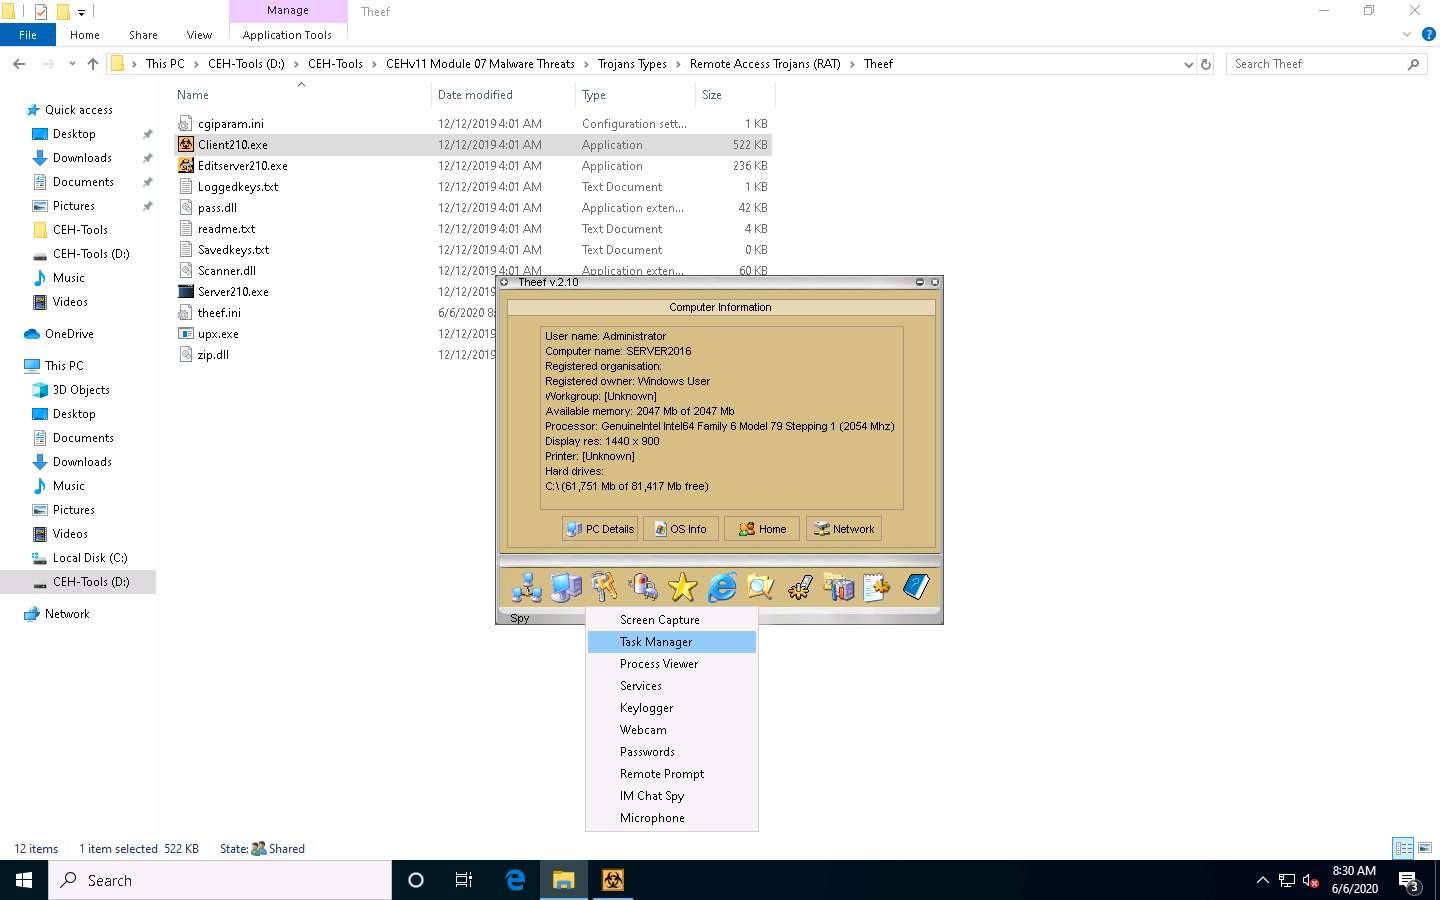
In the Task Manager window, click Refresh icon to obtain the list of running processes.
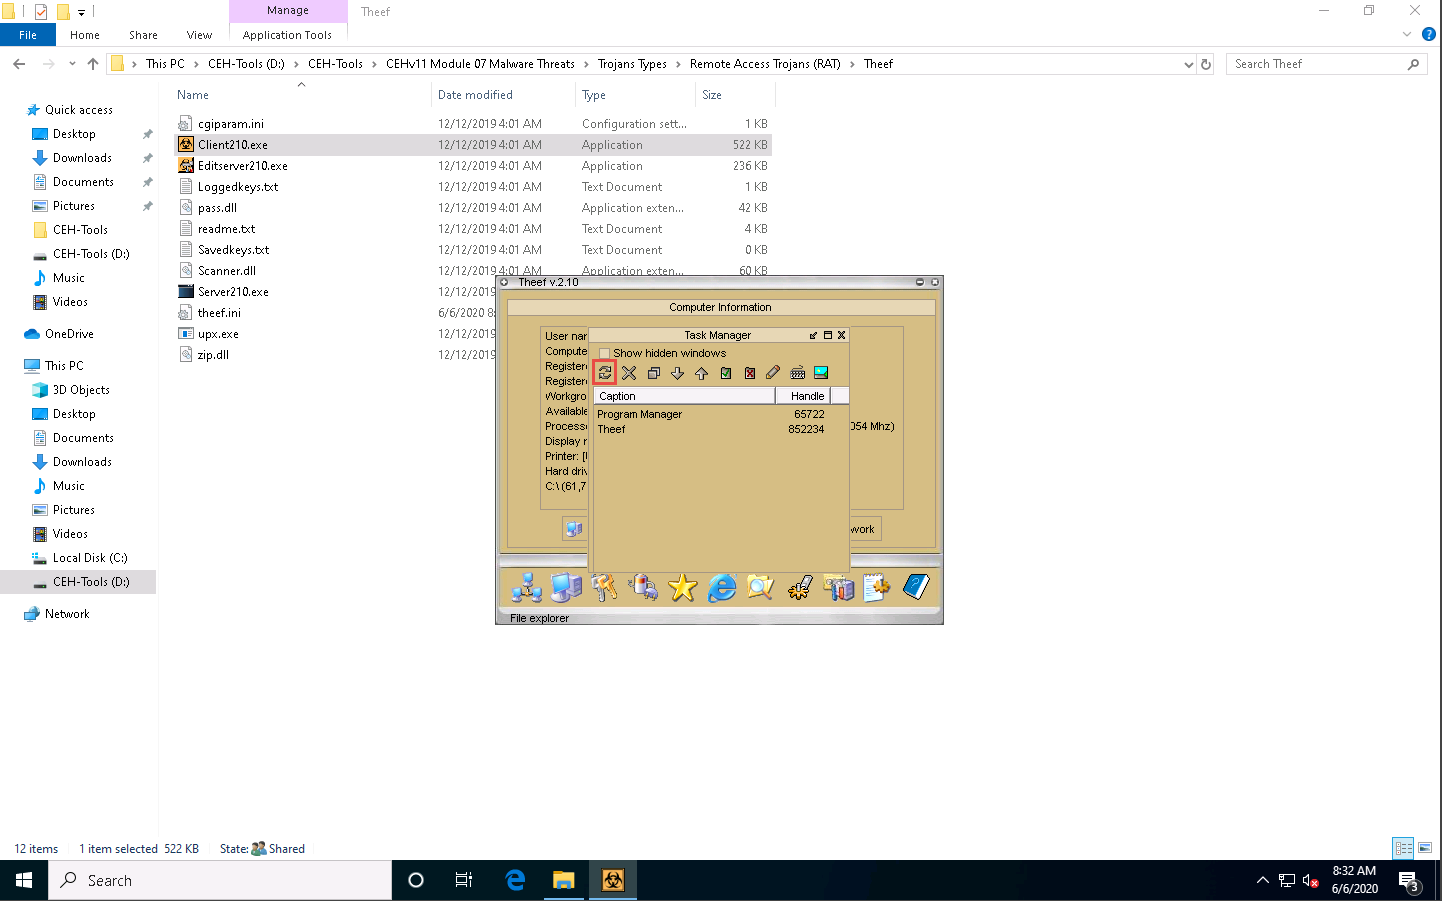
Select a process (task); click the Close window icon to end the task on the target machine.
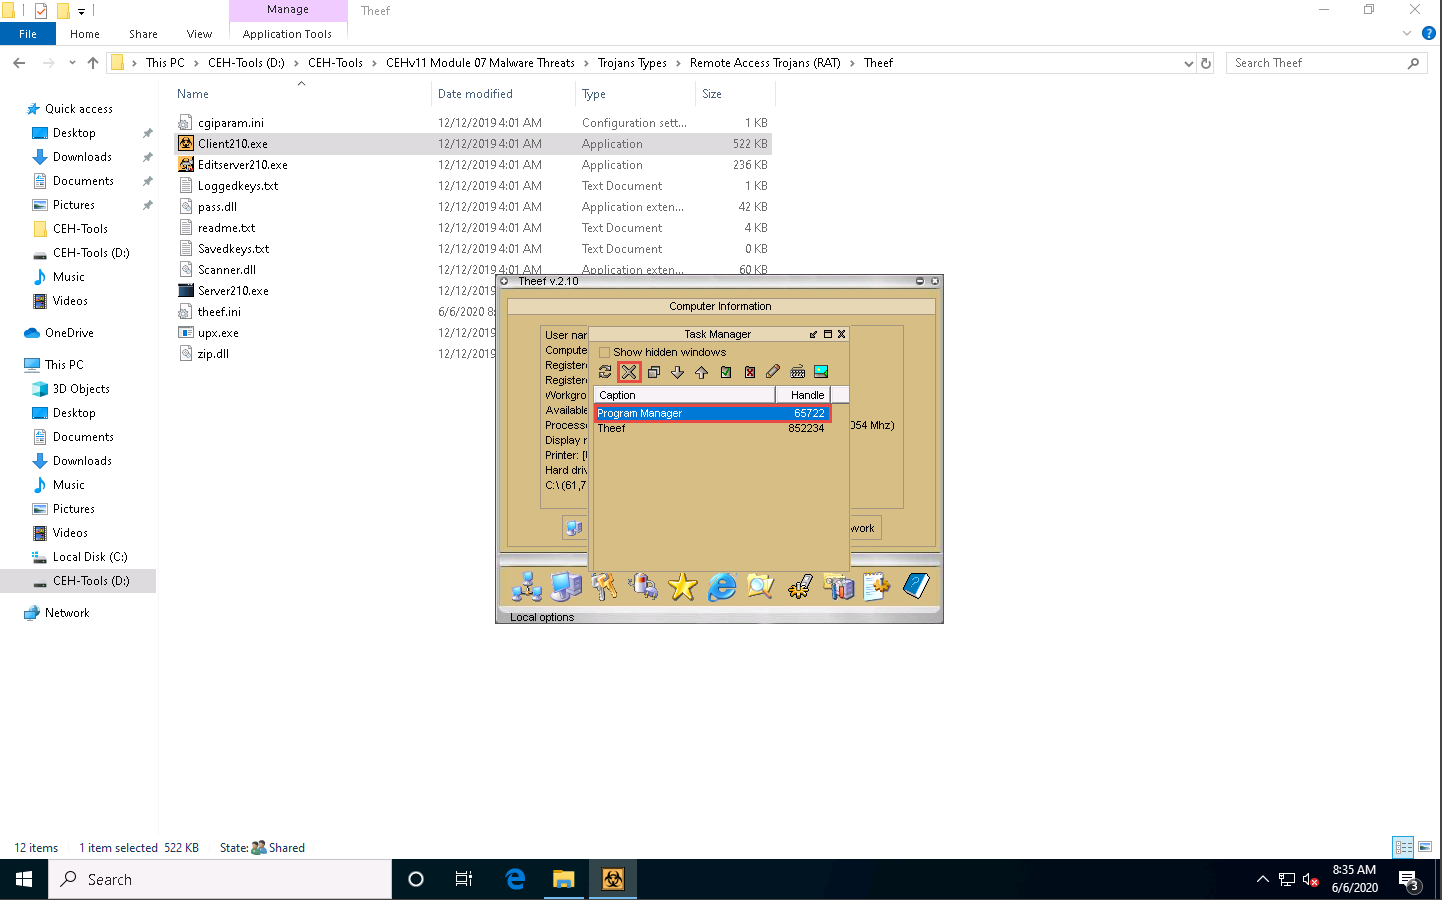
Close the Task Manager window.
The tasks running in the task manager may vary in your lab environment.
From the Spy menu, click Keylogger to record the keystrokes made on the victim machine.
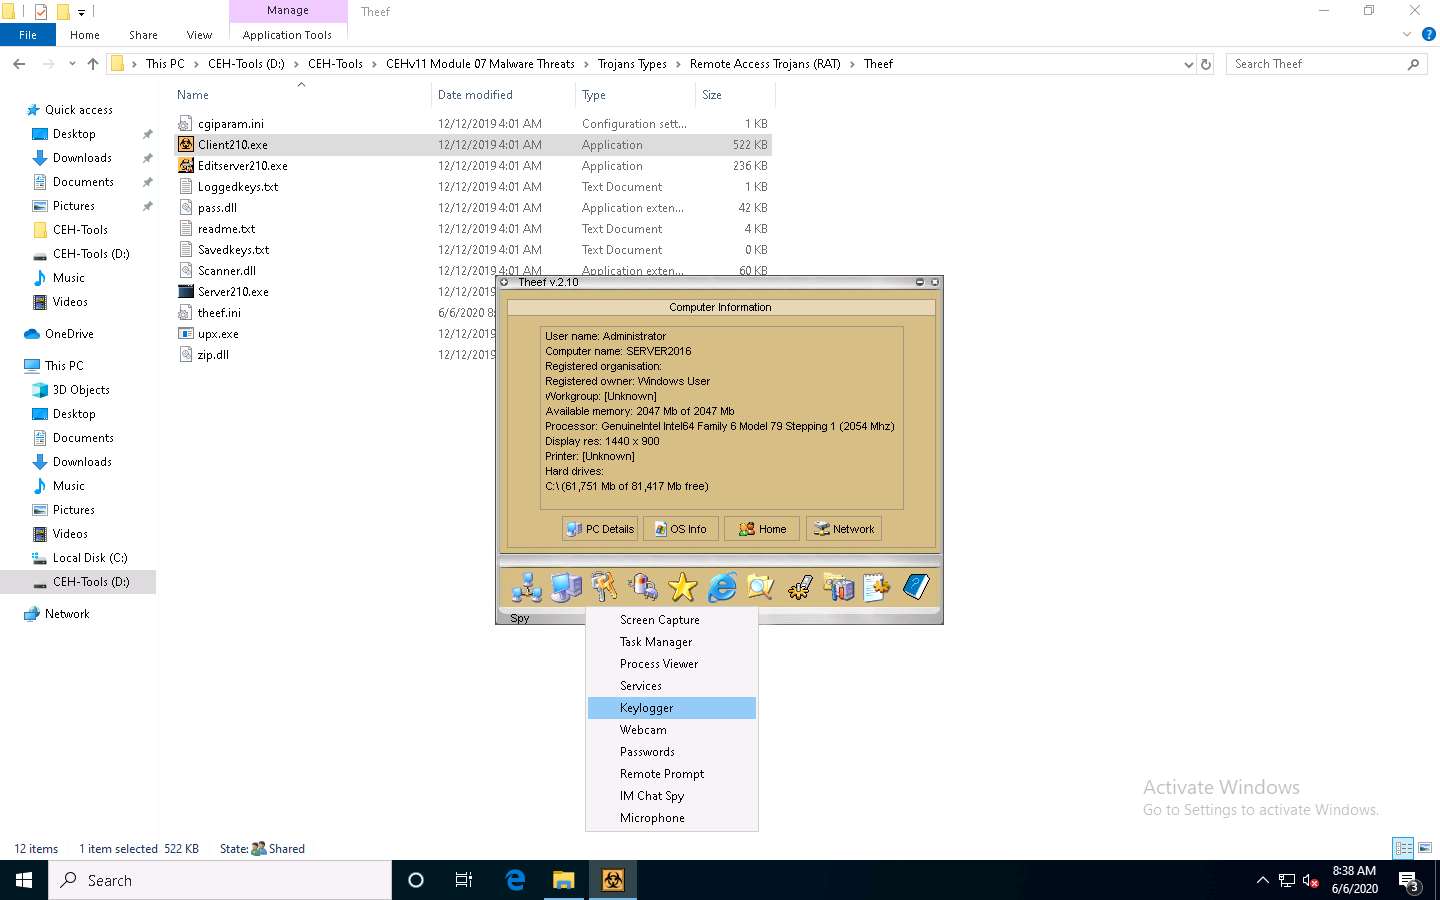
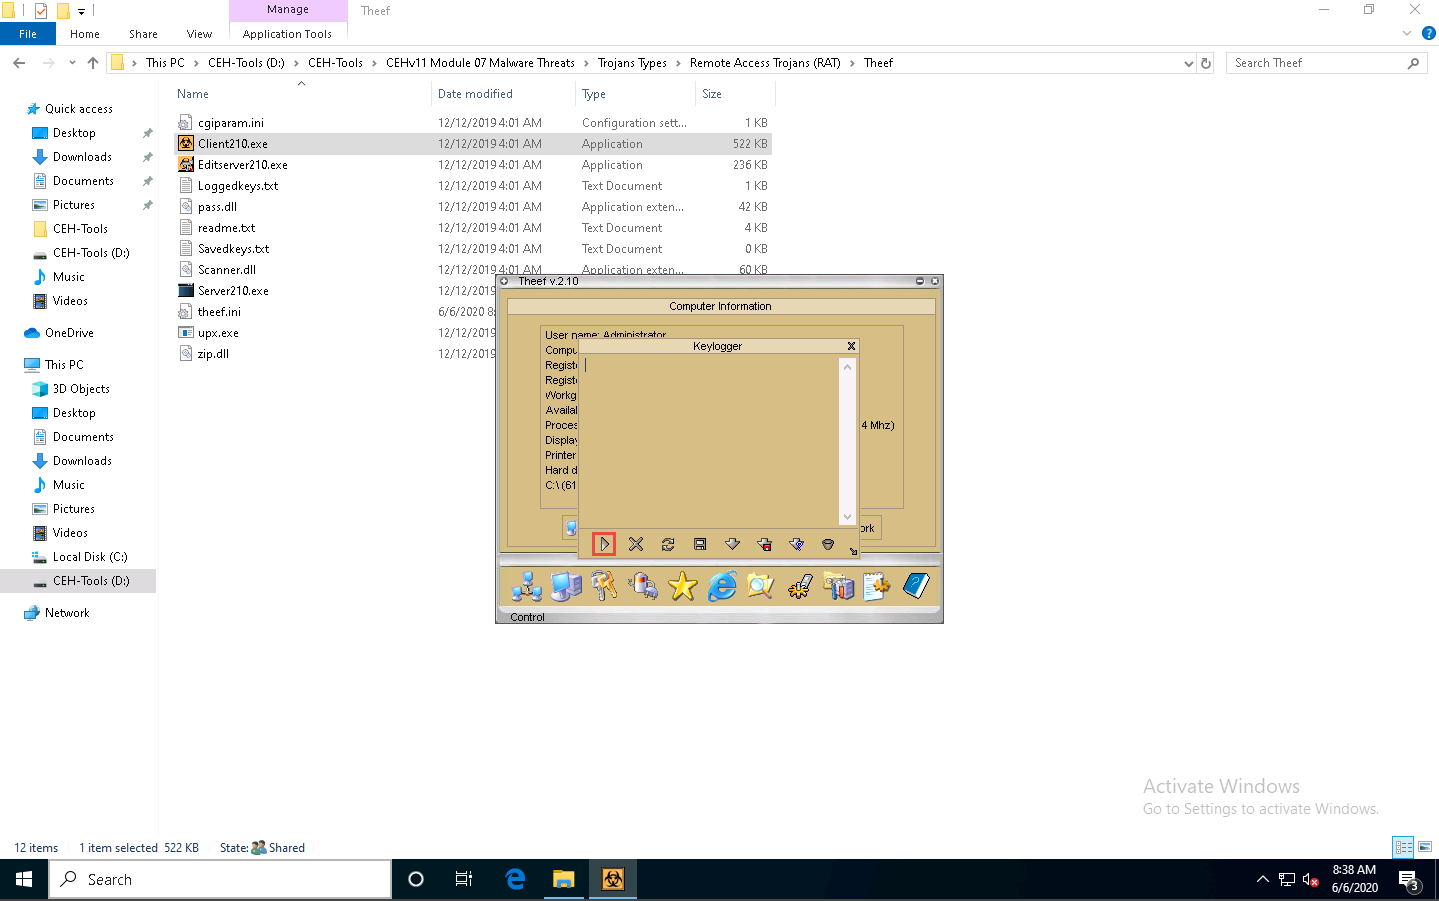
The Keylogger pop-up appears; click the Start icon to read the keystrokes of the victim machine.
Click Windows Server 2016 to switch to the Windows Server 2016 machine. Click Ctrl+Alt+Delete to activate the machine, by default, CEH\Administrator account is selected, click Pa$$w0rd to enter the password and press Enter.
Open a browser window and browse some websites or open a text document and type some sensitive information.
Click Windows 10 to switch back to the attacker machine (Windows 10) to view the recorded keystrokes of the victim machine in the Theef Keylogger window.
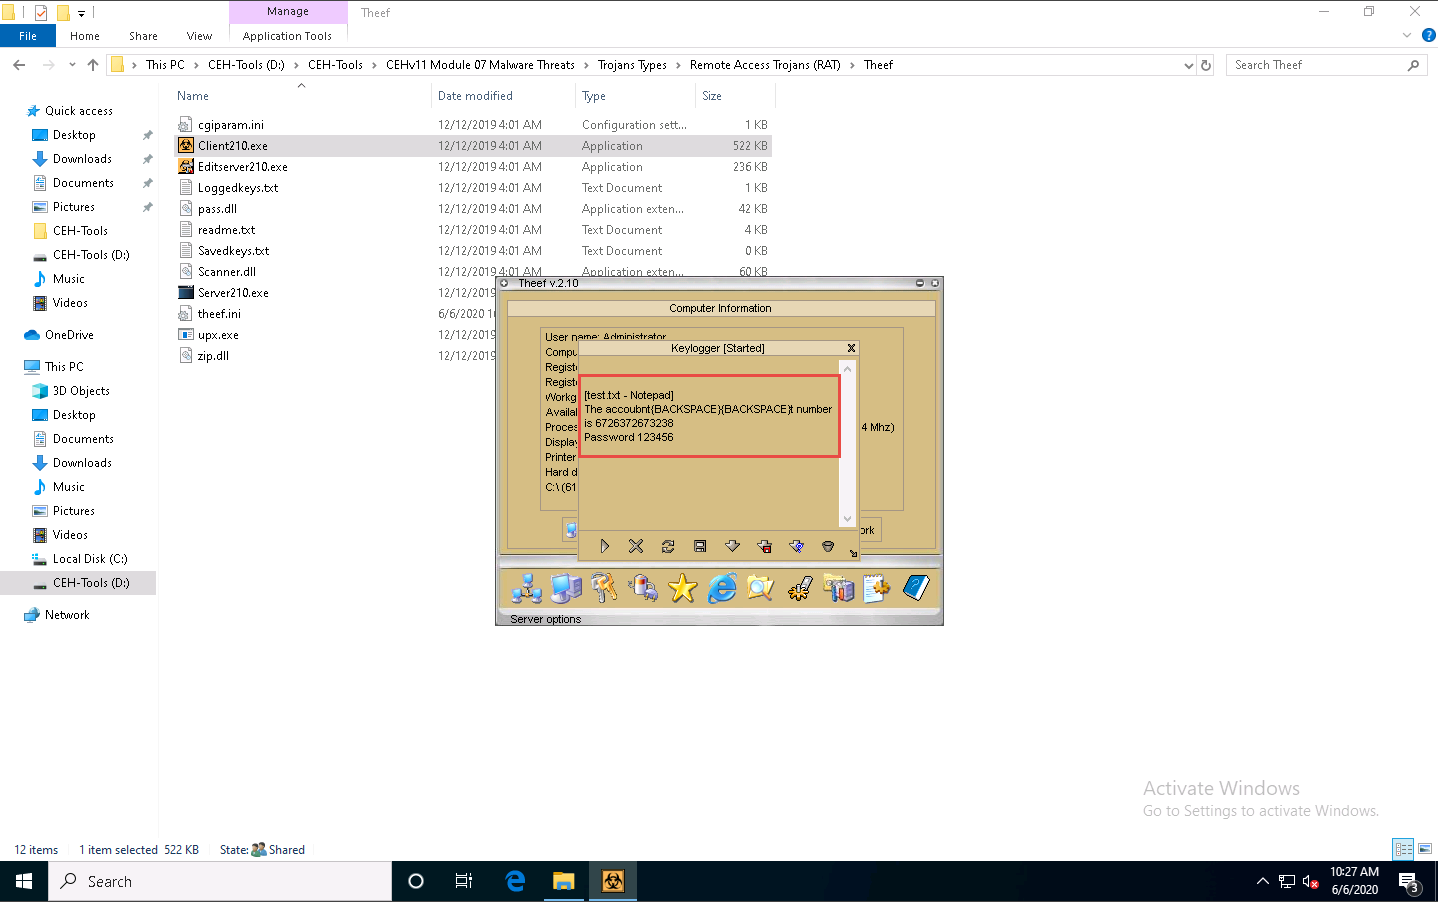
Close the Theef Keylogger window.
Similarly, you can access the details of the victim machine by clicking on the various icons.
Close all open windows on both the Windows 10 and Windows Server 2016 machines.
Comments
Post a Comment